Reguli de automatizare
Regulile de automatizare permit executarea uneia sau mai multor acțiuni predefinite ca răspuns la un declanșator specific, de exemplu, crearea unei activități când un câmp este setat la o anumită valoare sau arhivarea unei înregistrări la 7 zile după ultima actualizare.
La crearea unei reguli de automatizare, filtrele de domeniu vă permit să adăugați condiții care trebuie îndeplinite pentru ca regula de automatizare să fie executată, de exemplu, oportunitatea trebuie să fie atribuită unui anumit agent de vânzări sau starea înregistrării nu trebuie să fie Ciornă.
Pentru a crea o regulă de automatizare cu Odoo Studio, procedați după cum urmează:
Deschideți Studio și faceți clic pe Automatizări, apoi pe Nou.
Dați regulii de automatizare un nume clar și semnificativ care identifică scopul acesteia.
Selectați declanșatorul și, dacă este necesar, completați câmpurile care apar pe ecran în funcție de declanșatorul ales.
Faceți clic pe Adăugați o acțiune, apoi selectați Tipul de acțiune și completați câmpurile care apar pe ecran în funcție de acțiunea selectată.
Faceți clic pe Salvează și închide sau Salvează și nou.
Example
Pentru a asigura urmărirea clienților mai puțin mulțumiți, această regulă de automatizare creează o activitate la 3 luni după ce o comandă de vânzare este creată pentru clienții cu un procent de satisfacție mai mic de 30%.

Sfat
Folosiți fila Note pentru a documenta scopul și funcționarea regulilor de automatizare. Acest lucru face regulile mai ușor de întreținut și facilitează colaborarea între utilizatori.
Pentru a modifica modelul vizat de regula de automatizare, comutați modelele înainte de a da clic pe Automatizări în Studio sau activați modul dezvoltator, creați sau editați o regulă de automatizare și selectați Modelul în formularul Reguli de automatizare.
Regulile de automatizare pot fi create din orice etapă kanban dând clic pe pictograma (Setări) care apare când treceți cu mouse-ul peste numele etapei kanban, apoi selectând Automatizări. În acest caz, Declanșatorul este setat la Etapa este setată la în mod implicit, dar poate fi schimbat dacă este necesar.

Declanșator
Declanșatorul este folosit pentru a defini ce tip de eveniment trebuie să apară pentru ca regula de automatizare să se execute. Declanșatorii disponibili depind de model. În total sunt disponibile cinci categorii de declanșatoare:
Adăugarea condițiilor
Filtrele de domeniu vă permit să determinați înregistrările pe care o regulă de automatizare ar trebui să le vizeze sau să le excludă. Filtrarea eficientă îmbunătățește performanța globală, deoarece evită procesarea inutilă a înregistrărilor care nu sunt afectate de regulă.
Sfat
Activați modul dezvoltator înainte de a crea o regulă de automatizare pentru a avea cât mai multă flexibilitate în adăugarea filtrelor de domeniu.
În funcție de declanșatorul ales, este posibil să definiți una sau mai multe condiții pe care o înregistrare trebuie să le îndeplinească înainte și/sau după ce apare un declanșator.
Domeniul înainte de actualizare definește condițiile pe care o înregistrare trebuie să le îndeplinească înainte ca evenimentul declanșator să apară, de ex., înregistrarea trebuie să aibă
Tip = Factură clientșiStare = Postată.Cu modul dezvoltator activat, faceți clic pe Editare domeniu, dacă este disponibil, apoi pe Regulă nouă.
Condiții suplimentare sau, în unele cazuri, filtrele Aplicare pe, definesc condițiile pe care o înregistrare trebuie să le îndeplinească după apariția evenimentului de declanșare, de exemplu, factura clientului trebuie să aibă
Stare plată = Plătit parțial.Cu modul dezvoltator activat, dacă este necesar, faceți clic pe Adăugare condiții sau Editare domeniu, după caz, apoi pe Regulă nouă.
Când apare un declanșator, de ex., starea de plată a unei facturi client postate este actualizată, regula de automatizare verifică condițiile definite și execută acțiunea numai dacă înregistrarea corespunde acelor condiții.
Example
Dacă acțiunea automată ar trebui executată atunci când o adresă de e-mail este setată pentru prima dată (spre deosebire de modificarea unei adrese de e-mail) pe un contact existent care este o persoană fizică și nu o companie, utilizați E-mail nu este setat și Este o companie nu este setat ca Domeniu înainte de actualizare și E-mail este setat ca domeniu Aplicare pe.

Notă
Domeniul înainte de actualizare nu este verificat la crearea unei înregistrări.
Valori actualizate
Declanșați acțiuni automate când se produc modificări specifice în baza de date. Declanșatorii disponibili în această categorie depind de model și se bazează pe modificări comune, cum ar fi adăugarea unei etichete specifice (de ex., la o sarcină) sau setarea valorii unui câmp (de ex., setarea câmpului Utilizator).
Selectați declanșatorul, apoi selectați o valoare dacă este necesar.
Evenimente e-mail
Declanșează acțiuni automate la primirea sau trimiterea de e-mailuri.
Condiții de timp
Declanșați acțiuni automate la un moment dat relativ la un câmp de dată sau la crearea sau actualizarea unei înregistrări. Sunt disponibile următoarele declanșatoare:
Bazat pe câmp dată: Acțiunea este declanșată la o perioadă de timp definită înainte sau după data câmpului de dată selectat.
After creation: Acțiunea este declanșată după o perioadă de timp definită de la crearea și salvarea unei înregistrări.
After last update: Acțiunea este declanșată după o perioadă de timp definită de la editarea și salvarea unei înregistrări existente.
Puteți apoi defini:
un Delay: Specificați numărul de minute, ore, zile sau luni. Pentru ca o acțiune să fie executată înainte de data de declanșare, specificați un număr negativ. Dacă ați selectat declanșatorul Bazat pe câmp dată, trebuie să selectați și câmpul de dată care va fi folosit pentru a determina întârzierea.
Notă
În mod implicit, programatorul verifică regulile de automatizare declanșate temporal la fiecare 240 de minute sau 4 ore. Această frecvență este în general suficientă pentru întârzieri precum 3 luni după data comenzii sau 7 zile după ultima actualizare.
Pentru întârzieri mai mici de echivalentul a 2400 de minute sau 40 de ore, sistemul recalculează frecvența acestei verificări pentru a se asigura că întârzierile mai granulare, de exemplu, 1 oră înainte de data și ora de începere a evenimentului sau 30 de minute după creare, pot fi respectate cât mai fidel posibil.
Un mesaj pe ecran indică posibila întârziere după declanșarea programată a regulii.

Pentru a vizualiza sau edita manual frecvența programatorului, cu modul dezvoltator activat, accesați pentru a vedea toate acțiunile programate pentru baza dvs. de date.
Introduceți
Automationîn bara de căutare, apoi, în lista de rezultate, faceți clic pe Reguli de automatizare: verificare și executare. Dacă doriți, actualizați valoarea câmpului Execută la fiecare. Faceți clic pe Rulare manuală oricând pentru a declanșa manual această acțiune programată.Condiții suplimentare: Faceți clic pe Adăugare condiție, apoi specificați condițiile care trebuie îndeplinite pentru ca regula de automatizare să fie executată. Faceți clic pe Regulă nouă pentru a adăuga o altă condiție.
Acțiunea este executată când întârzierea este atinsă și condițiile sunt îndeplinite.
Example
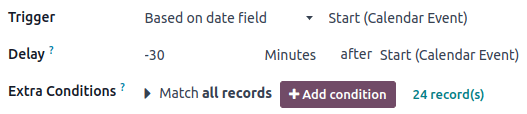
Pentru a trimite un e-mail de memento cu 30 de minute înainte de începerea unui eveniment de calendar, selectați Start (eveniment calendar) ca și câmp de dată pentru Declanșator și setați Întârzierea la -30 Minute.
Personalizat
Declanșează acțiuni automate:
La salvare: când o înregistrare este salvată.
On deletion: când o înregistrare este ștearsă.
On UI change: când valoarea unui câmp este modificată în vizualizarea de formular, chiar înainte ca înregistrarea să fie salvată.
Pentru declanșatoarele La salvare și La modificarea interfeței de utilizare, trebuie apoi să selectați câmpurile care vor fi utilizate pentru a declanșa regula de automatizare în La actualizare camp.
Atenționare
Dacă nu este selectat niciun câmp în câmpul La actualizare, acțiunea automată poate fi executată de mai multe ori pe înregistrare.
Opțional, puteți defini și condiții suplimentare care trebuie îndeplinite pentru a declanșa regula de automatizare în câmpul Aplicați pe.
Example
Pentru a declanșa o acțiune automată la crearea unei înregistrări, de exemplu, când se creează un contact nou, selectați declanșatorul La salvare și folosiți ID nu este setat ca Domeniu înainte de actualizare și ID este setat ca domeniu Aplicare pe. Asigurați-vă că câmpul corect este selectat în câmpul La actualizare.
Când un contact nou este salvat, acesta primește automat un ID de bază de date, declanșând astfel regula de automatizare.

Notă
Declanșatorul On UI change poate fi utilizat numai cu acțiunea Execute Code și funcționează doar când o modificare este efectuată manual. Acțiunea nu este executată dacă câmpul este modificat printr-o altă regulă de automatizare.
Extern
Declanșați acțiuni automate pe baza unui eveniment specific dintr-un sistem sau aplicație externă utilizând un webhook.
După ce webhook-ul este configurat în Odoo, unde URL-ul webhook-ului este generat și înregistrarea țintă definită, acesta trebuie implementat în sistemul extern.
Atenționare
Este foarte recomandat să consultați un dezvoltator, arhitect de soluții sau alt rol tehnic atunci când decideți să folosiți webhooks și pe tot parcursul implementării. Dacă nu sunt configurate corect, webhooks pot perturba baza de date Odoo și pot necesita timp pentru a reveni la starea inițială.

Notă
Este de asemenea posibil să configurați o acțiune automată care trimite date către webhook-ul unui sistem extern când apare un eveniment în baza dvs. de date Odoo.
Vedeți și
Acțiuni
După ce ați definit declanșatorul regulii de automatizare, faceți clic pe Adaugă o acțiune în fila Acțiuni de efectuat pentru a defini acțiunea care urmează să fie executată.
Sfat
Puteți defini mai multe acțiuni pentru aceeași regulă de automatizare. În mod implicit, acțiunile sunt executate în ordinea în care au fost definite.
Acest lucru înseamnă, de exemplu, că dacă definiți o acțiune Update record și apoi o acțiune Send email în care e-mailul face referire la câmpul care a fost actualizat, e-mailul utilizează valorile actualizate. Totuși, dacă acțiunea Send email este definită înaintea acțiunii Update record, e-mailul utilizează valorile stabilite înainte ca înregistrarea să fie actualizată.
Pentru a schimba ordinea acțiunilor definite, faceți clic pe pictograma (mâner de tragere) de lângă o acțiune și trageți-o în poziția dorită.
Actualizare înregistrare
Această acțiune actualizează unul dintre câmpurile înregistrării (sau câmpurile asociate). Faceți clic pe câmpul Actualizează și, în lista care se deschide, selectați sau căutați câmpul care urmează să fie actualizat. Dacă este necesar, faceți clic pe (săgeată dreapta) de lângă numele câmpului pentru a accesa lista câmpurilor asociate.
Dacă ați selectat un câmp many2many, alegeți dacă acest câmp trebuie actualizat prin Adăugare, Eliminare, Setare la valoarea selectată sau prin Golire.
Example
Dacă doriți ca acțiunea automatizată să elimine o etichetă din înregistrarea clientului, setați câmpul Actualizează la Client > Etichete, selectați prin eliminare, apoi selectați eticheta.

Sfat
Alternativ, puteți seta dinamic un câmp al unui înregistrări folosind cod Python. Pentru aceasta, selectați Calculează în loc de Actualizează, apoi introduceți codul care va fi folosit pentru calcularea valorii câmpului. De exemplu, dacă doriți ca regula de automatizare să calculeze un câmp datetime personalizat când prioritatea unei sarcini este setată la High (prin marcarea sarcinii cu stea), puteți defini declanșatorul Prioritatea este setată la High și acțiunea Actualizează înregistrarea astfel:

Creează activitate
Această acțiune este utilizată pentru a programa o nouă activitate legată de înregistrare. Selectați un Tip de activitate, introduceți un Titlu și o descriere, apoi specificați când doriți să fie programată activitatea în câmpul Data scadență în și selectați un :guilabel:` Tip utilizator`:
Pentru a atribui întotdeauna activitatea aceluiași utilizator, selectați Utilizator specific, apoi adăugați utilizatorul în câmpul Responsabil;
Pentru a viza un utilizator conectat la înregistrare în mod dinamic, selectați Utilizator dinamic (bazat pe înregistrare) și modificați Câmpul utilizatorului, dacă este necesar.
Example
După ce un client potențial este transformat într-o oportunitate, doriți ca acțiunea automată să stabilească un apel pentru utilizatorul responsabil pentru client potențial. Pentru a face acest lucru, setați Tipul de activitate la Apel și Tipul utilizatorului la Utilizator dinamic (bazat pe înregistrare).

Trimite e-mail și trimite SMS
Aceste acțiuni sunt folosite pentru a trimite un e-mail sau un mesaj text unui contact legat de o anumită înregistrare. Pentru a face acest lucru, selectați sau creați un Șablon de e-mail sau un Șablon SMS, apoi, în câmpul Trimite e-mail ca sau Trimite SMS ca, alegeți cum doriți să trimiteți e-mailul sau mesajul text:
E-mail: pentru a trimite mesajul ca e-mail către destinatarii Șablonului de e-mail.
Mesaj: pentru a posta mesajul pe înregistrare și pentru a notifica adepții înregistrării.
Notă: pentru a trimite mesajul ca o notă internă vizibilă utilizatorilor interni în chat.
SMS (fără notă): pentru a trimite mesajul ca mesaj text către destinatarii Șablonul SMS.
SMS (cu notă): pentru a trimite mesajul ca mesaj text către destinatarii Șablon SMS și pentru a-l posta ca notă internă în chatter.
Numai notă: pentru a posta mesajul doar ca notă internă în chatter.
Trimite WhatsApp
Important
Pentru a automatiza trimiterea mesajelor WhatsApp, trebuie create unul sau mai multe șabloane WhatsApp.
Această acțiune este utilizată pentru a trimite un mesaj WhatsApp către o persoană de contact legată de o anumită înregistrare. Pentru aceasta, selectați Șablonul WhatsApp corespunzător din meniul derulant.
Adăugați urmăritori și eliminați urmăritori
Această acțiune este utilizată pentru a abona/dezabona persoane de contact existente la/de la înregistrare.
Creează înregistrare
Această acțiune este folosită pentru a crea o înregistrare nouă pe orice model.
Selectați modelul dorit în câmpul Înregistrați pentru a crea; conține implicit modelul curent. Specificați un Nume pentru înregistrare și apoi, dacă doriți să creați înregistrarea pe alt model, selectați un câmp în câmpul Câmp de legătură pentru a lega înregistrarea care a declanșat crearea noului model. record.
Notă
Lista derulantă asociată câmpului Câmp de legătură conține doar câmpuri one2many existente pe modelul curent care sunt legate de un câmp many2one pe modelul țintă.
Sfat
Puteți crea o altă regulă de automatizare cu acțiuni Actualizare înregistrare pentru a actualiza câmpurile noii înregistrări, dacă este necesar. De exemplu, puteți utiliza o acțiune Creează înregistrare pentru a crea o nouă sarcină de proiect și apoi să o atribuiți unui utilizator specific utilizând o acțiune Actualizează înregistrare.
Executați codul
Important
Pentru regulile de automatizare care necesită executarea de cod personalizat, rețineți că mentenanța codului personalizat nu este inclusă în planurile de prețuri Standard sau Personalizat și implică taxe suplimentare.
Această acțiune este folosită pentru a executa codul Python. Puteți scrie codul în fila Cod folosind următoarele variabile:
env: mediu în care este declanșată acțiuneamodel: modelul înregistrării pe care se declanșează acțiunea; este un set de înregistrări nulrecord: înregistrare pe care este declanșată acțiunea; poate fi nulărecords: setul de înregistrări al tuturor înregistrărilor pe care acțiunea este declanșată în multi-mode; aceasta poate fi lăsată goalătime,datetime,dateutil,timezone: biblioteci utile Pythonfloat_compare: funcție de utilitate pentru a compara elementele flotante pe baza preciziei specificelog(message, level='info'): funcție de înregistrare pentru a înregistra informațiile de depanare în tabelul ir.logging_logger.info(message): logger pentru a emite mesaje în jurnalele serveruluiUserError: clasă de excepție pentru ridicarea mesajelor de avertizare adresate utilizatoruluiComand: x2many comenzi spațiu de numeComand: x2many comenzi spațiu de nume
Sfat
Variabilele disponibile sunt descrise atât în filele Cod, cât și în filele Ajutor.
Vedeți și
Trimiteți o notificare Webhook
Această acțiune este utilizată pentru a trimite o cerere API POST cu valorile Câmpurilor selectate către URL-ul webhook specificat în câmpul URL.
Sample Payload oferă o previzualizare a datelor incluse în cerere folosind datele unei înregistrări aleatorii sau date fictive dacă nu este disponibilă nicio înregistrare.
Notă
Este posibil, de asemenea, să configurați o acțiune automată care utilizează un webhook pentru a primi date de la un sistem extern atunci când un eveniment predefinit apare în acel sistem.
Executați acțiunile existente
Acțiunea este folosită pentru a declanșa mai multe acțiuni (legate de modelul curent) în același timp. Pentru a face acest lucru, faceți clic pe Adăugați o linie, apoi, în fereastra pop-up Adăugați: Acțiuni pentru copii, selectați o acțiune existentă sau faceți clic pe Nou pentru a crea una nouă.