기본 외주 전반
기본 하청 생산에서는 회사의 제품이 하청업체에서 전적으로 생산됩니다. 제품은 먼저 하청업체로부터 구매되며, 하청업체는 자체 부품을 조달하고 최종 제품을 제조한 다음 최종 제품을 발주 회사의 창고로 배송합니다.
다음 문서는 하청 제품을 구성하고 하청 프로세스를 실행하는 방법을 다룹니다.
환경설정
하청을 사용하려면 발주업체는 먼저공급업체 가격표와 하청 유형BoM로 제품을 구성해야 합니다.
가격표를 통해 발주 회사는PO를 통해 공급업체(하청업체)로부터 제품을 구매할 수 있으며,BoM를 통해 제품이 하청업체에 의해 외부에서 제조될 수 있습니다.
품목 공급업체 환경설정
제품의 공급업체를 기본 하청 방식으로 설정하려면으로 이동하세요. 그런 다음 제품을 선택하거나 새로 만드세요.
제품 양식에서매입탭을 클릭하고라인 추가를 클릭하여 제품의 하청업체를 공급업체로 추가합니다.공급업체드롭다운 메뉴에서 하청업체를 선택합니다.
그런 다음가격필드에 제품 가격을 입력합니다.
마지막으로리드 타임을 제품의배송 리드 타임필드에 설정하여 하청업체가 최종 제품을 생산하고 배송하는 데 걸리는 일수를 지정합니다.
참고
계약업체는 최종 제품을 구매하고 수령하는 일만 담당하므로BoM에 제조 리드 타임을 추가로 구성할 필요가 없습니다. 대신 하청업체의 제조 및 배송 시간을 모두 고려한 단일 *배송 리드 타임*만 공급업체 가격표에 제공합니다.
자재명세서 환경설정
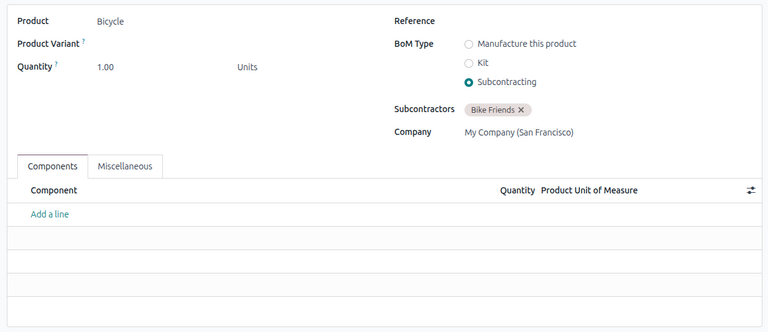
공급업체를 지정한 후 제품에 대한 하청 유형BoM을 구성합니다. 제품 양식에서자재 명세서스마트 버튼을 클릭합니다. 그런 다음 원하는BoM을 선택하거나 새로 만듭니다.
팁
또는로 이동하여 하청 제품의BoM를 선택합니다.
BoM 유형필드에서하청을 선택하세요. 표시되는하청업체필드에 하나 이상의 하청업체를 추가하세요.
구성 요소와 제조 모두 하청업체가 처리하므로BoM의구성 요소탭에 구성 요소를 나열할 필요가 없습니다.
기본 외주 워크플로우
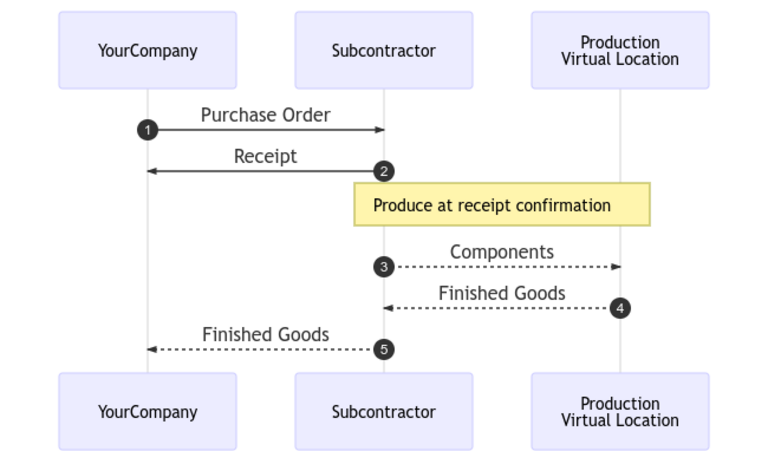
기본 하청 워크플로우는 하청업체로부터 제품을 매입하기 위해PO를 생성하는 것으로 시작합니다 (1).
그러면 계약업체(귀사)가PO을 확인하여 최종 제품을 이전하는 입고를 생성합니다(2). 하청업체는 제품을 제조하고 완료되면 계약업체에게 다시 배송합니다.
제품이 생산되어 수령되면 계약업체는입고를 검증하여(5) 하청업체에서 회사 재고로의재고 이동을 트리거합니다(3, 4).
PO 생성 및 확인
하청 제품에 대한PO를 생성하려면으로 이동하여새로 만들기를 클릭하세요.
공급업체드롭다운 메뉴에서 하청업체를 선택하여PO작성을 시작하세요.제품탭에서제품 추가를 클릭하여 새 제품 라인을 만드세요.제품필드에서 하청 제품을 선택하고수량필드에 수량을 입력하세요.
제품을 추가한 후예상 도착필드는 공급업체의 *배송 리드 타임*으로 이전에 구성된 완제품의 예상 배송 날짜로 업데이트됩니다.
마지막으로주문 확인을 클릭하여PO를 확인하세요. 입고가 자동으로 생성되고 양식 상단에입고스마트 버튼이 나타납니다.
입고 처리
주문이 확인되면 하청업체는 제품을 제조하고 완제품을 계약 회사에 다시 배송합니다.
하청업체로부터 완제품을 받으려면PO에서제품 받기버튼을 클릭하거나 페이지 상단의입고스마트 버튼을 클릭합니다. 그런 다음검증을 클릭하여 입고 선적을 재고에 입력합니다.
참고
다단계 재고 흐름이 활성화된 경우 입고 제품을 재고에 입력하려면 추가 이전을 확인해야 합니다.
재고 이동 내역 추적
입고를 검증한 후 Odoo는 위치 간 하청 제품 이동을 추적하기 위해 자동으로 재고 이동을 생성합니다. 이러한 재고 이동을 보려면으로 이동합니다.
하청에서 재고 이동을 추적하기 위해 Odoo는 모든 제품 구성 요소를 전용 *하청 위치*로 보냅니다. *생산*이라는가상 위치가 구성 요소를 소비하고 완제품을 생산합니다. 생산이 완료되면 제품은 *하청 위치*로 다시 이동한 후 입고가 검증될 때 최종적으로 계약업체의 재고로 들어갑니다.

참고
기본 하청에서는 구성 요소가 전송되지 않으므로 하청 위치*에서 *생산 위치로의 이동이 없습니다.