PDF 보고서
스튜디오를 사용하면:ref:`기존 PDF 보고서를 편집 <studio/pdf-reports/edit>`하거나(예: 송장, 견적서 등):ref:`새 보고서를 생성 <studio/pdf-reports/create>`할 수 있습니다.
기본 레이아웃
보고서의 기본 레이아웃은 스튜디오 외부에서 관리됩니다. 섹션에서 :guilabel:`문서 레이아웃 구성`을 클릭합니다. 레이아웃 설정은 회사별로 지정되지만 모든 보고서에 적용됩니다.
팁
여러 가지 설정을 통해 보고서 레이아웃을 어떻게 바꿀 수 있는지 오른쪽 보고서 미리보기에서 확인할 수 있습니다. 보고서를 생성하거나 편집할 때 화면 왼쪽에 있는 인쇄 미리보기 를 클릭하면 보고서 미리보기를 확인할 수 있습니다.
다음과 같이 설정합니다.
레이아웃: 7가지 레이아웃을 사용할 수 있습니다:


배경: 다음 배경을 사용할 수 있습니다.
빈칸: 표시되는 내용이 없습니다.
데모 로고: 데모 로고가 배경에 표시됩니다.
사용자 지정: 사용자 지정 배경 이미지를 업로드합니다.
텍스트: 8개의 글꼴을 사용할 수 있습니다: Lato, Roboto, Open Sans, Montserrat, Oswald, Raleway, Tajawal(아랍어 및 라틴 문자 지원), Fira Mono. 미리 보려면 `Google Fonts 웹사이트 <https://fonts.google.com/>`_를 방문하세요.
회사 로고: 로고를 업로드하거나 변경하려면 편집 버튼을 클릭합니다. 그러면 회사 모델의 회사 기록에 로고가 추가되며, 이 로고는 으로 이동한 후 회사 섹션에서 업데이트 정보 를 클릭하면 확인할 수 있습니다.
색상: 보고서 구조에 사용되는 기본 색상과 보조 색상을 변경합니다. 기본 색상은 로고의 색상을 기반으로 자동 생성됩니다.
주소: :ref:`외부 보고서 <studio/pdf-reports/header-footer>`의 헤더에 회사명과 주소가 표시됩니다. 여러 줄의 텍스트를 추가할 수 있습니다.
태그라인: Light, Striped, Bubble, Wave, Folder 레이아웃을 사용하는 :ref:`외부 보고서 <studio/pdf-reports/header-footer>`의 헤더와 Boxed, Bold 레이아웃을 사용하는 외부 보고서의 푸터에 표시됩니다. 여러 줄의 텍스트를 추가할 수 있습니다.
용지 서식: 보고서의 기본 용지 크기를 지정합니다. A4`(21cm x 29.7cm) 및 :guilabel:`US Letter`(21.59cm x 27.54cm) 중에서 선택할 수 있습니다. 또는 :ref:`스튜디오 <studio/pdf-reports/edit-options> 에 있는 용지 서식 필드에서 개별 보고서별로 지정하는 것도 가능합니다.
참고
설치한 앱이나 모듈에 따라 다른 용지 형식을 사용할 수 있습니다. 예를 들어 재고 관리 앱의 라벨 시트나 행사 앱의 이벤트 배지 등이 있습니다.
새 PDF 보고서 만들기
새 보고서를 모델 (예: 판매주문서)에 대해 생성하려면 모델에 액세스한 후 :icon:`oi-studio`(:guilabel:`스튜디오 토글`) 버튼을 클릭한 다음 보고서 를 클릭합니다. 신규 를 클릭한 후 팝업창이 열리면 보고서 유형을 선택합니다. 이 항목은 머리글과 바닥글에 표시되는 내용을 지정하는 목적으로만 사용됩니다.
보고서 생성이 완료되면 편집 을 시작할 수 있습니다.
PDF 보고서 편집
모델에서 사용 가능한 보고서에 액세스하려면 모델에 액세스하고 (Toggle Studio) 버튼을 클릭한 다음 :guilabel:`Reports`를 클릭합니다. 기존 보고서를 선택하여 엽니다.
또는 스튜디오를 열고 보고서` 를 클릭한 후 특정 보고서나 모델을 검색할 수도 있습니다.
중요
표준 보고서를 복제 한 후 복제된 버전에서 변경하는 것을 권장합니다. 보고서를 복제하려면 보고서의 오른쪽 상단에 마우스 포인터를 가져간 후 (세로 줄임표) 아이콘이 나타나면 클릭한 다음 복제 를 선택합니다.

옵션
보고서를 선택하거나 생성한 후 화면 왼쪽의 옵션을 사용하여 다음을 수행할 수 있습니다:
Report name 변경: 새 이름은 모든 곳에 적용됩니다(스튜디오, 양식 보기의 (gear) 아이콘 아래 Print 메뉴 및 PDF 파일 이름).
Paper format 수정: 값이 선택되지 않은 경우 :ref:`기본 레이아웃 <studio/pdf-reports/default-layout-paper>`에 정의된 형식이 사용됩니다.
Show in print menu: 양식 보기의 Print 메뉴에 보고서를 추가합니다.
첨부 파일에서 다시 로드: 보고서가 처음 생성될 때 레코드에 첨부 파일로 저장하고 이후에는 보고서의 원본 버전을 다시 로드합니다. 청구서에 법적으로 요구되는 사항이며 주로 이 경우에 사용됩니다.
Limit visibility to groups: PDF 보고서의 가용성을 특정 :doc:`사용자 그룹 <../general/users/access_rights>`으로 제한합니다.
소스 편집: XML 파일 에서 직접 보고서를 수정할 수 있습니다.
Reset report: 보고서에 대한 모든 변경 사항을 취소하고 표준 버전으로 재설정합니다.
인쇄 미리보기: 보고서 미리보기를 생성한 후 다운로드합니다.
보고서 편집기
보고서 편집기를 사용하면 보고서의 내용과 서식을 수정할 수 있습니다.
팁
중요
보고서에 있는 머리글과 바닥글을 편집할 경우 표준 보고서 및 사용자 지정 보고서에 영향을 주게 됩니다.
조건부 블록
점선 직사각형은 **조건부 블록**(if/else 문)을 나타냅니다. 특정 조건에 따라 콘텐츠를 표시하거나 숨기는 데 사용됩니다. 블록을 클릭하여 조건을 확인합니다.
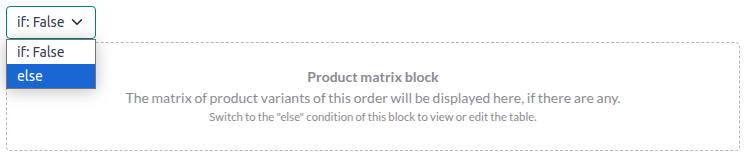
값을 선택하여 출력 내용을 미리 보기로 확인한 후 필요한 경우 수정할 수 있습니다.

참고
조건은 XML 형식으로만 편집할 수 있습니다.
기타 콘텐츠
보고서에는 두 가지 유형의 텍스트 콘텐츠가 있습니다.
정적 텍스트, 즉 파란색으로 강조 표시되지 않은 텍스트로 편집기에서 직접 수정할 수 있습니다.
동적 텍스트, 즉 파란색으로 강조 표시된 텍스트로 보고서가 생성될 때 필드 값으로 대체됩니다(예: 판매 주문 번호 또는 견적 날짜).
`/`를 입력하여 :ref:`파워박스 <essentials/html_editor/commands>`를 열고 명령 이름을 입력하거나 목록에서 선택하여 보고서에 콘텐츠(예: 필드, 목록, 표, 이미지, 배너 등)를 추가할 수 있습니다.
보고서에 정적 텍스트를 추가하려면, 추가하려는 위치에 텍스트를 입력합니다.
고급 변경 사항의 경우 직접 XML에서 보고서 편집 을 할 수 있습니다.
필드 추가
필드를 추가하려면 / 를 입력한 후 필드 명령어를 선택합니다. 목록이 열리면 필드를 선택하거나 검색합니다. 필요한 경우 필드명 옆에 있는 오른쪽 화살표를 클릭하면 필드 목록에 액세스할 수 있습니다. 그런 다음 레코드에서 필드가 완료되지 않은 경우 표시될 기본값을 지정하고 엔터 를 누릅니다.

표 추가 또는 편집
보고서에는 두 가지 표 유형이 있습니다:
:ref:`정적 표 <studio/pdf-reports/static-table>`는 정적 텍스트나 필드를 표시하는 데 사용됩니다. 이 유형의 표는 표를 추가할 때 열과 행의 수를 정의합니다.
동적 표 은 관계형 필드 데이터를 표시할 때 사용합니다. 이런 유형의 표에서는 표 추가를 할 때에는 열 수만 지정합니다. 생성된 보고서의 행 수는 현재 모델과 연결된 관련 모델의 레코드 수에 따라 결정됩니다.
Example
판매 주문 보고서에서 동적 테이블은 판매 주문과 관련된 주문 내역을 표시할 때 활용합니다. 판매주문서에 10개의 주문 라인이 포함되어 있는 경우 보고서에 생성된 테이블에는 10개의 라인이 있습니다. 주문 라인이 2개 있는 경우에는 테이블은 2개의 행으로 구성됩니다.
정적 테이블 추가 또는 편집
정적 표를 추가하려면 /`를 입력하고 :guilabel:`Table 명령을 선택합니다. 표의 열과 행 수를 결정합니다. 표가 추가되면 편집을 시작할 수 있습니다.
표 도구를 사용하여 열과 행을 삽입, 이동 및 삭제할 수 있습니다. 커서를 열 위쪽이나 행 왼쪽에 놓은 다음 보라색 직사각형을 클릭하고 옵션을 선택합니다.

열의 크기를 조정하려면 열 테두리를 원하는 위치로 드래그합니다. 표 도구에서 :guilabel:`Reset Size`를 선택하여 모든 열을 표준 크기로 재설정합니다.
셀에 :ref:`원하는 필드 <studio/pdf-reports/add-field>`를 추가하거나 입력하여 정적 텍스트를 추가하세요.
팁
/`를 입력하고 적절한 명령을 선택하여 구조화된 방식으로 표를 사용하지 않고 텍스트를 추가할 수 있습니다: :guilabel:`2 columns, 3 columns 또는 4 columns.
동적 테이블 추가 또는 편집
참고
one2many또는many2many유형의 관계만 동적 표로 표시할 수 있습니다.표준 보고서에 있는 기존의 동적 테이블은 사용자가 직접 추가하는 동적 테이블보다 구조가 훨씬 복잡합니다. 해당 테이블의 경우 열을 삽입하거나 삭제할 수 있지만 열을 이동하거나 행을 삽입, 이동 또는 삭제할 수는 없습니다.
동적 테이블을 추가하려면 / 를 입력한 후 동적 테이블 명령어를 선택합니다. 목록이 열리면서 테이블에서 기준이 될 관계를 선택하거나 검색하고 엔터 를 누릅니다. 테이블이 추가되면 편집할 수 있습니다.
:ref:`정적 표 <studio/pdf-reports/static-table>`와 마찬가지로 표 도구를 사용하여 열을 삽입, 이동 및 삭제할 수 있습니다. 생성된 행 위 또는 아래에 표시될 정적 행을 삽입하는 것도 가능합니다.
셀에 필드를 추가하려면 자리 표시자 텍스트를 삭제한 다음 선택한 필드 를 추가합니다. 대화 상자가 열리면 필드의 소스 개체(예: 주문 내역 모델)와 사용 가능한 필드 목록이 표시됩니다.

열 이름 라벨을 원하는 라벨명으로 바꿀 수 있습니다.
참고
기본 행은 필드의 내용을 자동으로 반복하여 각 필드 값에 대해 보고서에 행을 생성합니다(예: 주문 라인당 하나의 행).
서식
보고서에서 텍스트를 서식 지정하려면 텍스트를 선택한 다음 :doc:`텍스트 편집기 </applications/essentials/html_editor>`의 옵션을 사용하여 서식을 지정하세요.

보고서 XML 편집하기
경고
XML을 직접 수정할 경우 업그레이드 중에 보고서 문제가 발생할 수 있습니다. 이런 경우에는, 이전 데이터베이스에서 변경된 내용을 업그레이드된 데이터베이스로 복사만 하면 됩니다.
보고서에서 XML을 편집하려면 왼쪽 창에 있는 소스 편집 을 클릭합니다.
예시
보고서에서 데이터 표시 방식을 변경하려면 필드의 기본 위젯 을 수동으로 수정합니다. 아래의 예시에서 주문일에는 기본적으로 날짜와 시간을 표시되며 단가는 소수점 둘째 자리의 정밀도로 기본 설정됩니다.
<div class="oe_structure">
 <span t-field="doc.date_order"/>
 <span t-field="doc.price_unit"/>
</div>
t-options`를 사용하여, 이 경우 `widget 옵션을 사용하면 이러한 필드를 수정하여 각각 날짜만 표시하고 소수점 네 자리의 정밀도를 표시할 수 있습니다:
<div class="oe_structure">
 <span t-field="doc.date_order" t-options="{'widget': 'date'}"/>
 <span t-field="doc.price_unit" t-options="{'widget': 'float', 'precision': 4}"/>
</div>
특정 조건에 따라 콘텐츠를 표시/숨기려면 보고서 XML에 if/else 제어문을 수동으로 추가할 수 있습니다.
예를 들어 태그가 없는 경우 사용자 지정 데이터 표를 숨기려면 ‘t-if’ 속성을 사용하여 조건을 정의한 다음 ‘참’ 이나 ‘거짓’ 으로 평가할 수 있습니다. 따옴표 안에 태그가 없는 경우에는 표가 표시되지 않습니다.
<!-- table root element -->
<table class="table" t-if="len(doc.tag_ids) > 0">
    <!-- thead = table header, the row with column titles -->
    <thead>
        <!-- table row element -->
        <tr>
            <!-- table header element -->
            <th>ID</th>
            <th>Name</th>
        </tr>
    </thead>
    <!-- table body, the main content -->
    <tbody>
        <!-- we create a row for each subrecord with t-foreach -->
        <tr t-foreach="doc.tag_ids" t-as="tag">
            <!-- for each line, we output the name and price as table cells -->
            <td t-out="tag.id"/>
            <td t-out="tag.name"/>
        </tr>
    </tbody>
</table>
t-if 구문이 거짓 인 경우 다른 블록을 표시하려면 t-else 구문을 사용하여 지정할 수 있습니다. t-else 블록은 문서 구조에서 t-if 블록 바로 뒤에 위치해야 합니다. t-else 속성에 조건을 지정할 필요는 없습니다. 예를 들어 다음에서 견적서에 태그가 없음을 설명하는 간단한 메세지를 표시해 봅니다.
<!-- table root element -->
<table class="table" t-if="len(doc.tag_ids) > 0">
    <!-- thead = table header, the row with column titles -->
    <thead>
        <!-- table row element -->
        <tr>
            <!-- table header element -->
            <th>ID</th>
            <th>Name</th>
        </tr>
    </thead>
    <!-- table body, the main content -->
    <tbody>
        <!-- we create a row for each subrecord with t-foreach -->
        <tr t-foreach="doc.tag_ids" t-as="tag">
            <!-- for each line, we output the name and price as table cells -->
            <td t-out="tag.id"/>
            <td t-out="tag.name"/>
        </tr>
    </tbody>
</table>
<div class="text-muted" t-else="">No tag present on this document.</div>
t-if/t-else 표기법을 사용하면 보고서 편집기가 이러한 섹션이 상호 배타적이며 조건부 블록으로 표시되어야 함을 인식합니다:

편집기로 조건을 전환하여 출력 화면을 미리 볼 수 있습니다.

여러 가지 항목을 선택하려면 ‘t-elif’ 지시문을 사용하여 중간 조건을 추가할 수도 있습니다. 예를 들어 판매주문서 보고서의 제목은 기본 문서의 상태에 따라 변경되는 방식입니다.
<h2 class="mt-4">
    <span t-if="env.context.get('proforma', False) or is_pro_forma">Pro-Forma Invoice # </span>
    <span t-elif="doc.state in ['draft','sent']">Quotation # </span>
    <span t-else="">Order # </span>
    <span t-field="doc.name">SO0000</span>
</h2>
견적용 청구서 라는 제목은 일부 상황에서 사용하게 됩니다. 이러한 조건이 충족되지 않은 상태에서 문서 상태가 ‘초안’ 또는 ‘전송됨’인 경우에는 견적서 를 사용합니다. 이러한 조건 중 어느 것도 충족되지 않는 경우 보고서 제목은 주문서 가 됩니다.
보고서에서 이미지 작업을 하기란 쉽지 않습니다. 이미지 크기와 동작을 한결같이 정교하게 제어하기가 쉬운 일이 아니기 때문입니다. 보고서 편집기를 활용하여 이미지 필드를 삽입할 수는 있으나 (/Field 명령어 사용), t-field 지시문과 수반되는 t-options 속성을 사용하여 XML에 삽입하면 크기와 위치를 더욱 쉽게 제어할 수 있습니다.
예를 들어, 다음의 코드를 통해 해당 줄에 있는 품목의 image_128 필드가 64px 너비의 이미지로 출력됩니다(이미지의 가로세로 비율에 따라 높이가 자동 조정).
<span t-field="line.product_id.image_128" t-options-widget="image" t-options-width="64px"/>
다음 옵션을 이미지 위젯에 사용할 수 있습니다.
width: 이미지의 너비, 일반적으로 픽셀 또는 CSS 길이 단위(예:rem)로 표시(자동 너비의 경우 비워 둠).height: 이미지의 높이, 일반적으로 픽셀 또는 CSS 길이 단위(예:rem)로 표시(자동 높이의 경우 비워 둠).class:img태그에 적용된 CSS 클래스입니다; 부트스트랩 클래스 를 사용할 수 있습니다.alt: 이미지의 대체 텍스트스타일: 스타일 속성입니다. 더욱 자유롭게 스타일을 다시 지정하려면Bootstrap 클래스 <https://getbootstrap.com/docs/5.1/content/tables>를 확인해 보세요.
이러한 속성은 문자열, 즉 따옴표 안의 따옴표로 묶인 텍스트를 포함해야 합니다(예: t-options-width="'64px'")(또는 유효한 Python 표현식).
참고
이미지 위젯은 img 태그에 사용할 수 없습니다. 대신 span`(인라인 콘텐츠의 경우) 또는 `div`(블록 콘텐츠의 경우) 노드에 `t-field 지시문을 설정하세요.
예시로는 견적 표에 품목 이미지 열을 추가해 보겠습니다.
<table class="table table-sm o_main_table table-borderless mt-4">
    <thead style="display: table-row-group">
        <tr>
            <th>Image</th>
            <th name="th_description" class="text-start">Description</th>
            <th>Product Category</th>
            <th name="th_quantity" class="text-end">Quantity</th>
            <th name="th_priceunit" class="text-end">Unit Price</th>
[...]
        <t t-foreach="lines_to_report" t-as="line">
            <t t-set="current_subtotal" t-value="current_subtotal + line.price_subtotal"/>
            <tr t-att-class="'bg-200 fw-bold o_line_section' if line.display_type == 'line_section' else 'fst-italic o_line_note' if line.display_type == 'line_note' else ''">
                <t t-if="not line.display_type">
                   <td>
                       <span t-field="line.product_template_id.image_128"
                             t-options-widget="'image'"
                             t-options-width="'64px'"
                             t-options-class="'rounded-3 shadow img-thumbnail'"
                           />
                   </td>
                    <td name="td_name"><span t-field="line.name">Bacon Burger</span></td>
                    <td t-out="line.product_id.categ_id.display_name"/>
t-options-width 속성으로 이미지 너비를 64픽셀로 제한하고, t-options-class 에서 사용되는 Bootstrap 클래스로는 모서리가 둥글고 그림자가 있는 썸네일같은 테두리를 만듭니다.
