모델, 모듈 및 앱
모델을 통해 데이터베이스의 논리적 구조와 데이터를 저장하거나 구성 및 조작하는 방법을 정합니다. 즉, 모델은 다른 테이블과 연결할 수 있는 정보의 테이블입니다. 일반적으로 모델은 판매 주문, 연락처 또는 품목 과 같은 비즈니스적인 개념을 나타냅니다.
모듈과 앱에는 모델, 보기, 데이터 파일, 웹 컨트롤러, 정적 웹 데이터와 같은 다양한 요소가 포함되어 있습니다.
참고
모든 앱은 모듈입니다. 더 크고 독립적인 모듈은 일반적으로 앱이라고 하며, 다른 모듈은 일반적으로 해당 앱의 애드온 역할을 합니다.
추천 기능
스튜디오를 사용하여 새로 모델이나 앱을 생성하는 경우 최대 14개 기능을 추가하여 생성 프로세스 속도를 높일 수 있습니다. 해당 기능은 일반적으로 일부 표준 기능과 함께 사용되는 필드, 기본 설정 및 화면과 함께 번들로 제공됩니다. 대부분의 기능을 추후에 추가할 수 있지만, 처음부터 추가해 놓으면 모델 생성 프로세스가 훨씬 쉬워집니다. 또한 이러한 기능은 함께 사용하면 경우에 따라 더욱 편리하게 사용할 수 있습니다.

연락처 상세 정보
연락처 세부 정보 `를 선택하면 *연락처* 모델에 연결된 :ref:`양식 보기 <studio/views/general/form> 에 다대일 필드 와 관련 필드 중 전화 및 전자 메일 이 추가됩니다. 연락처 필드는 :guilabel:``목록 보기 <studio/views/multiple-records/list>` 에도 추가되며 지도 보기 기능이 활성화됩니다.
Example

사용자 배정
사용자 할당 을 선택하면 연락처 모델에 연결된 다대일 필드 가 양식 보기 에 추가되며, 다음의 도메인: 공유 사용자가 설정되지 않음 을 선택하면 사내 사용자 만 선택할 수 있게 됩니다. 또한, 사용자 아바타를 표시할 수 있도록 many2one_avatar_user 위젯을 사용합니다.또한 목록 보기 <studio/views/multiple-records/list>`에 :guilabel:`담당자 필드가 추가됩니다.
Example

날짜 & 캘린더
:guilabel:`날짜 및 달력`을 선택하면 :ref:`양식 보기 <studio/views/general/form>`에 :ref:`날짜 필드 <studio/fields/simple-fields-date>`가 추가되고 :ref:`캘린더 보기 <studio/views/timeline/calendar>`가 활성화됩니다.
날짜 범위 & 간트
날짜 범위 및 간트 를 선택하면 양식 보기 에 두 개의 날짜 필드 가 나란히 추가됩니다. 한 필드에는 날짜 범위 위젯으로 시작일을 설정하고, 다른 필드에는 종료일을 설정하게 되어 있으며, 이렇게 설정하면 간트 보기 가 활성화됩니다.
파이프라인 단계
파이프라인 단계 를 선택하면 칸반 보기 가 활성화되고, 우선순위 및 칸반 상태 와 같은 여러 가지 필드와 신규, 진행 중, 완료 의 세 단계가 추가됩니다. 파이프라인 상태 표시줄 및 칸반 상태 필드가 양식 보기 에 추가됩니다. 색상 필드가 목록 보기 에 추가됩니다.
참고
파이프라인 단계 기능은 나중에 추가할 수 있습니다.
사진
:guilabel:`사진`을 선택하면 :ref:`양식 보기 <studio/views/general/form>`의 오른쪽 상단에 :ref:`이미지 필드 <studio/fields/simple-fields-image>`가 추가됩니다.
참고
사진 기능은 나중에 추가할 수 있습니다.
명세
라인`을 선택하면 :ref:`양식 보기 <studio/views/general/form>`의 :guilabel:`탭 구성 요소 내에 :ref:`라인 필드 <studio/fields/relational-fields-lines>`가 추가됩니다.
메모
:guilabel:`메모`를 선택하면 :ref:`양식 보기 <studio/views/general/form>`에 양식의 전체 너비를 사용하는 :ref:`HTML 필드 <studio/fields/simple-fields-html>`가 추가됩니다.
통화 가치
금액`을 선택하면 :ref:`studio/views/general/form 및 목록 보기에 금액 필드 <studio/fields/simple-fields-monetary>`가 추가됩니다. :ref:`studio/views/reporting/graph 및 피벗 테이블 보기도 활성화됩니다.
참고
통화 필드가 추가되고 보기에서 숨겨집니다.
회사
회사`를 선택하면 :ref:`studio/views/general/form 및 목록 보기에 회사 모델과 연결된 :ref:`Many2One 필드 <studio/fields/relational-fields-many2one>`가 추가됩니다.
참고
이 기능은 다중 회사 환경에서 작업하는 경우에만 유용합니다.
사용자 지정 정렬
:guilabel:`사용자 지정 정렬`을 선택하면 :ref:`목록 보기 <studio/views/multiple-records/list>`에 레코드를 수동으로 재정렬할 수 있는 드래그 핸들 아이콘이 추가됩니다.
Example

대화 메시지
메시지창 을 선택하면 양식 보기 에 메시지창 기능(메시지 보내기, 메모 기록, 활동 예약)이 추가됩니다.
참고
메시지창 기능은 나중에 스테이지에서 추가할 수 있습니다.
Example

보관
보관`을 선택하면 :ref:`studio/views/general/form 및 목록 보기에 보관 작업이 추가되고 보관된 레코드가 기본적으로 검색 및 보기에서 숨겨집니다.
내보내기 및 가져오기 사용자 지정
스튜디오에서 사용자 지정 작업을 할 경우 studio_customization 이라는 새로운 모듈이 데이터베이스에 추가됩니다. 스튜디오 내보내기 기능을 사용하면 이 모듈을 ZIP 파일로 내보낼 수 있습니다. 그런 이 모듈을 다른 Odoo 데이터베이스로 가져올 수 있습니다. 이 기능은 예를 들어 새 모듈을 설정하거나 교육 목적으로 활용할 때 유용할 수 있습니다.
참고
이러한 방식으로 사용자 지정된 항목을 내보내고 가져오기를 할 때, 표준 Odoo 내보내기 및 가져오기 함수를 사용하지 않고도 합리적인 방식으로 데이터를 가져올 수 있습니다. 예를 들어 모듈에 고객과 판매주문서 정보가 있을 경우 판매주문서를 생성하기 위해서는 고객이 필요하므로 고객이 먼저 생성됩니다.
내보내기 사용자 지정
사용자 지정을 내보내려면 메인 Odoo (스튜디오 전환) 버튼을 클릭한 다음 :guilabel:`내보내기`를 클릭하고 다음 중 하나를 선택하세요:
내보내기 버튼을 클릭하여 모든 스튶디오 사용자 지정 항목을 다운로드합니다. 또는,
:ref:`내보낼 데이터 및 데모 데이터 구성 <studio/export-import/export/configure>`을 클릭하여 내보낼 데이터를 선택하세요.
데이터 내보내기 환경설정
특정 모델을 선택하여 내보내려면 스튜디오 내보내기 화면에서 :guilabel:`새로 만들기`를 클릭한 다음 관련 모델의 이름을 입력하거나 목록에서 선택하세요.
팁
사전 설정 을 클릭하면 데이터베이스에 있는 전체 모듈 목륵을 확인할 수 있으며 여기에는 스튜디오를 통해 수정된 레코드및 스튜디오로 제작한 모든 사용자 지정 모델이 포함되어 있습니다. 이러한 모델 중에서 하나를 내보내도록 설정하려면 모델을 클릭하여 열고 필요한 내용대로 변경합니다.
다음 옵션 중 해당되는 항목에 표시하세요:
데모: 내보낸 레코드를 가져올 때 데모 데이터로 간주해야 하는 경우입니다.
첨부 파일: 내보낸 레코드와 관련된 첨부 파일을 내보내기에 포함할지 여부입니다.
업데이트 가능: 모듈 업데이트 시 내보낸 레코드를 업데이트할 수 있어야 하는지 여부입니다.
필요한 경우 도메인`을 편집하여 모델의 어떤 레코드를 내보낼지 결정합니다. 이를 위해 :guilabel:`도메인 편집 버튼 또는 (필터 수정) 다음 :guilabel:`도메인 편집`을 적절하게 클릭합니다. 필요한 변경 사항을 적용합니다.
내보내기용 모델을 구성한 후 :guilabel:`스튜디오 내보내기`를 클릭하여 메인 화면으로 돌아갑니다. 나열된 모든 모델의 사용자 정의 항목이 포함된 ZIP 파일을 다운로드하려면 :guilabel:`내보내기`를 클릭합니다.
참고
나열된 모든 모델이 내보내기에 포함되므로 하나 이상의 모델을 선택할 필요는 없습니다. 내보내기에서 모델을 제거하려면 해당 모델을 선택하고 작업 버튼을 클릭한 다음 :guilabel:`삭제`를 클릭합니다.
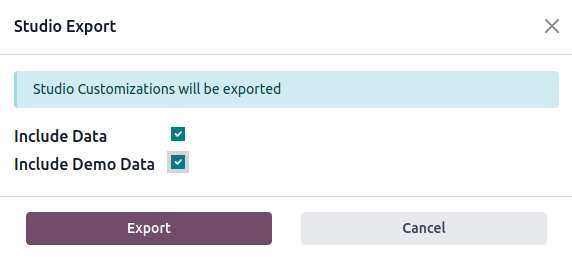
스튜디오 내보내기 창에서:
확인란을 체크하지 않고 두면 스튜디오에서 작업된 사용자 지정만 내보냅니다.
:guilabel:`데이터 포함`을 체크하여 선택한 모델의 데이터를 내보내기에 포함합니다.
:guilabel:`데모 데이터 포함`을 체크하여 데모 데이터로 표시된 선택한 모델의 데이터를 포함합니다. 이 옵션을 체크하면 :guilabel:`데이터 포함`도 함께 체크됩니다.
내보내기 버튼을 클릭하여 ZIP 파일을 다운로드합니다.
가져오기 사용자 지정
경고
가져오기 전에 대상 데이터베이스가 동일한 Odoo 버전에 있고 원본 데이터베이스와 동일한 앱 및 모듈을 포함하고 있는지 확인하세요. 스튜디오는 내보낸 모듈의 종속성으로 기본 모듈을 추가하지 않습니다.
다른 Odoo 데이터베이스에 Studio 사용자 지정 항목을 가져온 후 설치하려면: