등록 데스크
The Registration Desk feature in Odoo Events allows users to grant access to registered event attendees as they arrive and store attendee-related data in the reporting metrics.
등록 데스크 페이지
On a mobile device (on the Odoo app or in a browser), navigate to to open the Registration Desk page.

In the Registration Desk box, the user has the option to either Scan a badge or Select Attendee.
배지 스캔
To scan the code on event attendees’ badges, navigate to and tap the Scan or Tap option.
중요
Odoo must be granted access to the camera being used for the Scan a badge option to work.
Once Odoo has access to the camera, a Barcode Scanner pop-up window appears, showing a viewfinder box in the camera frame. The size of the box can be manually adjusted by dragging the (crop) icon.
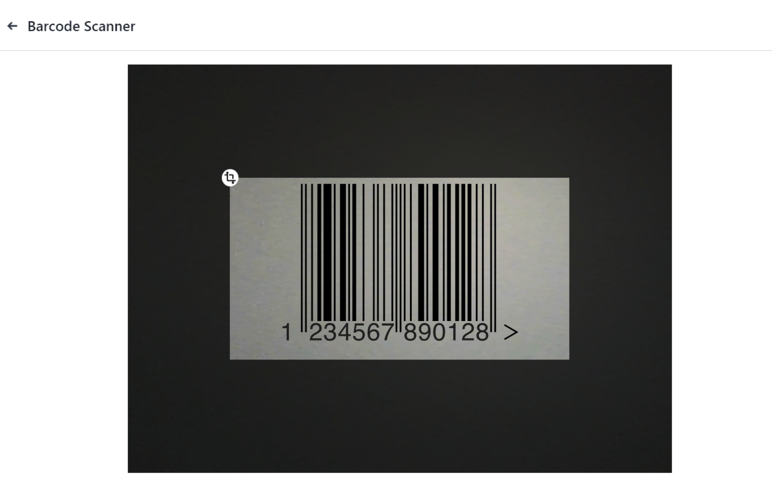
When the badge code is in the middle of the view-finder box, the code is scanned and the Barcode Scanner pop-up window disappears. The attendee is then granted access to the event and their attendance is logged in the Odoo Events app.
If the scanned barcode is invalid, an error pop-up message appears in the upper-right corner.
Select Attendee
To manually grant access to event attendees, navigate to and tap the Select Attendee option.
This opens an Attendees page with all registered attendees across events in the database. By default, this page opens in the (Kanban) view, allowing the user to see an overview of all attendees at a glance. Each attendee is displayed as a card with their name, registered event, associated company (if applicable), ticket type (if applicable), and registration status.
Alternatively, users can view a detailed list of all attendees using the (List) view. Each attendee is displayed on a line with their name, contact information, registered event, ticket type, registration status, and an option to Mark as Attending.

To grant access to an attendee and mark them as Attended in the Kanban view, click on their card. The resulting pop-up window notifies the user that the attendee has been marked as registered. Click Continue at the bottom-left to mark the attendee as Attended.
Alternatively, in the List view, click on the Mark as Attending button on the attendee’s line. The button then disappears and the attendee’s registration status changes to Attended.
팁
Users can apply filters and grouping options on the Attendees page in both the Kanban and List views to narrow down a large list of attendees or reorganize the page by specific categories.
To do that, click the (down arrow) beside the search bar to reveal a drop-down menu with Filters, Group By, and Favorites options.
더 보기: