프로젝트 마일스톤 기준으로 청구서 발행하기
프로젝트 마일스톤을 기반으로 한 청구서 발행은 비용이 많이 투입되거나 대규모인 프로젝트에 사용될 수 있습니다. 프로젝트에서 일련의 이정표를 통해 예상에 따라 프로젝트 및/또는 계약이 완료되는 작업 순서를 명확하게 나타냅니다.
이러한 청구서 발행 방법을 통해 회사는 프로젝트 기간 동안 안정적으로 자금 흐름을 확보할 수 있습니다. 고객은 프로젝트 개발에 있어서 모든 단계를 진행에 따라 면밀히 모니터링할 수 있을 뿐만 아니라 큰 금액의 청구서를 한 번에 지불하는 대신 여러 번에 나누어 지불할 수도 있습니다.
마일스톤 품목 만들기
Odoo에서 프로젝트에 있는 각각의 마일스톤은 개별 품목으로 간주됩니다.
이와 같이 작동하도록 품목을 만들거나 설정하려면 먼저 으로 이동합니다. 그런 다음 품목을 클릭하거나 새로 만들기 를 클릭하여 새 품목을 만듭니다.
마일스톤에 따라 청구서 발행 옵션은 특정한 품목 유형에만 사용할 수 있습니다.
품목 양식의 :guilabel:` 일반 정보` 탭에 있는 품목 유형 항목은 반드시 서비스, 행사 티켓 `, :guilabel:`행사 부스 또는 강좌 중 하나로 설정되어 있어야 합니다.

With any of those Product Type options selected, choose Based on Milestones from the Invoicing Policy drop-down menu.

그 아래에는 주문 시 생성 필드가 있습니다.
To ensure workflows are as seamless as possible, it is recommended that an option in the Create on Order field is selected.
참고
기본 없음 옵션으로 두더라도 원하는 워크플로우에 부정적인 영향을 미치지 않습니다. 그러나 해당하는 품목의 판매주문서 양식에서 반드시 프로젝트를 직접 생성해야 합니다. 프로젝트가 생성된 다음에 마일스톤과 작업을 생성하고 환경 설정할 수 있습니다.
When the Create on Order default option of Nothing is clicked, a drop-down menu is revealed with the following options:
Task: Odoo creates a task related to this milestone product in the Projects app when this specific product is ordered.
Project & Task: Odoo creates a project and task related to this milestone product in the Projects app when this specific product is ordered.
Project: Odoo creates a project related to this milestone product in the Projects app when this specific product is ordered.
When Task is selected, a Project field appears. In this field, select to which existing project in the Projects app this created task should be connected.

When Project & Task or Project is selected, two new fields appear: Project Template and Workspace Template.
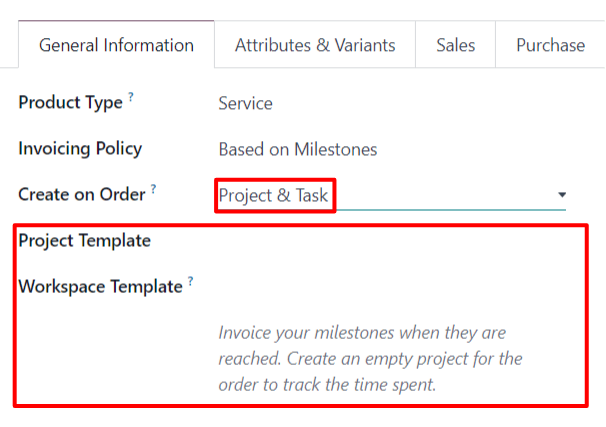
The Project Template field provides template options to use for the project that will be created when this specific product is ordered.
작업 공간 템플릿 을 통해 지정된 품목을 주문할 때 프로젝트에 대해 자동으로 생성되는 작업 공간 (프로젝트 앱이 아닌 문서 앱용)에서 사용할 템플릿을 선택하여 사용할 수 있습니다.
팁
정리를 할 수 있도록 품목 양식에서 판매 탭을 클릭하고 판매 설명 필드에 사용자 지정 ‘마일스톤’ 관련 설명을 입력합니다. 이 정보는 판매주문서의 주문 내역 탭에 있는 설명 열에 나타납니다.
또는 판매주문서 주문 줄 탭에 있는 설명 필드를 직접 편집/수정합니다.
이 항목은 필수 사항이 아닙니다.
청구서 마일스톤
참고
The following flow features a trio of milestone products that have Service set as their Product Type, and Task set on their Create on Order field.

Those tasks are then attached to a pre-existing Project, which, in this case, is titled, Rebranding Projects.
마일스톤에 청구서를 발행하려면 품목을 마일스톤으로 하여 판매주문서을 생성합니다. 그렇게 진행하려면 로 이동합니다. 그러면 빈 견적 양식이 표시됩니다.
이 견적 양식에서 고객 을 추가합니다. 그런 다음 주문 내역 탭에서 품목 추가 를 클릭합니다. 다음으로, 마일스톤 품목을 주문 내역 탭에 추가합니다.
Once the corresponding milestone product(s) have been added, click Confirm to confirm the order, which turns the quotation into a sales order.
주문서를 확인하면 품목 양식의 주문 시 생성 필드에서 선택한 내용에 따라 판매 주문 상단에 새로운 스마트 버튼이 나타납니다.
From the sales order, click the Milestones smart button. Doing so reveals a blank Milestones page. Click New to add milestones.

Enter a Name for the milestone. Next, apply it to the corresponding Sales Order Item. Lastly, assign a Deadline to the milestone, if desired.
모든 마일스톤 판매주문서 항목에 대해 해당 과정을 반복합니다.
그런 다음 이동 경로를 통해 판매주문서로 돌아갑니다. 판매주문서에서 작업 스마트 버튼을 클릭합니다. 그러면 각각의 판매매주문서 항목에 대한 작업이 있는 작업 페이지가 표시되며 주문 시 생성 필드에 해당 옵션이 지정되어 있습니다.

설정한 마일스톤을 수동으로 작업에 배정하려면, 원하는 작업을 클릭하여 작업 양식을 확인합니다. 작업 양식의 마일스톤 필드에서 작업을 연결시킬 적절한 마일스톤을 선택합니다.

모든 마일스톤 작업에 대해 이 프로세스를 반복합니다.
With those tasks properly configured, employees log in their progress as they work on the task, in addition to adding any notes related to the task.
Then, when that task is complete, that means that milestone has been reached. At that point, it is time to invoice that milestone.
마일스톤까지의 업무에 대해 청구서를 작성하려면 먼저 이동 경로 링크를 통해 판매주문서로 돌아가거나 :menuselection:`판매 앱 –> 주문서 –> 주문서’ 로 이동하여 알맞은 판매주문서를 선택합니다.
Back on the sales order form, click the Milestones smart button, and check the box in the Reached column for that particular task.

Next, return to the sales order — either by clicking View Sales Order on the Milestones page, or via the breadcrumb links.
판매주문서로 돌아가면 마일스톤에 도달한 품목 내역에 있는 배송 완료 열이 입력되어 있습니다. 품목이 마일스톤에 도달하여 배송이 완료되었기 때문입니다.

왼쪽 상단에 있는 청구서 생성 을 클릭합니다. 그러면 청구서 생성 팝업창이 나타납니다.

On the Create invoices pop-up window, leave the Create Invoice option on the default Regular Invoice selection, and click the Create Draft Invoice button.
Upon clicking Create Draft Invoice, Odoo reveals the Customer Invoice Draft, only showing that reached milestone in the Invoice Lines tab.

From this invoice page, click the Confirm button to confirm the invoice. Then, when the customer has paid for this milestone, click Register Payment.
결제 등록 을 클릭하면 결제 등록 팝업 창이 나타납니다.

이 팝업창에서 자동 입력 필드에 있는 내용이 정확한지 확인한 다음 결제 생성 을 클릭합니다.
클릭하면 팝업 창이 사라지고 Odoo에서는 해당 마일스톤에 대한 청구서로 돌아갑니다. 이제 오른쪽 상단에 초록색 결제 중 배너가 표시됩니다. 이 배너는 청구서가 결제되었다는 의미입니다.

그런 다음 이동 경로 링크를 통해 판매주문서로 돌아갑니다. 판매주문서로 돌아온 후 주문서 내역 탭에서 청구서 발행 및 결제 마일스톤에 도달하면 이제 청구 완료 열에 입력이 완료됩니다.

또한 판매주문서 상단에는 새로운 청구서 스마트 버튼이 있습니다. 이 버튼을 클릭하면 판매주문서에 연결되어 있는 모든 청구서가 표시됩니다.

위의 과정을 각 마일스톤을 작업할 때마다 반복하여 완료하면 됩니다.
Continue that process until the entire project has been completed, each milestone has been invoiced, and the entire order has been paid for in full.
더 보기
시간_자재
견적용 청구서
청구서 발행 정책