멕시코
모듈
다음 모듈이 멕시코 현지화에 자동으로 설치됩니다:
이름 |
기술적 명칭 |
설명 |
|---|---|---|
멕시코 - 회계 |
|
The default fiscal localization package adds accounting characteristics for the Mexican localization, such as: the most common taxes and the chart of accounts – based on the SAT account grouping code. |
멕시코용 EDI |
|
Includes all the technical and functional requirements to generate and validate electronics documents — based on the technical documentation published by the SAT. This allows you to send invoices (with or without addedums) and payment complements to the government. |
Odoo 멕시코 현지화 보고서 |
|
Adapts reports for Mexico’s electronic accounting: chart of accounts, trial balance, and DIOT. |
멕시코 - 13개월 차 시산표 |
|
Necessary to create the closing entry (also known as the month 13 move). |
Odoo 멕시코 XML Polizas 내보내기 |
|
Allows the export of XML files of journal entries for a compulsory audit. |
The following modules are optional. It’s recommended to install them only if meeting a specific requirement for the business.
이름 |
기술적 명칭 |
설명 |
|---|---|---|
멕시코용 EDI (고급 기능) |
|
Adds the external trade complement to invoices (a legal requirement for selling products to foreign countries). |
멕시코 - 전자 배송 가이드 |
|
*선하증권*을 생성할 수 있습니다. 선하증권이란 서명된 전자 문서를 통하여 A와 B 사이에 물품을 발송한다는 사실을 정부에 증명하는 것입니다. |
:guilabel:`Odoo 멕시코 현지화 재고/수입 관련 작업 |
|
전자 문서로 수입 부대 비용에 대한 통관 번호를 관리할 수 있습니다. |
판매주문서용 CFDI 4.0 필드 |
|
Adds extra fields to the Sales module to comply with the Mexican Electronic Invoicing |
POS 멕시코 현지화 |
|
Adds extra fields to the Point of Sale module to comply with the Mexican Electronic Invoicing |
멕시코 현지화 이커머스 |
|
Adds extra fields to the eCommerce module to comply with the Mexican electronic invoicing requirements |
임직원 관리 - 멕시코 |
|
Adds extra fields to the Employees module to comply with local information for employees. |
멕시코 - 회계와 통합된 급여 |
|
Adds the required rules and parameters to manage local payroll calculation with the Payroll app. |
동영상 튜토리얼
Videos on the Mexican localization are also available. Basic workflows and most topics covered on this page are also available in video format, please check out the following:
현지화의 전반적인 흐름
Odoo 멕시코 현지화 모듈을 사용하면 2022년 1월 1일 기준 법적 요건인 ‘CFDI 4.0 버전 <http://omawww.sat.gob.mx/ tramitesyservicios/Paginas/documentos/Anexo_20_Guia_de_llenado_CFDI.pdf>’ 에 대한 SAT 사양에 따라 전자 청구서에 서명할 수 있습니다. 또한 이 모듈을 활용하여 DIOT 등 관련 회계 보고서를 추가하거나, 해외 거래 활성화 및 배송 가이드를 생성하는 것도 가능합니다.
참고
In order to electronically sign any documents in Odoo, the Sign application must be installed.
요구 사항
Odoo에서 멕시코 현지화 모듈에 대한 환경 설정을 하기 전에 다음과 같은 요건을 충족해야 합니다.
유효한 RFC 를 사용하여 SAT 에 등록되어 있어야 합니다.
Have a Certificado de Sello Digital / Digital Seal Certificate (CSD).
Choose a PAC. Currently, Odoo works with the following PACs: Solución Factible, Quadrum, and SW Sapien - Smarter Web.
회사
After installing the correct modules, the next step is to verify that the company is configured with the correct data. To do so, go to , and select the company to configure.
Enter the full Address in the resulting form, including: ZIP code, State, Country, and RFC (Tax ID number).
According to the requirements of the CFDI 4.0, the name of the main company contact must match the business name registered in the SAT, without the legal entity abbreviation. This is the same for the ZIP code.
중요
From a legal point of view, Mexican companies must use the local currency (MXN). To use another currency, let MXN be the default currency and use a pricelist instead.
Next, go to , and scroll to the MX Electronic invoicing section. Under Service Tax Administration (SAT), select the Fiscal Regime that applies to the company from the drop-down list, and click Save.
팁
In order to test the Mexican localization, configure the company with a real address within
Mexico (including all fields). Add EKU9003173C9 as the Tax ID and ESCUELA KEMPER
URGATE as the Company Name. For the Fiscal Regime, use
General de Ley Personas Morales.
연락처
참고
연락처 앱을 설치 해야 연락처 레코드에 액세스할 수 있습니다.
To create a contact that can be invoiced, go to . Then, enter the contact name, full Address including the ZIP code, State, Country, and RFC (Tax ID).
중요
As with your own company, all contacts must have their correct business name registered in the SAT. This also applies to the Fiscal Regime, which needs to be added in the Sales & Purchase tab.
경고
Having a RFC (Tax ID) set but no Country configured may result in incorrect invoices.
세금
In order to properly sign invoices, set the Factor Type and Tax Object fields on sales taxes.
요인 유형
Both the SAT Tax Type and Factor Type fields are pre-loaded in the default taxes. If new taxes are created, these fields must be set. To do so, go to , then fill both fields in the Advanced Options tab for all tax records, with the Tax Type set as Sales.
Odoo supports four groups of SAT Tax Types: IVA, ISR, IEPS, and Local.
팁
멕시코는 두 가지 경우에 대비하여 영세 부가가치세를 두 가지로 관리하고 있습니다.
For 0% VAT, set the Factor Type as Tasa
For VAT Exempt, set the Factor Type as Exento
과세 대상
One requirement of the CFDI 4.0 is that the resulting XML file handles the breakdown of taxes of the operation in accordance with the regulation. There are three different possible values that are added in the XML file:
01: Not subject to tax: This value is added automatically if the invoice line doesn’t contain any taxes.02: Subject to tax: This is the default configuration of any invoice line that contains taxes.03: Subject to tax and not forced to break down: This value can be triggered on demand for certain customers to replace the value02.
To use the 03 value for a contact, navigate to the contact’s Sales & Purchase tab, and
activate the No Tax Breakdown checkbox under the Fiscal Information section.
중요
세금 분류 없음 값은 특정한 재정 체제 및/또는 세금에 한해서만 적용됩니다. 수정하기 전에 먼저 회계 전문가와 상의하여 비즈니스에 필요한 내용인지 확인합니다.
기타 세금 설정
멕시코 현지화에서는 현금 기준 세금 방식이 적용됩니다. 결제 등록 시 Odoo에서는 현금 기준 전환 계정 에서 청구서 또는 업체 청구서 행에 설정된 세금 레코드 정의 탭에 지정되어 있는 계정으로 세금을 이동합니다. 이러한 이동 작업에서 세금 재분류 시 전표 항목의 세금 기준 계정(899.01.99 Base Imponible de Impuestos en Base a Flujo de Efectivo)이 사용됩니다. 이 계정은 삭제하지 마세요.
품목
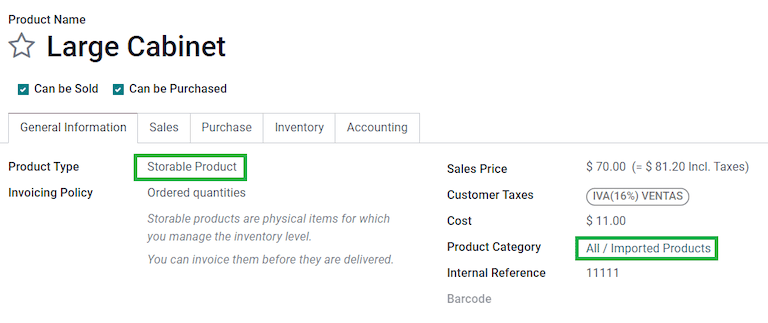
To configure products, go to , then select a product to configure, or Create a new one. In the Accounting tab, in the UNSPSC Product Category field, select the category that represents the product. The process can be done manually, or through a bulk import.
참고
All products need to have a SAT code associated with them in order to prevent validation errors.
전자 청구서
PAC 자격 증명
After processing your Private Key (CSD) with the SAT, you must register directly with the PAC of your choice before you start creating invoices from Odoo.
Once you’ve created your account with any of these providers, go to and navigate to the MX Electronic invoicing section. Under the Authorized Certification Provider (PAC) section, enter the name of your PAC with your credentials (PAC username and PAC password).

팁
To test the electronic invoicing without credentials, activate the MX PAC test environment checkbox, and select Solucion Factible as the PAC. It is not required to add a username or password for a test environment.
.cer 및 .key 인증서
The digital certificates of the company must be uploaded within the Certificates section. To do so, navigate to .
Under Manage your certificates, click the Keys link
to access the Keys list view. Click Create, upload the digital
Key file (.key file), add a Name to the key, and enter the
Private key password.
From , select
Certificates to access the Certificate list view. Click Create,
upload the digital Certificate (.cer file), add a Name to the
certificate, and select the Private Key created on the previous step from the drop-down
menu.
참고
The Certificate Password and Public Key fields on Certificate records are optional.
회계
전자 청구서
Odoo의 청구서 발행 프로세스는 SAT 전자 청구서 발행 Annex 20 4.0 버전을 기준으로 합니다.
고객 청구서
Odoo에서 청구서 발행을 시작하려면 반드시 표준 청구서 발행 흐름 를 사용하여 고객 청구서를 생성해야 합니다.
문서가 초안 모드에 있는 동안에는 문서를 변경할 수 있습니다 (예를 들어 고객이 적합한 결제 수단 또는 사용량 을 요구하면 추가할 수 있습니다.)
After clicking on Confirm in the customer invoice, click the Send button to process the invoice with the government. Make sure that the CFDI checkbox is marked.

After receiving the signed document back from the government, the Fiscal Folio field appears on the document, and the XML file appears both in the CFDI tab and attached in the chatter.
If an email address is configured on the customer contact record, marking the by Email and CFDI checkboxes sends both the XML and PDF files together.
PDF 파일을 로컬에서 다운로드하려면 인쇄 버튼을 클릭합니다.
팁
When clicking Update SAT, the SAT status field on the invoice will confirm if the XML file is Validated in the SAT.
On a testing environment, the message Not Found will always come up.
대변전표
청구서는 문서 유형 “I” (Ingreso)인 반면 대변 전표는 문서 유형 “E” (Egreso)입니다.
대변전표 표준 흐름 에 추가된 유일한 항목은 SAT 의 요구 사항에 따라 대변전표와 청구서 사이에 재정 폴리오를 통한 관계가 있어야 한다는 것입니다.
이 요구 사항으로 인해 CFDI 원본 필드에서 이 관계를 01| 로 추가하고 그 뒤에 원본 청구서의 회계 명세서를 추가합니다.
팁
CFDI 원본 필드를 자동으로 추가하려면 직접 생성하는 방법 대신 청구서에서 대변전표 추가 버튼을 사용합니다.
결제
결제 정책
One addition of the Mexican localization is the Payment Policy field. According to the SAT documentation, there are two types of payments:
PUE (Pago en una Sola Exhibición/일시불 결제)
PPD (Pago en Parcialidades o Diferido/할부 또는 후불 결제)
The difference lies in the Due Date or 지급 조건 및 분할 납부 of the invoice.
To configure PUE invoices, navigate to , and either select an invoice Due Date within the same month, or choose Payment terms that do not imply changing the due month (i.e., Immediate Payment, or 15 Days or 21 Days, as long as they fall within the current month).

PPD 청구서에 대한 환경 설정을 하려면 로 이동하여 마감일 이 다음 달 1일 이후 인 청구서를 선택합니다. 이는 귀하의 결제 조건 기간이 다음 달에 마감인 경우에도 적용됩니다.

결제 흐름
In both cases, the payment process in Odoo is the same, the main difference being payments related to PPD invoices, by law, need to be sent to the government as a document type “P” (Pago).
If a payment is related to a PUE invoice, it can be registered through the payment popup, and be associated with the corresponding invoice. To do so, navigate to , and select an invoice. Then, click the Pay button to open the payment popup, set the Payment Way and any other fields, and click Create Payment.
While this process is the same for PPD invoices, the addition of creating an electronic document means some additional requirements are needed to correctly send the document to the SAT.
From a legal perspective, PPD invoices must include the specific Payment Way that the payment was received. Because of this, the Payment Way field cannot be set as To Define, thus the field will become invisible when selecting it.
참고
If a bank account number is required, add it in the Accounting tab of a customer’s contact record.
정확한 환경 설정은 ‘SAT의 Anexo 20 <http://omawww.sat.gob.mx/tramitesyservicios/Paginas/anexo_20.htm>’_ 에 있습니다. 일반적인 은행 계좌 는 이체의 경우 10자리 또는 18자리, 신용 카드 또는 직불 카드의 경우 16자리여야 합니다.
If a fully-reconciled payment is related to an invoice with a Fiscal Folio, the Update Payments appears. Click the Update Payments button to send the payment complement XML file to the government automatically and display it in the CFDI tab in both the invoice and the payment.
팁
While it is a bad fiscal practice, the PUE payments can also be sent to the government, however it is required to click Force CFDI in the CFDI tab for this.
Similar to an invoice or credit note, the PDF and XML can be sent to the final customer. To do so, click the (gear) icon to open the actions drop-down menu and select Send receipt by email.
청구서 취소
|SAT|으로 전송된 EDI 문서를 취소할 수 있습니다. 재정 개혁안 2022 에 따르면 2022년 1월 1일부터 이와 관련된 두 가지 요건이 있습니다.
취소 신청을 할 경우 반드시 취소 사유 를 필히 기재해야 합니다.
After 24 hours from the invoice creation, the client must be asked to approve the cancellation. If there is no response within 72 hours, the cancellation is processed automatically.
다음 사유 중 하나에 해당되는 경우 청구서를 취소할 수 있습니다:
01 - 오류가 있는 청구서 발행(관련 문서 포함)
02 - 오류가 있는 청구서 발행(교체 불가)
03 - 작업이 수행되지 않음
04 - 전체 청구서 관련 분류 작업
To initiate a cancellation, go to , select the posted invoice to cancel, and click Request Cancel. Then, refer to the 취소 사유 01 or 취소 사유 02, 03, 04 sections, depending on the cancellation reason.
팁
Alternatively, request a cancellation from the CFDI tab by clicking Cancel on the line item.
참고
If a cancellation is requested on a locked period, the CFDI will be cancelled but not the accounting entry.
If the client rejects the cancellation, the invoice cancellation line item is removed from the CFDI tab.
취소 사유 01
CFDI 취소 요청 팝업창의 사유 필드에서 01 - 오류가 있는 청구서 발행(관련 문서 포함) 을 선택하고 대체 청구서 만들기 를 클릭하여 새 청구서 초안을 생성합니다. 해당 신규 청구서 초안이 이전 청구서를 관련 CFDI 와 함께 대체합니다.
Confirm the draft and Send the invoice.
Return to the initial invoice (i.e., the invoice from which you first requested the cancellation). Notice the Substituted By field appears with a reference to the new replacement invoice.
Click Request Cancel. In the Request CFDI Cancellation pop-up window, the 01 - Invoice issued with errors (with related document) option is automatically selected in the Reason field.
확인 을 클릭합니다.
The invoice cancellation is then generated with a reason line item in the CFDI tab.

참고
취소 사유가 01 - 오류 발행 청구서(관련 서류 포함) 인 경우 04| 접두사가 재정 위치 필드에 표시됩니다. 이는 Odoo에서 취소용으로 사용하는 내부용 접두사이며, 취소 사유인 04 - 전체 청구서와 관련된 분류 작업 과는 ** 무관합니다**.
취소 사유 02, 03, 04
In the Request CFDI Cancellation pop-up window, select the desired cancellation Reason and Confirm the cancellation.
Upon doing so, the invoice cancellation is generated with a reason line item in the CFDI tab.
참고
If the SAT Status goes back to Validated it could be due to one of these three reasons:
The invoice is labeled as No Cancelable in the SAT Website. due to the fact that it has a valid related document: Either another invoice linked with the CFDI Origin field or a Payment Complemement. If so, you need to cancel any other related document first.
The cancellation request is still being processed by the SAT. If so, wait a few minutes and try again.
The final customer needs to reject or accept the cancellation request in their Buzón Tributario. This can take up to 72 hours and, in case that the cancellation requests gets rejected, you will need to repeat the process again.
For the cancellation reasons 02, 03 and 04, the Create Replacement Invoice button is replaced by a Confirm button that requests the cancellation immediately.
Both the current State and Cancellation Reason can be found in the CFDI tab.

결제 취소
To cancel payment complements, go to the CFDI tab of the related invoice and click Cancel on the line of the payment complement.
Like with invoices, go to the payment and click Update SAT in order to change the SAT Status and Status to Cancelled.
참고
Just like invoices, when creating a new payment complement, you can add the relation of the
original document, by adding a 04| plus the fiscal folio in the CFDI Origin field.
This action cancels the invoice and marks the Reason as 01 - Invoice
issued with errors (with related document).
청구서 발행 관련 특수 사례
다중 통화
멕시코의 주요 통화 는 MXN입니다. 모든 멕시코 기업에 필수 항목이지만, 다른 통화로 청구서(및 결제)을 송수신하는 것도 가능합니다. 다중 통화 기능을 활성화하려면 로 이동한 후 자동 환율 섹션에서 서비스 를 [MX] 멕시코 중앙은행 으로 설정하세요. 그런 다음 간격 필드에 환율 업데이트 주기를 원하는 빈도로 설정합니다.
이렇게 할 경우, 문서에 있는 XML 파일에 정확한 환율과 함께 총 금액이 외화와 MXN 두 가지 방법으로 모두 표시될 수 있습니다.
It is highly recommended to use separate bank accounts for each currency.
참고
The only currencies that automatically update their exchange rate daily are: USD, EUR, GBP, JPY and CNY.
할인
By law, electronic documents sent to the government cannot have negative lines, as this can trigger errors. Therefore, when using Gift Cards or Loyalty Programs, the subsequent negative lines will be translated in the XML as if they were regular Discounts.
In order to set this up, navigate to and create a
product Discounts, make sure that it has a valid Tax (usually IVA at
16%).
After this, create and sign the invoice via CFDI, and add the Discounts product at the bottom. In the XML
the discount should be subtracted from the first invoice line available, Odoo will try to subtract
from each line the total amount in order until all the discount has been applied.
팁
A Discount and UNSPSC Product Category for each product variant related to Gift
Cards or Loyalty Programs have to be created.
선결제 금액
A common practice in Mexico is the usage of down payments. It’s usage primarily consists of cases where you receive a payment for a good or service where either the product or the price (or both) hasn’t been determinated at the moment.
The SAT allows two diferent ways to handle this process: both of them involve linking all invoices to each other with the CFDI Origin field.
참고
해당 프로세스를 진행하려면 반드시 판매 앱이 설치되어 있어야 합니다.
더 보기:
환경설정
First, navigate to to create a product Anticipo
and configure it. The Product Type must be Service, and use the
UNSPSC Category 84111506 Servicios de facturación.
그런 다음 로 이동하여 Anticipo 품목을 기본값으로 추가합니다.
방법 A
This method consists of creating a down payment invoice, creating a invoice for the total amount, and finally, creating a credit note for the total of the down payment.
First, create a sales order with the total amount, and create a down payment from it (either using a percentage or fixed amount). Then, sign the document via CFDI, and register the payment.
When the time comes for the customer to get the final invoice, create it again from the same sales order. In the Create Invoice popup, select Regular Invoice. Make sure to delete the line that contains the product Anticipo.
팁
When using down payments with the Mexican localization, make sure that the Invoicing Policy of the products are Ordered quantities. Otherwise a customer credit note will be created.
Then, copy the Fiscal Folio from the down payment invoice, and paste it into the
CDFI Origin of the final invoice, adding the prefix 07| before the value and sign
the document via CFDI.
Finally, create a credit note for the first invoice. Copy the Fiscal Folio from the
final invoice, and paste it in the CFDI Origin of the credit note, adding the prefix
07|. Then, sign the document via CFDI.
With this, all electronic documents are linked to each other. The final step is to fully pay the new invoice. At the bottom of the new invoice, you can find the credit note in the Outstanding credits - add it as payment. Finally, register the remaining amount with the Pay popup.
In the sales order, all three documents should appear as “In Payment”.
방법 B
Another, simpler way to fulfill SAT requirements involves creating only the down payment invoice, and a second invoice for the remnant. This method involves the fact that negative lines are treated as discounts.
이렇게 하려면 방법 A 와 동일하게 최종 청구서 생성 단계까지 진행합니다. Anticipo 가 기재되어 있는 행은 삭제하지 말고, 다른 품목의 설명 을 CFDI por remanente de un anticipo 라는 문구가 포함되도록 변경합니다. 최종 청구서의 CDFI 원본 에 선불 계약금 청구서의 Fiscal Folio 를 추가하고 반드시 접두사로 07| 을 붙이도록 합니다.
마지막으로 CFDI를 통해 최종 청구서에 서명합니다.
XML 리더
특정한 경우, 즉 다른 소프트웨어나 SAT 에서 직접 청구서를 생성하는 경우 해당 청구서를 Odoo에 업로드해야 할 수 있습니다. XML 리더를 활용하면 XML 파일에서 데이터를 가져올 수 있습니다. 이렇게 하려면 로 이동한 후 목록 보기에서 업로드 버튼을 클릭하여 생성하려는 숫자만큼 XML 파일을 선택하면 청구서 초안이 자동으로 생성됩니다. 컴퓨터에서 파일을 보기 창에 끌어다 놓는 방식으로도 동일하게 작업을 진행할 수 있습니다.
The draft invoices will retrieve the Customer information (if it doesn’t exist, new ones will be created), the Product Lines (only if products with the same name already exist) and will calculate all taxes and additional fields exclusive to the Mexican Localization. The import information will appear in the chatter.
경고
Depending on where the invoice was created, XML files could have different values from the total calculated in Odoo. Always double-check any document uploaded this way.
Customer Invoices created this way will be able to create payment complements and to be canceled at any time. If you use the Print button, the PDF document will have all the corresponding information.
이 작업은 공급업체 청구서 에서도 할 수 있습니다.
팁
To retrieve the Fiscal Folio, drag and drop XML files for already created draft invoices.
공개용 CFDI
The Mexican government requires that any goods or services that are sold must be backed up by an invoice. If the customer does not require an invoice or has no RFC, a CFDI to Public has to be created also known as a “nominative” invoice.
A contact must be created and it must have a particular name. If the CFDI to Public checkbox in either a sales order or an invoice is checked, the final XML will override the data in the invoice contact and will add the following characteristics:
RFC: XAXX010101000 if it is a national customer or XEXX010101000 if it is a foreign customer
우편번호: 회사와 동일한 코드
사용: S01 - 재정적 영향 없음

중요
If your contact Country is empty, the final invoice is considered as a CFDI to Public for national customers. A non-blocking warning will be displayed before signing the document.
If the final customer doesn’t share any details, create a generic Customer. The name
cannot be PUBLICO EN GENERAL or an error will be triggered (it can be, for example, CLIENTE
FINAL).
글로벌 청구서
If by the end of a certain period of time (that can vary from daily to bimonthly, depending of your company’s legal needs and preferences) and the customer still has sales that weren’t marked as regular invoices or individual CFDI to Public invoices, the SAT allows for the creation of a single invoice that can contain all operations, known as a global invoice.
참고
해당 프로세스를 진행하려면 반드시 판매 앱이 설치되어 있어야 합니다.
더 보기:
판매 절차
First, it is necessary to create a special Journal created in with the purpose of keeping a separate sequence.
Then, make sure that all the sales orders that need to be signed have the following configurations:
CFDI 공개 체크박스 활성화
청구서 상태 청구 예정 으로 표시
After this, go to , select all relevant sales orders and press Create Invoices. Make sure to disable the Consolidated Billing checkbox and click Create Draft Invoice.
Odoo will redirect to a list of invoices. Select all of them and in the Actions drop-down menu select Post entries. Select all posted invoices again and go back to the Actions drop-down menu to select Create Global Invoice.
In the wizard, select the Periodicity indicated by a professional accountant and press Create. All invoices should be signed under the same XML file, with the same Fiscal Folio.
팁
Click Show in the CFDI tab to display a list with all related invoices.
Click Cancel in the CFDI tab to cancel the global invoice in both the SAT and Odoo.
참고
Global invoices created this way won’t have a PDF in them as their information is already within Odoo and is not to be seen by a customer.
전산 회계 (보고)
멕시코의 경우 전자 회계 를 통해 전자적 수단을 통해 회계 기록 및 항목을 보관하고 SAT 웹사이트를 통해 매월 회계 정보를 제공할 의무가 있습니다.
이 항목은 세 가지 주요 XML 파일로 설정되어 있습니다.
The updated list of the chart of accounts that is currently in use
A monthly trial balance, plus a closing entry report, also known as: Trial Balance Month 13
An export of the journal entries in the general ledger (optional except in the case of a compulsory audit)
그 결과 XML 파일은 전자 회계 관련 기술 부속서 1.3 의 요구 사항에 부합할 수 있습니다.
In addition to this, it is possible to generate the DIOT: a report of vendors’ journal entries that involve IVA taxes that can be exported in a TXT file.
참고
In order to use these reports, the following modules must be installed:
Odoo 멕시코 현지화 보고서
l10n_mx_reports멕시코 - 13개월 차 시산표
l10n_mx_reports_closingOdoo 멕시코 XML Polizas 내보내기
l10n_mx_xml_polizas
The chart of accounts and the Trial Balance Month 13 reports can be found in . The DIOT report can be found in .
중요
전송할 보고서의 구체적인 특성 및 의무 사항은 회계 제도에 따라 변경될 수 있습니다. 정부에 문서를 전송하기 전에는 항상 회계 담당자에게 문의하세요.
계정과목표
The chart of accounts in Mexico follows a specific pattern based on SAT’s’ Código agrupador de cuentas.
It is possible to create any account, as long as it respects SAT’s encoding group: the pattern is
NNN.YY.ZZ or NNN.YY.ZZZ.
Example
예를 들어 ‘102.01.99’ 또는 ‘401.01.001’ 등이 있습니다.
When a new account is created in , with the SAT encoding group pattern, the correct grouping code appears in Tags, and the account appears in the COA report.
Once all accounts are created, make sure the correct Tags are added as these mark the nature of the account.
참고
It is not advised use any pattern that ends a section with a 0 (such as 100.01.01, 301.00.003
or 604.77.00). This triggers errors in the report. By default Odoo will mark the accounts as
yellow if the numbering will cause issue later on, this is to prevent reports from providing
inaccurate data.
Once everything is set up, go to , and click the COA SAT (XML) button to generate an XML file containing all of the accounts. This XML file is ready to upload to the SAT website.
시산표
시산표에서 계정의 초기 잔액, 차액 및 총 잔액을 확인할 수 있습니다. 이를 위해서는 인코딩 그룹 을 정확히 추가해야 합니다.
To generate an XML file of the trial balance, go to , select the date, and click the (action menu), then select SAT (XML).

참고
Odoo는 추가 평가판에 대해 잔액 이 생성되지 않습니다.
13월
An additional report is the Month 13: a closing balance sheet that shows any adjustments or movements made in the accounting to close the year.
To generate this XML document, navigate to , and create a new document. Here, add all amounts to modify, and balance the debit and/or credit of each one.
이 작업이 완료되면 기타 정보 탭으로 이동하여 13월 마감 필드를 확인합니다. 필요한 경우 로 이동하여 날짜를 13월 로 선택하면 연간 총액과 전표 추가 내역을 모두 확인할 수 있습니다. XML 파일을 생성하려면 (작업 메뉴) 를 클릭한 후 SAT (XML) 를 선택합니다.
총계정원장
By law, all transactions in Mexico must be recorded digitally. Since Odoo automatically creates all the underlying journal entries of all invoices and payments, simply exporting the general ledger complies with SAT’s audits and/or tax refunds.
팁
The report can be filtered by period or by journal, depending on the need.
To create the XML, go to , click (action menu), then click XML (Polizas). Then, select among four Export types:
세무 감사
감사 인증
품목 반품
보상
For Tax audit or Audit certification, add the Order Number provided by the SAT. For Return of goods or Compensation, add the Process Number, also provided by the SAT.
참고
To see this report without sending it, use ABC6987654/99 for the Order
Number or AB123451234512 for the Process Number.
DIOT 보고서
The DIOT (Declaración Informativa de Operaciones con Terceros / Informative Declaration of Operations with Third Parties) is an additional obligation with the SAT, where the current status of creditable and non-creditable payments, withholdings, import taxes, and refunds of VAT from your vendor bills are provided to the SAT.
참고
Since July 2025 the new 2025 version of the report is available.
Unlike other reports, the DIOT is uploaded to a software provided by the SAT that contains the A-29 form. In Odoo, you can download the records of your transactions as a TXT file that can be uploaded to the form, avoiding direct capture of this data.
거래 파일에는 공급업체 청구서에 등록된 총 결제 금액이 해당 유형의 IVA로 분류되어있습니다. 모든 공급업체에서 부가가치세 및 국가 는 필수 항목입니다.
To download the DIOT report as a TXT file, go to . Select the desired month, click (action menu), and select DIOT (TXT).

중요
It is required to fill in the Type of Operation field in the Accounting tab of each vendor to prevent validation errors. Make sure that foreign customers have their Country set.

Selecting 87 - Global Operations will cause the final TXT file to merge all vendors that are part of the global operations under one generic VAT: XAXX010101000.
해외 무역
외부 거래는 일반 청구서에 대한 일종의 보완책으로 ‘SAT 규정 <http://omawww.sat.gob.mx/tramitesyservicios/Paginas/complemento_comercio_exterior.htm>`_ 에 따라 해외 고객 대상의 청구서에 XML과 PDF 양쪽에 대한 특정 값을 추가합니다.
수신자와 발신자의 구체적인 주소
품목 유형을 식별할 수 있도록 관세율 추가
정확한 인코텀즈 (인코텀즈: 국제 상업 약관)
And more, such as the certificate of origin and special units of measure
이를 통해 판매된 품목에 대해 자세하게 설명할 수 있을 뿐 아니라 수출업체 및 수입업체를 정확하게 확인할 수 있습니다.
Since January 1, 2018, external trade is a requirement for taxpayers who carry export operations of type A1. While the current CFDI is 4.0, the external trade is currently on version 2.0.
참고
In order to use this feature, the EDI for Mexico (Advanced Features)
l10n_mx_edi_extended module must be installed.
중요
설치하기 전에 비즈니스에 이 기능이 필요한지 확인합니다. 필요한 경우 모듈을 설치하기 전에 먼저 회계 담당자에게 문의하세요.
환경설정
연락처
대외 거래용 회사 연락처를 설정하려면 으로 이동한 후, 기본 고객 청구서 필터를 제거한 후 회사 이름을 선택합니다. CFDI 4.0 요건에 따르면 회사 연락처 레코드에는 유효한 우편번호 를 추가해야 하는 것이 필수이나, 외부 거래 보완용으로는 도시 및 주 요건도 추가적으로 유효한 내용을 입력해야 합니다. 세 가지 필드 모두 공식 SAT Carta Porte 카탈로그 와 일치해야 하며, 일치하지 않는 경우 오류가 발생합니다.
경고
Add the City and State in the company’s contact record, not in the company record itself.
On the contact record, the optional fields Locality and Colony Code can also be filled. These two fields also have to coincide with the data in the SAT.
해외에서 수취하는 클라이언트에 대한 연락처 데이터를 설정하려면 으로 이동하여 해외 클라이언트의 연락처를 선택합니다. 오류를 방지하려면 연락처에 반드시 다음 내용을 입력해야 합니다.
유효한 ZIP 코드 및 외국 국가 를 포함한 전체 회사 주소
The foreign RFC (tax identification number), in the correct format (for example: Colombia
123456789-1)In the Sales & Purchase tab, to activate the Needs external trade? checkbox.
중요
Do not enable the No Tax Breakdown option for External Trade customers. Selecting this option hides mandatory fields that are required for external trade contact configuration.
참고
XML 결과 및 PDF 파일의 부가가치세 는 해외 거래에 있어서 일반 부가가치세인 XEXX010101000 으로 자동 대체됩니다.
품목
All products involved with external trade have four additional fields that are required, two of which are exclusive to external trade.
The Reference of the product must be set in the General Information tab.
The Weight of the product in the Inventory tab must be more than
0.The correct Tariff Fraction of the product must be set in the Accounting tab for external trade.
The UMT Aduana in the Accounting tab must be set and correspond to the Tariff Fraction for external trade.

청구서 발행 흐름
Before creating an invoice, it is important to take into account that external trade invoices require converting product prices into a foreign currency such as USD. Therefore, multicurrency must be enabled with the foreign currency activated in the Currencies section. The correct Service to run is [MX] Bank of Mexico. To convert product prices, create a pricelist in the foreign currency.
Then, with the correct exchange rate set up in , set the Incoterm and the optional Certificate Source fields in the invoice’s Other Info tab.
Finally, confirm the invoice with the same process as a regular invoice, and click the Send button to sign it via CFDI.
POS
The Point of sale adaptation of the Mexican Localization enables the creation of invoices that comply with the SAT requirements directly in the POS session, with the added benefit of creating receipt tickets that allow self-invoicing in a special portal and creating global invoices.
POS 작업 단계
Other than the standard Point of Sale configuration, the only requirement for the Mexican localization is the additional fact that each payment method needs to be configured with a correct Payment Way.
팁
By default Odoo creates preconfigured payment methods for cash, credit card, and debit card.
While selling on the Point of Sale, click the Customer button to either create or select a customer. Here it is possible to review customer invoicing information (such as the RFC or Fiscal Regime) and even modify it directly inside the session.
After selecting a customer, tick the Invoice checkbox. This opens a menu to select the Usage and to define if it is an invoice to the public. Click confirm, select the payment method, and then click validate to complete the order. The PDF is then downloaded and it is possible to send the invoice via mail to the final customer alongside the receipt.
팁
To create invoices from orders, go to the Orders menu, select the order, click Load Order, and tick the Invoice checkbox. This opens the same menu for the Usage and CFDI to Public.

To sign a credit note automatically, tick the Invoice checkbox when processing a refund.
참고
Credit notes for returned products will contain the relation type 03 - Devolución de mercancía sobre facturas o traslados previos.
중요
In the Mexican localization, positive and negative lines in a POS session cannot be mixed.
If a SAT validation error occurs customer will get a Pro-Forma invoice instead.
셀프 인보이스 발행 포털
If the final customer is not sure if they want to have their invoice generated at the exact moment of the sale, it is possible to give them the option of creating a receipt with either a QR code or a URL. To do so, follow these steps:
으로 이동합니다.
POS 를 선택합니다.
청구서 및 영수증 섹션으로 스크롤을 이동합니다.
셀프 청구서 발행 기능 을 활성화합니다.
Set the Print field to QR code, URL, or QR code + URL.
Customers who scan this QR code or follow the URL will access to a menu where they can add their fiscal information, including the Usage and Fiscal Regime once they enter the five digit code that is also provided on the receipt.
더 보기:
글로벌 청구서
As with regular sales orders, global invoices can also be created from a POS session.
For this, make sure not to select a customer or the invoice option in the payment menu and go to . There, select all the orders to invoice, click Actions and select Create Global Invoice.
판매주문서와 마찬가지로 주기 를 알맞게 선택한 후 생성 을 클릭합니다.
This attaches an XML file to each of the selected orders. The XML files can be downloaded by going to the CFDI tab. If needed, it is possible to cancel the invoice from the same tab.
If eventually any of the orders that are part of the global invoice need to be addressed to a customer, it is still possible to send an invoice by entering a new POS session, clicking the (drop-down menu), then click Orders. Change the All active orders filter to Paid, select the order, and click the Invoice button.
참고
Global invoices, just as regular invoices, can only be grouped by physical address. That is determined by the address set on the POS invoice journal, so when attempting to invoice two addresses a warning will come up to warn the user of the error.
이커머스
멕시코 현지화에서 이커머스를 사용하는 경우 SAT 요건에 맞는 청구서를 생성하기 위해 추가적인 단계가 제공됩니다. 여기에는 이커머스 에서 결제 후 고객 데이터를 조회하거나, 결제 처리 후 자동 청구서 에 서명할 수 있는 기능, 또는 고객에게 이메일로 파일을 전송하고 고객 포털에서 PDF 파일을 다운로드할 수 있도록 하는 기능 등이 있습니다.
이커머스 절차
During the regular checkout process, a new Invoicing Info step appears, where it is possible to request an invoice or not. If No is selected, a CFDI to Public is created,. If Yes is selected, the RFC, Fiscal Regime, and Usage are required in order to get all information in the sales order, where its status will change to To Invoice.
중요
Make sure to add a UNSPSC code to the shipping product.
If you enable the Automatic Invoicing in , the electronic document will be signed automatically.
구독
While handling subscriptions, all the sales fields are used to create the recurrent invoices. These are automatically signed and sent via email with the PDF and XML attached with no additional manual actions required.
재고 관리
통관 번호
A customs declaration (Pedimento Aduanero) is a fiscal document that certifies that all contributions to the fiscal entity (the SAT) have been paid for, including the import/export of goods.
According to the Annex 20 of CFDI 4.0, in documents where the invoiced goods come from a first-hand import operation, the Customs Number field, needs to be added to all lines of products involved with the operation.
참고
To do so, the Odoo Mexico Localization for Stock/Landing l10n_mx_edi_landing module
must be installed, in addition to the Inventory,
Purchase, and Sales apps.
중요
이 기능을 외부 거래와 혼동하지 마세요. 세관 번호는 품목 수입과 직접적으로 관련되어 있는 반면, 대외 무역 보완은 수출과 관련되어 있습니다. 이 기능이 필요한 경우 수정하기 전에 먼저 회계 담당자에게 문의하세요.
환경설정
In order to track the correct customs number for a specific invoice, Odoo uses landed costs. Go to , and in the Valuation section, make sure that Landed Costs is activated.
Begin by creating a service-type product called, Pedimento. In the Purchase tab,
activate Is a Landed Cost, and select a Default Split Method.
Then, configure the goods-type products that hold the customs numbers. To do so, create the products, and make sure the Product Category has the following configuration:
원가 계산법: FIFO 또는 AVCO
재고 가치 평가: 자동화
재고 평가 계정: 115.01.01 재고
재고 계정: 재고 가치 평가
재고 입고 계정: 115.05.01 운송 중인 재고
재고 출고 계정: 115.05.01 운송 중인 재고
참고
Setting the Inventory Valuation to Automated requires first enabling the feature. Go to , and in the Stock Valuation section, enable Automatic Accounting.

매입 및 판매 흐름
품목에 대한 환경설정을 완료한 후 표준 매입 작업 단계 에 따라 진행하세요.
Create a purchase order from . Then, confirm the order to display a Receipt smart button. Click the Receipt smart button and Validate the receipt.
Go to , and create a new record. In the Transfer, add the receipt that was just validated, add the Customs number and in the Additional Costs tab, add the Pedimento product.
Optionally, it is possible to add a cost amount. After this, Validate the landed cost. Once Posted, all products related to that receipt have the customs number assigned.
경고
The Pedimento Number field is not editable once it is set, so be careful when associating the correct number with the transfer(s).

Next, create a sales order and confirm it. Click the Delivery smart button that appears, and Validate the delivery order.
Finally, create an invoice from the sales order, and confirm it. The invoice line related to the product has a customs number on it. This number matches the customs number added in the landed cost record created earlier.

배송 가이드
운송 증서 란 운송되는 품목의 종류, 수량 및 목적지가 기재된 문서인 선하증권입니다.
On July 17th, 2024, version 3.1 of this CFDI was implemented for all transportation providers, intermediaries, and owners of goods. Odoo is able to generate a document type “T” (Traslado), which, unlike other documents, is created in a delivery order instead of an invoice or payment.
Odoo는 지상 운송 시 (또는 제외 시) XML 및 PDF 파일을 생성할 수 있으며 위험물 취급되는 물품을 처리할 수 있습니다.
참고
In order to use this feature, the Mexico - Electronic Delivery Guide
l10n_mx_edi_stock module must be installed.
Additionally, it is necessary to have the Inventory and Sales apps installed.
중요
Odoo는 운송 증서류의 문서 유형 “I” (Ingreso), 항공 또는 해상 운송을 지원하지 않습니다. 이 기능이 필요한 경우 수정 전에 먼저 회계 담당자에게 문의하세요.
환경설정
Odoo manages two different types of CFDI type “T”. Both can be created from either incoming shipments or delivery orders.
No Federal Highways is used when the Distance to Destination is less than 30 km.
Federal Transport is used when the Distance to Destination exceeds 30 km.
Other than the standard requirements of regular invoicing (the RFC of the customer, the UNSPSC code, etc.), if you are using No Federal Highways, no external configuration is needed.
For Federal Transport, several configurations have to be added to contacts, vehicle setups, and products. Those configurations are then included in the XML and PDF files.
연락처 및 차량
Like the external trade feature, the Address in both the company and the final customer must be complete. The ZIP code, City, and State must coincide with the Official SAT Catalog for Carta Porte.
팁
두 주소 모두 지역 은 선택 사항입니다.
중요
The origin address used for the delivery guide is set in . While this is set as the company address by default, you can change it to your correct warehouse address.
Another addition to this feature is the Vehicle Setups menu found in . This menu lets you add all the information related to the vehicle used for the delivery order.
필수 항목을 모두 입력해야 배송 가이드를 정확하게 생성할 수 있습니다.
팁
The fields, Vehicle Plate Number and Number Plate, must contain between 5 and 7 characters.
In the Intermediaries section, add the operator of the vehicle. The only mandatory fields for this contact are the VAT and Operator Licence.

품목
일반 청구서를 발행하는 경우와 마찬가지로 모든 품목에는 UNSPSC 카테고리 가 있어야 합니다. 이 외에도 배송 가이드와 관련된 품목에는 다음과 같은 두 가지 추가 설정을 해야 합니다.
재고 이동을 하려면 품목 유형 을 저장 가능한 품목 으로 설정해야 합니다.
In the Inventory tab, the field Weight must be more than
0.
경고
Creating a delivery guide of a product with the value 0 will trigger an error. As the
Weight has been already stored in the delivery order, it is needed to return the
products and create the delivery order (and delivery guide) again with the correct amounts.
판매 및 재고 흐름
To create a delivery guide, first, first create and confirm a sales order from . Click the Delivery smart button that is generated, and Validate the transfer.
After the status is set to Done, you can edit the transfer, and select the Transport Type in the Additional Info tab.
If using the No Federal Highways Transport Type, save the transfer, and then click Generate Delivery Guide. The resulting XML can be found in the chatter.
참고
Other than the UNSPSC on all products, delivery guides that use No Federal Highways do not require any special configuration to be sent to the government.
If using the Federal Transport Transport Type, the tab MX EDI
appears. There, enter a value in Distance to Destination (KM) greater than 0, and
select the Vehicle Setup used for this delivery.
마지막으로 차량의 총 중량 을 추가한 후 배송 가이드 생성 을 클릭합니다.
팁
Delivery Guides can also be created from Receipts, either from the Inventory app or by the standard flow of the Purchase app.
위험물
UNSPSC 카테고리 의 특정 값은 공식 SAT 카탈로그 에서 위험물 로 간주됩니다. 연방 운송 를 사용하여 배송 가이드를 만들 경우에는 이러한 카테고리에 대해 추가로 고려해야 합니다.
First, select the product from . Then, in the Accounting tab, fill the Hazardous Material Designation Code and Hazardous Packaging fields with the correct code from the SAT catalog.

중요
There exists the possibility that a UNSPSC Category may or may not be a dangerous
hazard (for example 01010101). If it is not dangerous, enter 0 in the Hazardous
Material Designation Code field.
In , complete the Environment Insurer and Environment Insurance Policy well. After this, continue with the regular process to create a delivery guide.
가져오기 및 내보내기
If your Carta Porte is for international operations (for exports), some additional fields need to be taken into account.
먼저, 관련된 모든 품목 에 다음과 같이 환경설정이 되어 있는지 확인합니다.
UNSPSC 카테고리 에는 01010101 카탈로그에 존재하지 않습니다 항목을 지정할 수 없습니다.
Tariff Fraction and UMT Aduana must be set, similar to the external trade flow.
자재 유형 반드시 설정합니다.
Then, when creating a Delivery Guide from a delivery or receipt, fill the following fields:
관세 제도
세관 문서 유형
세관 서류 식별
Then, when creating a Delivery Guide for a receipt where the Customs Document Type is Pedimento, two new fields appear: Pedimento Number and Importer.
팁
The field Pedimento Number should follow the pattern xx xx xxxx xxxxxxx. For
example, 15 48 3009 0001235.