Stat de plată
Odoo Payroll is used to process work entries and create payslips for employees, including both regular pay and commission. Payroll works in conjunction with other Odoo apps, such as Employees, Timesheets, Time Off, and Attendances.
The Payroll app helps ensure there are no issues or conflicts when validating work entries, handles country-specific localizations to ensure that payslips follow local rules and taxes, and allows for salary assignments. Payroll configuration is critical to ensure accurate and timely processing of payslips.
Setări
To access the Settings, go to . Whether or not payslips are posted in accounting, and whether SEPA payments are created, is selected here.
The Settings screen is where localization settings are configured. Localizations are country-specific settings pre-configured in Odoo at the creation of the database, and account for all taxes, fees, and allowances for that particular country. The Localization section of the Settings includes a detailed view of all benefits provided to employees.
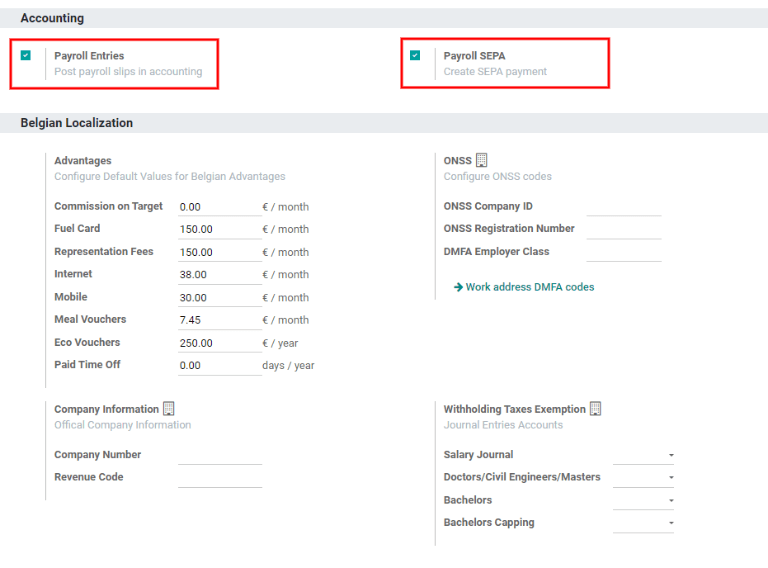
Any country-specific localizations are set up in the Localization section of the Settings screen. All localization items are pre-populated when the country is specified during the creation of the database. It is not recommended to alter the localization settings unless specifically required.
Notă
Odoo can handle a multi-company configuration. This is generally done when there is a main company or office location, such as a headquarters, and there are other offices/branches around the country or globe, that fall under that main company or headquarters. In Odoo, each company, including the headquarters, would be setup as their own company/branch using the multi-company method.
Each individual company can have a different localization setting configured for that specific company, since company locations can vary and be located anywhere in the world, where rules and laws differ. For more information on companies refer to this documentation on setting up companies.
Intrări de lucru
O înscriere de lucru este o înregistrare individuală pe foaia de pontaj a unui angajat. Înregistrările de lucru pot fi configurate pentru a ține cont de toate tipurile de muncă și de concediu, cum ar fi Prezență, Concediul medical, Instruire sau Sărbătoare publică.
Vedeți și
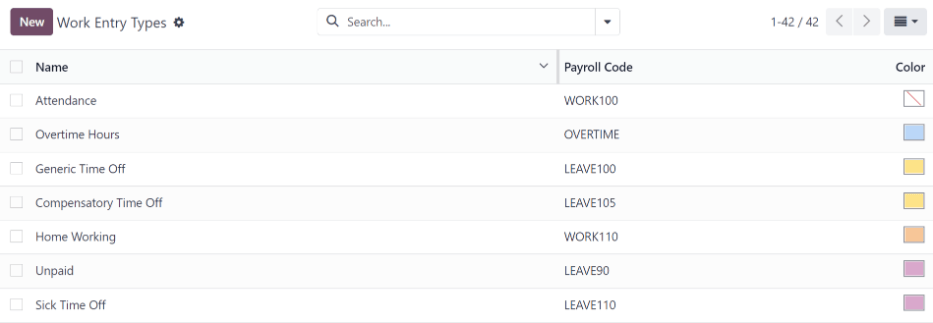
Tipuri de intrare în muncă
Când se creează o intrare de muncă în aplicația Salarizare sau când un angajat introduce informații în aplicația Foile de pontaj, trebuie selectat un Tip de intrare la muncă. Lista de Tipuri de intrare de lucru este creată automat pe baza setărilor de localizare stabilite în baza de date.
To view the current work entry types available, go to .
Fiecare tip de intrare în muncă are un cod pentru a ajuta la crearea fișelor de plată și pentru a se asigura că toate taxele și taxele sunt introduse corect.
Nou tip de intrare în muncă
Pentru a crea un nou Tip de intrare de lucru, faceți clic pe butonul Nou și introduceți informațiile pentru următoarele secțiuni din formular.
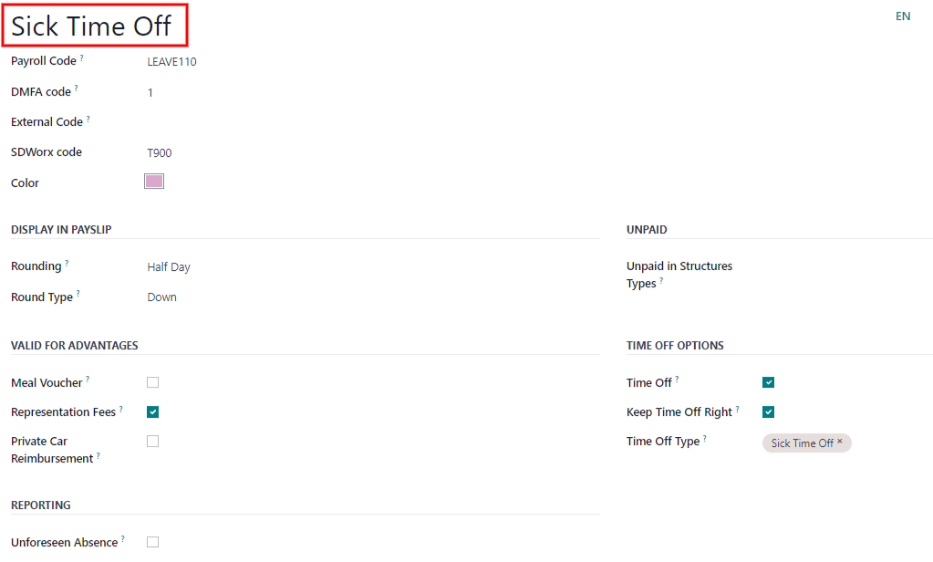
Secțiunea de informații generale
Work Entry Type Name: The name should be short and descriptive, such as
Sick TimeorPublic Holiday.Payroll Code: This code appears with the work entry type on timesheets and payslips. Since the code is used in conjunction with the Accounting application, it is advised to check with the accounting department for a code to use.
DMFA code: This code is used to identify DMFA entries on a corresponding DMFA report. The DMFA report is a quarterly report that Belgian-based companies are required to submit for social security reporting purposes. This report states the work done by the employees during the quarter, as well as the salaries paid to those employees.
External Code: This code is used for exporting data to a third-party payroll service. Check with the third-party being used in order to determine the External Code to enter for the new work entry type.
SDWorx code: This code is only for companies that use SDWorx, a payroll service provider.
Color: Select a color for the particular work entry type.
Afișare în secțiunea fișa de salariu
Rounding: The rounding method selected determines how quantities on timesheet entries are displayed on the payslip.
No Rounding: A timesheet entry is not modified.
Half Day: A timesheet entry is rounded to the closest half day amount.
Day: A timesheet entry is rounded to the closest full day amount.
Example
Dacă timpul de lucru este setat la o zi de lucru de 8 ore (săptămâna de lucru de 40 de ore), iar un angajat introduce un timp de 5,5 ore pe o foaie de pontaj, iar Rotunjire este setat la Fără rotunjire `, intrarea rămâne 5,5 ore. Dacă :guilabel:`Rotunjire este setată la Jumătate de zi, intrarea este schimbată la 4 ore. Dacă este setat la Day, se schimbă la 8 ore.
Secțiune neplătită
Unpaid in Structures Types: If the work entry is for work that is not paid, specify which pay structure the unpaid work entry applies to from the drop-down menu. Some situations where work would be logged on a timesheet but no compensation given would be for unpaid internships, unpaid training, or volunteer work.
Valabil pentru secțiunea de avantaje
Meal Voucher: If the work entry should count towards a meal voucher, check the box.
Representation Fees: If the work entry should count towards representation fees, check the box.
Private Car Reimbursement: If the work entry should count towards a private car reimbursement, check the box.
Secțiunea de opțiuni de concediu
Time Off: Check this box if the work entry type can be selected for a time off request or entry in the Time Off application. If Time Off is checked, a Time Off Type field appears. This field has a drop-down menu to select the specific type of time off, such as
Paid Time Off,Sick Time Off, orExtra Hoursfor example. A new type of time off can be entered in the field if the listed types of time off in the drop-down menu do not display the type of time off needed.Keep Time Off Right: This is for Belgian-specific companies only, and will not appear for other localizations. Check this box if the work entry is for time off that will affect the time off benefits for the following year. Workers are given time off each year according to the government, and in some cases, time-off taken during a specific time period can affect how much time off the employee will receive or accrue the following year.
Secțiunea de raportare
Unforeseen Absence: If the work entry should be visible on the unforeseen absences report, check this box.
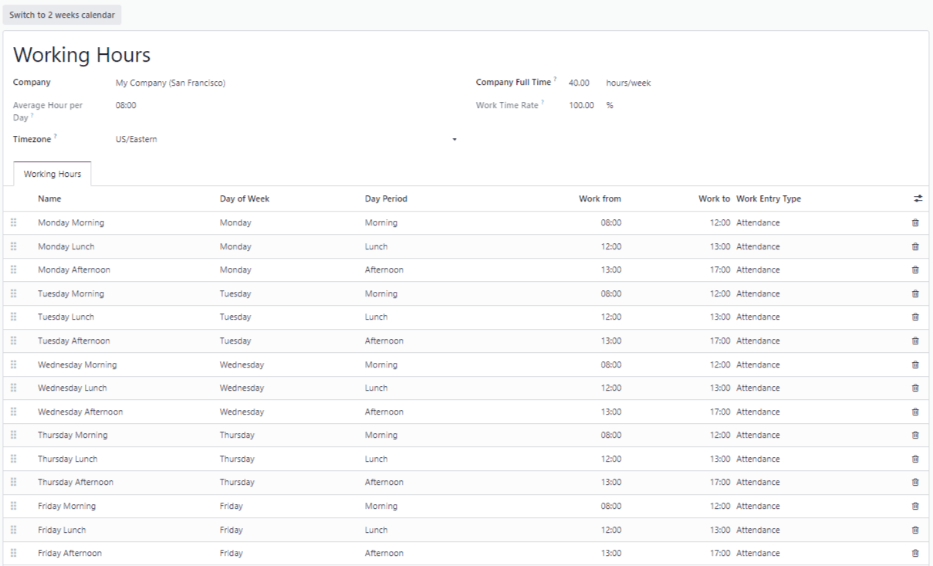
Programe de lucru
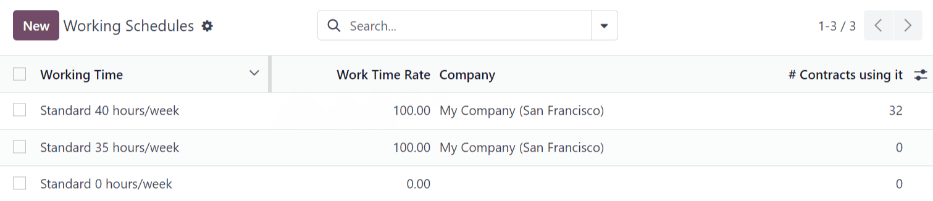
To view the currently configured working schedules, go to . The working schedules that are available for an employee’s contracts and work entries are found in this list.
Working schedules are company-specific. Each company must identify each type of working schedule they use.
Example
O bază de date Odoo care conține mai multe companii care utilizează o săptămână de lucru standard de 40 de ore trebuie să aibă o intrare separată a programului de lucru pentru fiecare companie care utilizează săptămâna de lucru standard de 40 de ore.
O bază de date cu cinci companii care folosesc toate o săptămână de lucru standard de 40 de ore trebuie să aibă cinci programe de lucru separate de 40 de ore configurate.
Program de lucru nou
Pentru a crea un nou program de lucru, faceți clic pe butonul Nou și introduceți informațiile din formular.
Câmpurile sunt completate automat pentru o săptămână obișnuită de lucru de 40 de ore, dar pot fi modificate. Mai întâi, schimbați numele timpului de lucru modificând textul din câmpul Nume. Apoi, faceți orice ajustări la zilele și orele care se aplică noului timp de lucru.
În fila Ore de lucru, modificați selecțiile Ziua săptămânii, Perioada zilei și Tipul de intrare de lucru făcând clic pe meniurile drop-down din fiecare coloană și făcând selecția dorită. Coloanele Work From și Work To sunt modificate prin introducerea orei.
Notă
Orele Work From și Work To trebuie să fie într-un format de 24 de ore. De exemplu, 2:00 PM va fi introdus ca 14:00.
If the working time should be in a two-week configuration, click the Switch to 2 weeks calendar button in the top left. This creates entries for an Even week and an Odd week.
Salariu
Tipuri de structuri
În Odoo, fișa de plată a unui angajat se bazează pe structuri și tipuri de structură, care afectează ambele modul în care un angajat introduce foile de pontaj. Fiecare tip de structură este un set individual de reguli pentru procesarea unei intrări în foaie de pontaj, care constă din diferite structuri imbricate în el. Tipurile de structură definesc cât de des este plătit un angajat, orele de lucru și dacă salariile se bazează pe un salariu (fix) sau câte ore a lucrat angajatul (variate).
De exemplu, un tip de structură ar putea fi „Angajat” și acel tip de structură ar putea avea două structuri diferite în el: o structură „Salarie obișnuită” care include toate regulile separate pentru procesarea plății obișnuite, precum și o structură pentru un „Sfârșit”. of Year Bonus` care include regulile doar pentru bonusul de sfârșit de an. Atât structura „Salarie obișnuită” cât și structura „Bonus de sfârșit de an” sunt structuri din tipul de structură „Angajat”.
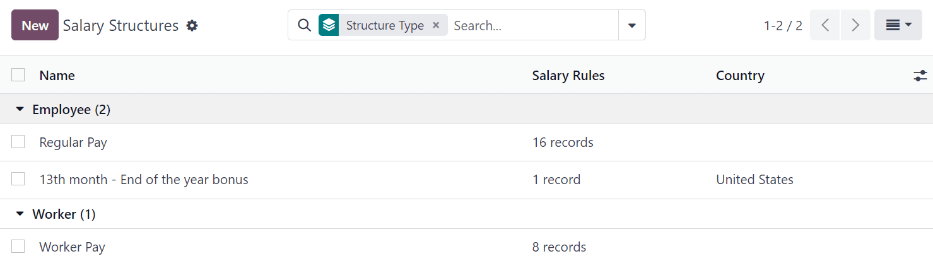
The different structure types can be seen by going to .
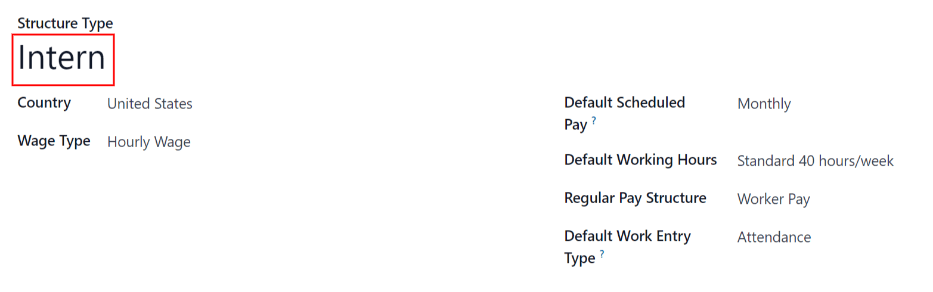
There are two default structure types configured in Odoo: Employee and Worker. Typically, Employee is used for salaried employees, which is why the wage type is Monthly Fixed Wage, and Worker is typically used for employees paid by the hour, so the wage type is Hourly Wage.

Nou tip de structură
To make a new structure type, click the New button and a structure type form appears. Enter the information in the fields. Most fields are pre-populated, but all the fields can be modified.
Structure Type: Enter the name for the new structure type, such as «Employee» or «Worker».
Country: Select the country that the new structure type applies to from the drop-down menu.
Wage Type: Select what type of wage the new structure type will use, either Monthly Fixed Wage or Hourly Wage. If the wage type is going to be used for salaried employees who receive the same wage every pay period, select Monthly Fixed Wage. If the wage type is going to be used for employees who receive wages based on how many hours they worked during a pay period, select Hourly Wage.
Default Scheduled Pay: Select the typical pay schedule for the new structure type from the drop-down menu. Options are Monthly, Quarterly, Semi-annually, Annually, Weekly, Bi-weekly, Bi-monthly. This indicates how often this type of structure type is paid out.
Default Working Hours: Select the default working hours for the new structure type from the drop-down menu. All available working hours for the currently selected company appear in the drop-down menu. The default working hours that are pre-configured in Odoo is the Standard 40 hours/week option. If the needed working hours do not appear in the list, a new set of default working hours can be created.
Regular Pay Structure: Type in the name for the regular pay structure.
Default Work Entry Type: Select the default type of work entry the new structure type will fall under from the drop-down menu. Options include Attendance, Overtime Hours, Generic Time Off, Compensatory Time Off, Home Working, Unpaid, Sick Time Off, Paid Time Off, and Out Of Contract.
Noul program de lucru implicit
To make new default working hours, type the name for the new working hours in the Default Working Hours field on the new structure type form. Click Create and edit. A default working hours form will pop up. The default working hours form has two sections, a general information section and a tab listing out all the individual working hours by day and time. When the form is filled out, click Save & Close.
Name: Type in the name for the new default working hours. This should be descriptive and clear to understand, such as
Standard 20 Hours/Week.Company: Select the company that can use these new default working hours from the drop-down menu. Keep in mind, working hours are company-specific and cannot be shard between companies. Each company needs to have their own working hours set.
Average Hour Per Day: The average hours per day field will be auto-populated based on the working hours configured in the Working Hours tab. This entry affects resource planning, since the average daily hours affect what resources can be used, and in what quantity, per work day.
Timezone: Select the timezone that the new default working hours will be used for from the drop-down menu.
Company Full Time: Enter the number of hours per week an employee would need to work in order to be considered a full-time employee. Typically, this is approximately 40 hours, and this number affects what types of benefits an employee can receive based on their employment status (full-time vs part-time).
Work Time rate: This percentage is auto-generated based on the entry for the Company Full Time and the working hours configured in the Working Hours tab. This number should be between
0.00%and100%, so if the percentage is above100%, it is an indication that the working times and/or Company Full Time hours need adjustment.Working Hours Tab: This tab is where each day’s specific working hours are listed. When a new default working hour form is created, the working hours tab is pre-populated with a default 40-hour week, with each day divided into three timed sections. Every day has morning (8:00-12:00), lunch (12:00-13:00), and evening (13:00-17:00) hours configured using a 24 hour time format. To adjust any of these hours, click on the specific field to adjust, and make the adjustment using the drop-down menus, or in the specific case of the times, type in the desired time.
Notă
If the working hours are not consistent each week, and the hours are on a bi-weekly schedule instead, click the Switch to 2 week calendar button at the top of the new default working hours form. This will change the working hours tab to display two weeks of working times that can be adjusted.
Structuri
Structurile salariale sunt diferitele moduri în care un angajat este plătit într-o anumită structură și sunt definite în mod specific de diverse reguli.
Cantitatea de structuri de care are nevoie o companie pentru fiecare tip de structură depinde de câte moduri diferite sunt plătiți angajații și de modul în care este calculat salariul lor. De exemplu, o structură comună care ar putea fi utilă de adăugat poate fi un „Bonus”.
To view all the various structures for each structure type, go to .
Fiecare structure type listează diferitele structuri asociate cu acesta. Fiecare structură conține un set de reguli care o definesc.
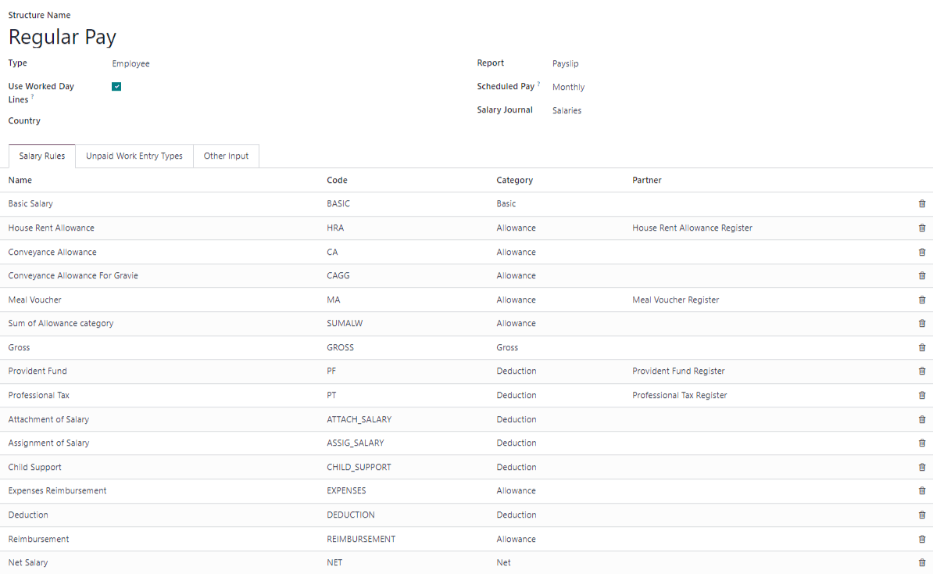
Faceți clic pe o structură pentru a vedea Regulile salariale. Aceste reguli sunt cele care calculează fișa de salariu pentru angajat.
Reguli
Fiecare structură are un set de reguli salariale de urmat în scopuri contabile. Aceste reguli sunt configurate de localizare și afectează acțiunile din aplicația Contabilitate, așa că modificările la regulile implicite sau crearea de noi reguli ar trebui făcute numai atunci când este necesar.
Pentru a vedea toate regulile, accesați . Faceți clic pe o structură (cum ar fi Plată regulată) pentru a vedea toate regulile.
To make a new rule, click New. A new rule form appears. Enter the information in the fields.
The required fields for a rule are:
Name: Enter a name for the rule.
Category: Select a category the rule applies to from the drop-down menu, or enter a new one.
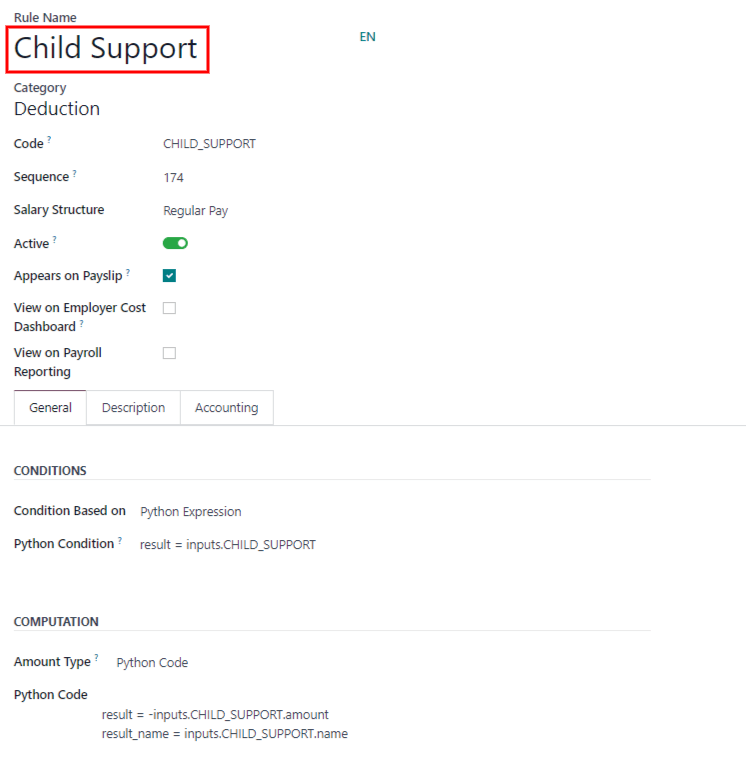
Code: Enter a code to be used for this new rule. It is recommended to coordinate with the accounting department for a code to use as this will affect accounting reports and payroll processing.
Salary Structure: Select a salary structure the rule applies to from the drop-down menu, or enter a new one.
Condition Based on: In the General tab, select from the drop-down menu whether the rule is Always True (always applies), a Range (applies to a specific range, which is entered beneath the selection), or a Python Expression (the code is entered beneath the selection).
Amount Type: In the General tab, select from the drop-down menu whether the amount is a Fixed Amount, a Percentage (%), or a Python Code. Depending on what is selected, the fixed amount, percentage, or Python code needs to be entered next.
Parametrii regulii
Notă
În prezent, funcția Parametrii regulilor aflată în meniul este încă în dezvoltare și servește doar un caz de utilizare specific pentru piețele belgiene. Documentația va fi actualizată atunci când această secțiune va ajunge la mai multe piețe.
Alte tipuri de intrare
When creating payslips, it is sometimes necessary to add other entries for specific circumstances, like expenses, reimbursements, or deductions. These other inputs can be configured by going to .
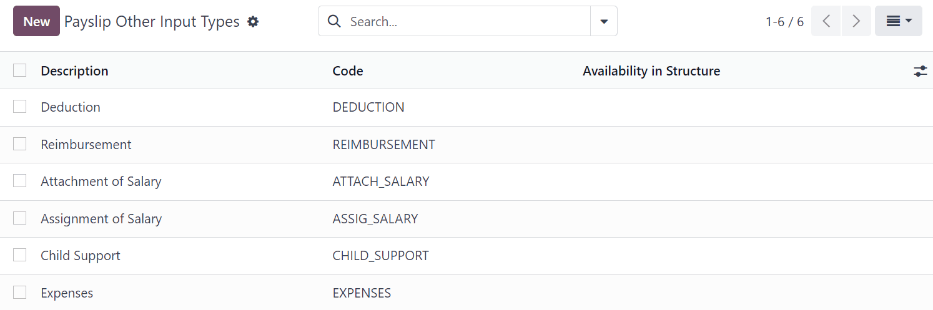
Pentru a crea un nou tip de intrare, faceți clic pe butonul Nou. Introduceți Descriere, Codul și ce structură se aplică în câmpul Disponibilitate în Structură.
Important
Codul este folosit în regulile de salarizare pentru a calcula fișele de salariu. Dacă câmpul Disponibilitate în structură este lăsat necompletat, indică faptul că noul tip de intrare este disponibil pentru toate fișele de plată și nu este exclusiv pentru o anumită structură.

Configurator pachet salarial
The various options under the Salary Package Configurator section of the menu all affect an employee’s potential salary. These sections (Advantages, Personal Info, Resume, and Offers) specify what benefits can be offered to an employee in their salary package.
Depending on what information an employee enters (such as deductions, dependents, etc.), their salary is adjusted accordingly. When an applicant applies for a job on the company website, the sections under Salary Package Configurator directly affect what the applicant sees, and what is populated as the applicant enters information.
Avantaje
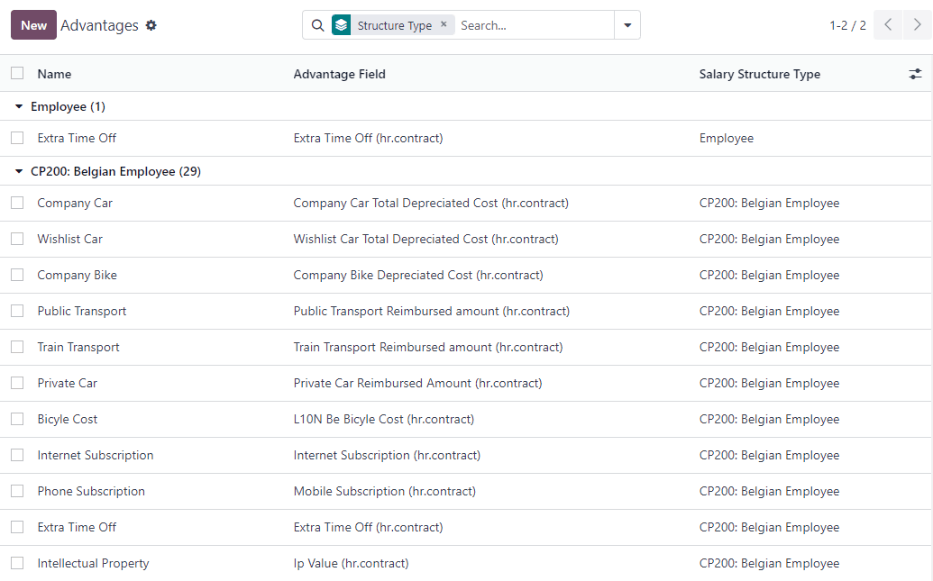
When offering potential employees a position, there can be certain advantages or benefits set in Odoo in addition to the salary to make an offer more appealing (such as extra time off, the use of a company car, reimbursement for a phone or internet, etc.).
To see the advantages, go to . Advantages are grouped by Structure type, and the advantage listed for a particular structure type is only available for that specific structure.
Example
A company has two structure types, one labeled Employee, and anther labeled Intern. The Employee structure type contains an advantage of using a company car, while the Intern structure type does not. Instead, the Intern structure type has a meal voucher advantage available, while the Employee structure type does not.
A person hired under the Employee structure type can use a company car, but cannot have meal vouchers. The opposite is true for someone hired under the Intern structure type. They would have meal vouchers available to them, not the use of a company car.
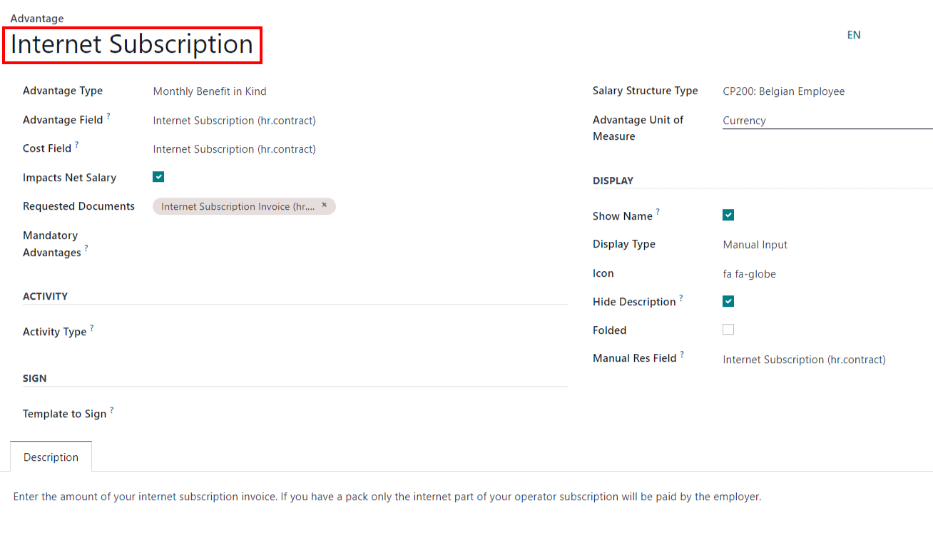
To make a new advantage, click the New button, and enter the information in the fields. The required fields for an advantage are:
Name: Enter the name for the advantage.
Advantage Field: Select from the drop-down menu what field in the payslip this advantage appears under.
Advantage Type: Select from the drop-down menu what type of advantage the benefit is. Select from Monthly Benefit in Kind, Monthly Advantages in Net, Monthly Advantages in Cash, or Yearly Advantages in Cash.
Salary Structure Type: Select from the drop-down menu which salary structure type this advantage applies to.
Display Type: Select from the drop-down menu how this advantage is displayed.
Informație personală
Fiecare angajat din Odoo are un carte de angajat care este creat atunci când un candidat devine angajat. Acest card include toate informațiile personale, CV-ul, informațiile despre serviciu și documentele.
Informațiile personale sunt culese din secțiunea configurator pachet salarial pe care o completează un candidat după ce i s-a oferit un post. Aceste informații personale sunt apoi transferate pe cardul de angajat atunci când sunt angajați.
Pentru a vedea cardul unui angajat, accesați tabloul de bord principal al aplicației și faceți clic pe cardul angajatului.
Notă
Un card de angajat poate fi considerat ca un dosar de personal al angajatului.
The Personal Information section lists all of the fields that are available to enter on the employee’s card. To access this section, go to .
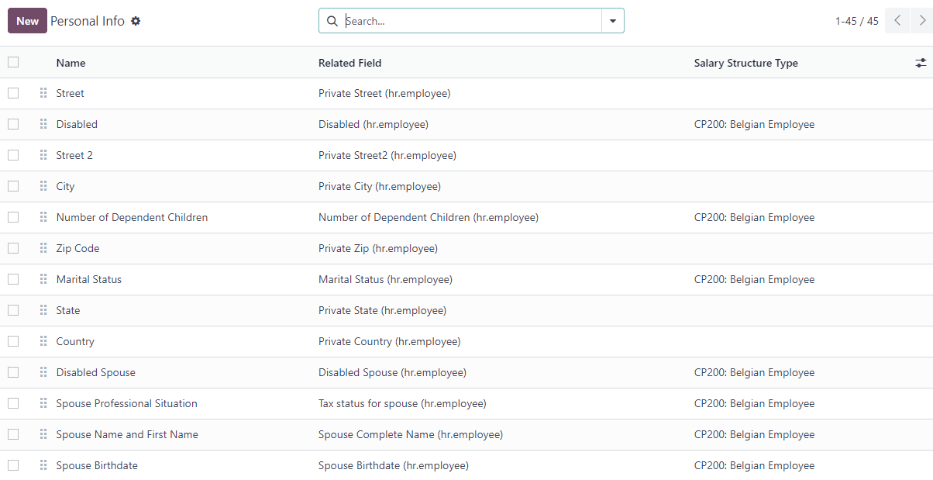
To edit a personal info entry, select the entry from the list, and modify the personal info. To create a new personal info entry, click the New button.
The required fields, aside from entering the Information name, are Related Model, Related Field, and Category. Select a Related Model from the drop-down menu. Employee populates the field by default, but the Bank Account option is also available if the information is related to a bank account instead. Select a Related Field from the drop-down menu that best describes what kind of personal information this entry is, and where it is going to be stored in the backed. Then, select a Category from the drop-down menu that the personal information should be under, such as Address or Personal Documents.
The two most important fields on the personal info form are Is Required and Display Type. Checking the Is Required box makes the field mandatory on the employee’s card. The Display Type drop-down menu allows for the information to be entered in a variety of ways, from a Text box, to a customizable Radio button, a Checkbox, a Document, and more.

Reluare
Notă
Currently, the Resume feature found inside the menu is still in development and only serves a specific use case for Belgian markets. The documentation will be updated when this section has matured to more markets.
Oferte
When a candidate is offered a position, there are several items that need to be tracked in order for a business to stay organized, such as where in the offer process the candidate is, how long the offer is valid for, as well as all the offer details. These details are all stored in each offers record.
To view all offers, go to . All offers that have been sent to either potential candidates or current employees appears in this list. The status, offer start date and expiration date, amount of the contract, and more, can all be found in this list. Offers sent via the Recruitment application appear here, but there is an option to create a new offer from the Payroll application as well.
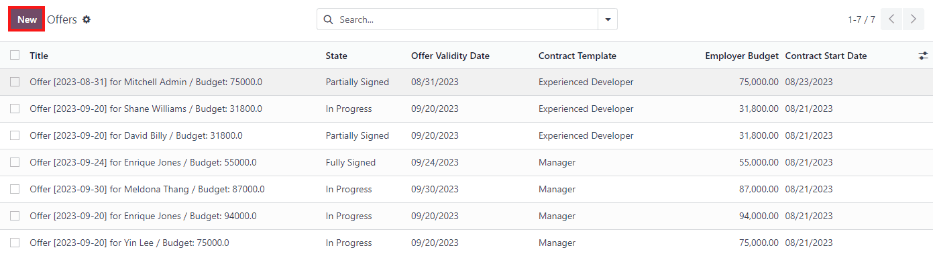
To create a new offer, click the New button. The two required fields are the Contract Template, and the Company. Select the Contract Template and Company from the drop-down menus. Fill in any other details for the offer, such as the Job Title, Department, the Contract Start Date and the Offer Validity Date.