Loonadministratie
Odoo Loonadministratie wordt gebruikt voor het verwerken van werkboekingen en het maken van loonstroken voor werknemers, inclusief regulier loon en commissies.
De Loonadministratie-applicatie zorg ervoor dat er geen problemen of conflicten zijn bij het valideren van prestaties, verwerkt landspecifieke lokalisaties zodat de loonstroken de lokale regels en belastingen volgen en maakt loonbeslagen mogelijk. De configuratie van de loonadministratie is van cruciaal belang om de loonstroken nauwgezet en tijdig te verwerken.
Instellingen
Voor de Instellingen, ga naar . Je kan hier instellen of loonstroken geboekt worden in de boekhouding en of SEPA betalingen gemaakt worden.
Op het scherm Instellingen worden de lokalisatie-instellingen geconfigureerd. Lokalisaties zijn landspecifieke instellingen die reeds vooraf zijn geconfigureerd in Odoo bij het maken van de database en die rekening houden met de belastingen, vergoedingen en toeslagen voor dat specifieke land. De sectie Lokalisatie van de Instellingen bevat een gedetailleerde weergave van alle aan de werknemers aangeboden voordelen.
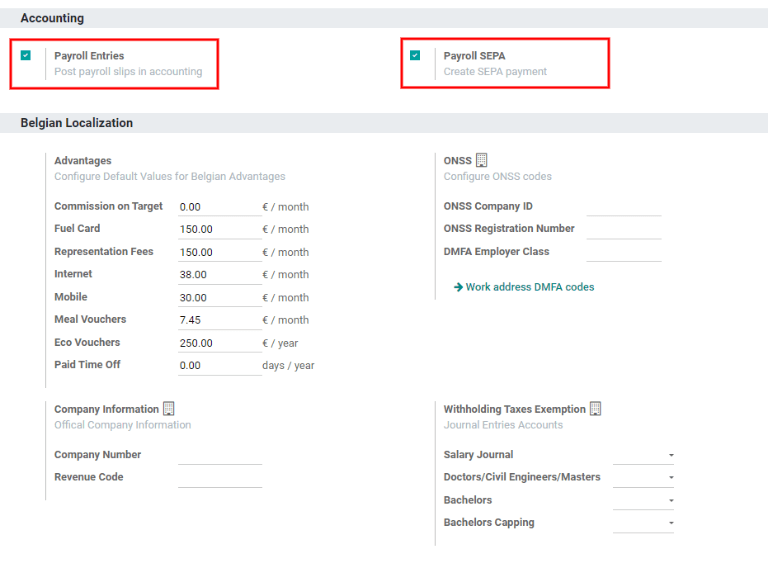
Alle landspecifieke lokalisaties worden geconfigureerd in de sectie Lokalisatie van de Instellingen. Alle lokalisatie-items worden vooraf ingevuld wanneer het land wordt gekozen tijdens het aanmaken van de database. Het is niet aangeraden om de instellingen van de lokalisatie te wijzigen, tenzij dit specifiek vereist is.
Notitie
Odoo can handle a multi-company configuration. This is generally done when there is a main company or office location, such as a headquarters, and there are other offices/branches around the country or globe, that fall under that main company or headquarters. In Odoo, each company, including the headquarters, would be setup as their own company/branch using the multi-company method.
Each individual company can have a different localization setting configured for that specific company, since company locations can vary and be located anywhere in the world, where rules and laws differ. For more information on companies refer to this documentation on setting up companies.
Werkboekingen
Een werkboeking is een individueel record op de urenstaat van een werknemer. Werkboekingen kunnen geconfigureerd worden om alle soorten werk en vrije tijd te registreren, zoals Aanwezigheden, Ziekteverlof, Training, of Feestdagen.
Zie ook
Werkboekingstypes
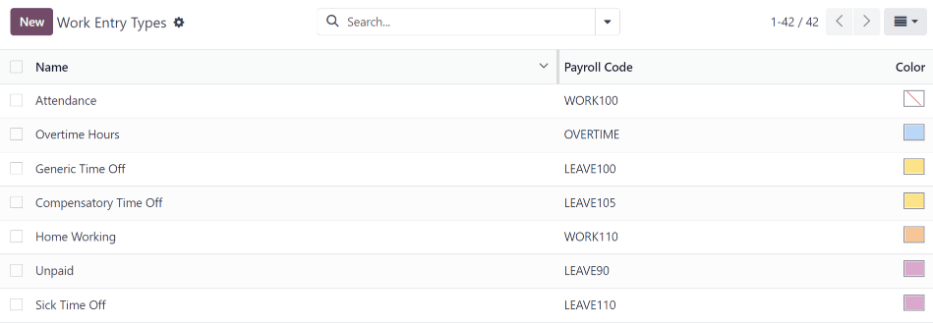
Bij het aanmaken van een werkboeking in de Loonadministratie-applicatie of wanneer een werknemer informatie invoert in de Urenstaten-applicatie moet een Werkboekingstype worden geselecteerd. De lijst met Werkboekingstypes wordt automatisch aangemaakt op basis van de lokalisatie instellingen in de database.
To view the current work entry types available, go to .
Each work entry type has a code to aid in the creation of payslips, and to ensure all taxes and fees are correctly entered.
Nieuwe werkboekingstype
To create a new Work Entry Type, click the New button, and enter the information for the following sections on the form.
General information section
Naam werkboekingstype: De naam moet kort en beschrijvend zijn, zoals
ZiekteverlofofFeestdag.Payroll Code: This code appears with the work entry type on timesheets and payslips. Since the code is used in conjunction with the Accounting application, it is advised to check with the accounting department for a code to use.
DMFA code: This code is used to identify DMFA entries on a corresponding DMFA report. The DMFA report is a quarterly report that Belgian-based companies are required to submit for social security reporting purposes. This report states the work done by the employees during the quarter, as well as the salaries paid to those employees.
External Code: This code is used for exporting data to a third-party payroll service. Check with the third-party being used in order to determine the External Code to enter for the new work entry type.
SDWorx code: This code is only for companies that use SDWorx, a payroll service provider.
Color: Select a color for the particular work entry type.
Display in payslip section
Rounding: The rounding method selected determines how quantities on timesheet entries are displayed on the payslip.
Geen afronding: De urenstaatpost wordt niet aangepast.
Halve dag: Een urenstaatpost wordt afgerond naar de dichtstbijzijnde halve dag.
Dag: Een urenstaatpost wordt afgerond naar de dichtstbijzijnde volledige dag.
Example
Als de werktijd is ingesteld op een werkdag van 8 uren (40-urige werkweek) en een werknemer voert 5,5 uur in op een urenstaat en de Afronding is ingesteld op Geen afronding, blijft de post 5,5 uur. Als de Afronding ingesteld is op Halve dag, wordt de post aangepast naar 4 uur. Als de afronding is ingesteld op Dag, wordt de post aangepast naar 8 uur.
Unpaid section
Unpaid in Structures Types: If the work entry is for work that is not paid, specify which pay structure the unpaid work entry applies to from the drop-down menu. Some situations where work would be logged on a timesheet but no compensation given would be for unpaid internships, unpaid training, or volunteer work.
Valid for advantages section
Meal Voucher: If the work entry should count towards a meal voucher, check the box.
Representation Fees: If the work entry should count towards representation fees, check the box.
Private Car Reimbursement: If the work entry should count towards a private car reimbursement, check the box.
Time off options section
Time Off: Check this box if the work entry type can be selected for a time off request or entry in the Time Off application. If Time Off is checked, a Time Off Type field appears. This field has a drop-down menu to select the specific type of time off, such as
Paid Time Off,Sick Time Off, orExtra Hoursfor example. A new type of time off can be entered in the field if the listed types of time off in the drop-down menu do not display the type of time off needed.Keep Time Off Right: This is for Belgian-specific companies only, and will not appear for other localizations. Check this box if the work entry is for time off that will affect the time off benefits for the following year. Workers are given time off each year according to the government, and in some cases, time-off taken during a specific time period can affect how much time off the employee will receive or accrue the following year.
Reporting section
Unforeseen Absence: If the work entry should be visible on the unforeseen absences report, check this box.

Working schedules
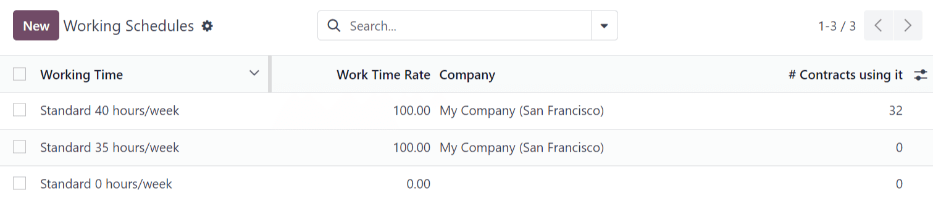
To view the currently configured working schedules, go to . The working schedules that are available for an employee’s contracts and work entries are found in this list.
Working schedules are company-specific. Each company must identify each type of working schedule they use.
Example
An Odoo database containing multiple companies that use a standard 40-hour work week needs to have a separate working schedule entry for each company that uses the 40-hour standard work week.
A database with five companies that all use a standard 40-hour work week needs to have five separate 40-hour working schedules configured.
New working schedule
To create a new working schedule, click the New button, and enter the information on the form.
De velden worden automatisch ingevuld voor een normale 40-urige werkweek, maar kunnen worden gewijzigd. Wijzig eerst de naam van de werktijd door de tekst in het veld Naam aan te passen. Pas vervolgens de dagen en tijden aan die van toepassing zijn op de nieuwe werktijd.
In het tabblad Werkuren, wijzig de Dag van de week, de Periode van de dag, en het Werkboekingstype door te klikken in het vervolgkeuzemenu in elke kolom en de gewenste selectie te maken. De kolommen Begintijd en Eindtijd worden gewijzigd door de tijd in te voeren.
Notitie
De Begintijd en de Eindtijd moeten in een 24-uurs indeling zijn. Bijvoorbeeld, 2:00 PM wordt ingegeven als 14:00.
If the working time should be in a two-week configuration, click the Switch to 2 weeks calendar button in the top left. This creates entries for an Even week and an Odd week.
Loon
Structuurtypes
In Odoo is de loonstrook van een werknemer gebaseerd op structuren en structuurtypes, die beide invloed hebben op de manier waarop een werknemer urenstaten invoert. Elk structuurtype heeft een individueel set regels voor het verwerken van een urenstaatpost, die bestaat uit verschillende ingeneste structuren. Structuurtypes bepalen hoe vaak een werknemer wordt betaald, de werkuren en of de salarissen gebaseerd zijn op een loon (vast) of op het aantal gewerkte uren van de werknemer (variabel).
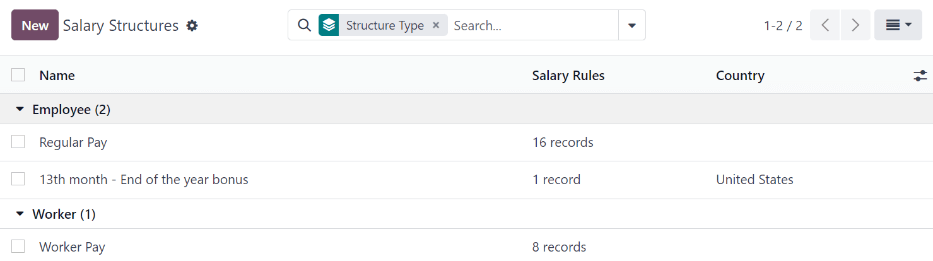
Een structuurtype kan bijvoorbeeld Werknemer zijn en dat structuurtype kan twee verschillende structuren hebben: een structuur voor Regulier loon met alle afzonderlijke regels voor het verwerken van het regulier loon, en een structuur voor een Eindejaarsuitkering enkel met de regels voor de eindejaarsuitkering. Zowel het Regulier loon als de Eindejaarsuitkering zijn structuren binnen het structuurtype Werknemer.
The different structure types can be seen by going to .
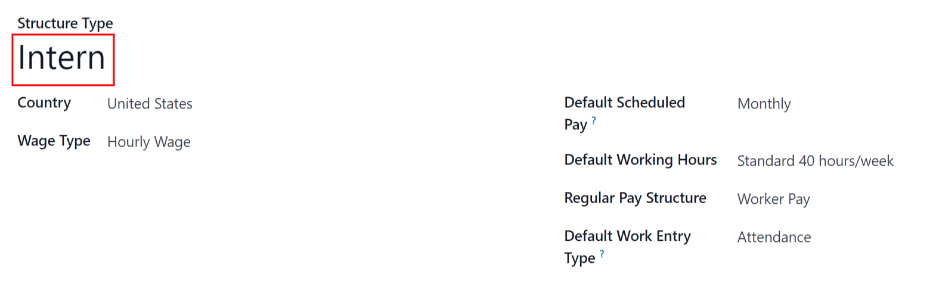
Er zijn twee standaard structuurtypes geconfigureerd in Odoo: Werknemer en Arbeider. Werknemer wordt meestal gebruikt voor werknemers in loondienst, daarom is het loontype een Maandelijks vast loon en Arbeider wordt meestal gebruikt voor werknemers die per uur betaald worden, dus het loontype is Uurloon.

New structure type
To make a new structure type, click the New button and a structure type form appears. Enter the information in the fields. Most fields are pre-populated, but all the fields can be modified.
Structure Type: Enter the name for the new structure type, such as ‘Employee’ or ‘Worker’.
Country: Select the country that the new structure type applies to from the drop-down menu.
Wage Type: Select what type of wage the new structure type will use, either Monthly Fixed Wage or Hourly Wage. If the wage type is going to be used for salaried employees who receive the same wage every pay period, select Monthly Fixed Wage. If the wage type is going to be used for employees who receive wages based on how many hours they worked during a pay period, select Hourly Wage.
Default Scheduled Pay: Select the typical pay schedule for the new structure type from the drop-down menu. Options are Monthly, Quarterly, Semi-annually, Annually, Weekly, Bi-weekly, Bi-monthly. This indicates how often this type of structure type is paid out.
Default Working Hours: Select the default working hours for the new structure type from the drop-down menu. All available working hours for the currently selected company appear in the drop-down menu. The default working hours that are pre-configured in Odoo is the Standard 40 hours/week option. If the needed working hours do not appear in the list, a new set of default working hours can be created.
Regular Pay Structure: Type in the name for the regular pay structure.
Default Work Entry Type: Select the default type of work entry the new structure type will fall under from the drop-down menu. Options include Attendance, Overtime Hours, Generic Time Off, Compensatory Time Off, Home Working, Unpaid, Sick Time Off, Paid Time Off, and Out Of Contract.
New default working hours
To make new default working hours, type the name for the new working hours in the Default Working Hours field on the new structure type form. Click Create and edit. A default working hours form will pop up. The default working hours form has two sections, a general information section and a tab listing out all the individual working hours by day and time. When the form is filled out, click Save & Close.
Name: Type in the name for the new default working hours. This should be descriptive and clear to understand, such as
Standard 20 Hours/Week.Company: Select the company that can use these new default working hours from the drop-down menu. Keep in mind, working hours are company-specific and cannot be shard between companies. Each company needs to have their own working hours set.
Average Hour Per Day: The average hours per day field will be auto-populated based on the working hours configured in the Working Hours tab. This entry affects resource planning, since the average daily hours affect what resources can be used, and in what quantity, per work day.
Timezone: Select the timezone that the new default working hours will be used for from the drop-down menu.
Company Full Time: Enter the number of hours per week an employee would need to work in order to be considered a full-time employee. Typically, this is approximately 40 hours, and this number affects what types of benefits an employee can receive based on their employment status (full-time vs part-time).
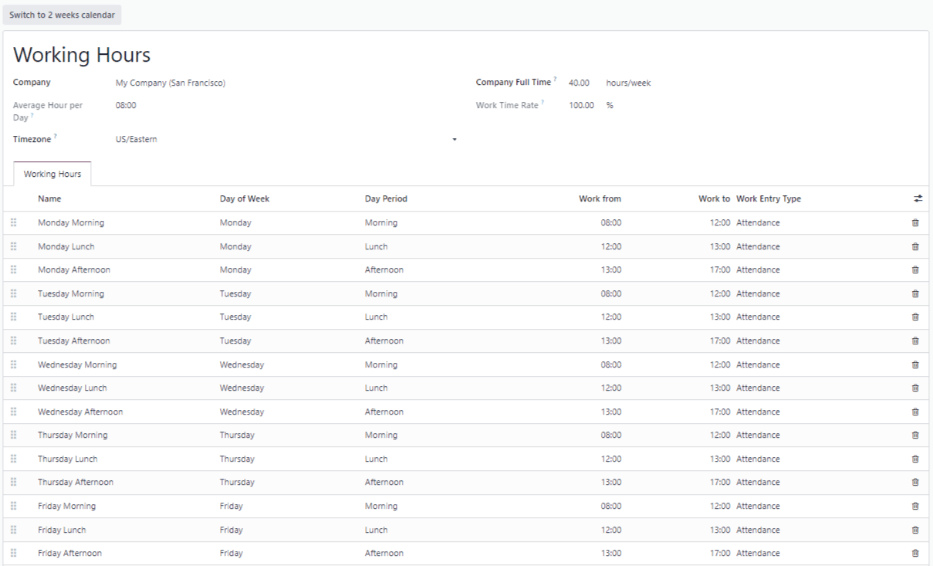
Work Time rate: This percentage is auto-generated based on the entry for the Company Full Time and the working hours configured in the Working Hours tab. This number should be between
0.00%and100%, so if the percentage is above100%, it is an indication that the working times and/or Company Full Time hours need adjustment.Working Hours Tab: This tab is where each day’s specific working hours are listed. When a new default working hour form is created, the working hours tab is pre-populated with a default 40-hour week, with each day divided into three timed sections. Every day has morning (8:00-12:00), lunch (12:00-13:00), and evening (13:00-17:00) hours configured using a 24 hour time format. To adjust any of these hours, click on the specific field to adjust, and make the adjustment using the drop-down menus, or in the specific case of the times, type in the desired time.
Notitie
If the working hours are not consistent each week, and the hours are on a bi-weekly schedule instead, click the Switch to 2 week calendar button at the top of the new default working hours form. This will change the working hours tab to display two weeks of working times that can be adjusted.
Structuren
Loonstructuren zijn de verschillende manieren waarop een werknemer betaald wordt binnen een specifieke structuur en worden specifiek bepaald door verschillende regels.
Het aantal structuren dat een bedrijf nodig heeft voor elk structuurtype hangt af van het aantal verschillende manieren waarop werknemers betaald worden en hoe hun loon wordt berekend. Bijvoorbeeld, een veelvoorkomende structuur die nuttig kan zijn is een Bonus.
To view all the various structures for each structure type, go to .
Elke structuurtype toont de verschillende structuren die erbij horen. Elke structuur bevat een set regels die deze bepalen.
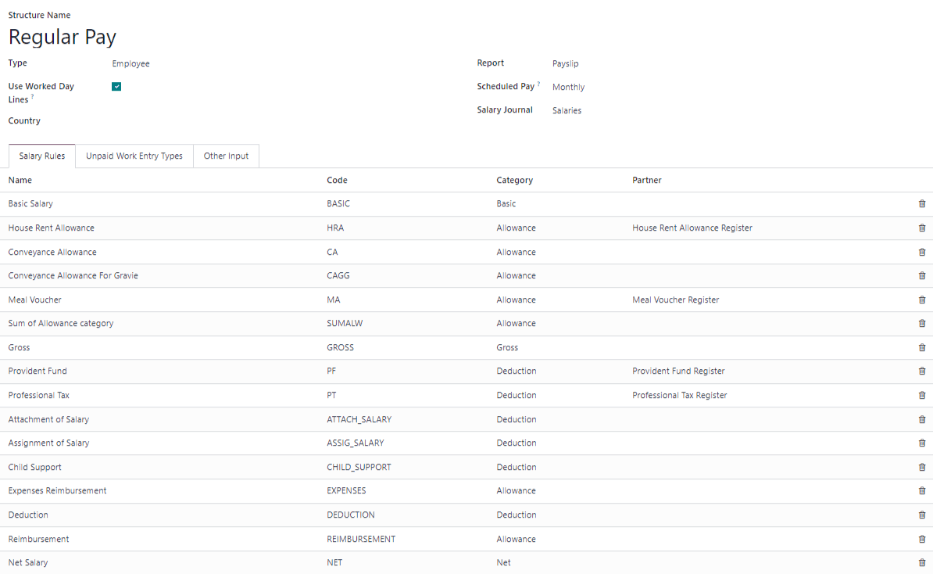
Klik op een structuur om de Salarisregels weer te geven. Deze regels berekenen de loonstrook van de werknemer.
Regels
Each structure has a set of salary rules to follow for accounting purposes. These rules are configured by the localization, and affect actions in the Accounting application, so modifications to the default rules, or the creation of new rules, should only be done when necessary.
To view all the rules, go to . Click on a structure (such as Regular Pay) to view all the rules.
To make a new rule, click New. A new rule form appears. Enter the information in the fields.
De vereiste velden voor een regel zijn:
Naam: Geef een naam aan de regel.
Categorie: Selecteer in het vervolgkeuzemenu een categorie waarop de regel van toepassing is of maak een nieuwe categorie.
Code: Enter a code to be used for this new rule. It is recommended to coordinate with the accounting department for a code to use as this will affect accounting reports and payroll processing.
Loonstructuur: Selecteer een loonstructuur waarop de regel van toepassing is in het vervolgkeuzemenu of voer een nieuwe structuur in.
Voorwaarde gebaseerd op: In het tabblad Algmeen, selecteer in het vervolgkeuzemenu of de regel Altijd waar is (altijd van toepassing), een Bereik is (van toepassing op een specifiek bereik dat wordt ingegeven onder de selectie), of een Python Expressie is (de code wordt ingegeven onder de selectie).
Bedragsoort: In het tabblad Algemeen, selecteer in het vervolgkeuzemenu of het bedrag een Vast bedrag, een Percentage (%), of een Python Code is. Afhankelijk van de selectie moet het vast bedrag, het percentage of de Python code vervolgens worden ingegeven.

Regel parameters
Notitie
Currently, the Rule Parameters feature found inside the menu is still in development and only serves a specific use case for Belgian markets. The documentation will be updated when this section has matured to more markets.
Andere invoertypes
When creating payslips, it is sometimes necessary to add other entries for specific circumstances, like expenses, reimbursements, or deductions. These other inputs can be configured by going to .
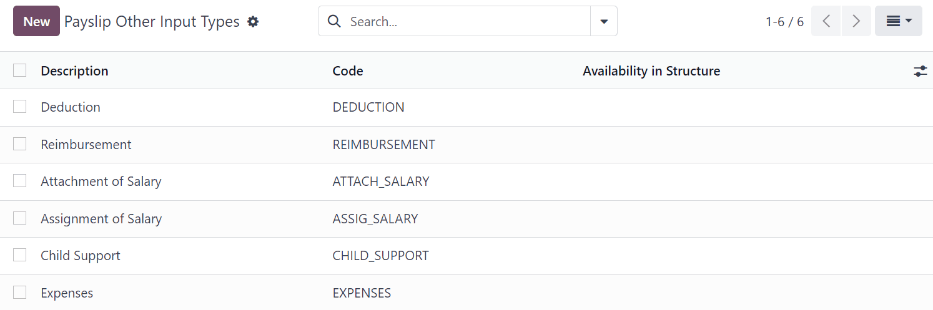
To create a new input type, click the New button. Enter the Description, the Code, and which structure it applies to in the Availability in Structure field.
Belangrijk
The Code is used in the salary rules to compute payslips. If the Availability in Structure field is left blank, it indicates that the new input type is available for all payslips and is not exclusive to a specific structure.

Salarisconfigurator
The various options under the Salary Package Configurator section of the menu all affect an employee’s potential salary. These sections (Advantages, Personal Info, Resume, and Offers) specify what benefits can be offered to an employee in their salary package.
Afhankelijk van de informatie ingegeven door de werknemer (zoals inhoudingen, personen ten laste, enz.), wordt zijn salaris overeenkomstig aangepast. Wanneer een sollicitant zich kandidaat stelt voor een baan op de bedrijfswebsite, hebben de secties onder Salarispakketconfigurator rechtstreeks invloed op wat de sollicitant te zien krijgt en wat wordt ingevuld wanneer de sollicitant informatie ingeeft.
Voordelen
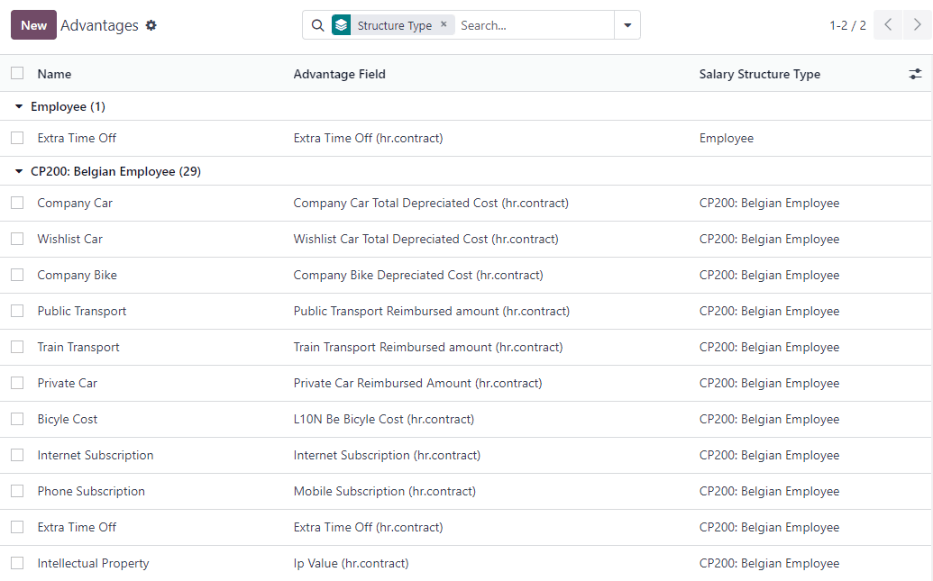
When offering potential employees a position, there can be certain advantages or benefits set in Odoo in addition to the salary to make an offer more appealing (such as extra time off, the use of a company car, reimbursement for a phone or internet, etc.).
To see the advantages, go to . Advantages are grouped by Structure type, and the advantage listed for a particular structure type is only available for that specific structure.
Example
A company has two structure types, one labeled Employee, and anther labeled Intern. The Employee structure type contains an advantage of using a company car, while the Intern structure type does not. Instead, the Intern structure type has a meal voucher advantage available, while the Employee structure type does not.
A person hired under the Employee structure type can use a company car, but cannot have meal vouchers. The opposite is true for someone hired under the Intern structure type. They would have meal vouchers available to them, not the use of a company car.
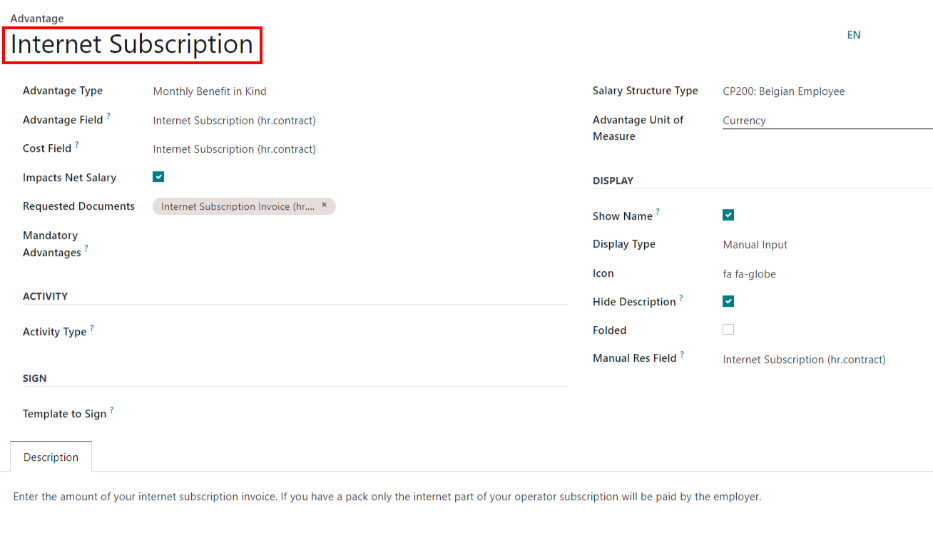
To make a new advantage, click the New button, and enter the information in the fields. The required fields for an advantage are:
Naam: Geef een naam aan het voordeel.
Voordeelveld: Selecteer in het vervolgkeuzemenu het veld waaronder dit voordeel verschijnt in de loonstrook.
Voordeeltype: Selecteer in het vervolgkeuzemenu welk type voordeel het betreft. Kies uit Maandelijks voordeel alle aard, Maandelijke voordelen in netto, Maandelijkse voordelen in contanten of Jaarlijkse voordelen in contanten.
Loonstructuurtype: Selecteer in het vervolgkeuzemenu het loonstructuurtype waarop dit voordeel van toepassing is.
Display Type: Select from the drop-down menu how this advantage is displayed.
Persoonlijke informatie
Every employee in Odoo has an employee card which is created when a candidate becomes an employee. This card includes all of their personal information, resume, work information, and documents.
The personal information is gathered from the salary package configurator section that a candidate fills out after being offered a position. This personal information is then transferred to the employee card when they are hired.
To view an employee’s card, go to the main app dashboard, and click on the employee’s card.
Notitie
Een werknemersfiche kan worden beschouwd als een personeelsdossier van een werknemer.
The Personal Information section lists all of the fields that are available to enter on the employee’s card. To access this section, go to .

To edit a personal info entry, select the entry from the list, and modify the personal info. To create a new personal info entry, click the New button.
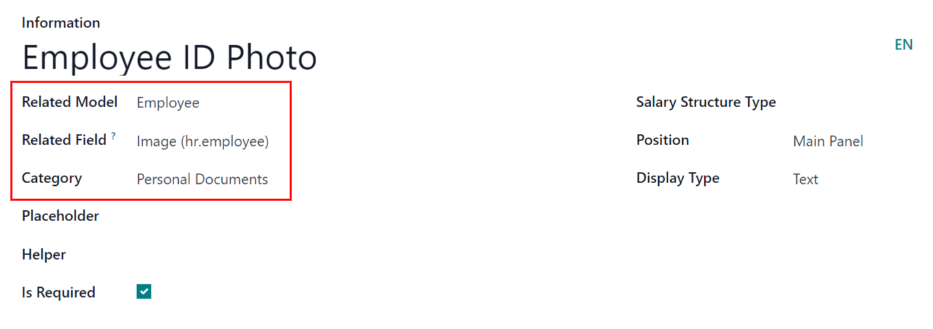
The required fields, aside from entering the Information name, are Related Model, Related Field, and Category. Select a Related Model from the drop-down menu. Employee populates the field by default, but the Bank Account option is also available if the information is related to a bank account instead. Select a Related Field from the drop-down menu that best describes what kind of personal information this entry is, and where it is going to be stored in the backed. Then, select a Category from the drop-down menu that the personal information should be under, such as Address or Personal Documents.
The two most important fields on the personal info form are Is Required and Display Type. Checking the Is Required box makes the field mandatory on the employee’s card. The Display Type drop-down menu allows for the information to be entered in a variety of ways, from a Text box, to a customizable Radio button, a Checkbox, a Document, and more.
Samenvatting
Notitie
Currently, the Resume feature found inside the menu is still in development and only serves a specific use case for Belgian markets. The documentation will be updated when this section has matured to more markets.
Aanbod
When a candidate is offered a position, there are several items that need to be tracked in order for a business to stay organized, such as where in the offer process the candidate is, how long the offer is valid for, as well as all the offer details. These details are all stored in each offers record.
To view all offers, go to . All offers that have been sent to either potential candidates or current employees appears in this list. The status, offer start date and expiration date, amount of the contract, and more, can all be found in this list. Offers sent via the Recruitment application appear here, but there is an option to create a new offer from the Payroll application as well.
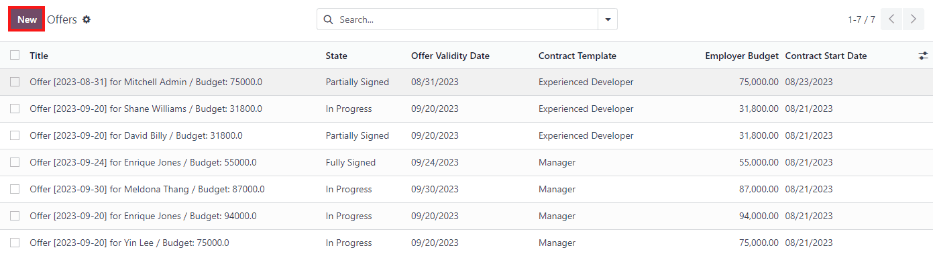
To create a new offer, click the New button. The two required fields are the Contract Template, and the Company. Select the Contract Template and Company from the drop-down menus. Fill in any other details for the offer, such as the Job Title, Department, the Contract Start Date and the Offer Validity Date.