在 Axivox 中管理用户
管理 Axivox 的 :abbr:`VoIP(网络电话)`用户是在 Odoo 数据库中设置:abbr:`VoIP(网络电话)`的重要部分。每个 Axivox 用户都有一个唯一的姓名、电话号码和/或分机号以及语音信箱。这样,就可以通过各种方便的方式联系到他们。
Axivox 用户在 Axivox 控制台中以简单明了的方式进行组织,因此管理员可以快速轻松地管理用户。
備註
本文档介绍如何通过 Axivox 提供商配置一切。根据所选 VoIP 提供商的不同,管理用户的流程也可能不同。
概覽
从 Axivox 管理控制台开始,导航到 https://manage.axivox.com。使用相应的管理员凭据登录。
備註
Axivox 管理控制台中的操作**必须**保存两次,以便更改生效。要保存任何更改,请单击个性化更改屏幕中的 保存。然后,要执行这些更改,请单击控制台右上角的 应用更改 按钮。
来电号码
来电号码是公司付费用来接听电话的所有号码。
点击 Axivox 管理控制台左侧菜单中的 。这样就会显示 来电号码 页面,其中列出了所有来电号码及其 目的地 和 SMS 信息。
:guilabel:`目的地`决定所采取的行动,或呼叫者在拨打上述号码时所遵循的路径。
要编辑 目的地 号码,请单击要修改的来电号码行最右边的 编辑 按钮。然后,在出现的 编辑号码 页面上,可以更改 语音呼叫目的地类型 。
在 语音呼叫的目的地类型 下拉菜单中的可用选项如下:
未配置
Extension
拨号计划
语音信箱
挂起
会议
根据在 语音呼叫目的地类型 下拉菜单中的选择,第二个特定于选择的下拉菜单将显示更多配置选项。此外,根据在 语音呼叫目的地类型 下拉菜单中的选择,还会显示更多字段。
完成所需的配置后,单击 保存,然后单击右上角的 :guilabel:`应用更改`以执行配置。
新用户
公司中使用 :abbr:`VoIP(网络电话)`的每位员工都需要一个与之相关的 Axivox 用户账户。
要查看 Axivox 管理控制台中的现有用户,请单击控制台左侧菜单中的 用户。每个用户都有 号码, 姓名, 语音信箱 和 拨出号码 选项。
要在 Axivox 控制台中创建新用户,请单击 添加用户 以显示 新用户 表单。以下选项卡可用于配置新用户:
General: basic information, including the extension of the user, can be set.
Forwardings: internal forwards on 『no answer』 or busy signals.
Follow Me: external forward configuration.
Keys: set hot-keys within the VoIP system.
SIP Identifiers: SIP username and password for external configuration.
Permissions: set access rights for users in the Axivox management console.
常规选项卡
在 新用户 表单的 常规 选项卡下的 扩展 字段中,输入用户独有的分机号。这是内部用户拨号联系特定员工的号码。
在 姓名 字段中输入员工姓名。
接下来,填写 用户的电子邮件地址 字段。此处应添加员工的有效电子邮件地址,用户可通过该地址接收业务邮件。
在 GSM 号码 字段中,输入可以联系到用户的其他号码。请务必包含国家/地区代码。
備註
国家/地区代码是一个定位代码,可用于访问所需国家/地区的电话系统。先拨国家/地区代码,再拨目标号码。世界上每个国家/地区都有自己特定的国家/地区代码。
国家/地区代码列表,请访问: https://countrycode.org。

在 语音信箱 字段中,从下拉菜单中选择 是 或 否。
在 目录 字段中,管理员可以选择留空,不做任何更改,或从下拉菜单中选择 默认。目录 用于拨号计划的 数字接待员 功能元素。
在 常规 选项卡底部,有两个带选择框的独立选项。
第一个选项是 此用户可同时接听多个来电。选择该选项后,用户就可以在接听电话时同时接听其他来电。
第二个选项 该用户必须登录后才能呼叫 提供了强制用户登录的选项。
備註
如果一家公司在办公桌上使用实体网络电话,并希望员工能够从办公室内的*任何*电话或办公桌登录,他们就会选择 :guilabel:`该用户必须登录才能拨打电话`选项。
完成所需配置后,单击 保存,然后单击右上角的 应用更改。
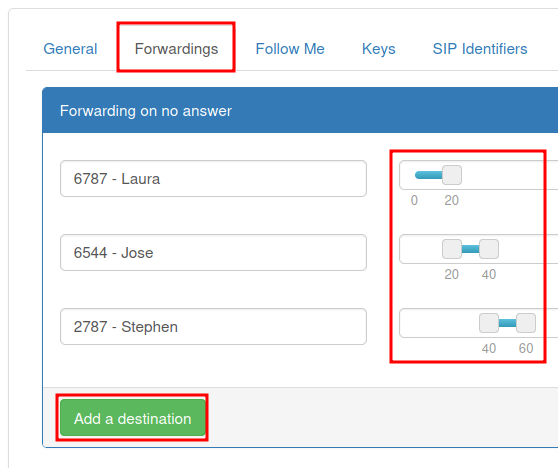
转发选项卡
在 新用户 表单的 转发 选项卡下,公司可以决定如果有人呼叫某个用户但无人接听,会发生什么情况。
重要
Forwardings are disabled when the Follow Me option is enabled.
例如,在 :guilabel:`无回答时转发`字段下,当选择 :guilabel:`添加目的地`按钮时,将显示添加特定用户或电话号码的选项。在输入 :guilabel:`目的地`后,可以通过滑动 :guilabel:`秒数条`来选择所需的振铃时间段。
可添加其他 目的地 并设定不同的响铃时间。
備註
响铃时间可以错开,以便在第一个用户不接电话后,将呼叫转移到另一个用户。如果 目的地 不接电话,管理员可以选择 将发送到语音信箱最为最后选择。
在 忙时转发 字段下,管理员可以 添加目的地。点击后,就可以设置 目的地`(用户)和时间范围。如果原始用户的 :abbr:`网络电话 分机或来电号码繁忙,呼叫将被转发到目的地。
完成所需配置后,点击 保存,然后点击页面右上角的 应用更改。
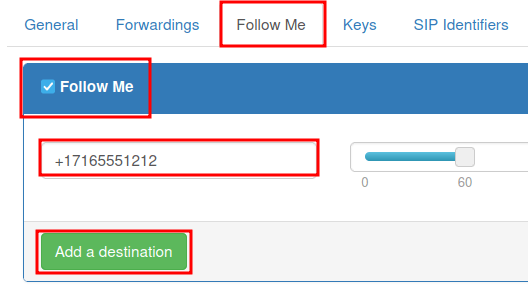
关注我选项卡
选择 关注我 选项后,在 新用户 表单的 关注我 选项卡下,将无法进行 操作。
此外,当选择 关注我 选项时,还可以选择 添加目的地 按钮,将用户或目标电话号码添加到原始用户的帐户中。这样,当有来电时,这些添加的号码就会响铃。
输入 目的地 后,可通过滑动 秒钟栏 到所需的响铃时间来设定具体的时间范围。可以添加其他 目的地 并设定不同的响铃时间。
備註
选择该选项后,原用户的 VoIP(网络电话) 号码 不会 响铃。响铃时间也可以错开,这样在第一个用户不接电话后,呼叫就会被转发给另一个用户。
重要
Odoo 移动应用程序或其他 SIP(会话发起协议) 移动客户端允许用户的分机或来电号码同时振铃。更多信息,请访问 VoIP 移动设备整合 说明文档。
完成所有所需配置后,点击 保存,然后点击右上角的 应用更改。
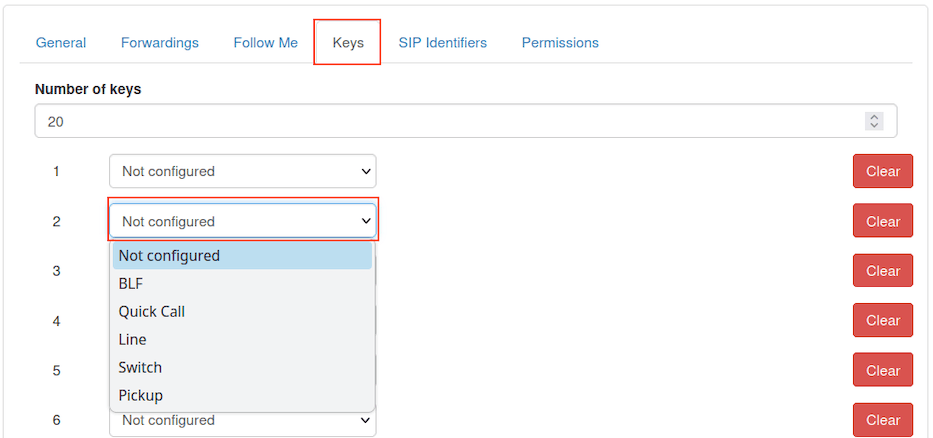
按键选项卡
在 新用户 表单的 按键 选项卡下,可配置用户的快速拨号操作。还可以使用一些更高级的选项。
以下选项可设置为数值 1-20。
每个号码都可以设置这些操作:
未配置:默认操作,即无操作。
BLF(忙灯区域):该操作显示连接到 Axivox 电话系统的其他用户电话的状态。主要用于桌面电话。
快速呼叫:此操作允许快速拨打外部号码。
线路:此操作允许用户呼叫另一个用户。
切换:该操作允许用户切换桌面电话中的通话。
接听:该操作允许用户从桌面电话接听来电。
完成所有所需配置后,点击 保存,然后点击右上角的 应用更改。
重要
前面的许多选项都有辅助选项,可用于链接用户或外部电话号码。这些 必须 与初始操作一起填写。
備註
在 新用户 表单的 按键 选项卡顶部的 按键数量 字段中输入所需的数值,即可更改 按键数量 字段。
SIP 标识符选项卡
SIP 是会话发起协议电话的缩写,允许用户通过互联网连接拨打和接听电话。在 新用户 表单中的 SIP 标识符 选项卡包含在 Odoo 和/或不同的: abbr:`SIP(会话发起协议)`移动客户端中配置 Axivox 用户所需的凭证。
在 SIP 标识符 标签下,SIP 用户名 字段代表在 通用 标签下的 扩展 字段中输入的用户信息。
:guilabel:`域名`字段由 Axivox 代表分配给公司。
每个 Axivox 用户在 SIP 密码 字段中的值都是唯一的。此值用于在 Odoo 上登录 Axivox,以及用于任何移动 SIP(会话启动协议) 客户端。
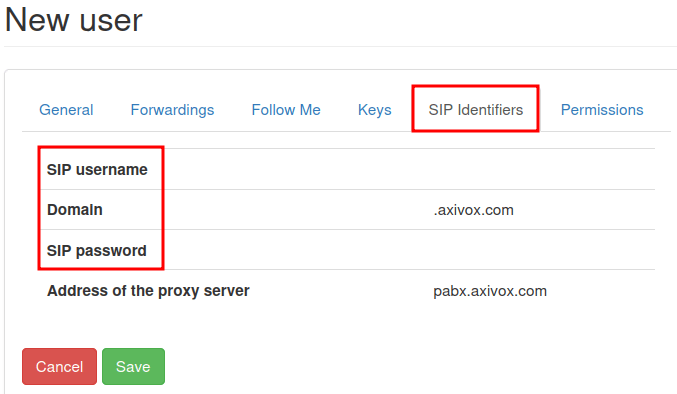
在 代理服务器地址 字段中列出的值通常是: pabx.axivox.com,但 Axivox 可能会更改,因此请务必查看 SIP 标识符 选项卡以获取最准确的值。
完成所有所需配置后,点击 保存,然后点击右上角的 应用更改。
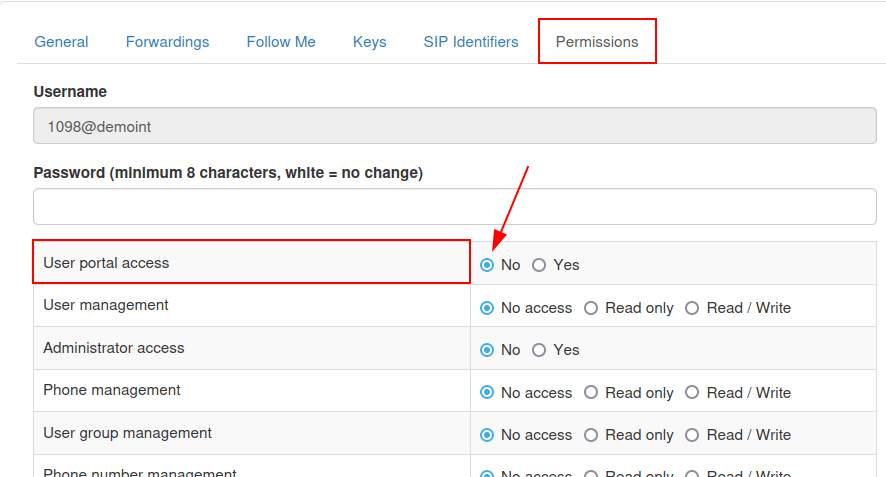
权限选项卡
在 新用户 表单的 权限 选项卡下,可为用户输入 用户名 和 密码。
在这些字段下面,可以授予 Axivox 用户以下权限,以便他们访问门户网站:
用户门户访问权限
用户管理
管理员访问
电话管理
用户组管理
电话号码管理
拨号计划管理
拣货组管理
交换机管理
会议管理
队列管理
语音邮件管理
语音信息管理
音乐占线管理
目录管理
通话列表
已连接用户列表
全球设置
应用更改按钮
下载发票
发票详情
黑名单管理
参会者管理
要访问 Axivox 用户门户的凭证,请导航至 选项卡的顶部。然后,复制 用户名,并为单个用户输入正确的 密码。用户密码至少有 8 个字符。
備註
授予 Axivox 管理员的权限与 Axivox 管理控制台左侧菜单中列出的权限相同。如果选择状态为 否 或 无权限,则菜单选项**不会**为用户弹出。
完成所有所需配置后,点击 保存,然后点击右上角的 应用更改。
完成新用户设置后,可链接 来电号码 。
用户组
用户组是 Axivox 用户的分组,可连接到队列以实现呼叫中心功能。
要开始使用用户组,请访问 https://manage.axivox.com。
然后,使用相应的管理员凭据登录。在 Axivox 管理面板左侧的菜单中,点击进入 用户组。
要从 用户组 页面添加用户组,请点击 添加组。
然后,在 名称 字段中输入文本,为组命名。然后,在 成员 字段中输入用户名称的前几个字母,为组添加成员。用户会出现在该字段下方的下拉菜单中。然后,点击所需的用户,他们就会被添加到用户组。
重复此过程,将更多用户添加到组中。
完成所有所需配置后,点击 保存,然后点击右上角的 应用更改。