高级拨号计划
通常情况下,公司每天都有大量来电,但许多公司并不希望其团队每周 7 天、每天 24 小时守着电话。
通过使用 Axivox 高级拨号计划功能,可以实现流程自动化,并为所有情况设置路由。这样,客户就不会因为无法联系到任何人而等待或沮丧。
通过利用拨号计划中的高级元素,公司可以在特定日期或时间(如公司节假日)自动进行呼叫路由选择。公司还可以让来电者自己输入分机号,并通过数字前台自动转接。这样,行政团队就**不必**全天候待命。
甚至还可以根据呼叫者所在的位置为其选择路由,从而最大限度地提高效率。
重要
有关基本拨号计划以及如何添加元素的更多信息,请访问 拨号方案基础 。
警告
使用浏览器插件拼写可能会妨碍在拨号计划中使用可视化编辑器。**请勿**在 Axivox 管理控制台中使用翻译器。
高级元素
在 Axivox 拨号计划(如 拨号方案基础 中所述)中,有两个高级元素可以使用。
guilabel:
录音:已启用录音功能(需要更改计划,在 Axivox 设置中启用)。呼叫者 ID:用被叫号码或任意文本替换来电号码。
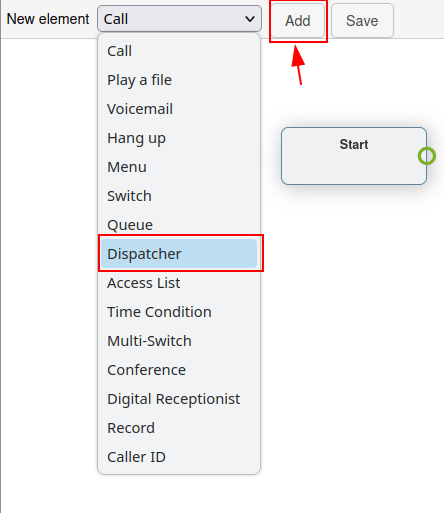
要添加这些元素,请导航至 拨号计划 页面,该页面位于`Axivox 管理控制台 <https://manage.axivox.com>`_左侧的菜单中。
然后,单击所需拨号计划右侧的 可视化编辑器 按钮进行编辑。最后,打开 新元素 下拉菜单,选择元素,然后单击 添加。
更多信息,请访问 拨号计划。
重要
:guilabel:`录音`元素会记录通过该元素路由的通话,并需要在 Axivox 中进行额外的计划更改。
要启用 Axivox 上的录音功能,请导航至 Axivox 管理控制台 <https://manage.axivox.com>`_中的 :guilabel:`设置。然后,转到页面底部附近的 录音 下拉菜单。从那里,从下拉菜单中选择 启用 以在拨号计划中使用 录音 元素启用录音。
小訣竅
如果 录音 下拉菜单不可用且无法更改,请咨询 Axivox 以启用该功能。
通过 呼叫者 ID 元素,可以在路由后替换下游的呼叫方 ID。
在拨号计划中添加 呼叫者 ID 元素并双击该元素进行配置后,会出现两个选项。
第一个选项是 任意文本 字段,可以输入任何文本来替换来电显示。第二个选项是 用被叫号码替换来电显示。该选项用 :guilabel: 来电号码`替换呼叫者 ID。
小訣竅
公司可能希望使用 呼叫者 ID 元素取代 来电号码,这样员工或外部转接人员就无法看到号码,信息也不会被泄露。
基本路由元素
Axivox 拨号计划中的基本路由元素提供基于分机的路由。这可以通过添加*菜单*将逐个拨号数字与操作联系起来,或使用*数字接待员*根据呼叫者输入的按键自动路由或监听分机来实现。
两个元素之间的主要区别在于,*数字接待员*并**不**需要预先配置数字操作,它充当的是虚拟接待员的角色。
guilabel:
菜单:添加逐个号码拨号目录和配置的下游操作(非终端)。例如,逐个号码拨号功能可以包含一个元素,点击 『2』 后,呼叫者将进入拨号计划中与菜单元素上的 『2』 链接的元素。Digital Receptionist: attach a virtual dispatcher to listen for extensions.
要添加这些元素,请导航到位于 Axivox 管理控制台 <https://manage.axivox.com>`_左侧菜单中的 :guilabel:`拨号计划 页面。然后,点击拨号计划右侧的 可视化编辑器 按钮,编辑拨号计划。然后,打开 新元素 下拉菜单,选择元素,点击 添加。
更多信息,请访问 拨号计划。
数字接待员情景
数字接待员 单元是一个监听功能,可以根据呼叫者通过键盘输入的分机号码,准确地通过拨号计划将呼叫者路由到相应的位置。
设置*数字接待员*,不再需要团队或现场接待员全天候待命。有了这个功能,呼叫可以直接到达目标,无需人工干预。
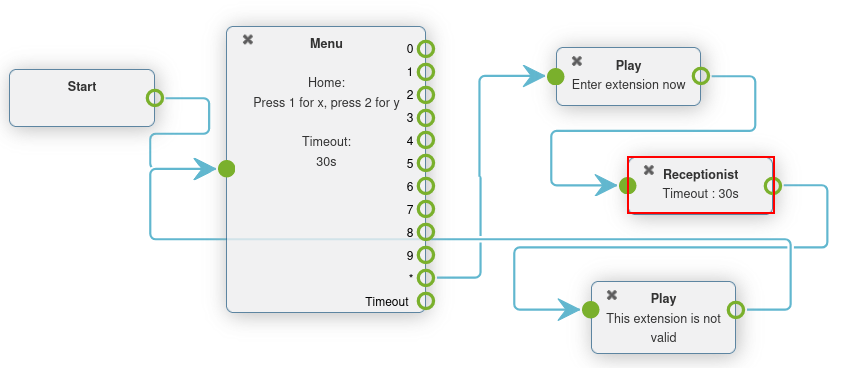
在拨号计划中添加 数字接待员 元素后,连接适当的端点,然后双击该元素,在弹出的 接待员 窗口中设置 时间 。
时间 可以 5 秒为单位设置,从 5 秒到 60 秒不等。
重要
The Digital Receptionist element requires a Play a file element on either side of it, to explain what action to take, and when a wrong extension is entered.
Example
While customizing a dial plan in a Dialplan Editor pop-up window, add a
Menu element, with a Greeting message that might read, Press star to
dial an extension.
Then, on the Menu element, for the * (star) option, link a Play a file element, that plays an Audio message saying, 『Enter the extension of the person you are trying to reach』.
Following the first Play a file element, add the Digital Receptionist element, followed by another Play a file element, which states, 『That is not a valid extension』.
This last element is in place to close the loop, should the caller not enter a correct extension.
Finally, this last Play a file element is looped back into the Menu element.
高级路由元素
高级路由功能可在收到呼叫时自动将其路由到来电号码。可使用地理位置、白名单或基于时间的变量进行配置。呼叫在到达最终目的地之前会经过一个过滤器,然后根据设定的变量进行路由。
以下是高级路由要素:
guilabel:
调度器:根据呼叫者 ID 的地理位置创建呼叫过滤器,以路由流量。访问列表:根据 VIP 客户的偏好,创建量身定制的访问列表。
时间条件:创建时间条件,以便在节假日或其他敏感时间段对进入的流量进行路由。
小訣竅
白名单是一个技术术语,用于创建允许使用的号码列表。相反,黑名单用于创建拒绝号码列表。
要添加这些元素之一,请导航到位于 Axivox 管理控制台 <https://manage.axivox.com>`_左侧菜单中的 :guilabel:`拨号计划 页面。然后,点击拨号计划右侧的 可视化编辑器 按钮,编辑拨号计划。然后,打开 新元素 下拉菜单,选择元素,并单击 添加。更多信息,请访问 拨号计划。
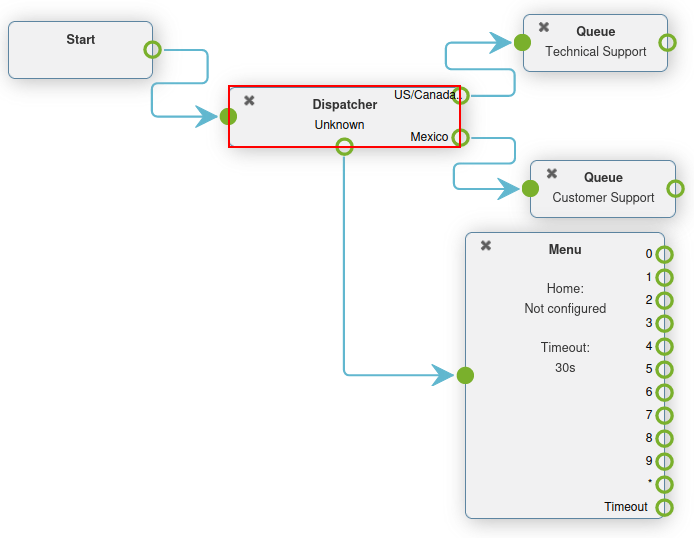
调度器情景
*调度器*元素是一种拨号计划功能,可根据区域或地理位置引导呼叫。在大多数情况下,拨号计划中的 调度器 元素与 开始 元素相连,以便在来电号码进入时过滤或筛选来电。
在弹出的 拨号计划编辑器 窗口中双击 调度器 元素进行配置。
该元素根据正则表达式检查(通过该元素路由的)数字。要添加正则表达式,请单击 调度器 弹出窗口底部的 添加行。
然后,在 名称 下输入一个可识别的名称来标识此表达式。这是在 拨号计划编辑器 弹出窗口中显示的拨号计划的 调度器 元素中出现的名称。
在 正则表达式 字段中,输入 Axivox 应为来电路由的国家代码或区号。当公司希望根据客户的地理位置将其客户过滤到特定队列或用户时,这一点尤其有用。
要指定某个国家代码或区号后面的所有号码,请在国家代码或国家代码 + 区号后面加上 d+。
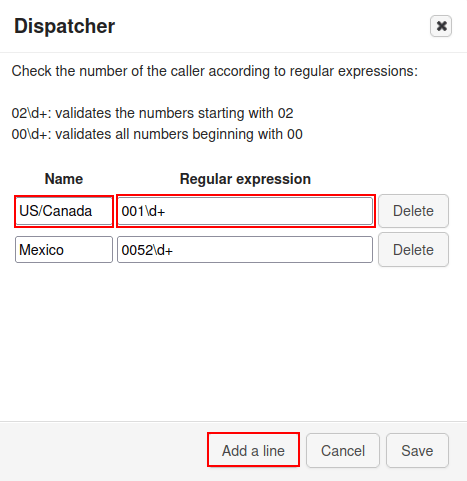
Example
02d+:验证以`02`开头的数字00\d+:验证所有以00开头的数字0052\d+验证以 0052(墨西哥国家代码)开头的所有号码。001716\d+:验证所有以001716开头的号码(美国国家代码 + 纽约州西部区号)
小訣竅
正则表达式(简称为 「regex」 或 「regexp」),有时也称为 「有理表达式」,是指定文本匹配模式的字符序列。换句话说,就是在给定的数字范围内进行匹配。
在弹出的 调度器 窗口中完成所需配置后,请务必单击 保存。
这样,调度器 元素就会根据设置的 正则表达式 显示可配置的不同路径。
在弹出的 拨号计划编辑器 窗口中,将这些路径附加到任何 新元素 上。
默认情况下,在设置至少一个 正则表达式 之后,调度器`元素上会出现一个 :guilabel:`未知 路径。
当呼叫号码与 调度器 元素上设置的任何 正则表达式 不匹配时,呼叫会遵循此路径。
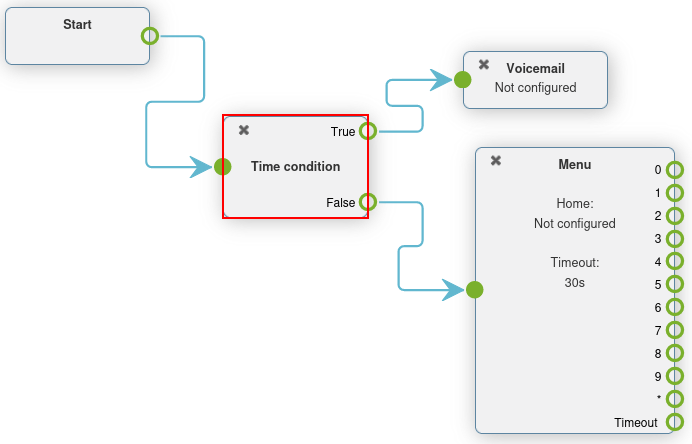
时间条件情景
When a Time Condition element is added to a dial plan, it has a simple True and False routing.
After adding the Time Condition element to a dial plan, double-click it to configure the variables. Hour/Minute, Days of the week, Day of the month, and Month can all be configured.
If the time which the caller contacts the incoming number matches the set time conditions, then the True path is followed, otherwise the False path is followed.
Example
对于每年在美国独立日假期(7 月 4 日)放假的公司,应设定以下时间条件:
Hour/Minute -
0:0 to 23:59Day of the week -
All to AllDay of the month -
From 4 to 4月份 -
七月
The Time Condition element is especially useful for holidays, weekends, and to set working hours. When a caller reaches a destination where they can be helped, either with a real person or voicemail, this reduces wasted time and hangups.
重要
To set the Timezone that the Time Condition operates under, navigate to Axivox management console, and click Settings in the menu on the left. Then, set the Timezone using the second field from the bottom, by clicking the drop-down menu.
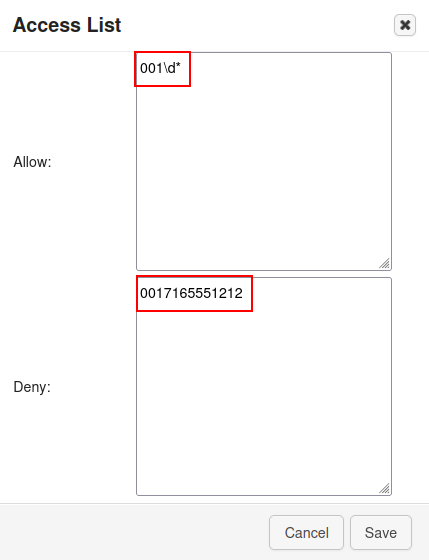
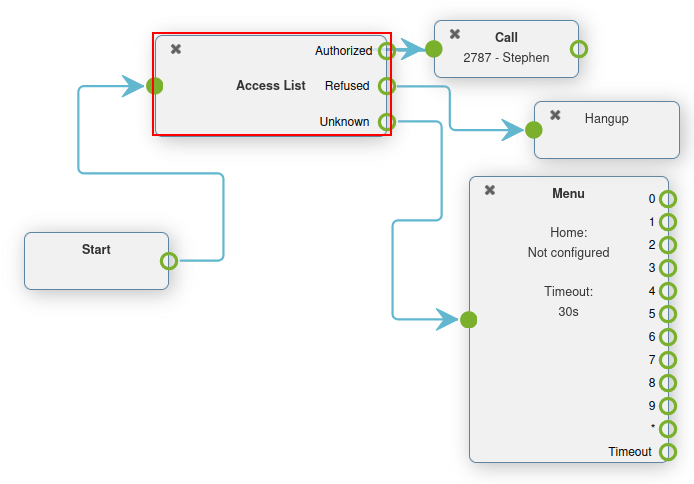
访问列表情景
拨号计划中的*访问列表*元素允许路由某些号码,并禁止(拒绝)其他号码。
After adding an Access List element to a dial plan, it can be configured by double-clicking on the element directly in the Dialplan Editor pop-up window.
Two fields appear where regular expressions can based in the Allow and Deny fields of the Access List pop-up window.
Example
For a very important customer, their number can be set in the Allow field, and these callers can be sent directly to management.
小訣竅
A regular expression (shortened to 「regex」 or 「regexp」), sometimes also referred to as a 「rational expression,」 is a sequence of characters that specifies a match pattern in text.
Example
2\d\d:验证从200 到 299的数字02\d*: 验证所有以02开头的数字0017165551212:验证号码(0017165551212)
使用正则表达式或数字设置 允许 和 否决 字段后,在弹出的 访问列表 窗口中点击 保存。
然后,在拨号计划中的 访问列表 元素上,有三个路径(或路由)可用于链接到进一步的操作。
通过添加 菜单 元素并将其连接到 未知 路径,未知呼叫可通过常规菜单流进行路由。 已拒绝 呼叫可路由到 挂机 元素。最后,:guilabel:`已授权`呼叫者可被发送到特定的分机或队列。
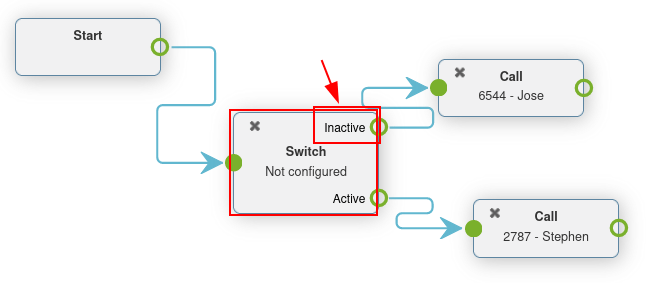
Switches
A Switch element in Axivox is a simple activated/deactivated route action.
可以快速激活或选择这些功能,从而在不更改拨号计划的情况下快速更改路由。
Alternate routes can be configured, so that in a moments notice, they can be switched to. This could be for new availability, or to adjust traffic flow for any number of reasons.
Axivox allows for a simple on/off switch, and a multi-switch, which can have several paths to choose from.
Switch: a manual on/off control that can divert traffic, based on whether it is opened (on) or closed (off).
Multi-Switch: a mechanism to create paths, and turn them on and off, to divert incoming calls.
Basic switch
A Switch can be set in the Axivox management console by navigating to Switches in the left menu. To create a new switch click Add a switch from the Switches dashboard, configure a Name for it, and click Save.
Then, toggle the desired switch to either On or Off, from the State column on the Switches dashboard.
This On / Off state automatically routes traffic in a dial plan, in which this switch is set.
The traffic travels to the Active route when On is toggled in the switch. The call traffic travels to the Inactive route when Off is toggled in the switch.
Changes can be made on the fly, just be sure to click Apply changes to implement the them.
在拨号计划中添加开关
要在拨号计划中添加 开关,请导航到 Axivox 管理控制台,然后点击左侧菜单中的 拨号计划。然后,点击所需拨号计划旁边的 视觉编辑器 以打开弹出的 拨号计划编辑器 窗口。
然后,从 新元素 下拉菜单中选择 开关,然后点击 添加。双击该元素,进一步配置 开关 元素。
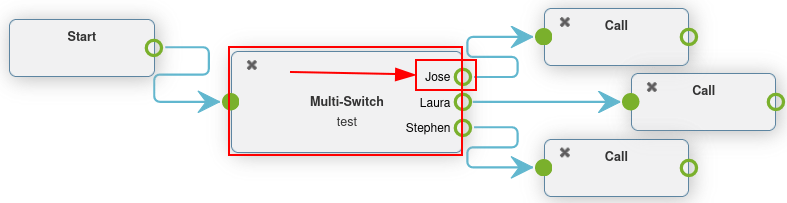
多路交换机
Axivox 中的*多路交换机*元素是一种可配置多条路径并在其间切换的交换机。
要配置 多路交换机 元素,请访问 Axivox 管理控制台<https://manage.axivox.com>,然后点击左侧菜单中的 交换机 菜单项。
切换至 多路交换机 标签页,以创建或设置预配置的 多路交换机 元素。
要新建 多路交换机,请点击 新建。然后输入元素的 名称,并填写 可用选项。每个 可用选项 需单独一行,且**不得**重复。
完成后记得点击 保存。
要选择 多路交换机 的:guilabel:状态,请在 交换机 仪表板的 多路交换机 标签页下,点击 多路交换机 名称旁的下拉菜单。
所选 状态 即为拨号方案中遵循的路由。状态 可实时编辑,只需确保点击 应用更改 即可。
为拨号方案添加多路交换机
要将 多路交换机 元素添加至拨号方案,请访问 Axivox 管理控制台,并点击左侧菜单中的 拨号方案。
然后,选择或创建拨号计划。然后,在所需的拨号计划上点击 视觉编辑器。
在弹出的 拨号计划编辑器 窗口中,点击 新元素 下拉菜单,选择 多路开关。然后点击 添加。双击该元素,进一步配置 切换 元素。