Kiosks
Odoo’s Attendances app allows employees to check in and out of work directly from the database or a kiosk.
En kiosk är en dedikerad enhet (en PC, surfplatta eller mobiltelefon) som anställda kan använda när de checkar in och ut.
Kiosker behövs för anställda som inte har tillgång till databasen.
Only employees with access to the Odoo database can check in and out from the Attendances app, and they are referred to as users.
Viktigt
Om anställda checkar in och ut med hjälp av en bricka eller en RFID, måste en accessible device i Kiosk Mode vara tillgänglig för att kunna använda dessa två metoder.
Konfiguration
To use kiosks in the Attendances application, navigate to , and configure the Modes section and the Avsnittet Kioskinställningar.
Once all desired settings have been configured, click the Save button on the Settings page to activate and enable them.
Modes section
Determine how an employee checks in at a kiosk, either by searching for their name (Manual Selection), scanning an employee ID or key fob (Barcode/RFID), or both.
On the settings page, using the drop-down menu for the Kiosk Mode field in the Modes section, make the desired selection. Options are Barcode/RFID, Barcode/RFID and Manual Selection, or Manual Selection.
Observera
The Barcode application does not need to be installed to use one of the Barcode/RFID settings.
Avsnittet Kioskinställningar
De olika inställningarna i avsnittet Kioskinställningar bestämmer hur anställda checkar in och ut med kiosker.
Barcode Source : This setting appears only if one of the two Barcode/RFID selections were configured for the Kiosk Mode setting.
If available, select how barcodes are scanned at the kiosk from the drop-down menu. Barcodes can be scanned with a dedicated Scanner, or with a device’s Front Camera or Back Camera.
Display Time : Determine how many seconds a check-in/check-out confirmation message remains on the kiosk screen before returning to the main check-in screen.
Employee PIN Identification: Click this checkbox to require employees to use a unique PIN to check in. PINs are configured on each individual employee record. Refer to the new employee documentation for more information on setting up PINs.
Attendance Kiosk Url: Odoo generates a unique web address (URL) to use a device as a kiosk, without having to sign in to the Odoo database. When setting up a kiosk device, navigate to this unique web address in a web browser to present the Attendances app kiosk.
Viktigt
These kiosk URLs are not secured with any type of access code. Anyone who has the URL can access the Attendances app kiosk. If the URL is compromised for any reason, such as in the event of a security breach, click Generate new URL, located beneath the link, to generate a new URL and update the kiosk accordingly.
Kiosk mode
Att gå in i Kioskläge är endast tillgängligt för användare med specifika åtkomsträttigheter.
Kiosk Mode kan aktiveras på två olika sätt:
Navigera till , och klicka på Kiosk Mode i toppmenyn. Enheten loggar sedan ut från Odoo och går in i Kiosk Mode.
Navigera till . I avsnittet Kiosk Settings använder du länken i fältet Attendance Kiosk Url för att öppna Kiosk Mode på valfri enhet.

Viktigt
Som en säkerhetsåtgärd är det inte möjligt att gå tillbaka till databasen utan att logga in igen när en enhet befinner sig i Kiosk Mode.
Observera
När som helst kan en ny URL för kiosken genereras om det behövs. Klicka på Generera en ny URL för kioskläge
The kiosk loads, displaying the current date and time, along with the following banner at the top: Connect an RFID reader, and scan a token. ’Read the Documentation’/ ’Buy an RFID Device.
Click the text link Read the Documentation to open the corresponding documentation in a new tab. Click the text link Buy an RFID Device to open a new tab with available products to purchase on Amazon. Close either tab to return to the kiosk.
At the end of the text, an X appears. Click the X to close the banner. Closing the banner hides it from that point on, and cannot be enabled again.
To exit Kiosk Mode, either close the tab in the web browser or return to the main log-in screen of Odoo.
Checka in och ut med en kiosk
Utmärkelse
To check in or out using a badge, tap the Scan your badge image in the center of the kiosk.
Skanna sedan streckkoden på brickan med den metod som konfigurerats i avsnittet Kioskinställningar i konfigurationsmenyn.
När streckkoden har skannats checkas medarbetaren in eller ut, och ett bekräftelsemeddelande visas med all information.
RFID
To check in or out using an RFID key fob, scan the fob with an RFID reader.
När den anställde har skannats checkas han eller hon in eller ut, och ett bekräftelsemeddelande visas med all information.
Manuellt
Users who do not have a scannable badge or an RFID fob can manually check in and out at a kiosk.
Tap the Identify Manually button on the kiosk, and a screen appears with all the employees who can be checked in or out. Tap on a person to check them in or out, and a confirmation message appears.
To find a specific person, either:
Search: Tap into the search bar and enter the desired person’s name. As the name is typed, matching results are displayed on the screen.
By department: Tap on any desired selection in the department section, located on the left side of the screen, to only view employees from that specific department. The number at the end of each listed department represents how many employees that department has.
PIN-KOD
Om kryssrutan PIN-identifiering av anställd var markerad i avsnittet Kioskinställningar i konfigurationsmenyn uppmanas den anställde att ange en PIN-kod när han eller hon checkar in eller ut manuellt.
After the employee is selected, a number pad appears with a message. When checking in, (Employee) Please enter your PIN to check in appears above the numbers. When checking out, (Employee) Please enter your PIN to check out appears above the numbers.
Knappa in PIN-koden med hjälp av nummerplattan och tryck sedan på OK när du är klar. Den anställde checkas sedan in eller ut, och ett bekräftelsemeddelande visas.

Bekräftelse av meddelande
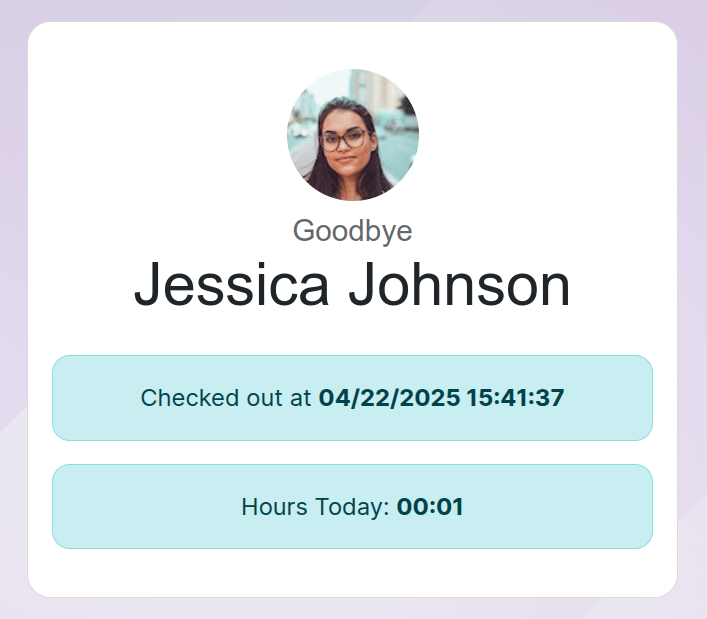
When an employee checks in or out, a confirmation message appears, with all the check-in or check-out information.
When checking in, the Welcome (Employee) message appears, along with the current date and time. If the employee has already checked in and out that day, an Hours Previously Today: HH:MM message also appears, showing the total hours logged earlier.
When checking out, Goodbye (Employee) appears, as well as the date and time of checkout. Beneath the message is an Hours Today: HH:MM field, with the total hours and minutes logged for the day.
Beneath both the ”welcome” and ”goodbye” messages is an OK button. To exit the screen before the preset time in the kiosk, tap the OK button.