Spanien
Konfiguration
Installera 🇪🇸 Spanish :doc:``fiscal localization package <../fiscal_localizations>` för att få alla standardfunktioner för redovisning i den spanska lokaliseringen.
Det finns tre spanska lokaliseringar, var och en med sina egna förkonfigurerade PGCE kontoplaner:
Spanien - små och medelstora företag (2008);
Spanien - komplett (2008);
Spanien - Icke vinstdrivande organisationer (2008).
För att välja vilket som ska användas går du till och väljer ett paket i avsnittet Fiscal Localization.
Varning
Du kan bara ändra bokföringspaketet så länge du inte har skapat någon bokföringspost.
Kontoplan
Du når Kontoplanen genom att gå till :menyval:`Redovisning --> Konfiguration --> Redovisning: Kontoplan`.
Tips
När du skapar en ny Odoo Online-databas installeras Spain - SMEs (2008) som standard.
Skatter
Standardskatter för Spanien skapas automatiskt när modulen Spanish - Accounting (PGCE 2008) (l10n_es) installeras, och skatterapporter finns tillgängliga när modulen Spain - Accounting (PGCE 2008) (l10n_es_reports) installeras. Varje skatt påverkar de Spanien-specifika skatterapporterna (Modelo), som finns tillgängliga genom att gå till .
Rapporter
Här är en lista över tillgängliga spanskspecifika rapporter:
Balansräkning;
Vinst och förlust;
EG:s försäljningslista;
Skattedeklaration (Modelo 111);
Skattedeklaration (Modelo 115);
Skattedeklaration (Modelo 130);
Skattedeklaration (Modelo 303);
Skattedeklaration (Modelo 347);
Skattedeklaration (Modelo 349);
Skattedeklaration (Modelo 390).
Du kan få tillgång till Spanien-specifika skatterapporter genom att klicka på bok-ikonen när du är på en rapport och välja dess Spanien-specifika version: (ES).
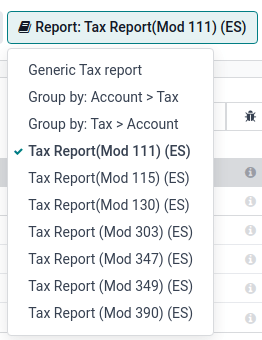
Modell 130
Ändra procentsatsen
Om du vill ändra procentberäkningen av rutan [04] under avsnittet I och/eller av rutan [09] under avsnittet II:
Aktivera developer mode, gå till , och välj rapporten Tax report (Modelo 130).
Klicka på ikonen (cogs) till höger om Report: Skatterapport (Mod 130) (ES).
Klicka på den ruta du vill ändra och i popup-fönstret klickar du på raden percentage. I det nya popup-fönstret ändrar du värdet i fältet Formula till den procentsats som du vill använda. Upprepa denna åtgärd om du vill ändra den andra rutan också.
Rapportera jordbruksverksamhet
Om du vill ha något belopp inlagt i II-sektionen (från rutorna [08] till [11]) måste du ändra bransch för motsvarande kontakt till Jordbruk:
Gå till kontaktformuläret ( eller , till exempel) och välj en kontakt.
På fliken Sales & Purchase ställer du in fältet Industry till Agriculture.
Upprepa denna operation för alla kontakter som är relaterade till jordbruk-branschen.
Veri*Factu
Observera
Producers of Veri*Factu billing systems must self-certify their compliance with the regulations.
Download Odoo's "declaración responsable"
Veri*Factu is an e-Invoicing system used by the Spanish Tax Agency. It is mandatory for most taxpayers in Spain, except for those who use the SII system or are under a regional tax regime (i.e., TicketBai).
Odoo allows invoices and Point of Sale orders to be automatically sent to the tax authorities.
Konfiguration
To enable Veri*Factu, follow these steps:
Open the Settings app to make sure your company’s Country and Tax ID are correctly set in the Companies section.
Install the Spain - Veri*Factu (l10n_es_edi_verifactu) module.
Go to , scroll to the Veri*Factu section, check the Enable Veri*Factu option, and click Manage certificates to add a certificate.
In the Certificates for Veri*Factu list view, click New.
Click Upload your file, then select a certificate file and enter the Password needed to open the certificate (if there is one).
Observera
At least one certificate has to be uploaded.
By default Veri*Factu is in testing mode. The data is sent to test servers and is not considered official. When official data can be sent to the production servers, go to the Veri*Factu section in the Settings and disable Test Environment.
Fakturor
Once an invoice is confirmed, it can be sent. In the Send window, the Veri*Factu option is available if Veri*Factu has been enabled.
Click Send to generate a JSON file containing the invoice details. This file is stored as a Veri*Factu document. In the Veri*Factu tab, all corresponding documents are listed by their creation date and current status.
Tips
To download a JSON file, click on its document in the Veri*Factu tab. Then, in the Open: Veri*Factu Documents window, click the link in the JSON field.
Observera
The document should be sent to the AEAT immediately. However, it may be delayed due to mandatory waiting periods between submissions required by the AEAT. In such cases, the document is automatically sent the next time a scheduled action runs.
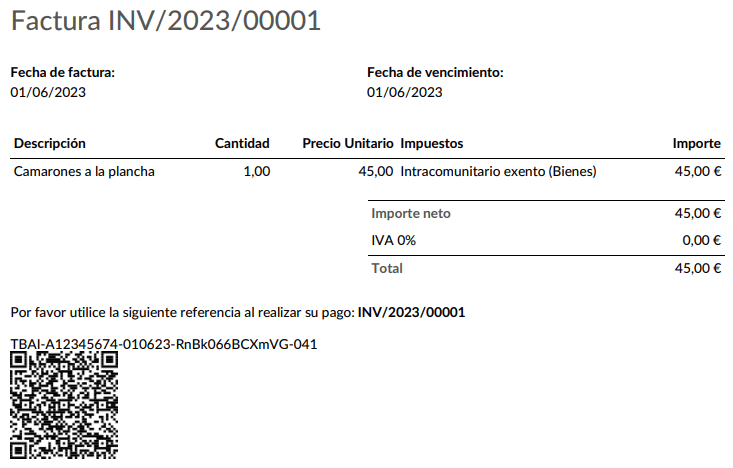
A Veri*Factu QR code appears on the invoice PDF. Scan this code to verify that the invoice has been received and recognized by the AEAT.
Point of sale orders
Once an order has been paid, a JSON file containing the order details is generated. This file is stored as a Veri*Factu document.
Go to . In the Orders list view, select the relevant order. In the Veri*Factu tab, all the corresponding documents are listed by their creation date and current status.
Tips
To download a JSON file, click on its document in the Veri*Factu tab. Then, in the Open: Veri*Factu Documents window, click the link in the JSON field.
Observera
The document should be sent to the AEAT immediately. However, it may be delayed due to mandatory waiting periods between submissions required by the AEAT. In such cases, the document is automatically sent the next time a scheduled action runs.
If an invoice is generated for an order during the payment process, the Veri*Factu document is created and sent for the invoice instead.
Observera
A Veri*Factu QR code appears on the order receipt, even if an invoice is created for the order. Scan this code to verify that the invoice has been received and recognized by the AEAT
TicketBAI
Ticket BAI <https://www.gipuzkoa.eus/es/web/ogasuna/ticketbai>`_ eller TBAI är ett e-faktureringssystem som används av den baskiska regeringen och dess tre provinsstyrelser (Álava, Biscaya och Gipuzkoa).
Odoo stöder det elektroniska faktureringsformatet TicketBAI (TBAI) för alla tre regionerna i Baskiska landet. För att aktivera TicketBAI ställer du in ditt företags Country och Tax ID under i avsnittet Companies.
Sedan installera modulen Spain -TicketBAI (l10n_es_edi_TBAI), gå till och välj en region i avsnittet Spain Localization i fältet Tax Agency for TBAI.
När en region har valts klickar du på Hantera certifikat (SII/TicketBAI), sedan klickar du på Ny, laddar upp certifikatet och anger lösenordet som tillhandahålls av skatteverket.
Varning
Om du testar certifikat ska du aktivera Test Mode i avsnittet Spain Localization, som du hittar under Accounting i appen Settings.
Användningsfall
När en faktura har skapats och bekräftats, visas en TicketBAI banner högst upp.

Odoo skickar fakturor via TicketBAI automatiskt var 24:e timme. Du kan dock klicka på Process now för att skicka fakturan omedelbart.
När fakturan är sänd ändras statusen för fältet Electronic Invoice till Sent, och XML-filen finns i chatter. Under fliken EDI Documents kan du se spårbarheten för andra genererade dokument som är relaterade till fakturan (t.ex. om fakturan också ska skickas via SII visas den här).
Observera
TBAI QR-koden visas på fakturans PDF.
FACe
FACe är den e-faktureringsplattform som används av de offentliga förvaltningarna i Spanien för att skicka elektroniska fakturor.
Innan du konfigurerar FACe-systemet, installera Spain - Facturae EDI (l10n_es_edi_facturae)-modulen och andra Facturae EDI-relaterade moduler.
To configure FACe, follow these steps:
Go to .
Click New to create a new certificate.
Complete the fields, including uploading the file of the Certificate provided by the tax agency and the provided Certificate Password.
Observera
If using the Invoicing app instead of Accounting, go to .
Användningsfall
Once you have created an invoice and confirmed it, click Send. Make sure Generate Facturae edi file is enabled, and click Send again. Once the invoice is sent, the generated XML file is available in the chatter.
Varning
Filen skickas ** INTE** automatiskt. Du måste själv skicka den manuellt.
Tips
Du kan skicka FACe XML-filer i batch genom den statliga portalen.
Administrativa centra
För att FACe ska kunna arbeta med administrativa center måste fakturan innehålla specifika uppgifter om centren.
För att lägga till administrativa center skapar du en ny kontakt som du lägger till i partner-företaget. Välj FACe Center som typ, tilldela en eller flera roller till den kontakten och Save. De tre roller som vanligtvis krävs är:
Organisk gest: Receptor (Mottagare);
Bearbetningsenhet: Pagador (Betalare);
Bokföringsbyrå: Fiscal (Skatteverket).

Tips
Om administrativa center behöver olika Codes per roll, måste du skapa olika center för varje roll.
När en elektronisk faktura skapas med hjälp av en partner med administrativa center, inkluderas alla administrativa center i fakturan.
Du kan lägga till en kontakt med flera roller eller flera kontakter med olika roller.