Kenia
Konfiguration
Installieren Sie das 🇰🇪 Kenianische steuerliche Lokalisierungspaket, um alle Funktionen der kenianischen Lokalisierung zu erhalten.
eTIMS
The Kenya Revenue Authority (KRA) has implemented the electronic Tax Invoice Management System (eTIMS) for tax collection.
To submit documents through eTIMS, you must use an OSCU that integrates with the existing Trader Invoicing System (TIS), such as the one provided by Odoo. The OSCU is used to validate, encrypt, sign, transmit, and store tax invoices.
Bemerkung
Make sure to install the Kenya eTIMS EDI modules to use the OSCU device fully.
OSCU device initialization
The OSCU must be initialized before use. To do so, navigate to , click Update Info in the Companies section, and enter your Tax ID.
To initialize the OSCU:
Go to and scroll down to the Kenya eTIMS Integration section.
Set the eTIMS Server Mode to Test for the initialization.
Enter the Serial Number of the device and tick the two check boxes.
Click Initialize OSCU.
Bemerkung
Diese Servermodi sind verfügbar:
Demo: Designed for demo purposes; it uses mock data and does not require an initialized OSCU;
Test: Used to test the connection to eTIMS;
Production: Used for live databases that are ready to send data.
Wichtig
If your device has already been initialized (through another ERP, for example), enable the Entwicklermodus (Fehlerbeseitigungsmodus). Then, in the Kenya eTIMS Integration section, enter the ID of the unit in the Unit ID field and the key obtained through a previous initialization in the CMC Key field. Click Save when done.
Once the OSCU module has been initialized, an OSCU serial number
is generated for each company on that database with its country set to Kenya. The
serial number is generated based on the VAT number of the company (regardless of its validity). It
is a unique and sequential serial number starting with the prefix ODOO followed by the company’s
VAT number and a sequence of numbers.
Registering on eTIMS
Taxpayers must sign up and create an account on the KRA portal. If you do not have an account yet:
Sign up, enter your PIN, and verify that all information is correct, including your phone number, email address, and postal address. Correct any errors on the iTax page.
An OTP is sent to the phone number provided. Unblock promotional messages if you do not receive it.
Upload the business owner ID or director’s ID (as listed on iTax), along with the filled-out and signed commitment form .
On the eTIMS dashboard, click Service request at the top of the page. Select OSCU as the eTIMS type, enter
Odoo KE LTDas the third-party integrator, and enter your company’s OSCU serial number retrieved earlier.
Bemerkung
Service request approvals are usually quick. If there’s a delay, contact the eTIMS operation or KRA office.
Commitment form
Part 1: Fill in the taxpayer’s information.
Part 2: Fill in the business owner’s or director’s information.
Part 3: Fill in your unique serial number found in Odoo.
Part 4: Tick OSCU, enter Odoo KE LTD PIN
PO52112956W, and enter the Odoo version you’re using (17.0 or onwards).Part 5: Check the mandatory boxes, enter a date, and sign.
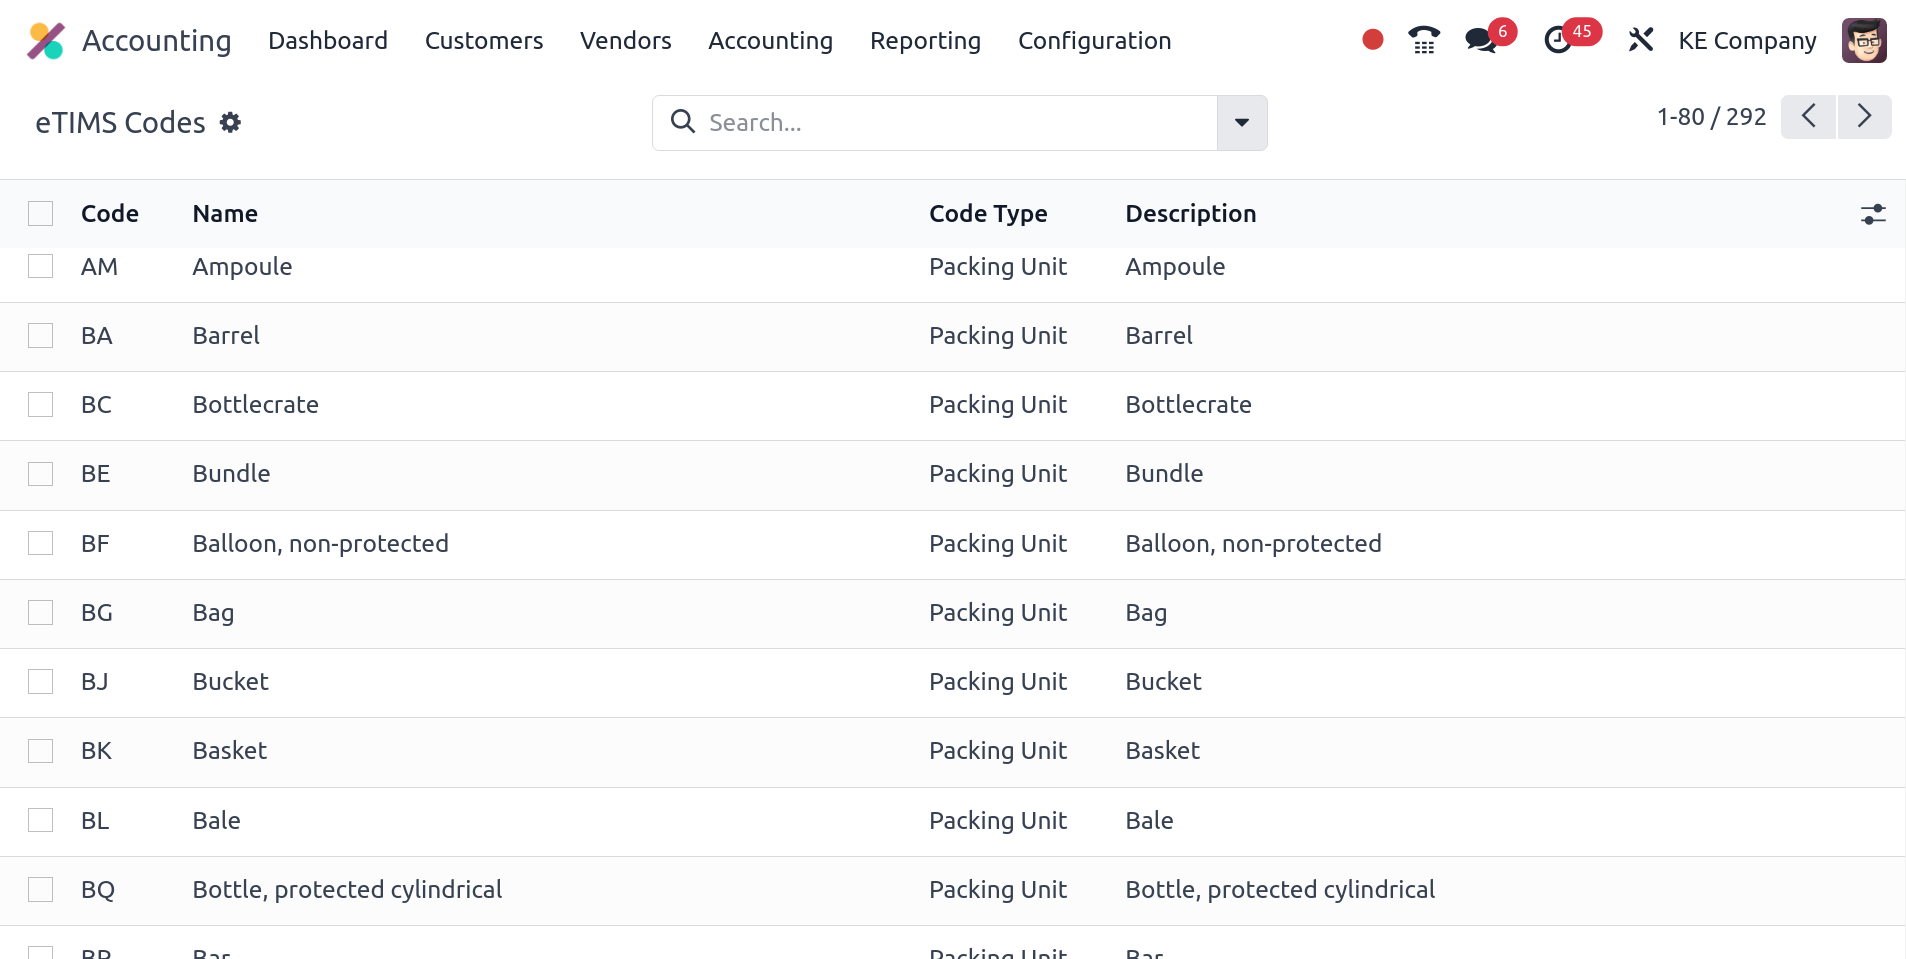
eTIMS-Codes
Common standard codes are automatically fetched from the KRA eTIMS API servers every two days. To fetch them manually, proceed as follows:
Aktivieren Sie den Entwicklermodus (Fehlerbeseitigungsmodus).
Go to and search for KE eTIMS: Fetch KRA standard codes.
Click the action in the list, then click Run Manually to fetch the codes.
Go to to view the complete list of fetched OSCU codes.

UNSPSC-Codes
The KRA needs UNSPSC codes for a product to be registered. UNSPSC codes are automatically fetched from the KRA eTIMS API servers every day. To fetch them manually, proceed as follows:
Aktivieren Sie den Entwicklermodus (Fehlerbeseitigungsmodus).
Go to and search for KE eTIMS: Fetch UNSPSC codes from eTIMS.
Click the action in the list, then click Run Manually to fetch the codes.
Go to the product form, and in the Accounting tab, click the UNSPSC Category field to view the complete list of fetched UNSPSC codes.
Notices
Notices are automatically fetched from the KRA eTIMS API servers every day. To fetch them manually, proceed as follows:
Aktivieren Sie den Entwicklermodus (Fehlerbeseitigungsmodus).
Go to and search for KE eTIMS: Fetch KRA notices from eTIMS.
Click the action in the list, then click Run Manually to fetch the notices.
Go to to view the complete list of fetched notices.
Mehrere Unternehmen
Siehe auch
If you have multiple companies, you can centralize and manage them all on a single Odoo database. The KRA identifies and differentiates the parent company from its subsidiaries by using IDs. Furthermore, subsidiaries are classified as branches of the parent company.
To configure the company’s ID, open the Settings app, click Update Info in the
Companies section, and search for the eTIMS Branch Code field. The parent
company has a branch ID equal to 00 in a multi-company environment. Companies that are not the
parent company have a branch ID other than 00 and are assigned an ID by the KRA.
To fetch the branch ID from the KRA for your non-parent companies, ensure the parent company has a Kenyan Tax ID and the OSCU device has been initialized. Then, go to the Branches tab and click Populate from KRA.
Bemerkung
The KRA considers each place of supply as a separate branch (ID).
The OSCU device must be initialized independently for each branch.
Contact branch ID
To attribute a branch ID to a contact, access the contact form, go to the Accounting tab, and enter the branch code in the eTIMS Branch Code field.
Bemerkung
By default, contacts‘ branch IDs are set to OO.
KRA sequences
Wichtig
Odoo invoice sequences and KRA sequences are different.
In Odoo, invoice sequences depend on the parent company. Parent companies can see the invoices of branches, but branches cannot see the parent company’s invoices or those of other branches.
The KRA needs independent sequences per branch. Therefore, Odoo manages sequences individually per branch.
Example
If you have a parent company with two branches, the invoice sequence would be the following:
Creating an invoice on branch 1: INV/2024/00001;
Creating an invoice on branch 2: INV/2024/00002;
Creating an invoice on the parent company: INV/2024/00003.
This is how Odoo manages sequences to be compliant with the KRA regulations:
Creating an invoice on branch 1: INV/2024/00001;
Creating an invoice on branch 2: INV/2024/00001;
Creating an invoice on the parent company: INV/2024/00001.
Versicherung
For health service providers, you can send insurance information about the parent and branch companies and update it in eTIMS. To do so, go to , scroll to the Kenya eTIMS Integration section, and fill in the Code, Name, and Rate fields. Click Send Insurance Details when done.
Product registration
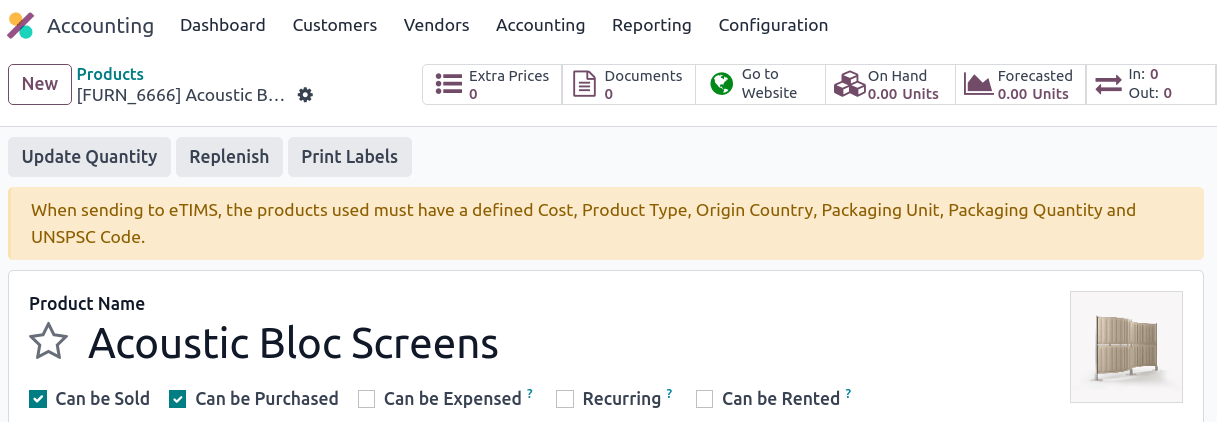
The KRA requires products to be registered first before conducting business operations (such as stock movements, BOM, customer invoices, etc.). For a product to be registered, the following fields must be defined on the product form:
In the General Information tab: Cost.
In the Accounting tab:
Packaging Unit;
Packaging Quantity;
Origin Country;
eTIMS Product Type;
Insurance Applicable;
If the elements above are defined, the product is automatically registered while sending the operation to the KRA. If not, you will be alerted by a yellow banner at the top of the screen inviting you to check the missing elements.

Stock movements
All stock movements must be sent to the KRA. They do not require an invoice if they are internal operations or stock adjustments; therefore, Odoo automatically sends them if at least one of the following conditions are met:
No contact is set for the move;
The contact is your parent company or a branch of the parent company.
If the stock moves are external operations (e.g., to contacts that are not part of the parent company or its branches), the stock moves are automatically sent after the invoice is sent to eTIMS.
Bemerkung
The stock move must be confirmed before sending the invoice to eTIMS.
The product(s) must be registered for the stock move to be sent to eTIMS. If the product has not been registered yet, a yellow banner will prompt the products‘ registration.
Einkäufe
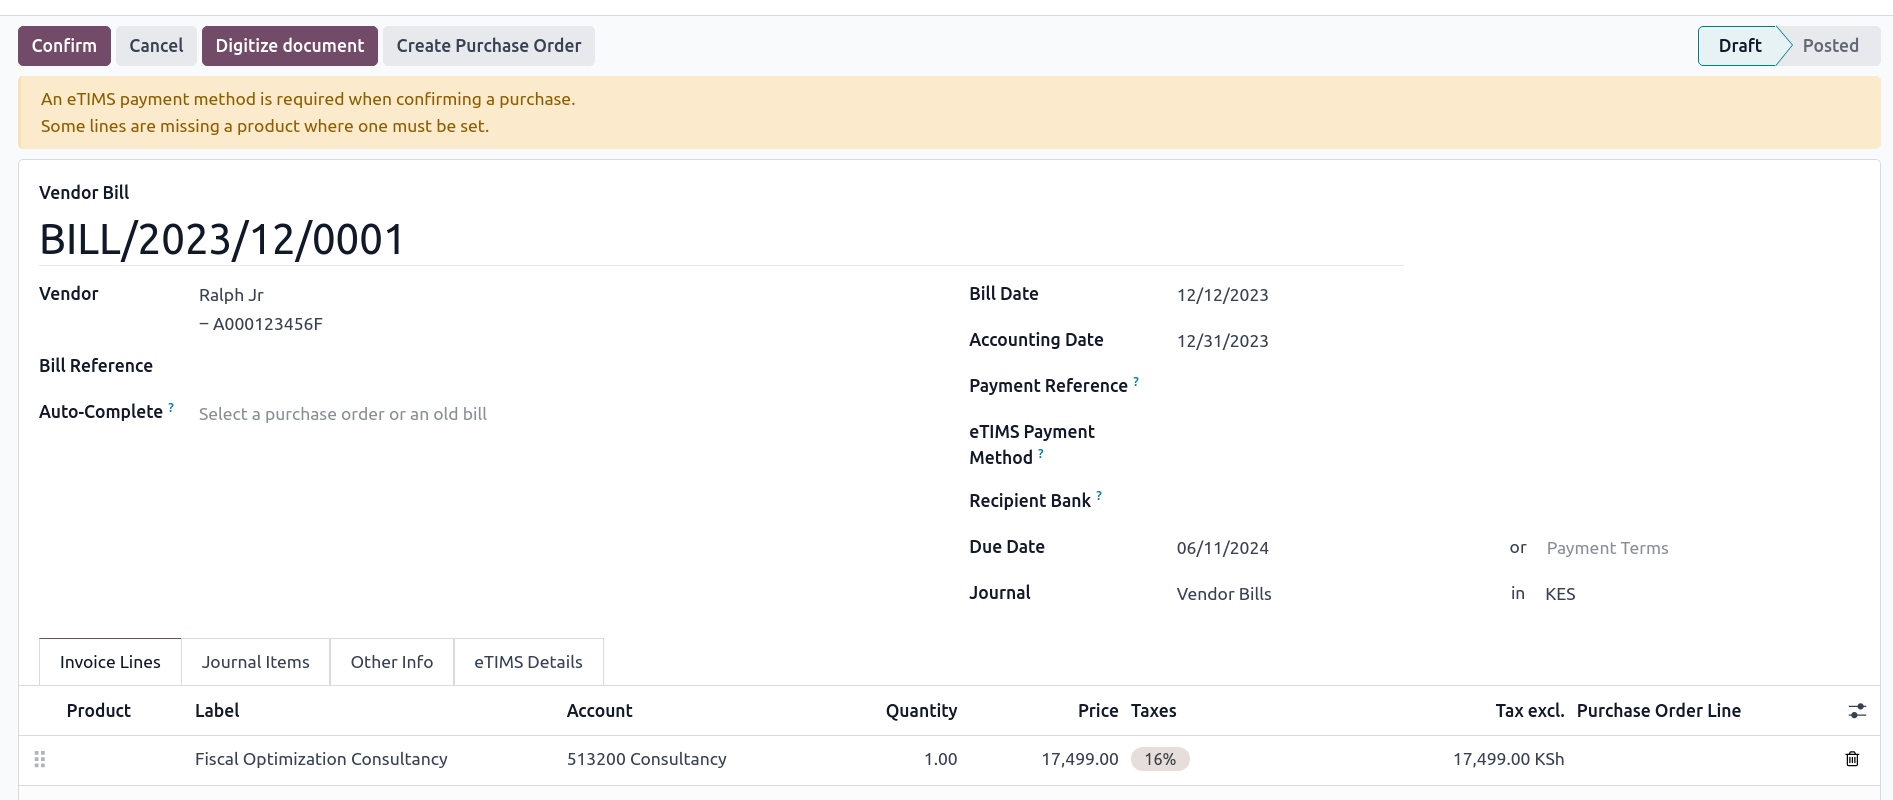
Odoo automatically fetches new vendor bills from eTIMS every day. You need to confirm the fetched vendor bills and send the confirmation to the KRA. To confirm a vendor bill, it must be linked to one or several confirmed purchase order line(s).
In the case of purchases (not customs imports), the steps to link purchase order lines with bills are the following:
Go to . The vendor bill is fetched from the KRA servers. The JSON file is available in the chatter of the vendor bill if needed.
Odoo looks at the Tax ID (PIN) of the vendor (partner);
If it is unknown, a new contact (partner) is created.
If it is known and the branch ID is the same, Odoo uses the known contact.
In the fetched bill from the KRA, select the Product. Each vendor bill must contain a product to be confirmed and sent to eTIMS later on.
Odoo checks existing purchase order lines matching the product(s) entered at the previous step and the partner (if any). Click the Purchase Order Line field, and select the correct related purchase order line(s) matching the product(s). The quantities on the bill must be the same as the received quantities indicated on the purchase order.
If no existing purchase order line matches the lines of the fetched bill, click Create Purchase Order and create a purchase order based on the unmatched line(s). Validate the resulting stock move and Confirm the bill.
Set a method in the eTIMS Payment Method field..
Once all steps are completed, click Send to eTIMS to send the vendor bill. When the vendor bill has been confirmed on eTIMS, the KRA invoice number can be found in the eTIMS Details tab.

Rechnungsstellung
Bemerkung
The KRA does not accept sales if the product is not in stock.
This is the advised sales flow in Odoo when selling:
Erstellen Sie einen Verkaufsauftrag.
Validieren Sie die Lieferung.
Bestätigen Sie die Rechnung.
Click Send and print, and then enable Send to eTIMS.
Click Send & print to send the invoice.
Once the invoice has been sent and signed by the KRA, the following information can be found on it:
KRA-Rechnungsnummer;
Mandatory KRA invoice fields, such as SCU information, date, SCU ID, receipt number, item count, internal date, and receipt signature;
The KRA tax table;
A unique KRA QR code for the signed invoice.
Importe
Customs import codes are automatically fetched from the KRA eTIMS API servers every day. To fetch them manually, proceed as follows:
Aktivieren Sie den Entwicklermodus (Fehlerbeseitigungsmodus).
Go to and search for KE eTIMS: Receive Customs Imports from the OSCU.
Click the action in the list, then click Run Manually to fetch the codes.
Go to to view the imported codes.
The following steps are required to send and have customs imports signed by the KRA:
Go to ; The customs import is fetched automatically from the KRA.
Match the imported item with an existing registered product in the Product field (or create a product if no related product exists).
Set a vendor in the Partner field.
Based on the partner, match the imported item with its related purchase order (see purchase steps). The stock must be correctly adjusted when the customs import is approved.
If no related purchase order exists, create one and Confirm it. Then, confirm the delivery by clicking Receive Products, then Validate on the purchase order.
Click Match and Approve or Match and Reject, depending on the situation of the goods.
Bemerkung
The JSON file received from the KRA is attached to the chatter of the customs import.
Stückliste
The KRA requires all BOMs to be sent to them. To send BOMs to eTIMS, the product and its components must be registered. To access a product’s BOM, click on the product and then click the Bill of Materials smart button.
Stellen Sie sicher, dass die :ref:` von der KRA erforderlichen Felder <kenya/product-registration>` im Abschnitt KRA-eTIMS-Details des Reiters Buchhaltung im Produktformular ausgefüllt sind, und klicken Sie auf An eTIMS senden. Der erfolgreiche Versand der Stückliste wird im Chatter bestätigt, wo Sie die gesendeten Informationen auch in einer angehängten JSON-Datei finden.
Gutschriften
The KRA does not accept credit notes with quantities or prices higher than the initial invoice. When creating a credit note, a KRA reason must be indicated: In the credit note form, go to the eTIMS Details tab, select the eTIMS Credit Note Reason, and then select the invoice number in the Reversal of field.