割当
休暇タイプと休暇累積(付与ルール)が設定されたら、次のステップは従業員に休暇を*割り当てる*(付与する)ことです。
休暇アプリの割当ページは、休暇アプリケーションの休暇管理者または管理者のいずれかのアクセス権を持つユーザにのみ表示されます。アクセス権の詳細については、アクセス権のドキュメントを参照してください。
休暇を付与する
新しい割当を作成するには、に移動します。
これにより、現在のすべての割当とそれぞれのステータスの一覧が表示されます。
Click New to allocate time off, and a blank allocation form appears.
フォームの最初の空白フィールドに割当の名前を入力した後、以下の情報を入力します:
休暇タイプ: ドロップダウンメニューを使用して、従業員に割り当てられる休暇のタイプを選択します。
Allocation Type: Select either Regular Allocation or Accrual Allocation. If the allocation is not based on an accrual plan, select Regular Allocation.
Accrual Plan: If Accrual Allocation is selected for the Allocation Type, the Accrual Plan field appears. Using the drop-down menu, select the accrual plan with which the allocation is associated. An accrual plan must be selected for an Accrual Allocation.
有効期間/開始日: 割当タイプに通常割当が選択されている場合、このフィールドは有効期間というラベルになります。割当タイプに累積割当が選択されている場合、このフィールドは開始日というラベルになります。
デフォルトでは、最初の日付フィールドに現在の日付が入力されます。別の日付を選択するには、事前入力された日付をクリックしてポップオーバーカレンダーウィンドウを表示します。割り当ての開始日に移動し、日付をクリックして選択します。
If the allocation expires, select the expiration date in the next date field. If the time off does not expire, leave the second date field blank. No Limit appears in the field if no date is selected.
:guilabel:`割り当てタイプ`に:guilabel:`累積割当`が選択されている場合、この2番目のフィールドには:guilabel:`実行期限`というラベルが付けられます。
重要
If the Start Date entered is in the middle of a period of time, such as the middle of the month, Odoo applies the allocation to the beginning or end of the period, depending on the Accrued Gain Time entered on the accrual plan (either At the start of the accrual period, or At the end of the accrual period) instead of the specific date entered.
For example, an allocation is created, and references an accrual plan that grants time At the start of the accrual period, monthly, on the first of the month.
On the allocation form, the Allocation Type is set to Accrual Allocation, and the Start Date entered is
06/16/24.Odoo's Time Off app retroactively applies the allocation to the beginning of the time period entered in the Start Date.
Therefore, this allocation accrues time from
06/01/24, rather than06/16/24.Additionally, if on the accrual form, the allocation references an accrual plan that grants time `At the end of the accrual period, the allocation accrues time from
7/01/24rather than6/18/24.付与数: 従業員に割り当てられる時間を入力します。このフィールドには、選択した休暇タイプの設定に応じて、時間または日で時間が表示されます。
Mode: Using the drop-down menu, select how the allocation is assigned. This selection determines who receives the time off allocation. The options are By Employee, By Company, By Department, or By Employee Tag.
Depending on what is selected for the Mode, the field beneath Mode is labeled either: Employees, Company, Department, or Employee Tag.
Using the drop-down menu, indicate the specific employees, company, department, or employee tags receiving this time off.
Multiple selections can be made for either Employees or Employee Tag.
Only one selection can be made for the Company or Department.
理由を追加...: 休暇の割り当てを説明するための説明またはメモが必要な場合は、フォームの下部にあるこのフィールドに入力します。

付与申請
従業員が休暇をすべて使用した場合、または休暇が不足する場合は、追加の休暇の付与を申請できます。付与は、ダッシュュボードまたは個人の付与ビューの2つの方法で申請できます。
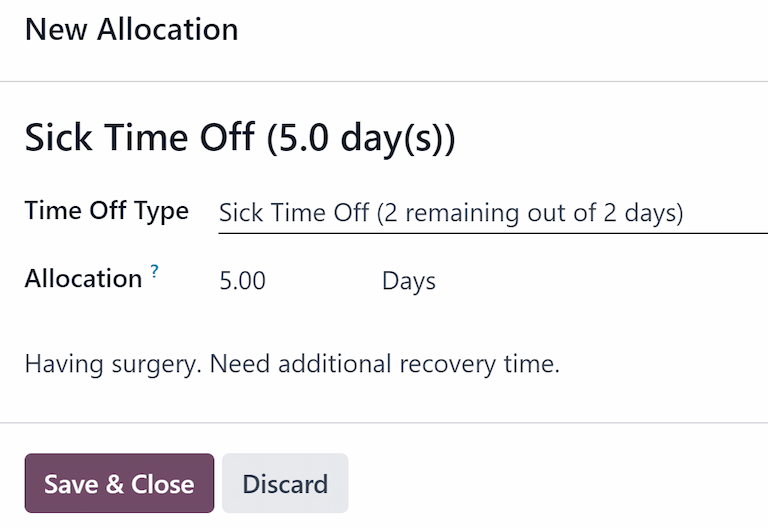
新しい付与申請を作成するには、**休暇**ダッシュボードのメイン画面の新規付与申請ボタン、または個人の付与リストビューの新規ボタンをクリックします。どちらのボタンも新しい付与申請フォームを開きます。
注釈
Both options open a new allocation request form, but when requested from the Dashboard, the form appears in a pop-up window, and the Validity Period field does not appear. When requested from the My Allocations list view, the screen navigates to a new allocation request page, instead of presenting a pop-up window.
新しい付与申請フォームに次の情報を入力します:
Time Off Type: Select the type of time off being requested for the allocation from the drop-down menu. After a selection is made, the title updates with the time off type.
Validity Period: By default, the current date populates this field, and it is not able to be modified. This field only appears when requesting an allocatoin from the My Allocations view ().
付与数:このフィールドに申請する時間を入力します。形式は、休暇タイプの設定に応じて、日または時間で表示されます。このフィールドに入力すると、付与申請の名前が更新され、申請する時間が含まれます。
理由を追加...:このフィールドに付与申請の説明を入力します。これには、承認者が申請を承認するために必要な詳細を含める必要があります。
申請がダッシュュボードから作成された場合は、新規付与ポップアップウィンドウの保存して閉じるボタンをクリックして、情報を保存し、申請を送信します。
If the form was completed from the My Allocations list view, the information is automatically saved as it is entered. However, the form can be saved manually at any time by clicking the (cloud upload) icon.