
採用
Odoo keeps all job applicants organized with a pre-configured series of steps and stages that each applicant goes through. Each stage has a specific step(s) that should be performed. These range from scheduling a phone call, conducting an interview, or sending a job offer, for example. This process is referred to as the 'applicant flow.'
When an applicant applies for a job position, an applicant card is automatically created in Odoo's Recruitment app for that specific job position. As the applicant progresses through the recruitment pipeline, the recruitment team moves their card from one stage to the next.
Stages can be configured so that an email is automatically sent out using a set, pre-configured template as soon as an applicant's card enters a stage. These automated emails are defined on each stage in the applicant flow.
The applicant flow explained in this document is the default flow in Odoo, and goes through the applicant flow when using the Recruitment application's default configuration. The applicant flow is able to be modified to suit the specific recruitment flow for any business.
注釈
The applicant flow with all its stages are universal and applies to all job positions, unless specified. A specific stage can be configured to be job-specific, meaning that specific stage is only visible for that specific job position. Otherwise, if a new stage is created, or an existing stage is modified, those changes are visible on all job positions.
管理設定
Before creating a job position in Odoo, configure the necessary settings for the Recruitment app. To view and edit the settings, navigate to . After any changes are made, click the Save button in the top-left corner to save all the changes.
Job posting
The Job Posting section of the Recruitment app settings has only one selection to make. If job positions are to be posted to the company's website, enable the Online Posting option.
注釈
The Online Posting is only available if the Website application is also installed.
Recruitment process
The Recruitment process section of the settings page specifies what the database can and cannot do during the recruitment process.
面接アンケート調査を送信
Odooは、応募者に関する詳細情報を収集するためにアンケート調査を応募者に送信できます。アンケート調査は試験や質問票と考えることができ、さまざまな方法でカスタマイズして採用チームに応募者に関する貴重な洞察を提供できます。
面接アンケート調査を送信オプションを有効にして、応募者にアンケート調査を送信します。有効にすると、面接アンケート調査の内部リンクが表示されます。面接アンケート調査リンクをクリックして、作成されたすべてのアンケート調査のリストに移動します。
This list includes all surveys that were created in the database, not just surveys used in the Recruitment app. If no surveys have been created, the surveys list displays a No Survey Found message, and presents options to create a survey from several pre-configured survey templates.
参照
For more detailed information about surveys, refer to the survey essentials documentation.
注釈
Enabling the Send Interview Survey option will install the Surveys application once the settings are saved, if it is not installed already.
SMS配信
It is possible to send text messages to applicants directly through the Recruitment app. To do so, enable the Send SMS option. This option requires credits to use, which can be obtained by clicking the Buy credits internal link that emerges when the feature is enabled.
参照
詳細は、:doc:`SMSの価格とFAQ <../marketing/sms_marketing/pricing_and_faq>`ドキュメンテーションを参照して下さい。
CV display
When applicants submit an application, one of the default required fields is a resumé, or CV. All resumés are stored in the Documents application, and are accessible on the applicant's card.
A resumé has the option to appear on the applicant's form, which can be viewed by clicking on the applicant's card. The resumé appears on the right-side of the screen. If this is not enabled, the resumé is accessed via a link in the chatter, where it needs to be clicked to expand and view it, or downloaded.
Enable the CV Display option to show the resumé on the applicant's card by default, and in addition to the document link. When enabled, the resumé appears on the right side of the applicant's card.
注釈
For the resumé to appear on the right-side, the browser window must be in full-screen mode (where the browser spans the entire screen).
If the browser window is set to a size smaller than the entire width of the screen (not full-screen), then the resumé does not appear on the right-side. Instead, the resumé appears in the Files section of the chatter, below the applicant's card.

CV digitization (OCR)
When an application is submitted using any of the available methods, such as an online application submission, emailing a resume to the job position alias, or creating an applicant record directly from the database, it is possible to have Odoo extract the applicant's name, phone number, and email address from the resumé and populate the applicant's form. To do so, enable the CV Digitization (OCR) option.
有効にすると、追加のオプションが表示されます。対応するラジオボタンをクリックして、次のオプションのいずれかを選択します:
Do not digitize: this option turns off resumé digitization.
Digitize on demand only: this option only digitizes resumes when requested. A Digitize document buttons appears on applicant cards. When clicked, the resumé is scanned and the applicant's card is updated.
Digitize automatically: this option automatically digitizes all resumés when they are submitted.
Beneath these options are two additional links. Click the Buy credits button to purchase credits for CV digitization. Click the View My Services to view a list of all current services, and their remaining credit balances.
ドキュメントのデジタル化とIAP(アプリ内購入)の詳細については、アプリ内購入(IAP)のドキュメントを参照してください。
注釈
The Do not digitize option for CV digitization (OCR) at first may seem like a redundancy. It seems to be the same as disabling the CV digitization (OCR) option.
When the CV digitization (OCR) option is enabled, a module is installed so that resumés can be scanned. Disabling this option would uninstall the module.
If at some point, there is a desire to temporarily stop digitizing resumés, the Do not digitize option is selected. The reason this option is available is so that the module is not uninstalled, allowing for digitization to be enabled in the future by selecting one of the other two options.
給与パッケージ設定ツール
応募者にオファーを送信するときに、オファーに有効期限を設定できます。日フィールドに、オファーが有効な日数を入力します。設定された日数が経過した後、応募者がオファーを受け入れていない場合、オファーは対応可能ではなくなります。
かんばんビュー
To access the Kanban view for a job position, navigate to the main dashboard, which is the default view when opening the application. All job positions appear on the main dashboard. Click the (#) New Applications smart button on a job position card to navigate to the Kanban view for all the applicants for that particular job position.

Inside the job application, the Kanban stages appear, with all the applicants populated in their respective columns, indicating what stage they are currently in. There are six default stages in Odoo:
最後の列である契約署名済みは、デフォルトで折りたたまれています。折りたたまれた列は灰色で表示され、その中の応募者は非表示になります。折りたたまれたステージを展開して、その列の応募者カードを表示するには、ステージ名が表示されている細い灰色の列の任意の場所をクリックすると、列が展開され、応募者が表示されます。

各ステージには、ステージ名の下に色分けされたバーがあり、その特定のステージにいる応募者のステータス情報が表示されます。ステータスの色は次のとおりです:
緑:応募者は次のステージに進む準備ができています。
赤:応募者は次のステージへの移動がブロック中です。
灰色:応募者は現在のステージで進行中であり、次のステージへの準備もブロックもされていません。
各カードのステータスは手動で設定します。ステータスを設定するには、応募者カードの左下にある小さな円形をクリックします。ステータスのポップアップウィンドウが表示されます。応募者に対して希望するステータスをクリックします。応募者カードのステータスドットとステータスバーが更新されます。

ちなみに
The names for the three status colors (In Progress, Blocked, and Ready for Next Stage)
can be modified, if desired.
ステージをカスタマイズ
Stages can be modified, added, or deleted to best meet the needs of the particular hiring steps of a business.
新しいステージ
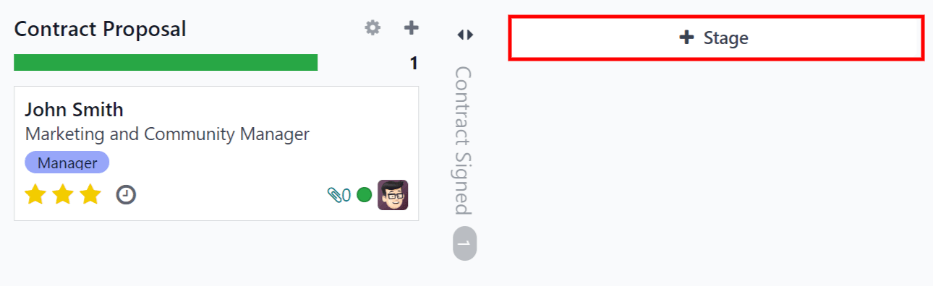
新しいステージを作成するには、ステージをクリックすると、新しい列が表示されます。ステージタイトルフィールドに新しいステージのタイトルを入力し、追加をクリックします。新しい列が表示され、さらに別の新しいステージを作成できるようになります。新しいステージが不要な場合は、画面上の任意の場所をクリックして、新しいステージの作成を終了します。
ステージの変更
To modify the settings of a stage, hover over the name of the stage, and a (gear) icon appears in the upper right hand side of the stage. Click on the (gear) icon and a menu appears. Then click on the Edit option. An Edit: (Stage) form appears. Make any desired modifications to the form, then click Save & Close when done.

ステージ編集フォーム
編集:(ステージ)フォームでは、ステージの設定を構成します。必須フィールドは:guilabel:ステージ名のみです。
入力または変更するフィールドは次のとおりです:
Stage Name: type in a name for the stage.
Email Template: select an email template to be used from the drop-down menu. If a template is selected, when the applicant card enters the stage, an email is automatically sent to the applicant using the selected template.
Folded in Kanban: check the box to have the stage appear folded (hidden) at all times in the default view.
Hired Stage: check the box if this stage indicates that the applicant is hired. When an applicant's card enters this stage, the card displays a Hired banner in the upper right corner. If this box is checked, this stage is used to determine the hire date of an applicant.
Job Specific: if the stage only applies to specific job positions, select the job positions from the drop-down menu. Multiple job positions can be selected.
Show in Referrals: check the box if this stage should be seen in the Referrals application, and allow the referrer to accrue points when a referral of theirs reaches this stage. If this is active, a Points field appears. Enter the amount of referral points the employee receives when an applicant enters this stage. The Referrals app must be installed in order to use this option.
Tooltips section: there are three pre-configured status labels (colored circles) for each applicant's card, indicating its status. These colors are displayed at the top of each stage to reflect the statuses of the applicants in the stage. The names for the label can be modified, but the label itself (the color) cannot. The default names and labels are: In Progress (gray), Blocked (red), and Ready for Next Stage (green).
Requirements: enter any internal notes for this stage explaining any requirements of the stage.
ステージの削除
If a stage is no longer needed, the stage can be deleted. To delete a stage, hover over the name of the stage, and a (gear) icon appears. First, click on the (gear) icon to reveal a drop-down menu, then click Delete. A Confirmation pop-up warning appears, asking Are you sure you want to delete this column? Click Delete to delete the column.
重要
削除しようとしているステージに現在応募者がいる場合、ステージを削除しようとするとエラーが表示されます。ステージを削除する前に、ステージ内の現在のレコードを削除、アーカイブ、または別のステージに移動する必要があります。
メールテンプレート
To communicate with the applicant, Odoo has several pre-configured email templates that can be used. The pre-configured email templates and when to use them are as follows:
採用:応募者確認:このテンプレートは、応募者に応募が受理されたことを知らせるために使用されます。このメールは、応募者が:guilabel:
新規ステージになると自動的に送信されます。採用:関心:このテンプレートは、応募者に応募が採用担当者の注意を引いたこと、そして通話または面接のために候補者リストに追加されたことを知らせるために使用されます。
Recruitment: Schedule Interview: this template is used to let the applicant know that they have passed the Initial Qualification stage and they will be contacted to set up an interview with the recruiter. This email is automatically sent out once the applicant is in the Initial Qualification stage.
採用:関心がなくなった:このテンプレートは、応募者がポジションに関心がなくなったことを伝えてきた場合に使用され、時間と検討に対して感謝の意を表します。
採用:却下:このテンプレートは、応募者がポジションの検討対象外となった場合に使用されます。
注釈
メールテンプレートは、ビジネスのニーズに合わせて作成、変更、削除できます。メールテンプレートの詳細については、メールテンプレートドキュメントを参照してください。
手動でメールを送信するには、チャッターで:guilabel:メッセージを送信をクリックします。テキストボックスと応募者のメールアドレスが表示されます。
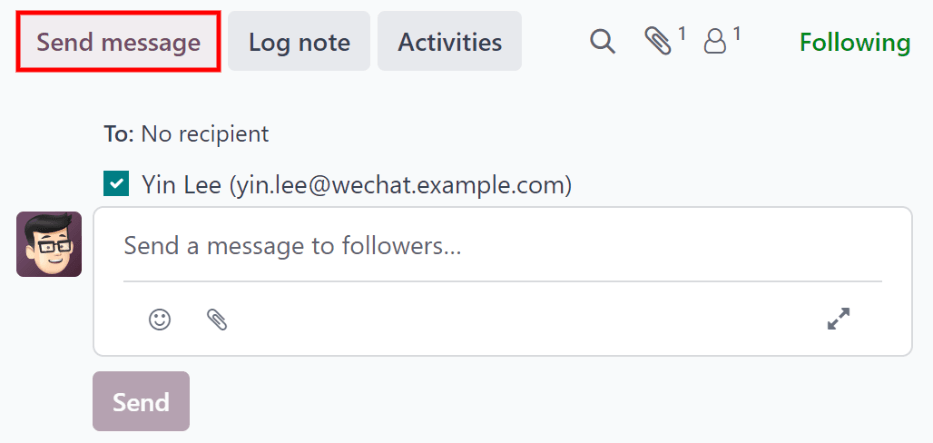
Click the (expand) full composer icon in the bottom right corner of
the Send Message tab in the chatter. A Compose Email pop-up window loads,
with the Recipients and Subject pre-populated. The applicant's email address
is entered in the Recipients line, and the Subject is (Job Position). The
email body is empty by default.
To use a pre-configured email template, click the field next to Load template in the bottom section of the window. Select the email template to use from the drop-down menu.
Pre-configured email templates may contain dynamic placeholders so unique information can be populated in the email for a more personalized message to the applicant. There are several pre-configured email templates to choose from. Depending on the template selected, the email subject and/or body may change.
注釈
Only the email templates that are configured for the model load. There are other email templates pre-configured in Odoo, but if they are not configured for the recruitment application, they do not appear in the list of available templates.
If any attachments are to be added, click the Attachments button in the lower left corner. Navigate to the file to be attached, then click Open to attach it. To delete an attachment, click the (delete) icon to the right of the attachment.
If any changes need to be made to the email, edit the body of the email. If the edits should be saved to be used in the future, the email can be saved as a new template. Click the Save Template button in the bottom. To send the email, click Send and the email is sent to the applicant. The email then appears in the chatter.

参照