
自動化規則
Automation rules are used to trigger automatic changes based on user actions (e.g., apply a modification when a field is set to a specific value), email events, time conditions (e.g., archive a record 7 days after its last update), or external events.
To create an automation rule with Studio, proceed as follows:
Select the トリガー and, if necessary, fill in the fields that appear on the screen based on the chosen trigger.
施策を追加をクリックし、Typeから施策を選択して、選択した施策に基づいて画面に表示されるフィールドに入力します。
保存して閉じるまたは保存して新規作成をクリックします。
Example
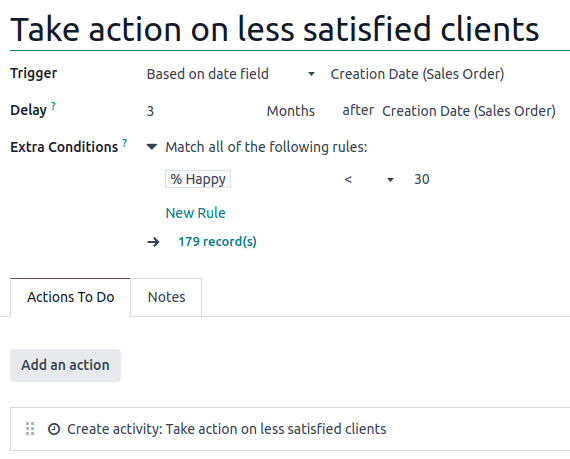
ちなみに
To modify the model of the automation rule, switch models before clicking Automations in Studio, or activate the developer mode, create or edit an automation rule, and select the Model in the Automation Rules form.
You can also create automation rules from any kanban stage by clicking the gear icon (⚙ ) next to the kanban stage name, then selecting Automations. In this case, the Trigger is set to Stage is set to by default, but you can change it if necessary.

トリガー
The Trigger is used to define when the automation rule should be applied. The available triggers depend on the model. Five trigger categories are available overall:
ちなみに
You can also define a Before Update Domain to specify the conditions that must be met before the automation rule is triggered. In contrast, the conditions defined using the Extra Conditions and Apply on filters are checked during the execution of the automation rule.
To define a Before Update Domain, activate the developer mode, create or edit an automation rule, click Edit Domain, then click New Rule.
For example, if you want the automated action to happen when an email address is set on a contact that did not have an address before (in contrast to modifying their existing address), define the Before Update Domain to Email is not set, and the Apply on domain to Email is set.

値が更新されました
The triggers available in this category depend on the model and are based on common field changes, such as adding a specific tag (e.g., to a task) or setting the User field. Select the trigger, then select a value if required.

Eメールイベント
メールの受信または送信時に自動アクションをトリガーします。
タイミング条件
Trigger automated actions based on a date field. The following triggers are available:
Based on date field: Select the field to be used next to the Delay field.
After creation: The action is triggered when a record is created and saved.
After last update: The action is triggered when an existing record is edited and saved.
次に、以下を定義できます:
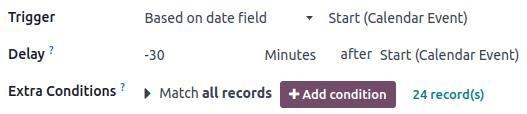
a Delay: Specify the number of minutes, hours, days, or months. To trigger the action before the trigger date, specify a negative number. If you selected the Based on date field trigger, you must also select the date field to be used to determine the delay.
Extra Conditions: Click Add condition, then specify the conditions to be met to trigger the automation rule. Click New Rule to add another condition.
The action is triggered when the delay is reached and the conditions are met.
Example
If you want to send a reminder email 30 minutes before the start of a calendar event, select the Start (Calendar Event) under Trigger Date and set the Delay to -30 Minutes.
注釈
By default, the scheduler checks for trigger dates every 4 hours, meaning lower granularity in time-based automations may not always be honored.
カスタム
自動アクションをトリガー:
On save: When the record is saved;
On deletion: When a record is deleted;
On UI change: When a field's value is changed on the Form view, even before saving the record.
保存時およびUI変更時のトリガーでは、更新時フィールドで自動化ルールをトリガーするために使用するフィールドを選択する**必要があります**。
警告
:guilabel:`更新時`フィールドでフィールドが選択されていない場合、自動アクションはレコードごとに複数回実行される可能性があります。
オプションで、:guilabel:`適用対象`フィールドで自動化ルールをトリガーするための追加条件を定義することもできます。
注釈
The On UI change trigger can only be used with the コードを実行 action and only works when a modification is made manually. The action is not executed if the field is changed through another automation rule.
外部
Trigger automated actions based on an external event using a webhook. A webhook is a method of communication between two systems where the source system sends an HTTP(S) request to a destination system based on a specific event. It usually includes a data payload containing information about the event that occurred.
To configure the On webhook trigger, copy the URL generated by Odoo into the destination system (i.e., the system receiving the request). Then, in the Target Record field, enter the code to run to define the record(s) to be updated using the automation rule.
警告
The URL must be treated as confidential; sharing it online or without caution could potentially expose your system to malicious parties. Click the Rotate Secret button to change the URL's secret if necessary.
注釈
The code defined by default in the Target Record field works for webhooks coming from another Odoo database. It is used to determine the record(s) to be updated using the information in the payload.
If you wish to use the webhook's content for a purpose other than to find the record(s) (e.g., create a record), your only option is to use an コードを実行 action. In this case, the Target record field must contain any valid code, but its result doesn't have any effect on the automated action itself.
The webhook content is available in the server action context as a
payloadvariable (i.e., a dictionary that contains the GET parameters or POST JSON body of the incoming request).
You can also choose to Log Calls to record the payloads received, e.g., to make sure the data sent by the source system matches the expected format and content. This also helps identify and diagnose any issues that may arise. To access the logs, click the Logs smart button at the top of the Automation rules form.
ToDoアクション
Once you have defined the automation rule's trigger, click Add an action to define the action to be executed.
ちなみに
You can define multiple actions for the same trigger/automation rule. The actions are executed in the order they are defined. This means, for example, that if you define an Update record action and then a Send email action, the email uses the updated values. However, if the Send email action is defined before the Update record action, the email uses the values set before the update action is run.
レコードを更新
This action allows to update one of the record's (related) fields. Click the Update field and, in the list that opens, select or search for the field to be updated; click the right arrow next to the field name to access the list of related fields if needed.
many2manyフィールドを選択した場合は、選択した値に対して追加、削除、または設定することでフィールドを更新するか、空にするかを選択します。
Example
If you want the automated action to remove a tag from the customer record, set the Update field to Customer > Tags, select By Removing, then select the tag.

ちなみに
または、Pythonコードを使用してレコードのフィールドを動的に設定することもできます。これを行うには、Updateの代わりに計算を選択し、フィールドの値を計算するために使用するコードを入力します。たとえば、タスクの優先度が`High`に設定されたとき(タスクにスターを付けることで)に、自動化ルールでカスタムのdatetimeフィールドを計算する場合、トリガーをPriority is set toから`High`に定義し、Update Record施策を次のように定義できます:

活動を作成
この施策は、レコードにリンクされた新しい活動をスケジュールするために使用されます。Activity Typeを選択し、Titleと説明を入力してから、Due Date Inフィールドで活動をスケジュールするタイミングを指定し、User typeを選択します:
To always assign the activity to the same user, select Specific User and add the user in the Responsible field;
レコードにリンクされたユーザを動的にターゲットにするには、Dynamic User (based on record)を選択し、必要に応じてUser Fieldを変更します。
Example
リードが案件に変換された後、自動化施策でリード担当ユーザのための通話を設定します。これを行うには、Activity TypeをCallに設定し、User TypeをDynamic User (based on record)に設定します。

メール送信とSMS送信
これらの施策は、特定のレコードにリンクされた連絡先にメールまたはテキストメッセージを送信するために使用されます。これを行うには、Email TemplateまたはSMS Templateを選択または作成し、Send Email AsまたはSend SMS Asフィールドで、メールまたはテキストメッセージの送信方法を選択します:
メール: :guilabel:`メールテンプレート`の受信者にメッセージをメールとして送信します。
メッセージ: レコードにメッセージを投稿し、レコードのフォロワーに通知します。
メモ: チャッター内で内部ユーザーに表示される内部メモとしてメッセージを送信します。
SMS(メモなし): :guilabel:`SMSテンプレート`の受信者にメッセージをテキストメッセージとして送信します。
SMS(メモ付き): :guilabel:`SMSテンプレート`の受信者にメッセージをテキストメッセージとして送信し、チャッターに内部メモとして投稿します。
メモのみ: チャッターに内部メモとしてのみメッセージを投稿します。
フォロワーの追加とフォロワーの削除
Use these actions to (un)subscribe existing contacts to/from the record.
レコードを作成
この施策は、任意のモデルで新しいレコードを作成するために使用されます。
Record to Createフィールドで必要なモデルを選択します(デフォルトでは現在のモデルが含まれています)。レコードのNameを指定し、別のモデルでレコードを作成する場合は、Link Fieldフィールドでフィールドを選択して、新しいレコードの作成をトリガーしたレコードをリンクします。
注釈
Link Fieldフィールドに関連するドロップダウンリストには、現在のモデルに存在するone2manyフィールドのうち、ターゲットモデルのmany2oneフィールドにリンクされているもののみが含まれます。
ちなみに
You can create another automation rule with レコードを更新 actions to update the fields of the new record if necessary. For example, you can use a Create Record action to create a new project task and then assign it to a specific user using an Update Record action.
コードを実行
このアクションはPythonコードを実行するために使用されます。:guilabel:`コード`タブに次の変数を使用してコードを記述できます:
env: アクションがトリガーされる環境model: アクションがトリガーされるレコードのモデル。空のレコードセットrecord: アクションがトリガーされるレコード。空の場合がありますrecords: マルチモードでアクションがトリガーされるすべてのレコードのレコードセット。空の場合がありますtime、datetime、dateutil、timezone: 便利なPythonライブラリfloat_compare: 特定の精度に基づいて浮動小数点数を比較するユーティリティ関数log(message, level='info'):ir.loggingテーブルにデバッグ情報を記録するログ関数_logger.info(message):サーバログにメッセージを出力するロガーUserError:ユーザ向け警告メッセージを発生させる例外クラスCommand:x2manyコマンド名前空間action = {...}:アクションを返す
ちなみに
利用可能な変数は、コードタブとヘルプタブの両方に記載されています。
Webhook通知を送信
This action allows to send a POST request with the values of the Fields to the URL specified in the URL field.
サンプルペイロードは、ランダムなレコードのデータを使用して、またはレコードが利用できない場合はダミーデータを使用して、申請に含まれるデータのプレビューを提供します。
既存アクションの実行
この施策は、複数の施策(現在のモデルにリンクされた)を同時にトリガーするために使用されます。これを行うには、明細追加をクリックし、Add: Child Actionsポップアップで既存の施策を選択するか、Newをクリックして新しい施策を作成します。