ライブチャット
Odooの ライブチャット 機能では、ユーザはウェブサイト訪問者とリアルタイムでコミュニケーションをとることができます。 ライブチャット**機能により、リードの販売可能性を評価したり、サポートに関する質問に迅速に回答したり、問題を適切なチームに転送してさらなる調査やフォローアップを行うことができます。 **ライブチャット 機能では、顧客からの即時フィードバックを得ることもできます。
ライブチャットを有効にする
ライブチャット アプリケーションのインストール方法は複数あります:
に移動し、
ライブチャットを検索し、インストール をクリックします。のリストビューに移動し、チームを選択して、そのチームの設定ページで、ライブチャット のチェックボックスをクリックします。チャネル セクションの下にあります。
に進み、Eメールマーケティング セクションまでスクロールし、ライブチャット の横のボックスにチェックを入れ、保存 をクリックします。

注釈
ライブチャット アプリケーションがインストールされると、デフォルトでライブチャットの チャネル が作成されます。
ライブチャットチャネルを作成する
新しいライブチャットの チャネル を作成するには、 に移動します。これにより、空白のチャネル詳細フォームが開きます。チャネル名 フィールドに新しいチャネルの名前を入力します。

チャネル詳細フォームの残りのタブ (オペレータ、オプション、チャネル規則、および ウィジェット) を設定するには、以下の手順に従います。
ちなみに
任意のチャネルの詳細フォームにアクセスするには、ダッシュボードの ウェブサイトライブチャットチャネル に戻り、パンくずリストを使用します。適切なライブチャットチャネルのかんばんカードを見つけ、カーソルを合わせ、 :guilabel:` (縦三点リーダ)` アイコンをクリックしてドロップダウンメニューを開きます。チャネル設定 をクリックすると、チャネルの詳細フォームが開きます。
オペレータータブ
*オペレータ*とは、顧客からのライブチャットのリクエストに対応する担当者として業務を行うユーザを指します。 ライブチャットチャネルにユーザがオペレータとして追加されると、データベース内のどこにいてもウェブサイト訪問者からのチャットを受信することができます。 チャットウィンドウは画面の右下隅に開きます。

チャネルの詳細フォームで、オペレータ タブをクリックします。ライブチャットチャネルを最初に作成したユーザが、デフォルトでオペレータとして追加されています。
注釈
現在のオペレーターは、オペレーター タブのそれぞれのボックスをクリックすることで編集または削除できます。これにより、個別の 開く: オペレーター モーダルが表示されます。そのモーダルで、必要に応じて情報を調整します。次に、保存 をクリックするか、削除 をクリックしてそのオペレーターをチャネルから削除します。
追加`をクリックすると、:guilabel:`追加: オペレータ ポップアップウィンドウが表示されます。
ポップアップウィンドウで、希望するユーザを見つけるためにスクロールするか、検索バーに名前を入力します。次に、追加するユーザの横にあるチェックボックスにチェックを入れ、選択 をクリックします。
このポップアップウィンドウから直接、新しいオペレーターを作成してリストに追加することもできます。新規作成 をクリックし、オペレーターを作成 フォームに入力します。フォームの入力が完了したら、保存して閉じる をクリックするか、複数のレコードを作成する場合は 保存して新規作成 をクリックします。
危険
新しいユーザを作成すると、データベース内の総ユーザ数が請求率に影響するため、Odooサブスクリプションのステータスに影響を与える可能性があります。新しいユーザを作成する前には、十分にご注意下さい。ユーザがすでに存在する場合、そのユーザをオペレーターとして追加しても、データベースのサブスクリプションや請求率は変更されません。
オプションタブ
ライブチャットチャネルの詳細フォームの オプション タブには、ライブチャットウィンドウの視覚的およびテキストの設定が含まれています。
ライブチャットボタン
ライブチャットボタン は、ウェブサイトの右下隅に表示されるアイコンです。

通知テキスト フィールドのテキストを変更することで、ウェブサイトにライブチャットボタンが表示された際に、テキストバブル内に表示される挨拶文を更新できます。
ライブチャットボタン色`は、ウェブサイトに表示されるライブチャットボタンの色を変更します。色を変更するには、色のバブルをクリックして色選択ウィンドウを開き、色のグラデーションに沿って円をクリックしてドラッグします。完了したら、選択ウィンドウの外をクリックしてください。色バブルの右にある :icon:`fa-refresh (リフレッシュ) アイコンをクリックすると、色をデフォルトの選択に戻します。
ちなみに
ボタンまたはヘッダーの色の選択は、スライダーを使用して手動で、またはいずれかのカラーバブルをクリックすると表示されるポップアップカラー選択ウィンドウから RGB、HSL、または HEX カラーコードのエントリを使用して行うことができます。オペレーティングシステムに応じて、さまざまなオプションが利用可能です。
ライブチャットウィンドウ
The Livechat Window is the space where the live chat conversation with website visitors takes place.
ウェルカムメッセージ を編集して、訪問者が新しいチャットセッションを開始したときに表示されるメッセージを変更します。このメッセージは、あたかもライブチャットのオペレータから送られたかのように表示され、挨拶と会話を始めるきっかけの両方の役割を果たします。
チャット入力プレースホルダ を編集して、訪問者が返信を入力するボックスに表示されるテキストを変更します。このメッセージは、訪問者にチャットを開始するよう促します。
チャネルヘッダー は、チャットウィンドウの上部にある色付きのバーです。チャネルヘッダーの色 は、ライブチャットボタン と同じ手順で変更できます。

紫色のチャネルヘッダーと「何かお書きください...」というプレースホルダテキストが表示されたライブチャットウィンドウ。
チャネル規則タブ
ライブチャットウィンドウを開くウェブサイト上のユーザアクションを設定するには、ライブチャットチャネルの詳細フォームの チャネル規則 タブに移動します。
新しいチャネル規則を作成するには、 行を追加 をクリックします。これにより、 規則を作成 ポップアップウィンドウが開きます。

新しい規則を作成する
:guilabel:`規則を作成`ポップアップウィンドウのフィールドに、以下の指示に従って入力し、:guilabel:`保存して閉じる`をクリックしてください。
ライブチャットボタン は、ウェブサイトの右下隅に表示されるアイコンです。以下の表示オプションからいずれかを選択してください:
表示: ページにチャットボタンを表示します。
通知付きで表示: チャットボタンと、その横にはフローティングテキストバブルを表示します。
自動的に開く: ボタンを表示し、指定した時間(このオプションを選択すると表示される 自動的に開くタイマー フィールドで指定)後にチャットウィンドウを自動的に開きます。
非表示: ページ上のチャットボタンを非表示にします。
このチャネルに チャットボット を含めるには、ドロップダウンメニューから選択してください。オペレータが不在の場合のみチャットボットを有効にする場合は、オペレータが不在の場合にのみ有効 チェックボックスをオンにしてください。
オペレータが不在の場合のみ有効 フィールドは、チャットボット フィールドでチャットボットが選択されている場合にのみ表示されます。
URL Regex は、この規則を適用するウェブページを指定します。URL Regex フィールドに、チャットボタンを表示するページの相対 URL を入力してください。
たとえば、URL`https://mydatabse.odoo.com/shop`に規則を適用するには、URL Regex フィールドに /shop と入力します。
データベースの すべての ページにこの規則を適用するには、URL Regex フィールドに / を入力してください。
このフィールドは、チャットウィンドウが開くまでにページが開いているべき時間 (秒単位) を指定します。このフィールドは、この規則の ライブチャットボタン が 自動的に開く に設定されている場合にのみ表示されます。
このチャネルを特定の国のサイト訪問者に のみ 利用可能にする場合は、国 フィールドに国名を追加してください。このフィールドを空白のままにすると、ロケーションに関係なく、すべてのサイト訪問者がチャネルを利用できるようになります。
注釈
訪問者の地理的なロケーションを追跡するには、GeoIP をデータベースにインストールする必要があります。この機能は Odoo オンライン データベースにはデフォルトでインストールされていますが、オンプレミス データベースでは追加の セットアップ手順 が必要です。
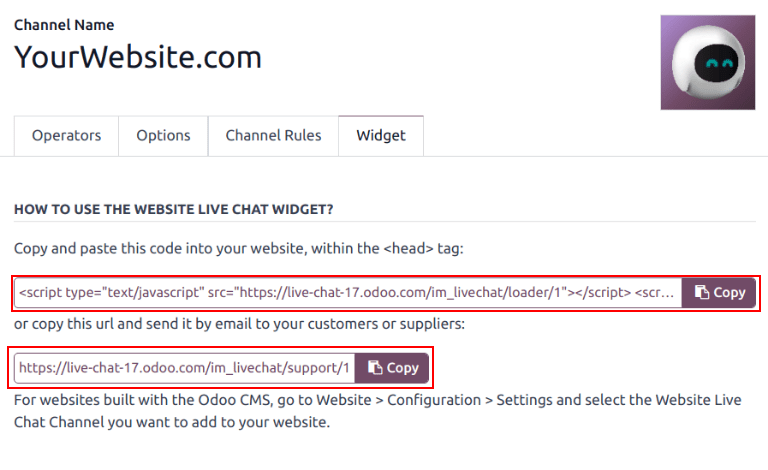
ウィジェットタブ
The Widget tab on the live chat channel detail form provides the code for a website widget. This code can be added to a website to provide access to a live chat window.
ちなみに
ライブチャットウィジェットは、Odoo で作成したウェブサイトに、 の順に選択して追加できます。次に、:menuselection:`Eメール& マーケティング`セクションまでスクロールします。 :guilabel:`チャネル`フィールドで、サイトに追加するチャネルを選択します。 :guilabel:`保存`をクリックして適用します。
To add the widget to a website created on a third-party platform, click the first COPY
button on the Widget tab, and paste the code into the <head> tag on the site.
Likewise, to send a live chat session to a customer, click the second COPY button on the Widget tab. This link can be sent directly to a customer. When they click the link, they are redirected to a new chat window.
参照
ライブチャット/応答
ライブチャット/評価
ライブチャット/チャットボット
ライブチャット/参加