Alocări
După ce tipurile de concediu și planurile de acumulare au fost configurate, următorul pas este să alocați sau să oferiți concediu angajaților.
Pagina Alocări din aplicația Concedii este vizibilă doar utilizatorilor care au drepturi de acces Responsabil Concedii sau Administrator pentru aplicația Concedii. Pentru mai multe informații despre drepturile de acces, consultați documentația drepturi de acces.
Alocați timp liber
Pentru a crea o nouă alocare, navigați la .
Aceasta prezintă o listă a tuturor alocărilor curente, inclusiv stările respective.
Faceți clic pe Nou pentru a aloca timp liber și apare un formular de alocare gol.
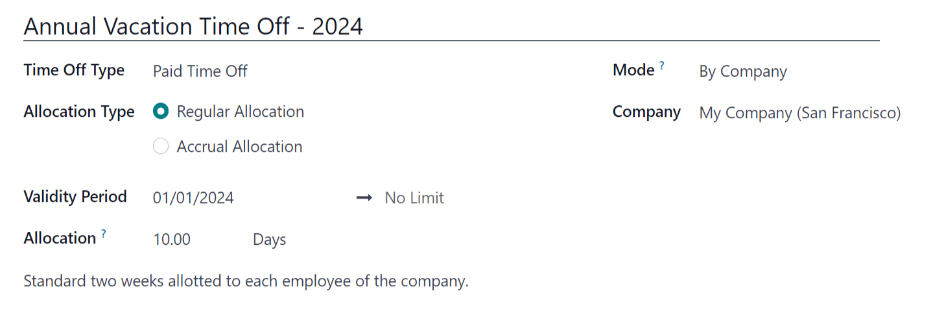
După ce ați introdus un nume pentru alocare în primul câmp gol al formularului, introduceți următoarele informații:
Tip concediu: Folosiți meniul derulant pentru a selecta tipul de concediu care va fi alocat angajaților.
Allocation Type: Select either Regular Allocation or Accrual Allocation. If the allocation is not based on an accrual plan, select Regular Allocation.
Accrual Plan: If Accrual Allocation is selected for the Allocation Type, the Accrual Plan field appears. Using the drop-down menu, select the accrual plan with which the allocation is associated. An accrual plan must be selected for an Accrual Allocation.
Perioadă de valabilitate/Data de început: Dacă este selectată Alocare regulată pentru Tip alocare, acest câmp se numește Perioadă de valabilitate. Dacă este selectată Alocare pe bază de acumulare, câmpul se numește Data de început.
Data curentă completează implicit primul câmp de dată. Pentru a selecta o altă dată, faceți clic pe data precompletată pentru a deschide o fereastră popover cu calendar. Navigați la data de început dorită pentru alocare și faceți clic pe dată pentru a o selecta.
If the allocation expires, select the expiration date in the next date field. If the time off does not expire, leave the second date field blank. No Limit appears in the field if no date is selected.
Dacă Alocare acumulare este selectat pentru Tipul de alocare, acest al doilea câmp este etichetat Run până la.
Important
If the Start Date entered is in the middle of a period of time, such as the middle of the month, Odoo applies the allocation to the beginning or end of the period, depending on the Accrued Gain Time entered on the accrual plan (either At the start of the accrual period, or At the end of the accrual period) instead of the specific date entered.
For example, an allocation is created, and references an accrual plan that grants time At the start of the accrual period, monthly, on the first of the month.
On the allocation form, the Allocation Type is set to Accrual Allocation, and the Start Date entered is
06/16/24.Odoo’s Time Off app retroactively applies the allocation to the beginning of the time period entered in the Start Date.
Therefore, this allocation accrues time from
06/01/24, rather than06/16/24.Additionally, if on the accrual form, the allocation references an accrual plan that grants time `At the end of the accrual period, the allocation accrues time from
7/01/24rather than6/18/24.Alocare: Introduceți cantitatea de timp care este alocată angajaților. Acest câmp afișează timpul fie în Ore, fie în Zile, în funcție de cum este configurat Tipul de concediu selectat.
Mode: Using the drop-down menu, select how the allocation is assigned. This selection determines who receives the time off allocation. The options are By Employee, By Company, By Department, or By Employee Tag.
Depending on what is selected for the Mode, the field beneath Mode is labeled either: Employees, Company, Department, or Employee Tag.
Using the drop-down menu, indicate the specific employees, company, department, or employee tags receiving this time off.
Se pot face selecții multiple fie pentru Angajați, fie pentru Etichetă de angajat.
Se poate face o singură selecție pentru Company sau Department.
Adăugați un motiv…: Dacă este necesară o descriere sau o notă pentru a explica alocarea concediului, introduceți-o în acest câmp din partea de jos a formularului.
Solicitați alocare
Dacă un angajat a folosit tot concediul sau va rămâne fără concediu, poate solicita o alocare suplimentară. Alocările pot fi solicitate în două moduri: fie din Tabloul de bord, fie din vizualizarea Alocările mele.
Pentru a crea o nouă cerere de alocare, faceți clic fie pe butonul Cerere nouă de alocare de pe tabloul de bord principal Concedii, fie pe butonul Nou din lista Alocările mele. Ambele butoane deschid un nou formular de cerere de alocare.
Notă
Both options open a new allocation request form, but when requested from the Dashboard, the form appears in a pop-up window, and the Validity Period field does not appear. When requested from the My Allocations list view, the screen navigates to a new allocation request page, instead of presenting a pop-up window.
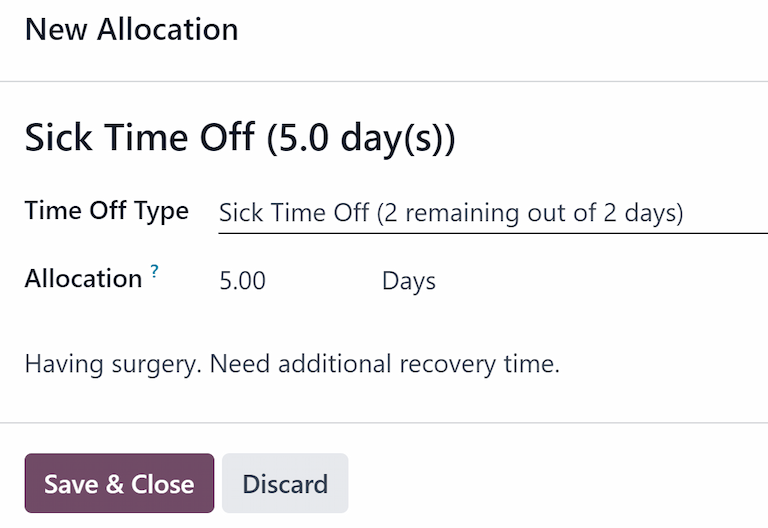
Introduceți următoarele informații în noul formular de cerere de alocare:
Time Off Type: Select the type of time off being requested for the allocation from the drop-down menu. After a selection is made, the title updates with the time off type.
Validity Period: By default, the current date populates this field, and it is not able to be modified. This field only appears when requesting an allocatoin from the My Allocations view ().
Alocare: Introduceți cantitatea de timp solicitată în acest câmp. Formatul este prezentat fie în Zile, fie în Ore, în funcție de cum este configurat Tipul de concediu. Odată ce acest câmp este completat, numele cererii de alocare se actualizează pentru a include cantitatea de timp solicitată.
Adăugați un motiv…: Introduceți o descriere pentru cererea de alocare în acest câmp. Aceasta ar trebui să includă orice detalii de care aprobatorii ar putea avea nevoie pentru a aproba cererea.
Dacă cererea a fost creată din Tabloul de bord, faceți clic pe butonul Salvează și închide din fereastra pop-up Alocare nouă pentru a salva informațiile și a trimite cererea.
If the form was completed from the My Allocations list view, the information is automatically saved as it is entered. However, the form can be saved manually at any time by clicking the (cloud upload) icon.