Allocazioni
Una volta configurati i tipi di ferie e i piani di maturazione, il passaggio successivo consiste nell”assegnare, o concedere, ferie ai dipendenti.
La pagina Assegnazioni dell’app Ferie è visibile solo agli utenti che dispongono dei diritti di accesso Responsabile Ferie o Amministratore per l’applicazione Ferie. Per ulteriori informazioni sui diritti di accesso, consultare la documentazione sui diritti di accesso.
Assegnare ferie
Per creare una nuova assegnazione, andare a .
Viene visualizzato un elenco di tutte le assegnazioni correnti, inclusi i rispettivi stati.
Click New to allocate time off, and a blank allocation form appears.
Dopo aver inserito un nome per l’assegnazione nel primo campo vuoto del modulo, inserire le seguenti informazioni:
Tipo di Ferie: utilizzando il menu a tendina, selezionare il tipo di ferie che viene assegnato ai dipendenti.
Allocation Type: Select either Regular Allocation or Accrual Allocation. If the allocation is not based on an accrual plan, select Regular Allocation.
Accrual Plan: If Accrual Allocation is selected for the Allocation Type, the Accrual Plan field appears. Using the drop-down menu, select the accrual plan with which the allocation is associated. An accrual plan must be selected for an Accrual Allocation.
Periodo di Validità/Data di Inizio: se Assegnazione Regolare è selezionato per il Tipo di Assegnazione, questo campo è etichettato Periodo di Validità. Se Assegnazione per Maturazione è selezionato per il Tipo di Assegnazione, questo campo è etichettato Data di Inizio.
La data corrente popola il primo campo data per impostazione predefinita. Per selezionare un’altra data, fare clic sulla data precompilata per visualizzare una finestra di calendario a comparsa. Navigare alla data di inizio desiderata per l’assegnazione e fare clic sulla data per selezionarla.
If the allocation expires, select the expiration date in the next date field. If the time off does not expire, leave the second date field blank. No Limit appears in the field if no date is selected.
Se Assegnazione per Maturazione è selezionato per il Tipo di Assegnazione, questo secondo campo è etichettato Esegui fino al.
Importante
If the Start Date entered is in the middle of a period of time, such as the middle of the month, Odoo applies the allocation to the beginning or end of the period, depending on the Accrued Gain Time entered on the accrual plan (either At the start of the accrual period, or At the end of the accrual period) instead of the specific date entered.
For example, an allocation is created, and references an accrual plan that grants time At the start of the accrual period, monthly, on the first of the month.
On the allocation form, the Allocation Type is set to Accrual Allocation, and the Start Date entered is
06/16/24.Odoo’s Time Off app retroactively applies the allocation to the beginning of the time period entered in the Start Date.
Therefore, this allocation accrues time from
06/01/24, rather than06/16/24.Additionally, if on the accrual form, the allocation references an accrual plan that grants time `At the end of the accrual period, the allocation accrues time from
7/01/24rather than6/18/24.Assegnazione: inserire il periodo di ferie assegnato ai dipendenti. Questo campo visualizza il tempo in Ore oppure Giorni, a seconda di come è configurato il tipo di ferie selezionato.
Mode: Using the drop-down menu, select how the allocation is assigned. This selection determines who receives the time off allocation. The options are By Employee, By Company, By Department, or By Employee Tag.
Depending on what is selected for the Mode, the field beneath Mode is labeled either: Employees, Company, Department, or Employee Tag.
Using the drop-down menu, indicate the specific employees, company, department, or employee tags receiving this time off.
Multiple selections can be made for either Employees or Employee Tag.
Only one selection can be made for the Company or Department.
Aggiungi un motivo…: se è necessaria una descrizione o una nota per spiegare l’assegnazione delle ferie, inserirla in questo campo nella parte inferiore del modulo.

Richiedi assegnazione
Se un dipendente ha utilizzato tutte le sue ferie o le sta per esaurire, può richiedere un’assegnazione per tempo aggiuntivo. Le assegnazioni possono essere richieste in due modi, dalla Dashboard o dalla vista Le mie assegnazioni.
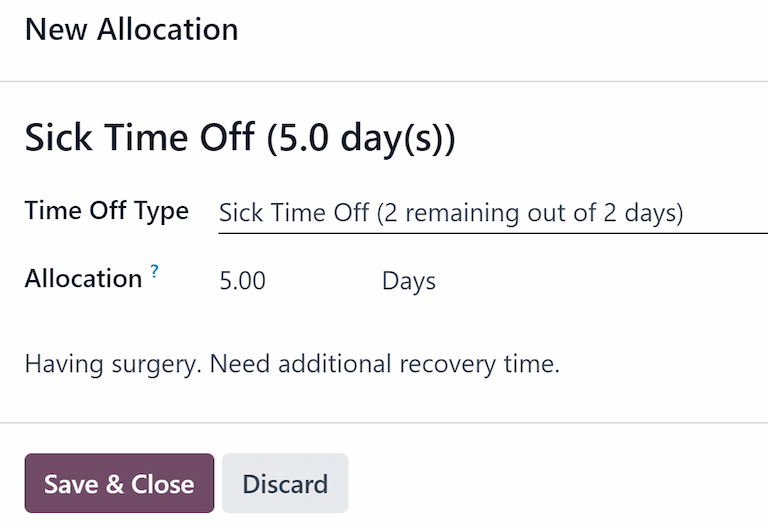
Per creare una nuova richiesta di assegnazione, fare clic sul pulsante Nuova richiesta di assegnazione nella dashboard principale di Ferie, oppure sul pulsante Nuovo nella vista elenco Le mie assegnazioni. Entrambi i pulsanti aprono un nuovo modulo di richiesta di assegnazione.
Nota
Both options open a new allocation request form, but when requested from the Dashboard, the form appears in a pop-up window, and the Validity Period field does not appear. When requested from the My Allocations list view, the screen navigates to a new allocation request page, instead of presenting a pop-up window.
Inserire le seguenti informazioni nel nuovo modulo di richiesta di assegnazione:
Time Off Type: Select the type of time off being requested for the allocation from the drop-down menu. After a selection is made, the title updates with the time off type.
Validity Period: By default, the current date populates this field, and it is not able to be modified. This field only appears when requesting an allocatoin from the My Allocations view ().
Assegnazione: inserire la quantità di tempo richiesta in questo campo. Il formato è presentato in Giorni o Ore, a seconda di come è configurato il Tipo di ferie. Una volta popolato questo campo, il nome della richiesta di assegnazione viene aggiornato per includere la quantità di tempo richiesta.
Aggiungi un motivo…: inserire una descrizione per la richiesta di assegnazione in questo campo. Dovrebbe includere tutti i dettagli che gli approvatori potrebbero necessitare per approvare la richiesta.
Se la richiesta è stata creata dalla Dashboard, fare clic sul pulsante Salva e chiudi nella finestra pop-up Nuova assegnazione per salvare le informazioni e inviare la richiesta.
If the form was completed from the My Allocations list view, the information is automatically saved as it is entered. However, the form can be saved manually at any time by clicking the (cloud upload) icon.