Pivottabeller
Pivottabeller gör det möjligt att organisera, sammanfatta och analysera stora mängder data utan behov av komplexa formler. Genom att gruppera och segmentera data i dimensioner (dvs. de fält som läggs till som kolumner och rader) och definiera vad som ska mätas (t.ex. totalt belopp eller beställd kvantitet), beräknas motsvarande värden för varje datapunkt automatiskt.
Olika manipulationer kan utföras för att se samma dataset från olika perspektiv, såsom att omorganisera eller sortera dimensioner, eller ändra hur värden aggregeras eller beräknas.
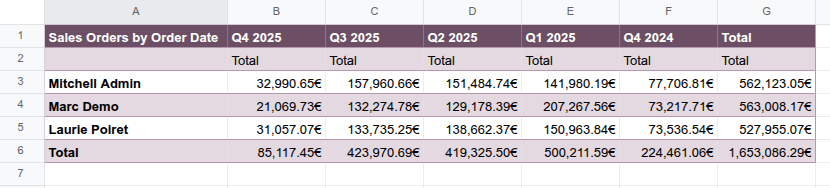
Example
I exemplet visar pivottabellen det Totala beloppet för försäljningsorder per säljare per kvartal. Fältet Säljare representeras i rader, Orderdatum (grupperat per kvartal och år) i kolumner, medan värdena representerar det totala beloppet för given säljare och kvartal.
Med Odoo Kalkylark är det möjligt att:
infoga en pivottabell från en Odoo-pivotvy i ett Odoo-kalkylark, Odoo-dashboard eller offertkalkylatorkalkylark.
infoga en pivottabell som refererar till Odoo-data direkt från ett Odoo-kalkylark. Detta alternativ gör det möjligt att hämta och arbeta med data från vilken modell som helst, inklusive modeller för vilka ingen Odoo-pivotvy är tillgänglig, t.ex. modellen Försäljningsorderrad.
infoga en pivottabell från ett dataområde. Data kan vara statisk data eller dynamisk Odoo-data som har infogats i kalkylarket, t.ex. från en listvy.
När en pivottabell infogas i ett Odoo-kalkylark skapas en datakälla, som kopplar pivottabellen till underliggande databasdata eller kalkylarkintervall.
Infoga en pivottabell från ett dataintervall
Tips
Innan du infogar en pivottabell från ett dataintervall:
Organisera dina data i kolumner, inte rader, dvs. varje kolumn ska innehålla en kategori av information, medan varje rad ska innehålla en post.
Säkerställ att alla kolumner har ett unikt sidhuvud; undvik dubbla rader av sidhuvuden eller sammanslagna celler.
Formatera dina data som en tabell genom att välja en cell i intervallet, klicka på Infoga tabell från verktygsfältet och välj sedan en stil. Detta säkerställer att eventuella uppdateringar av tabellen återspeglas i pivottabellen.
För att skapa en pivottabell från ett dataintervall:
Öppna det relevanta Odoo-kalkylbladet.
Välj en cell inom det dataintervall som ska analyseras och klicka sedan på från menyraden.
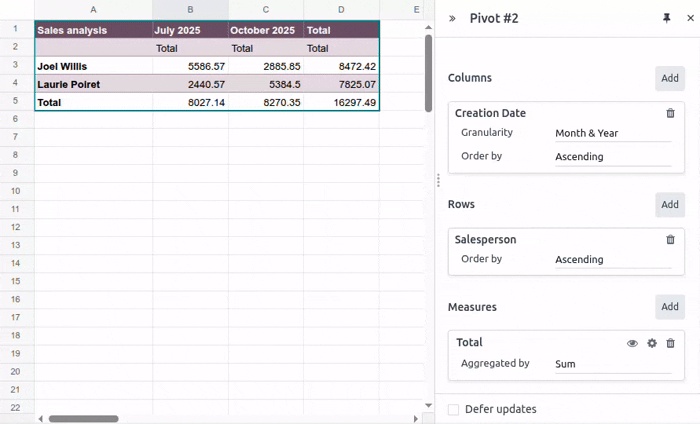
Ett nytt blad öppnas med en tom pivottabell i det övre vänstra hörnet av bladet; bladnamnet är pivottabellens ID, t.ex. Pivot #2. Som standard är pivottabellen en dynamisk pivottabell, där den övre vänstra cellen innehåller en Odoo-specifik matrisfunktion som hämtar data från dataintervallet när kolumner, rader och värden har lagts till.
En panel på höger sida av kalkylarket visar pivottabellens egenskaper.
Pivottabellens egenskaper
När en pivottabell infogas i ett Odoo-kalkylblad öppnas en egenskapspanel till höger om kalkylbladet.
Tips
En pivottabells egenskapspanel kan öppnas när som helst via menyn Data genom att klicka på den relevanta pivottabellen, som föregås av ikonen (pivot), eller genom att högerklicka var som helst på den relevanta pivottabellen och klicka på Visa pivotegenskaper.
Beroende på hur pivottabellen har infogats visas följande egenskaper, varav vissa kan redigeras:
Pivot #: pivottabellens ID.
Observera
En pivottabell behåller sitt ID under kalkylbladets ekonomiska livslängd. Förutom att refereras längst upp i egenskapspanelen identifierar detta ID även pivottabellen i menyn Data. Pivottabells-ID tilldelas sekventiellt när ytterligare pivottabeller infogas i kalkylbladet.
Namn: pivottabellens namn. Redigera namnet vid behov. Observera att redigering av namnet i pivottabellens egenskaper inte ändrar bladnamnet, och vice versa.
Intervall: för en pivottabell skapad från ett dataintervall, det använda intervallet. Redigera intervallet vid behov.
Modell: för en pivottabell som refererar till Odoo-data som infogades från en Odoo-pivotvy eller infogades direkt från kalkylbladet, den modell från vilken datan hämtas.
Domän: för en pivottabell som refererar till Odoo-data som infogades från en Odoo-pivotvy eller infogades direkt från kalkylbladet, de regler som används för att bestämma vilka Odoo-poster som visas. Klicka på Redigera domän för att lägga till eller redigera regler.
Observera
När du refererar till dynamiska Odoo-data i en pivottabell och använder globala filter, kombineras denna domän med de valda värdena för det globala filtret innan datan laddas in i kalkylbladet.
Kolumner och Rader är dimensioner som används för att gruppera eller segmentera data, medan Värden definierar vad som mäts eller analyseras baserat på de valda dimensionerna.
För att förhindra realtidsuppdateringar när du bygger eller manipulerar en pivottabell, aktivera Skjut upp uppdateringar.
För att duplicera eller radera datakällan för en pivottabell, klicka på (kugghjul)-ikonen högst upp i egenskapspanelen och sedan Skapa kopia eller Radera vid behov.
Bygga eller manipulera en pivottabell
När en pivottabell har infogats i ett Odoo-kalkylark är det möjligt att:
redigera domänen för en pivottabell som är länkad till en Odoo-modell
Viktigt
En pivottabell som infogats från en Odoo-pivotvy måste först konverteras till en dynamisk pivottabell för att kunna manipulera dimensioner och värden.
Tips
Som standard återspeglas de flesta manipulationer av en pivottabell i pivottabelldata i realtid. För att förhindra uppdateringar medan du gör ändringar, till exempel om datamängden är mycket stor, aktivera Skjut upp uppdateringar längst ner i egenskapspanelen. När du är klar med att göra ändringar, klicka på Uppdatera (tillämpa alla ändringar) eller (Kassera alla ändringar).
Avaktivering av Skjut upp uppdateringar tillämpar alla ändringar som gjorts sedan alternativet aktiverades och återställer realtidsuppdatering.
Dimensioner
Dimensionerna i en pivottabell, dvs. fält som lagts till som kolumner och rader, representerar de kategorier som används för att gruppera eller segmentera data. Kolumner används vanligtvis för fält som kan ge en jämförande vy, t.ex. Orderdatum grupperat per kvartal, medan rader vanligtvis används för fält som returnerar många värden, t.ex. Kund eller Produkt.
Det är möjligt att:
Lägga till eller ta bort dimensioner
Att lägga till eller ta bort dimensioner gör det möjligt att skräddarsy pivottabellen efter dina behov och kontrollera detaljnivån för data.
För att lägga till en dimension i en pivottabell:
I sektionen Kolumner eller Rader, beroende på vad som är relevant, klicka på Lägg till.
Välj lämpligt fält.
Ändra sorteringen, om så önskas.
Tips
För datum- eller tidsbaserade dimensioner, välj önskad Granularitet från optionerna i rullgardinsmenyn.
I en pivottabell som refererar Odoo-data som infogades från en Odoo-pivotvy eller infogades direkt från kalkylarket, klicka på (högerpil) bredvid fältnamnet för att komma åt listan över relaterade fält när du lägger till kolumner eller rader.
För att ta bort en dimension från en pivottabell, klicka på ikonen (radera) på dimensionens kort.
Kapslade dimensioner
Att lägga till flera rad- eller kolumndimensioner skapar en kapslad hierarki. För att ändra hierarkin för dimensionerna, dra dimensionens kort till önskad position inom dess sektion.
Example
I exemplet lades fältet Produkt till som en raddimension utöver Säljare för att visa produkter per säljare. Att byta ordning på dimensionerna visar då säljare per produkt.
För att dölja eller visa en kapslad hierarki i pivottabellen, klicka på ikonen (visa) eller (dölj) beroende på vad som är relevant.
Ordna om dimensioner
Att ordna om dimensionerna i en pivottabell, dvs. flytta ett fält från en kolumn till en rad, eller vice versa, gör det möjligt att visa samma dataset från olika perspektiv och potentiellt få nya insikter.
För att ändra axeln på vilken en individuell dimension visas:
Dra dimensionens kort från sektionen Kolumner till sektionen Rader eller vice versa.
För att flytta alla dimensioner som representeras i kolumner till rader och vice versa, samtidigt:
Klicka på ikonen (kugghjul).
Klicka på Vänd axlar.
Observera
Beroende på datamängden kan växling av axlarna i en pivottabell resultera i ett #SPILL-fel. Detta inträffar när en formel försöker mata ut ett intervall med värden, men något hindrar celler från att fyllas i, såsom annan data, sammanslagna celler eller gränserna för det aktuella kalkylbladet.
När du håller muspekaren över cellen som innehåller #SPILL visas detaljer om felet.
Sortera dimensioner
Sortering av dimensioner gör det möjligt att organisera pivottabelldata och enklare upptäcka de insikter du behöver. Alla dimensioner kan sorteras efter dimensionsvärde, medan raddimensioner även kan sorteras efter mått.
Efter dimensionsvärde
Dimensionsvärden sorteras vanligtvis i stigande alfabetisk, kronologisk eller numerisk ordning som standard.
Så här ändrar du hur en dimension sorteras efter dimensionsvärde:
Öppna pivottabellens egenskaper.
På kortet för den relevanta dimensionen, i fältet Sortera efter, välj Stigande, Fallande eller Osorterad.
Efter mått
Raddimensioner kan sorteras efter mått, t.ex. för att se det totala beloppet för försäljningsorder per säljare per kvartal i stigande ordning baserat på det totala beloppet.
Så här sorterar du raddimensioner efter mått:
Högerklicka på valfritt värde i den relevanta kolumnen, klicka sedan på Sortera pivot och välj Stigande eller Fallande.
För att återgå till standardordningen, följ samma steg och välj sedan Ingen sortering från rullgardinsmenyn.
Gruppera dimensionsvärden
Gruppering av dimensionsvärden gör det möjligt att rensa upp pivottabellen genom att kombinera flera dimensionsvärden till en enda, hopfällbar grupp. Detta kan vara användbart, till exempel för att skapa en Andra-kategori för att gruppera mindre betydelsefulla värden och möjliggöra fokus på mer betydelsefull data.
Så här grupperar du dimensionsvärden och skapar en Andra-kategori:
Håll ned
Ctrloch välj sedan cellerna för rad- eller kolumndimensionsvärdena som ska grupperas.Högerklicka på en av de valda cellerna, klicka sedan på Gruppera pivotdimensioner. En ny dimension läggs till i sektionen Kolumner eller Rader, beroende på vad som är relevant. Ändra sorteringen till Stigande eller Fallande.
På kortet för den nya dimensionen:
Změňte pole Seřadit podle z Neseřazeno na Stigande nebo Fallande, podle potřeby.
Kliknutím na Skupiny rozbalte podsekci.
Volitelně přejmenujte Skupinu kliknutím na ni a zadáním nového názvu.
Kliknutím na + ”Ostatní” přidáte nevybrané hodnoty dimenze do jedné skupiny, která se poté umístí za vybrané hodnoty.
Chcete-li sbalit nebo rozbalit skupinu dimenzí v pivotové tabulce, klikněte podle potřeby na ikonu (rozbalit) nebo (sbalit).
Example
V příkladu byly údaje o prodejcích pro sekundární trhy Španělska, Francie, Irska a Itálie seskupeny do kategorie Ostatní, kterou lze poté sbalit a její údaje zobrazit vedle údajů hlavních trhů Belgie a Spojených států.

Mått
Hodnoty pivotové tabulky představují to, co je měřeno nebo analyzováno, a jsou to obvykle pole jako Celkem, Objednané množství, osv.
Tips
Pokud požadovaná hodnota neexistovala v původním zdroji dat, vytvořte vypočtenou hodnotu, t.ex. pro zobrazení průměrné tržby na objednávku.
Det är möjligt att:
Přidat nebo odebrat hodnoty
Přidání hodnoty do pivotové tabulky:
V sekci Hodnoty klikněte na Přidat.
Vyberte příslušnou hodnotu nebo klikněte na Přidat vypočtenou hodnotu pro vytvoření a přidání vlastní vypočtené hodnoty.
Volitelně upravte název hodnoty kliknutím a následnou úpravou názvu hodnoty.
Volitelně změňte způsob agregace hodnoty výběrem hodnoty z rozbalovací nabídky.
Chcete-li odebrat hodnotu z pivotové tabulky, klikněte na ikonu (smazat) na kartě dimenze. Chcete-li hodnotu dočasně skrýt místo jejího odebrání, klikněte na ikonu (Skrýt); chcete-li zviditelnit dříve skrytou hodnotu, klikněte na ikonu (Zobrazit).
Tips
Chcete-li jednoduše zobrazit počet dimenzí namísto kvantifikovatelné hodnoty, vyberte jako hodnotu Počet.
I pivottabellen visas en värdeetikett i en andra sidhuvudsrad som standard; dölj denna rad om så önskas.
Samma värde kan läggas till flera gånger med olika aggregeringar.
Om flera värden läggs till visas de i kolumner i den ordning de läggs till; ändra ordningen om så önskas.
Skapa beräknade värden
Det är möjligt att lägga till ett eller flera beräknade värden om det önskade värdet/de önskade värdena inte fanns i den ursprungliga datakällan. Ett beräknat värde kan till exempel läggas till för att visa den genomsnittliga intäkten per beställning eller vinstmarginalen per produkt.
Observera
Fälten som behövs för beräkningen av det nya värdet måste redan ha lagts till i pivottabellen som dimensioner eller värden.
För att lägga till ett beräknat värde:
V sekci Hodnoty klikněte na Přidat.
Under den rullbara listan, klicka på Lägg till beräknat värde.
Döp om det beräknade värdet genom att klicka på namnet och skriva.
Klicka på raden som börjar med
=och ange sedan relevant formel.Tips
Funktioner kan användas i formeln för ett beräknat värde.
Välj hur värdet ska aggregeras genom att välja ett värde från rullgardinsmenyn.
Example
I exemplet beräknas den genomsnittliga intäkten per beställning genom att summan av försäljningen divideras med antalet beställningar.

Ordna om värden
I pivottabellen visas värden i kolumner i den ordning de lades till.
För att ändra ordningen som värden visas i:
Dra värdets kort till önskad position.
’Visa värde som’
Som standard visas värden som det faktiska returnerade värdet, utan ytterligare beräkningar. Det är dock också möjligt att visa värden i relation till andra data, t.ex. som % av totalsumman eller rankade från minst till störst.
För att ändra hur ett värde visas:
På värdets kort klickar du på ikonen (Visa värden som).
Välj önskat alternativ från rullgardinsmenyn.
Klicka på Spara.
Observera
När du ändrar hur värdena visas uppdateras pivottabellens data i realtid även om Skjut upp uppdateringar är aktiverat.
Ta bort värdestitlar
Som standard visas värdenas titlar i en andra rubrikrad i en pivottabell.
Så här tar du bort denna rubrikrad:
Dubbelklicka på den övre vänstra cellen i pivottabellen för att kunna redigera formeln.
Placera markören efter pivot-ID:t och skriv sedan
,för att gå vidare till [include_measure_titles], skriv sedan0.
Raden som visar värdenas titlar tas bort.

Tips
I en statisk pivottabell som infogats från en Odoo-pivotvy kan du radera den andra rubrikraden manuellt om du vill.
Skapa kopia av eller radera en pivottabell
Observera
När du skapar en kopia av eller raderar en pivottabell är det viktigt att komma ihåg att varje infogad pivottabell också har en datakälla.
Kopiera en pivottabell
Att skapa en kopia av en pivottabell via pivottabellens egenskaper skapar en ytterligare datakälla. Detta möjliggör olika manipulationer av samma data inom ett kalkylark. Du kan till exempel se samma data aggregerad efter olika dimensioner eller använda globala filter för att förskjuta datumet och skapa pivottabeller som jämför aktuell periods data med en föregående period.
Så här skapar du en kopia av en pivottabell:
Med pivottabellens egenskaper öppna klickar du på ikonen (kugghjul) och sedan Skapa kopia.
Den duplicerade pivottabellen infogas automatiskt i ett nytt ark i kalkylarket, med pivottabellens egenskaper öppna i den högra panelen.
Redigera Namn i egenskapspanelen och arkfliken om det behövs.
Den nya datakällan tilldelas nästa tillgängliga pivottabells-ID. Om till exempel inga andra pivottabeller har infogats under tiden resulterar kopiering av Pivot #1 i skapandet av Pivot #2.
Observera
Att skapa en kopia av en pivottabell genom att kopiera och klistra in den eller genom att duplicera arket skapar inte en ny datakälla. Eventuella ändringar av pivottabellens egenskaper skulle därför påverka alla kopior av pivottabellen.
När en pivottabell kopieras är den nya pivottabellen som standard en dynamisk pivottabell vars dimensioner och värden kan manipuleras.
Radera en pivottabell
Följ dessa steg i valfri ordning för att fullständigt radera en pivottabell och dess datakälla från ett kalkylark:
Radera pivottabellen med den metod du föredrar, t.ex. via tangentbordskommandon, kalkylarksmenyerna eller genom att radera arket.
Från egenskapspanelen för den relevanta pivottabellen klickar du på ikonen (kugghjul) och sedan Radera. Detta raderar datakällan för pivottabellen.
Observera
Att radera pivottabellen först resulterar i ett varningsmeddelande bredvid motsvarande datakälla i menyn Data, medan radering av datakällan först resulterar i en pivottabell fylld med #ERROR-fel.