Recruitment
Odoo keeps all job applicants organized with a pre-configured series of steps and stages that each applicant goes through. Each stage has a specific step(s) that should be performed. These range from scheduling a phone call, conducting an interview, or sending a job offer, for example. This process is referred to as the ‘applicant flow.’
When an applicant applies for a job position, an applicant card is automatically created in Odoo’s Recruitment app for that specific job position. As the applicant progresses through the recruitment pipeline, the recruitment team moves their card from one stage to the next.
Stages can be configured so that an email is automatically sent out using a set, pre-configured template as soon as an applicant’s card enters a stage. These automated emails are defined on each stage in the applicant flow.
The applicant flow explained in this document is the default flow in Odoo, and goes through the applicant flow when using the Recruitment application’s default configuration. The applicant flow is able to be modified to suit the specific recruitment flow for any business.
Note
The applicant flow with all its stages are universal and applies to all job positions, unless specified. A specific stage can be configured to be job-specific, meaning that specific stage is only visible for that specific job position. Otherwise, if a new stage is created, or an existing stage is modified, those changes are visible on all job positions.
Settings
Before creating a job position in Odoo, configure the necessary settings for the Recruitment app. To view and edit the settings, navigate to . After any changes are made, click the Save button in the top-left corner to save all the changes.
Job posting
The Job Posting section of the Recruitment app settings has only one selection to make. If job positions are to be posted to the company’s website, enable the Online Posting option.
Note
The Online Posting is only available if the Website application is also installed.
Recruitment process
The Recruitment process section of the settings page specifies what the database can and cannot do during the recruitment process.
Send interview survey
Odoo is capable of having a survey sent to an applicant to gather more information about them. Surveys can be thought of as exams, or questionnaires, and can be customized in various ways to provide the recruitment team with valuable insights into the applicant
Enable the Send Interview Survey option to send surveys to applicants. Once enabled, an Interview Survey internal link appears. Click the Interview Survey link to navigate to a list of all created surveys.
This list includes all surveys that were created in the database, not just surveys used in the Recruitment app. If no surveys have been created, the surveys list displays a No Survey Found message, and presents options to create a survey from several pre-configured survey templates.
See also
For more detailed information about surveys, refer to the survey essentials documentation.
Note
Enabling the Send Interview Survey option will install the Surveys application once the settings are saved, if it is not installed already.
Send SMS
It is possible to send text messages to applicants directly through the Recruitment app. To do so, enable the Send SMS option. This option requires credits to use, which can be obtained by clicking the Buy credits internal link that emerges when the feature is enabled.
See also
For more information, refer to the SMS pricing and FAQs documentation.
CV display
When applicants submit an application, one of the default required fields is a resumé, or CV. All resumés are stored in the Documents application, and are accessible on the applicant’s card.
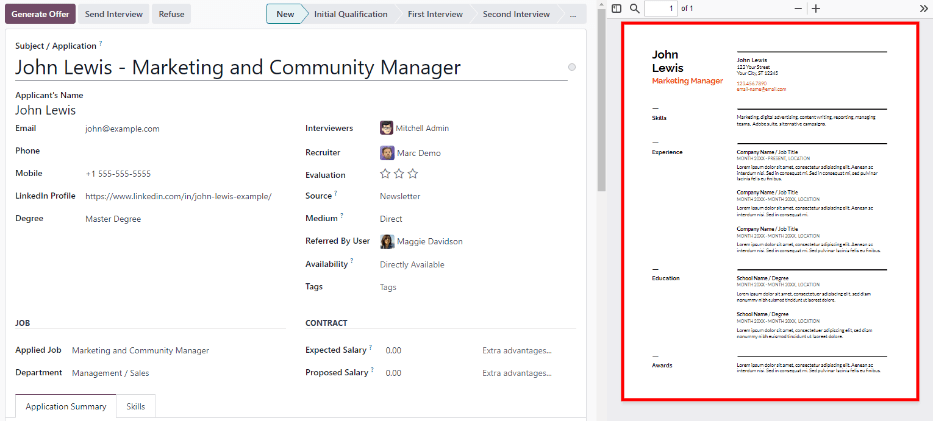
A resumé has the option to appear on the applicant’s form, which can be viewed by clicking on the applicant’s card. The resumé appears on the right-side of the screen. If this is not enabled, the resumé is accessed via a link in the chatter, where it needs to be clicked to expand and view it, or downloaded.
Enable the CV Display option to show the resumé on the applicant’s card by default, and in addition to the document link. When enabled, the resumé appears on the right side of the applicant’s card.
Note
For the resumé to appear on the right-side, the browser window must be in full-screen mode (where the browser spans the entire screen).
If the browser window is set to a size smaller than the entire width of the screen (not full-screen), then the resumé does not appear on the right-side. Instead, the resumé appears in the Files section of the chatter, below the applicant’s card.
CV digitization (OCR)
When an application is submitted using any of the available methods, such as an online application submission, emailing a resume to the job position alias, or creating an applicant record directly from the database, it is possible to have Odoo extract the applicant’s name, phone number, and email address from the resumé and populate the applicant’s form. To do so, enable the CV Digitization (OCR) option.
When enabled, additional options appear. Click on the corresponding radio button to select one of the following options:
Do not digitize: this option turns off resumé digitization.
Digitize on demand only: this option only digitizes resumes when requested. A Digitize document buttons appears on applicant cards. When clicked, the resumé is scanned and the applicant’s card is updated.
Digitize automatically: this option automatically digitizes all resumés when they are submitted.
Beneath these options are two additional links. Click the Buy credits button to purchase credits for CV digitization. Click the View My Services to view a list of all current services, and their remaining credit balances.
For more information on document digitization and IAP’s, refer to the In-app purchase (IAP) documentation.
Note
The Do not digitize option for CV digitization (OCR) at first may seem like a redundancy. It seems to be the same as disabling the CV digitization (OCR) option.
When the CV digitization (OCR) option is enabled, a module is installed so that resumés can be scanned. Disabling this option would uninstall the module.
If at some point, there is a desire to temporarily stop digitizing resumés, the Do not digitize option is selected. The reason this option is available is so that the module is not uninstalled, allowing for digitization to be enabled in the future by selecting one of the other two options.
Salary package configurator
When sending an offer to an applicant, an expiration date can be set on the offer. Enter the number of days an offer is valid for in the days field. After the set amount of days has passed, if the applicant has not accepted the offer, the offer is no longer available.
Kanban view
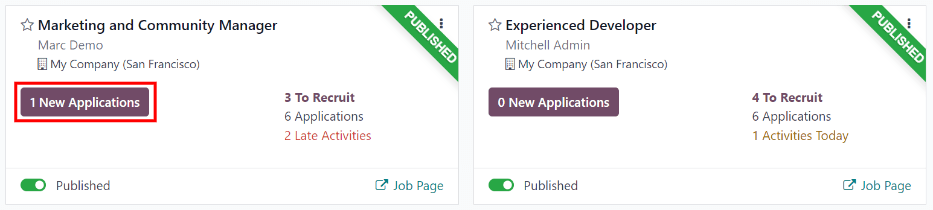
To access the Kanban view for a job position, navigate to the main dashboard, which is the default view when opening the application. All job positions appear on the main dashboard. Click the (#) New Applications smart button on a job position card to navigate to the Kanban view for all the applicants for that particular job position.
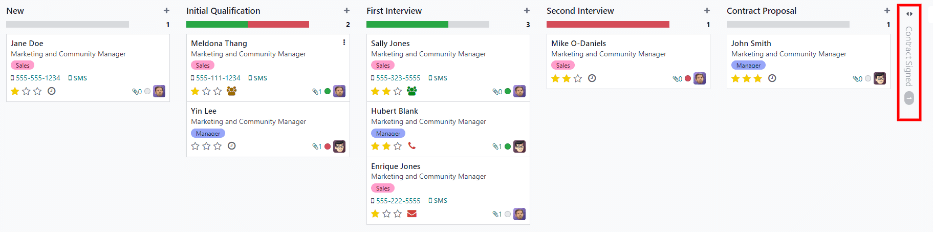
Inside the job application, the Kanban stages appear, with all the applicants populated in their respective columns, indicating what stage they are currently in. There are six default stages in Odoo:
The last column, Contract Signed, is folded by default. Folded columns appear gray, and the applicants in it are hidden from view. To expand the folded stage and view the applicant cards for that column, click anywhere on the thin gray column that says the stage name and the column expands, revealing the applicants.
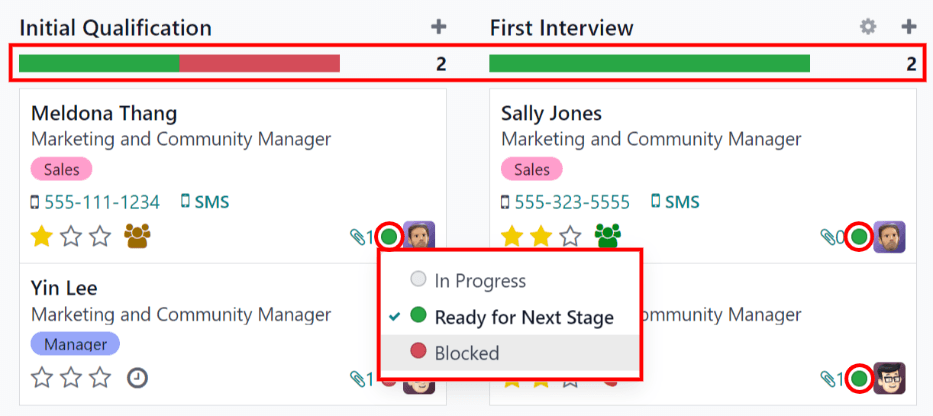
Each stage has a color-coded bar beneath the stage name, providing status information for the applicant’s in that specific stage. The status colors are:
Green: the applicant is ready to move to the next stage.
Red: the applicant is blocked from moving to the next stage.
Gray: the applicant is still in progress in the current stage and is neither ready nor blocked from the next stage.
The status for each card is set manually. To set the status, click on the small circle in the lower-left of the applicant card. A status pop-up window appears. Click on the desired status for the applicant. The status dot on the applicant card as well as the status bar updates.
Tip
The names for the three status colors (In Progress, Blocked, and Ready for Next Stage)
can be modified, if desired.
Customize stages
Stages can be modified, added, or deleted to best meet the needs of the particular hiring steps of a business.
New stage
To create a new stage, click on Stage and a new column appears. Enter the title for the new stage in the Stage title field, then click Add. The new column appears, and another new stage is available to create. If no new stages are needed, click anywhere on the screen to exit the new stage creation.

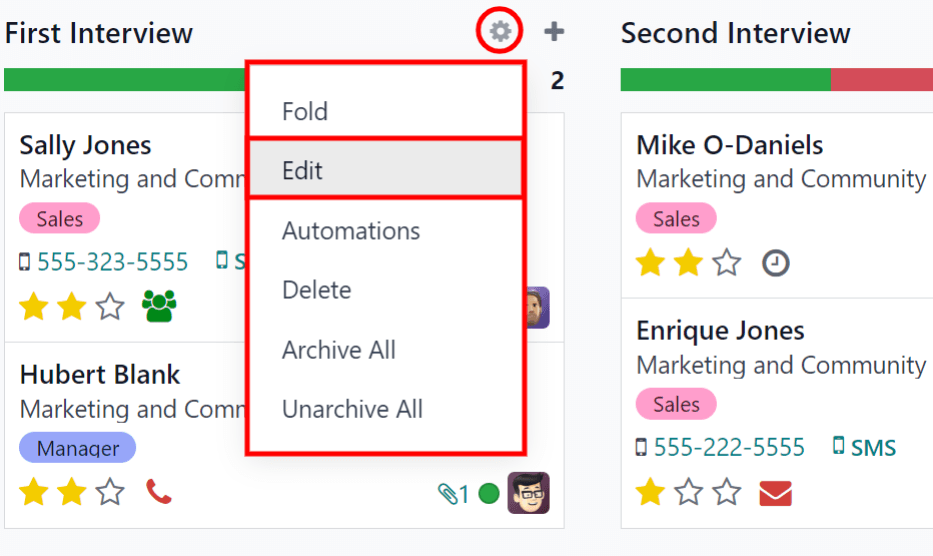
Modify stage
To modify the settings of a stage, hover over the name of the stage, and a (gear) icon appears in the upper right hand side of the stage. Click on the (gear) icon and a menu appears. Then click on the Edit option. An Edit: (Stage) form appears. Make any desired modifications to the form, then click Save & Close when done.
Edit stage form
The Edit: (Stage) form is where the stage’s settings are configured. The only required field is the Stage Name.
The fields to be populated or modified are:
Stage Name: type in a name for the stage.
Email Template: select an email template to be used from the drop-down menu. If a template is selected, when the applicant card enters the stage, an email is automatically sent to the applicant using the selected template.
Folded in Kanban: check the box to have the stage appear folded (hidden) at all times in the default view.
Hired Stage: check the box if this stage indicates that the applicant is hired. When an applicant’s card enters this stage, the card displays a Hired banner in the upper right corner. If this box is checked, this stage is used to determine the hire date of an applicant.
Job Specific: if the stage only applies to specific job positions, select the job positions from the drop-down menu. Multiple job positions can be selected.
Show in Referrals: check the box if this stage should be seen in the Referrals application, and allow the referrer to accrue points when a referral of theirs reaches this stage. If this is active, a Points field appears. Enter the amount of referral points the employee receives when an applicant enters this stage. The Referrals app must be installed in order to use this option.
Tooltips section: there are three pre-configured status labels (colored circles) for each applicant’s card, indicating its status. These colors are displayed at the top of each stage to reflect the statuses of the applicants in the stage. The names for the label can be modified, but the label itself (the color) cannot. The default names and labels are: In Progress (gray), Blocked (red), and Ready for Next Stage (green).
Requirements: enter any internal notes for this stage explaining any requirements of the stage.
Delete stage
If a stage is no longer needed, the stage can be deleted. To delete a stage, hover over the name of the stage, and a (gear) icon appears. First, click on the (gear) icon to reveal a drop-down menu, then click Delete. A Confirmation pop-up warning appears, asking Are you sure you want to delete this column? Click Delete to delete the column.
Important
If there are applicants currently in the stage being deleted, an error pops up when attempting to delete the stage. The records currently in the stage to need to be either deleted, archived, or moved to a different stage before the stage can be deleted.
Email templates
To communicate with the applicant, Odoo has several pre-configured email templates that can be used. The pre-configured email templates and when to use them are as follows:
Recruitment: Applicant Acknowledgement: this template is used to let the applicant know that their application was received. This email is automatically sent out once the applicant is in the New stage.
Recruitment: Interest: this template is used to let the applicant know that their application caught the recruiter’s attention, and they have been shortlisted for either a phone call or an interview.
Recruitment: Schedule Interview: this template is used to let the applicant know that they have passed the Initial Qualification stage and they will be contacted to set up an interview with the recruiter. This email is automatically sent out once the applicant is in the Initial Qualification stage.
Recruitment: Not interested anymore: this template is used when an applicant communicates that they are no longer interested in the position, and thanks them for their time and consideration.
Recruitment: Refuse: this template is used when an applicant is no longer being considered for the position.
Note
Email templates can be created, modified, and deleted to suit the needs of a business. For more information on email templates, refer to the Email templates document.
To manually send an email, click Send message in the chatter. A text box appears, as well as the applicant’s email address.
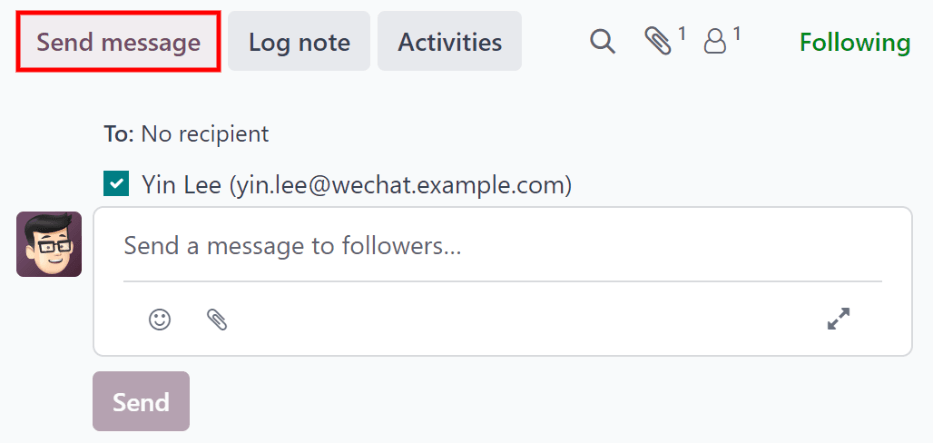
Click the (expand) full composer icon in the bottom right corner of
the Send Message tab in the chatter. A Compose Email pop-up window loads,
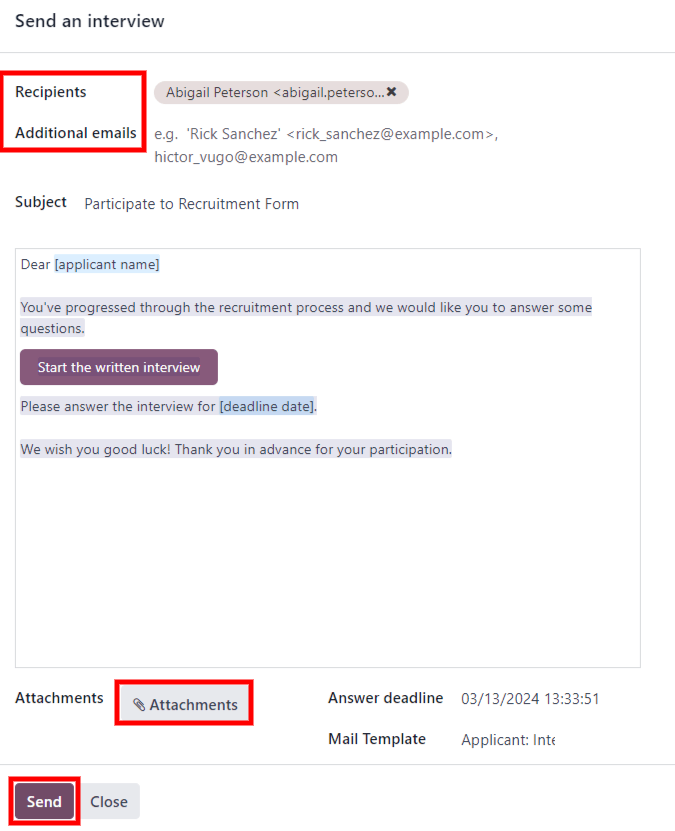
with the Recipients and Subject pre-populated. The applicant’s email address
is entered in the Recipients line, and the Subject is (Job Position). The
email body is empty by default.
To use a pre-configured email template, click the field next to Load template in the bottom section of the window. Select the email template to use from the drop-down menu.
Pre-configured email templates may contain dynamic placeholders so unique information can be populated in the email for a more personalized message to the applicant. There are several pre-configured email templates to choose from. Depending on the template selected, the email subject and/or body may change.
Note
Only the email templates that are configured for the model load. There are other email templates pre-configured in Odoo, but if they are not configured for the recruitment application, they do not appear in the list of available templates.
If any attachments are to be added, click the Attachments button in the lower left corner. Navigate to the file to be attached, then click Open to attach it. To delete an attachment, click the (delete) icon to the right of the attachment.
If any changes need to be made to the email, edit the body of the email. If the edits should be saved to be used in the future, the email can be saved as a new template. Click the Save Template button in the bottom. To send the email, click Send and the email is sent to the applicant. The email then appears in the chatter.
See also