Chapter 4 - Customisation, Part II
Create a custom background shape
Shapes are decorative elements that can be applied to backgrounds or images. They are SVG files that can be animated and customized with different colors.
To better align with the website’s desired atmosphere, create a custom background shape that the client can reuse on different blocks.
Create your custom shape using the following setup:
Declare your shape. You can find the original SVG shape here.
Set the base color of the shape to the theme’s green, and add it to the list of available shapes.
Ver también
See reference documentation on how to add a custom background shapes.

Truco
#CEF8A1). Therefore, in the SVG file, you must
use color 1 from Odoo’s default palette (#3AADAA).Find the solution in our Airproof example for:
the shape declaration on shapes.xml (once the SVG has been added to the right shapes folder).
the style of the shape via the primary_variable.scss file.
adding the shape to the list of shapes thanks to a new file background_shapes_option_plugin.js. Don’t forget to declare it in the __manifest__.py in the
website.website_builder_assetspart.
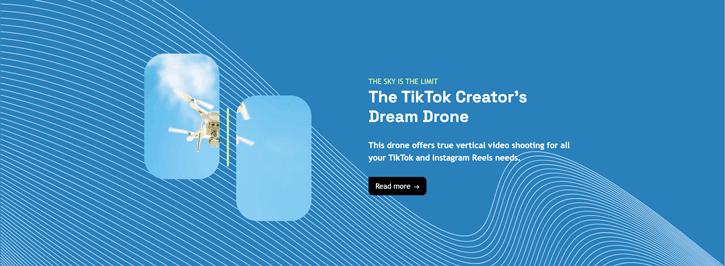
Based on the Airproof design, apply the shape you just added to a
Text-Imagebuilding block on the homepage:Ensure the shape is in the right position.
Set its color to the theme’s light blue.
Ver también
See reference documentation on how to use background shapes.

Truco
Unlike a shape applied via the Website Builder, we don’t use the class o_html_builder_xxx. You
have to replace html_builder with the name you have set for your shapes in your primary
variables.
/website_airproof/data/pages/home.xml¶<!-- Text-image block & Background shape -->
<section class="s_text_image o_cc o_cc3 o_colored_level pt120 pb96"
data-snippet="s_image_text" data-name="Image - Text" style="background-color: rgb(41, 128, 187);"
data-oe-shape-data="{'shape': 'website_airproof/waves/01', 'colors': {'c1': '#BBE1FA'}, 'flip': ['x']}">
<div class="o_we_shape o_website_airproof_waves_01 o_we_flip_x" style="background-image:
url('/html_editor/shape/website_airproof%2Fwaves%2F01.svg?c1=%23BBE1FA');
background-position: 100% 100%;"/>
[...]
</section>
Create a custom image shape
In the same vein, create a custom shape for the images. A part of the work has been done for you by already creating the shape that you can reuse.
Now begin by integrating the shape into your theme. To do this, simply follow these few steps:
Create the preview for the Website Builder.
Apply the dark blue color from the theme to the vertical line.
To use it through the Website Builder, add the tag that links the image uploaded by the futur user to this shape.
Finally, add the shape to the list of shapes for the images available through the Website Builder.
Ver también
See reference documentation on how to create a custom image shape.
Find the solution in our Airproof example:
After adding the shape to the right folder, complete this file with the shape preview.
/website_airproof/static/image_shapes/duo/01.svg¶<svg viewBox="0 0 1 1" id="preview" preserveAspectRatio="none">
<use xlink:href="#filterPath" fill="darkgrey"/>
</svg>
Adjust the color of the vertical line:
/website_airproof/static/image_shapes/duo/01.svg¶<svg viewBox="0 0 1 1" preserveAspectRatio="none">
<rect class="background" x="0.494" y="0.325" width="0.0125" height="0.35" rx="0.00625" ry="0.00625"
fill="#7C6576"/>
</svg>
Add the image tag
/website_airproof/static/image_shapes/duo/01.svg¶<image xlink:href="" clip-path="url(#clip-path)">
<animateMotion dur="1ms" repeatCount="indefinite"/>
</image>
Add it to the list of image shapes with this JS file image_shapes_option_plugin.js.
Once this is done, apply this shape on the image of the building block you created for the previous exercise. And apply the green color to the vertical line of the shape.
Ver también
See reference documentation on how to use image shapes.
/website_airproof/data/pages/home.xml¶<img src="/html_editor/image_shape/website_airproof.img_drone_flying/website_airproof/duo/01.svg"
class="img img-fluid" alt="Drone flying"
data-shape="website_airproof/duo/01" data-shape-colors=";#BBE1FA;;;"
data-mimetype="image/svg+xml"
data-mimetype-before-conversion="image/webp"
data-original-src="website_airproof/static/src/img/content/drone-flying.webp"
data-file-name="drone-flying.svg"/>
Create a custom gradient
Next, let’s add gradients to backgrounds. To enhance the page’s dynamism, apply a gradient from blue
rgb(11, 142, 230) to dark blue rgb(41, 128, 187) to your ”Latest products” block. But before
that, add the gradient to the website builder so that the client can easily reuse it.
Ver también
See reference documentation on how to apply gradients and how to create custom gradients.
Create a color_picker_gradient_tab.js file to create and add the custom gradient to the Website Builder options.
Declare your file in your
manifest.Advertencia
Don’t forget that the files related to the Website Builder options behaviours are declared in the bundle
website.website_builder_assets.Apply it to the ”Latest products” section background on the homepage.
/website_airproof/data/pages/home.xml¶<!-- Latest products section --> <section data-snippet="s_dynamic_snippet_products" data-name="Products" class="..." data-custom-template-data="{}" data-number-of-records="16" data-product-category-id="all" data-show-variants="true" data-filter-id="3" data-template-key="website_airproof.dynamic_filter_template_product_product_airproof" data-carousel-interval="5000" data-number-of-elements="4" data-number-of-elements-small-devices="2" style="background-image: linear-gradient(0deg, rgb(41, 128, 187) 0%, rgb(11, 142, 230) 100%) !important; --o-wsale-products-grid-gap: 16px;"> [...] </section>
Animations
The client loves the overall design but finds the page a bit static. Enhance page interactivity with
animations such as fade-in, rotate, bounce, etc. These can be applied to columns, images,
texts, buttons…
Based on the airproof design, animate the following elements:
the text of the first slide of the carousel.
the sticker and the photo of the drone from the first slide.
the 4 columns with icons.
Adjust animation delays for smoother transitions.
Ver también
See reference documentation on how to apply Animations.
Find the solution in our Airproof example on home.xml.
<img src="/web/image/website_airproof.img_sticker" class="img img-fluid position-absolute
x_sticker o_animate o_anim_rotate_in o_visible" style="animation-delay: 0.8s;
--wanim-intensity: 30;"/>

<img src="/web/image/website_airproof.img_drone" class="img img-fluid o_animate
o_anim_zoom_out o_visible" alt="Drone"/>
<span class="o_animated_text o_animate o_anim_fade_in o_anim_from_bottom o_visible">One
step</span>
<div class="o_grid_item o_colored_level g-height-7 g-col-lg-3 col-lg-3 text-center
o_anim_fade_in o_animate o_anim_from_bottom o_visible" style="z-index: 2;
grid-area: 6 / 1 / 12 / 4; --wanim-intensity: 15;">
</div>
Forms
The forms in Odoo are very powerful. They can send emails directly to a personal inbox or integrate directly with other Odoo applications. This is great, as one of your client’s main priorities is after-sales service. Therefore, the contact form must be properly configured.
Based on the airproof design, create a contact page. Remember to disable the default one and add the new page link to the menu. The client has the following requests for their contact form:
Name and email address field.
Company name field.
Conditional VAT field displayed only if Company name is filled in.
All fields should be mandatory, except for Company name.
Form submission must trigger an email.
After form submission, the
thank-you messageshould remain visible on the contact page.
Ver también
See reference documentation on how to:
Truco
To determine the correct code for your form:
- Create a test page via the Website Builder.Drag & drop the building block that interests you and apply the right design.Use the code generated through Editor HTML/SCSS.
You can also find the original building block code in Odoo: odoo/addons/website/views/snippets/s_website_form.xml.
Find the solution in our Airproof example on contact.xml.
Create a page template
You don’t have the time to create all the service pages for the client. No worries! Create a template page that the client can use to build their own service pages.
This page should be composed as follows:
a Parallax building block,
a Key benefits building block with the title replaced by «Discover our service»,
a Call to action building block,
your custom carousel snippet.
Ver también
See reference documentation on how to create page templates.

Create your
new_page_template_templates.xmlfile and discover its content in our Airproof example.Don’t forget to declare your file in the
__manifest__.pyfile and define what the template page contains./website_airproof/__manifest__.py¶'data': [ # ... 'views/new_page_template_templates.xml', ], 'assets': { # ... }, 'new_page_templates': { 'airproof': { 'services': ['s_parallax', 's_airproof_key_benefits_h2', 's_call_to_action', 's_airproof_carousel'] } },