Shapes
Shapes are handy if you want to add personality to your website. In this chapter, you will learn how to add standard and custom background/image shapes.
They are SVG files that you can add as a decorative background in your different sections or directly on your images. Each shape has one or several customizable colors, and some of them are animated.
Advertencia
Odoo’s default shapes use the Odoo default colors palette map as reference. This way, colors will be automatically adapted to a new palette everytime it changes:
default_palette = {
   '1': '#3AADAA',
   '2': '#7C6576',
   '3': '#F6F6F6',
   '4': '#FFFFFF',
   '5': '#383E45',
}
Background shapes
Standard
A large selection of default background shapes is available.
Usage
<section data-oe-shape-data="{'shape':'html_builder/Zigs/06'}">
   <div class="o_we_shape o_html_builder_Zigs_06" />
   <div class="container">
      <!-- Content -->
   </div>
</section>
data-oe-shape-data is a JSON object containing information about your shape like the location
of the SVG file, the repeat and flip options, etc.
For example, you can flip the shape horizontally or vertically by using the X or Y axis like this:
<section data-oe-shape-data="{'shape':'html_builder/Zigs/06','flip':['x','y']}">
   <div class="o_we_shape o_html_builder_Zigs_06" />
   <div class="container">
       <!-- Content -->
   </div>
</section>
Colors mapping
You can also change the default colors mapping of your shape either by switching colors in the current map or by creating a alternate map without modifying the initial one.
Switch colors mapping
First, we can use a shape like this:

<svg xmlns="http://www.w3.org/2000/svg" xmlns:xlink="http://www.w3.org/1999/xlink" preserveAspectRatio="none" width="100%" height="100%">
   <defs>
      <svg id="zigs06_top" viewBox="0 0 30 30" preserveAspectRatio="xMinYMin meet" fill="#383E45" width="100%">
         <path d="M30,7.9C22.5,7.9,22.5,20,15,20S7.5,7.9,0,7.9V0h30V7.9z" />
      </svg>
      <svg id="zigs06_bottom" viewBox="0 0 30 30" preserveAspectRatio="xMinYMax meet" fill="#FFFFFF" width="100%">
         <path d="M0,22.1C7.5,22.1,7.5,10,15,10s7.5,12.1,15,12.1V30H0V22.1z" />
      </svg>
   </defs>
   <svg>
      <use xlink:href="#zigs06_top" />
      <use xlink:href="#zigs06_bottom" />
   </svg>
</svg>
Here, we use #383E45 and #FFFFFF which corresponds to the 5th and 4th colors in the Odoo’s
default color palette.
The shape is declared as follows in SCSS:
/website_airproof/static/src/scss/primary_variables.scss¶'Zigs/06': ('position': bottom, 'size': 30px 100%, 'colors': (4, 5), 'repeat-x': true),

The blackish color is used at the top (c5), the lightish (c4) at the bottom and in between,
the shape is simply transparent.
We are going to rewrite the colors map with some key: value couples:
With color palette reference and custom color
/website_airproof/static/src/scss/primary_variables.scss¶ $o-bg-shapes: change-shape-colors-mapping('html_builder', 'Zigs/06', (4: 3, 5: rgb(187, 27, 152)))
Or just with references
/website_airproof/static/src/scss/primary_variables.scss¶ $o-bg-shapes: change-shape-colors-mapping('html_builder', 'Zigs/06', (4: 3, 5: 1));
The c4 (white) will be replaced by c3 (whitish) and c5 (black) by c1 (white).
Results


Add extra colors mapping
Adding extra color mapping allows you to add a color variant to the template of a shape while keeping the original.
/website_airproof/static/src/scss/boostrap_overridden.scss¶$o-bg-shapes: add-extra-shape-colors-mapping('html_builder', 'Zigs/06', 'second', (4: 3, 5: 1));
<section data-oe-shape-data="{'shape':'html_builder/Zigs/06'}">
   <div class="o_we_shape o_html_builder_Zigs_06 o_second_extra_shape_mapping" />
   <div class="container">
      <!-- Content -->
   </div>
</section>
Custom
Sometimes, your design might require creating one or several custom shapes.
Firstly, you need to create an SVG file for your shape.
/website_airproof/static/shapes/waves/01.svg¶<svg xmlns="http://www.w3.org/2000/svg" xmlns:xlink="http://www.w3.org/1999/xlink" viewBox="0 0 1309 581">
<path style="fill: #3AADAA;" d="..." />
</svg>
Importante
Make sure to use colors from the default Odoo palette for your shape (as explained above).
Attachment
Declare your shape file.
/website_airproof/data/shapes.xml¶<record id="shape_waves_01" model="ir.attachment">
<field name="name">waves_01.svg</field>
<field name="datas" type="base64" file="website_airproof/static/shapes/waves/01.svg" />
<field name="url">/html_editor/shape/website_airproof/waves/01.svg</field>
<field name="public" eval="True" />
</record>
Field |
Description |
|---|---|
name |
Name of the shape |
datas |
Path to the shape |
url |
The location of your shape in the HTML Editor. The file is automatically duplicated in
|
public |
Makes the shape available for later editing. |
SCSS
Define the styles of your shape.
/website_airproof/static/src/scss/primary_variables.scss¶$o-bg-shapes: map-merge($o-bg-shapes,
(
'website_airproof': (
'waves/01': ('position': left bottom, 'size': 100% auto, 'colors': (1)),
),
)
);
Key |
Description |
|---|---|
File location |
|
position |
Defines the position of your shape. |
size |
Defines the size of your shape. |
colors |
Defines the color c* you want it to have (this will override the color you specified in your SVG). |
repeat-x |
Defines if the shape is repeated horizontally. This key is optional and only needs to be
defined if set to |
repeat-y |
Defines if the shape is repeated vertically. This key is optional and only needs to be
defined if set to |
Add the option
Lastly, add your shape to the list of shapes available on the Website Builder by extending the
background_shape_groups_providers resource.
/website_airproof/static/src/builder/background_shapes_option_plugin.js¶import { Plugin } from "@html_editor/plugin";
import { _t } from "@web/core/l10n/translation";
import { registry } from "@web/core/registry";
export class AirproofBackgroundShapesOptionPlugin extends Plugin {
static id = "airproofBackgroundShapesOption";
resources = {
background_shape_groups_providers: () => ({
airproof: {
label: _t("Airproof"),
subgroups: {
airproof: {
label: _t("Airproof"),
shapes: {
"website_airproof/waves/01": {
selectLabel: _t("Waves 01"),
},
},
},
},
},
}),
};
}
registry.category("website-plugins").add(
AirproofBackgroundShapesOptionPlugin.id,
AirproofBackgroundShapesOptionPlugin
);
Nota
Add the JavaScript file to the website.website_builder_assets bundle so the editor loads it.
Use it into your pages
In your XML pages, you can use your shape in the same way as the others.
<section class="..." data-oe-shape-data="{'shape': 'website_airproof/waves/01', 'colors': {'c1': '#BBE1FA'}, 'flip': ['x']}">
   <div
      class="o_we_shape o_website_airproof_waves_01 o_we_flip_x"
      style="background-image: url('/html_editor/shape/website_airproof/waves/01.svg?c1=%23BBE1FA'); background-position: 100% 100%;" />
   <div class="container">
      <!-- Content -->
   </div>
</section>
You can also redefine colors using the data-oe-shape-data attribute, but this is optional.
Image shapes
Image shapes are SVG files you can add as a clipping mask on your images. Some shapes have customizable colors, and some are animated.
Standard
A large selection of default image shapes is available.
Usage
A shape can only be applied on an image that has been previously declared in an ir.attachment
record as the Website Builder needs to re-process the image. To summarize, the system injects the
original image into a SVG file containing both the image and the shape.
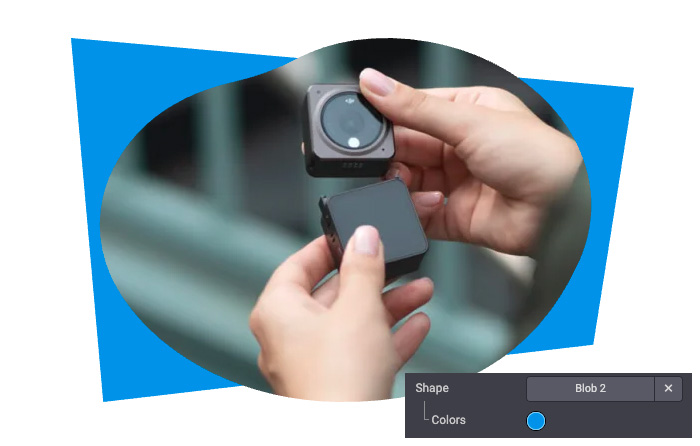
Once fully processed a shaped image looks like the example below:
<img
   src="..."
   class="img img-fluid mx-auto"
   alt="..."
   data-shape="html_builder/solid/solid_blob_2"
   data-shape-colors="#0B8EE6;;;;"
   data-mimetype="image/svg+xml"
   data-mimetype-before-conversion="image/jpeg"
   data-original-src="/website/static/src/img/snippets_demo/s_picture.jpg"
   data-file-name="s_text_image.svg"
   data-original-id="590"
   data-attachment-id="590" />
The img includes different data attributes allowing the Website Builder
to re-process the image if it is edited again:
Attribute |
Description |
|---|---|
data-shape |
Location of the shape |
data-shape-colors |
Colors (5 max) applied to the shape (each value, even if empty, are separated by a semicolon) |
data-mimetype |
Mimetype of the shaped image |
data-mimetype-before-conversion |
Mimetype of the original image |
data-original-src |
Path to the original image file |
data-file-name |
Name of the file which is created after a shape modification (Always use |
data-original-id |
Identifier of the original |
data-attachment-id |
Identifier of the |
Call the shape
Insert a shaped image requires to call the processed attachment with minimum required attributes, not just the original image.
Here is an example of the minimum required to call a shape with colored elements:
<img
   src="..."
   class="img img-fluid mx-auto"
   alt="..."
   data-shape="html_builder/solid/solid_blob_2"
   data-shape-colors="#0B8EE6;;;;"
   data-format-mimetype="image/jpeg"
   data-file-name="s_text_image.svg"
   loading="lazy" />
When a shape is manually applied with the Website Builder:
The original record is processed and the
srcattribute is updated with abase64image.Once the page is saved, the base64 image is moved into the final SVG (specified in
data-file-name).Finally, the
srcattribute is updated with the following path structure:/web/image/<attachment_id>-<attachment_checksum>/<finale_image>.svgand some data attributes are generated by the Website Builder (data-original-id,data-attachment-id,data-mimetype,data-mimetype-before-conversion, etc).
But here are 2 issues:
Convert the final image into
base64format is not that easy (as this is not really human readable).The
checksumcomputation of the finalir.attachmentuses an algorithm.
In a way or another, an external tool would be required but the html_editor module provides a
controller with a useful route that can mix an image shape and an image file:
@http.route([
   '/web_editor/image_shape/<string:img_key>/<module>/<path:filename>',
   '/html_editor/image_shape/<string:img_key>/<module>/<path:filename>'],
   type='http', auth="public", website=True)
Ver también
Focus on /html_editor path, which is the «new name» for the old Web Editor used
up to Odoo 18, and replace the placeholders with real data:
<img
   src="/html_editor/image_shape/website_airproof.img_drone_robin/html_builder/solid/solid_blob_2.svg"
   class="img img-fluid mx-auto"
   alt="..."
   data-shape="html_builder/solid/solid_blob_2"
   data-shape-colors="#0B8EE6;;;;"
   data-mimetype="image/svg+xml"
   data-mimetype-before-conversion="image/webp"
   data-original-src="website_airproof/static/src/img/content/drone-robin.webp"
   data-file-name="drone-robin.svg"
   data-original-id="560"
   data-attachment-id="560" />
Truco
If the shape displays a default Odoo color (compared to what is defined in data-shape-colors)
before any edition, pass a color palette parameter with the same escaped color as defined in
the data-shape-colors:
<img
   src="/html_editor/image_shape/website_airproof.img_drone_robin/html_builder/solid/solid_blob_2.svg?c1=%230B8EE6" />
- The
c*matches the position within thedata-shape-colors: c1with#0B8EE6;;;;c2with;#0B8EE6;;;Etc
Importante
Keep in mind that as long as the image is not saved manually with the Website Builder, it is not stored in the database as a record, it is generated in real time for each visitor displaying the page. So it can have an impact on the loading performances of the website.
Colors
The image shapes can include up to 5 colors. As the SVG file contains colors related to the Odoo
default colors palette, the system is able to map the colors existing in the file and match the ones
called in the data-shape-colors attribute of the image.
<img
   src="..."
   class="img img-fluid mx-auto"
   alt="..."
   data-shape="html_builder/solid/solid_blob_2"
   data-shape-colors="#0B8EE6;;;;"
   data-mimetype="image/svg+xml"
   data-mimetype-before-conversion="image/jpeg"
   data-original-src="/website/static/src/img/snippets_demo/s_picture.jpg"
   data-file-name="s_text_image.svg"
   data-original-id="590"
   data-attachment-id="590" />
In the example above, the color #0B8EE6 is applied as the first color of the palette. Considering
the first color in the default palette is #3AADAA, the Website Builder replaces #3AADAA by
#0B8EE6.
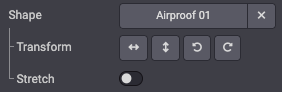
Transformations & Stretch
Some shapes can be adjusted with transformations (Flip, rotate):

<img
   src="..."
   class="img img-fluid mx-auto"
   alt="..."
   data-shape="html_builder/geometric/geo_slanted"
   data-shape-flip="xy"
   data-shape-rotate="90"
   data-aspect-ratio="1/1"
   data-mimetype="image/svg+xml"
   data-mimetype-before-conversion="image/jpeg"
   data-original-src="/website/static/src/img/snippets_demo/s_picture.jpg"
   data-file-name="s_text_image.svg"
   data-original-id="590"
   data-attachment-id="590" />
Attribute |
Description |
|---|---|
data-shape-flip |
Flips the shape along the x-axis( |
data-shape-rotate |
Rotates the shape by 90 degrees ( |
data-aspect-ratio |
Stretch the shape to the image ratio: |
Animation
Some shapes are animated and their velocity can be adjusted:

<img
   src="..."
   class="img img-fluid mx-auto"
   alt="..."
   data-shape="html_builder/geometric/geo_square_1"
   data-shape-animation-speed="2"
   data-mimetype="image/svg+xml"
   data-mimetype-before-conversion="image/jpeg"
   data-original-src="/website/static/src/img/snippets_demo/s_picture.jpg"
   data-file-name="s_text_image.svg"
   data-original-id="590"
   data-attachment-id="590" />
Attribute |
Description |
|---|---|
data-shape-animation-speed |
Animation velocity (Range from |
Custom
The creation of a custom image shape is quite simple and relies on 2 steps:
Create an SVG file with a specific structure
Add the custom shape to the list
Create the SVG
Firstly, create an SVG file for your image shape.
/website_airproof/static/image_shapes/duo/01.svg¶<svg xmlns="http://www.w3.org/2000/svg"
xmlns:xlink="http://www.w3.org/1999/xlink"
width="800"
height="800">
<defs>
<!-- Mask -->
<clipPath id="clip-path" clipPathUnits="objectBoundingBox">
<use xlink:href="#filterPath" fill="none" />
</clipPath>
<!-- Vector used in the mask definition (Clip-path) -->
<path id="filterPath" d="M0.325,0.75H0.125c-0.069,0-0.125-0.056-0.125-0.125V0.125C0,0.056,
0.056,0,0.125,0h0.2c0.069,0,0.125,0.056,0.125,0.125v0.5c0,0.069-0.056,0.125-0.125,0.125ZM1,
0.875v-0.5c0-0.069-0.056-0.125-0.125-0.125h-0.2c-0.069,0-0.125,0.056-0.125,0.125v0.5c0,
0.069,0.056,0.125,0.125,0.125h0.2c0.069,0,0.125-0.056,0.125-0.125Z" />
</defs>
<!-- Other decorative element around (not used as a mask) -->
<svg viewBox="0 0 1 1" preserveAspectRatio="none">
<rect x="0.494"
y="0.325"
width="0.0125"
height="0.35"
rx="0.00625"
ry="0.00625"
fill="#7C6576" />
</svg>
<!-- Preview of the Path declared in the <defs> -->
<svg viewBox="0 0 1 1" id="preview" preserveAspectRatio="none">
<use xlink:href="#filterPath" fill="darkgrey" />
</svg>
<!-- Future image that on wich the mask is applied -->
<image xlink:href="" clip-path="url(#clip-path)">
<!-- Compatibility hack (Safari, Firefox) for non-animated shapes -->
<animateMotion dur="1ms" repeatCount="indefinite" />
</image>
</svg>
The SVG file can be created in any vector editing software but requires some adaptations to work properly with the Website Builder. Let’s break down the example above.
Main SVG
The Image Shape is wrapped into a single main SVG object with explicit width and height attributes
in pixels:
<svg
   xmlns="http://www.w3.org/2000/svg"
   xmlns:xlink="http://www.w3.org/1999/xlink"
   width="800"
   height="800">
   ...
</svg>
Mask
The mask is defined into a <defs> tag in order to be reusable (even if it’s not). It’s compound
by 2 elements : a clip-path and a vector (a path in our shape).At this step, what’s set into
defs does not appear.
<defs>
   <!-- Mask -->
   <clipPath id="clip-path" clipPathUnits="objectBoundingBox">
      <use xlink:href="#filterPath" fill="none" />
   </clipPath>
   <!-- Vector used in the mask definition (Clip-path) -->
   <path id="filterPath" d="M0.325,0.75H0.125c-0.069,0-0.125-0.056-0.125-0.125V0.125C0,0.056,
   0.056,0,0.125,0h0.2c0.069,0,0.125,0.056,0.125,0.125v0.5c0,0.069-0.056,0.125-0.125,0.125ZM1,
   0.875v-0.5c0-0.069-0.056-0.125-0.125-0.125h-0.2c-0.069,0-0.125,0.056-0.125,0.125v0.5c0,
   0.069,0.056,0.125,0.125,0.125h0.2c0.069,0,0.125-0.056,0.125-0.125Z" />
</defs>
Additional decorations
If the shape contains any other decorative element, they are set into the main SVG but outside the
defs
<svg viewBox="0 0 1 1" preserveAspectRatio="none">
   <rect
      x="0.494"
      y="0.325"
      width="0.0125"
      height="0.35"
      rx="0.00625"
      ry="0.00625"
      fill="#7C6576" />
</svg>
Truco
The main SVG has width and height attributes expressed in pixels (800 in this example) but
the viewBox is always normalized to values between 0 and 1. As the SVG is a scalable format, it
ensures the image to be sharp no matter its rendered size.
This decoration has a fill color that can be edited with the Website Builder:

Importante
Do not forget to use a color coming from the Odoo default colors palette to make it editable by the Website Builder (as explained above).
Preview
Then render the mask in a «preview» by using a reference to the ìd set before (filterPath):
<svg viewBox="0 0 1 1" id="preview" preserveAspectRatio="none">
   <use xlink:href="#filterPath" fill="darkgrey" />
</svg>
Image
Finally, add an image tag with a clip-path reference. It will receive your future image (in
base64 format).
<image xlink:href="" clip-path="url(#clip-path)">
   <!-- Compatibility hack (Safari, Firefox) for non-animated shapes -->
   <animateMotion dur="1ms" repeatCount="indefinite" />
</image>
Truco
Feel free to run this tool in your browser to convert your source SVG file into an image shape compatible file.
Add it to the list
Finally, add the custom shape to the list:
/website_airproof/static/src/website_builder/image_shapes_option_plugin.js¶import { Plugin } from "@html_editor/plugin";
import { _t } from "@web/core/l10n/translation";
import { registry } from "@web/core/registry";
export class AirproofImageShapesOptionPlugin extends Plugin {
static id = "airproofImageShapesOption";
resources = {
image_shape_groups_providers: () => ({
airproof: {
label: _t("Airproof"),
subgroups: {
airproof_duo: {
label: _t("Duo"),
shapes: {
"website_airproof/duo/01": {
selectLabel: _t("Duo 01"),
transform: true,
togglableRatio: true,
},
},
},
},
},
}),
};
}
registry.category("website-plugins").add(
AirproofImageShapesOptionPlugin.id,
AirproofImageShapesOptionPlugin
);
Property |
Description |
|---|---|
selectLabel |
Name of the shape displayed in the list |
transform |
Show/hide the transformation option (vertical and horizontal mirror, left and right rotation). |
togglableRatio |
Show/hide the stretch option. |
animated |
Indicates if the shape contains some animations |
imgSize |
Set the image ratio used for Devices (example: |
Transform and Stretch options
Use it into your pages
Custom image shapes can be now applied on images, for example, in your static pages:
<img
   src="/html_editor/image_shape/website_airproof.img_drone_robin/website_airproof/duo/01.svg?c2=%230B8EE6"
   class="img img-fluid mx-auto"
   alt="..."
   data-shape="website_airproof/duo/01"
   data-shape-colors=";#0B8EE6;;;"
   data-format-mimetype="image/webp"
   data-file-name="drone-robin.svg"
   loading="lazy" />