Quiosques
Odoo’s Attendances app allows employees to check in and out of work directly from the database or a kiosk.
Um quiosque é um :doc:`dispositivo dedicado <hardware>`(um PC, tablet ou celular) para os funcionários utilizarem para entrada e saída do trabalho.
Os quiosques são necessários para os funcionários que não têm acesso à base de dados.
Only employees with access to the Odoo database can check in and out from the Attendances app, and they are referred to as users.
Importante
Se os funcionários puderem entrar e sair utilizando um crachá ou um RFID, então um dispositivo acessível em Modo Quiosque deve estar disponível para usar estes dois métodos.
Configuração
To use kiosks in the Attendances application, navigate to , and configure the Modes section and the Seção Definições do quiosque.
Once all desired settings have been configured, click the Save button on the Settings page to activate and enable them.
Modes section
Determine how an employee checks in at a kiosk, either by searching for their name (Manual Selection), scanning an employee ID or key fob (Barcode/RFID), or both.
On the settings page, using the drop-down menu for the Kiosk Mode field in the Modes section, make the desired selection. Options are Barcode/RFID, Barcode/RFID and Manual Selection, or Manual Selection.
Nota
The Barcode application does not need to be installed to use one of the Barcode/RFID settings.
Seção Definições do quiosque
As diversas definições na seção Configurações do quiosque determinam como os funcionários registram entradas e saídas nos quiosques.
Barcode Source : This setting appears only if one of the two Barcode/RFID selections were configured for the Kiosk Mode setting.
If available, select how barcodes are scanned at the kiosk from the drop-down menu. Barcodes can be scanned with a dedicated Scanner, or with a device’s Front Camera or Back Camera.
Display Time : Determine how many seconds a check-in/check-out confirmation message remains on the kiosk screen before returning to the main check-in screen.
Employee PIN Identification: Click this checkbox to require employees to use a unique PIN to check in. PINs are configured on each individual employee record. Refer to the new employee documentation for more information on setting up PINs.
Attendance Kiosk Url: Odoo generates a unique web address (URL) to use a device as a kiosk, without having to sign in to the Odoo database. When setting up a kiosk device, navigate to this unique web address in a web browser to present the Attendances app kiosk.
Importante
These kiosk URLs are not secured with any type of access code. Anyone who has the URL can access the Attendances app kiosk. If the URL is compromised for any reason, such as in the event of a security breach, click Generate new URL, located beneath the link, to generate a new URL and update the kiosk accordingly.
Modo quiosque
A entrada no Modo Quiosque está só disponível para usuários com direitos de acesso específicos.
O Modo quiosque pode ser ativado de duas formas diferentes:
Navegue até o , e clique em Modo quiosque no menu superior. O dispositivo sai do Odoo e entra no Modo quiosque.
Navegue ao app . Na seção Configurações do quiosque, use o link no campo URL do quiosque de ponto para abrir o Modo Quiosque em qualquer dispositivo.

Importante
Como medida de segurança, quando um dispositivo está no Modo de quiosque, não é possível voltar à base de dados sem iniciar sessão.
Nota
Em qualquer momento, é possível gerar um novo URL de quiosque, se necessário. Clique no Gerar um novo URL do modo quiosque
The kiosk loads, displaying the current date and time, along with the following banner at the top: Connect an RFID reader, and scan a token. ‘Read the Documentation’/ ‘Buy an RFID Device.
Click the text link Read the Documentation to open the corresponding documentation in a new tab. Click the text link Buy an RFID Device to open a new tab with available products to purchase on Amazon. Close either tab to return to the kiosk.
At the end of the text, an X appears. Click the X to close the banner. Closing the banner hides it from that point on, and cannot be enabled again.
To exit Kiosk Mode, either close the tab in the web browser or return to the main log-in screen of Odoo.
Entrada e saída pelo quiosque
Crachá
To check in or out using a badge, tap the Scan your badge image in the center of the kiosk.
Em seguida, digitalize o código de barras do cartão usando o método configurado na seção Configurações do quiosque do menu de configuração.
Após o código de barras ser lido, o funcionário é registrado na entrada ou na saída e aparece uma mensagem de confirmação <attendances/confirmation>` com todas as informações.
RFID
To check in or out using an RFID key fob, scan the fob with an RFID reader.
Feita a leitura, a entrada ou saída do funcionário é efetuada e aparece uma mensagem de confirmação <attendances/confirmation>` com toda a informação.
Manualmente
Users who do not have a scannable badge or an RFID fob can manually check in and out at a kiosk.
Tap the Identify Manually button on the kiosk, and a screen appears with all the employees who can be checked in or out. Tap on a person to check them in or out, and a confirmation message appears.
To find a specific person, either:
Search: Tap into the search bar and enter the desired person’s name. As the name is typed, matching results are displayed on the screen.
By department: Tap on any desired selection in the department section, located on the left side of the screen, to only view employees from that specific department. The number at the end of each listed department represents how many employees that department has.
PIN
Se a caixa de seleção Identificação do PIN do funcionários estiver assinalada na secção Configurações do quiosque do menu de configuração, é solicitado que o funcionário insira um PIN quando registrar entradas e saídas manualmente.
After the employee is selected, a number pad appears with a message. When checking in, (Employee) Please enter your PIN to check in appears above the numbers. When checking out, (Employee) Please enter your PIN to check out appears above the numbers.
Digite o PIN usando o teclado numérico e, quando terminar, toque em OK. Em seguida, é feito o check-in ou o check-out do funcionário, e uma mensagem de confirmação é exibida.

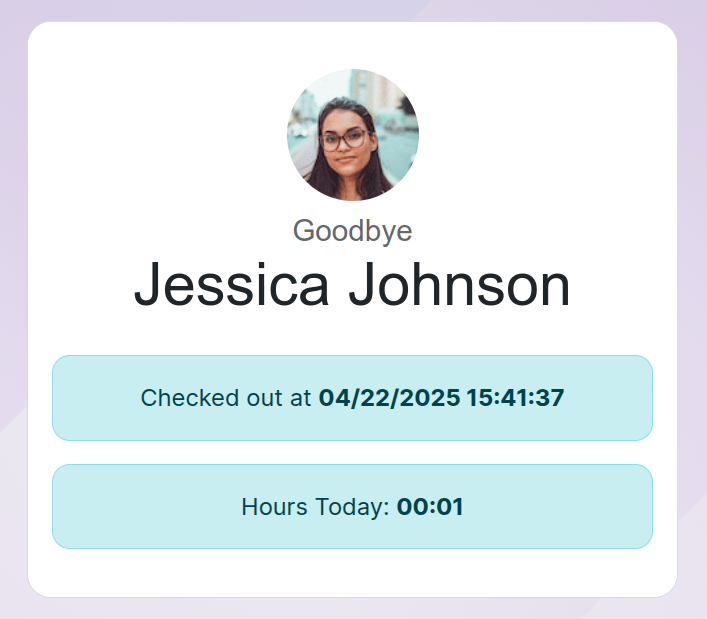
Mensagem de confirmação
When an employee checks in or out, a confirmation message appears, with all the check-in or check-out information.
When checking in, the Welcome (Employee) message appears, along with the current date and time. If the employee has already checked in and out that day, an Hours Previously Today: HH:MM message also appears, showing the total hours logged earlier.
When checking out, Goodbye (Employee) appears, as well as the date and time of checkout. Beneath the message is an Hours Today: HH:MM field, with the total hours and minutes logged for the day.
Beneath both the “welcome” and “goodbye” messages is an OK button. To exit the screen before the preset time in the kiosk, tap the OK button.