
Peraturan-peraturan otomatisasi
Automation rules are used to trigger automatic changes based on user actions (e.g., apply a modification when a field is set to a specific value), email events, time conditions (e.g., archive a record 7 days after its last update), or external events.
To create an automation rule with Studio, proceed as follows:
Buka Studio dan klik Automations, lalu New.
Select the Pemicu and, if necessary, fill in the fields that appear on the screen based on the chosen trigger.
Klik Add an action, lalu pilih Type dari action dan isi kolom yang muncul di layar berdasarkan action yang Anda pilih.
Klik Save & Close atau Save & New.
Example
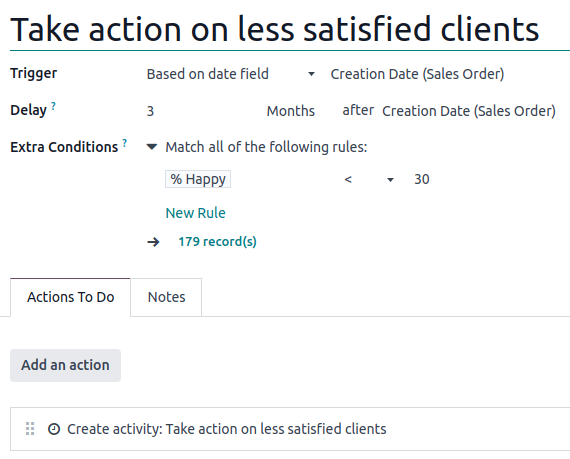
Tip
To modify the model of the automation rule, switch models before clicking Automations in Studio, or activate the developer mode, create or edit an automation rule, and select the Model in the Automation Rules form.
You can also create automation rules from any kanban stage by clicking the gear icon (⚙ ) next to the kanban stage name, then selecting Automations. In this case, the Trigger is set to Stage is set to by default, but you can change it if necessary.

Pemicu
The Trigger is used to define when the automation rule should be applied. The available triggers depend on the model. Five trigger categories are available overall:
Tip
You can also define a Before Update Domain to specify the conditions that must be met before the automation rule is triggered. In contrast, the conditions defined using the Extra Conditions and Apply on filters are checked during the execution of the automation rule.
To define a Before Update Domain, activate the developer mode, create or edit an automation rule, click Edit Domain, then click New Rule.
For example, if you want the automated action to happen when an email address is set on a contact that did not have an address before (in contrast to modifying their existing address), define the Before Update Domain to Email is not set, and the Apply on domain to Email is set.

Value Diupdate
The triggers available in this category depend on the model and are based on common field changes, such as adding a specific tag (e.g., to a task) or setting the User field. Select the trigger, then select a value if required.

Email Acara
Memicu tindakan otomatis saat menerima atau mengirim email.
Kondisi Timing
Trigger automated actions based on a date field. The following triggers are available:
Based on date field: Select the field to be used next to the Delay field.
After creation: The action is triggered when a record is created and saved.
After last update: The action is triggered when an existing record is edited and saved.
Anda kemudian dapat menentukan:
a Delay: Specify the number of minutes, hours, days, or months. To trigger the action before the trigger date, specify a negative number. If you selected the Based on date field trigger, you must also select the date field to be used to determine the delay.
Extra Conditions: Click Add condition, then specify the conditions to be met to trigger the automation rule. Click New Rule to add another condition.
The action is triggered when the delay is reached and the conditions are met.
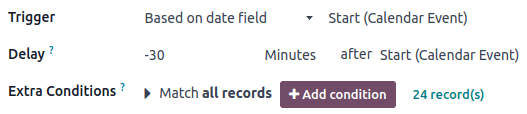
Example
If you want to send a reminder email 30 minutes before the start of a calendar event, select the Start (Calendar Event) under Trigger Date and set the Delay to -30 Minutes.
Catatan
By default, the scheduler checks for trigger dates every 4 hours, meaning lower granularity in time-based automations may not always be honored.
Khusus
Memicu tindakan otomatis:
On save: When the record is saved;
On deletion: When a record is deleted;
On UI change: When a field's value is changed on the Form view, even before saving the record.
Untuk pemicu On save dan On UI change, Anda harus memilih kolom yang akan digunakan untuk memicu aturan otomatis di kolom When updating.
Peringatan
Jika tidak ada field yang dipilih di field When updating, tindakan otomatis mungkin dijalankan beberapa kali per catatan.
Secara opsional, Anda juga dapat menentukan kondisi tambahan yang harus dipenuhi untuk memicu aturan automasi di field Apply on.
Catatan
The On UI change trigger can only be used with the Jalankan Kode action and only works when a modification is made manually. The action is not executed if the field is changed through another automation rule.
Eksternal
Trigger automated actions based on an external event using a webhook. A webhook is a method of communication between two systems where the source system sends an HTTP(S) request to a destination system based on a specific event. It usually includes a data payload containing information about the event that occurred.
To configure the On webhook trigger, copy the URL generated by Odoo into the destination system (i.e., the system receiving the request). Then, in the Target Record field, enter the code to run to define the record(s) to be updated using the automation rule.
Peringatan
The URL must be treated as confidential; sharing it online or without caution could potentially expose your system to malicious parties. Click the Rotate Secret button to change the URL's secret if necessary.
Catatan
The code defined by default in the Target Record field works for webhooks coming from another Odoo database. It is used to determine the record(s) to be updated using the information in the payload.
If you wish to use the webhook's content for a purpose other than to find the record(s) (e.g., create a record), your only option is to use an Jalankan Kode action. In this case, the Target record field must contain any valid code, but its result doesn't have any effect on the automated action itself.
The webhook content is available in the server action context as a
payloadvariable (i.e., a dictionary that contains the GET parameters or POST JSON body of the incoming request).
You can also choose to Log Calls to record the payloads received, e.g., to make sure the data sent by the source system matches the expected format and content. This also helps identify and diagnose any issues that may arise. To access the logs, click the Logs smart button at the top of the Automation rules form.
Tindakan untuk Dilakukan
Once you have defined the automation rule's trigger, click Add an action to define the action to be executed.
Tip
You can define multiple actions for the same trigger/automation rule. The actions are executed in the order they are defined. This means, for example, that if you define an Update record action and then a Send email action, the email uses the updated values. However, if the Send email action is defined before the Update record action, the email uses the values set before the update action is run.
Update Record
This action allows to update one of the record's (related) fields. Click the Update field and, in the list that opens, select or search for the field to be updated; click the right arrow next to the field name to access the list of related fields if needed.
Jika Anda memilih many2many field, pilih apakah kolom harus diperbarui dengan Adding, Removing, atau Setting it to nilai yang dipilih atau dengan Clearing it.
Example
If you want the automated action to remove a tag from the customer record, set the Update field to Customer > Tags, select By Removing, then select the tag.

Tip
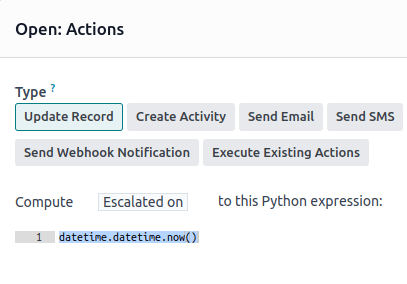
Atau, Anda juga dapat mengatur kolom record secara dinamis menggunakan kode Python. Untuk melakukannya, pilih Compute alih-alih Update, lalu masukkan kode yang akan digunakan untuk menghitung nilai kolom. Misalnya, jika Anda ingin aturan otomatis menghitung datetime field kustom ketika prioritas tugas diatur ke High (dengan memberi bintang pada tugas), Anda dapat menentukan pemicu Priority is set to ke High dan menentukan action Update Record sebagai berikut:
Buat Aktivitas
Action ini digunakan untuk menjadwalkan aktivitas baru yang terhubung ke record. Pilih Activity Type, masukkan Title dan deskripsi, lalu tentukan kapan Anda ingin aktivitas dijadwalkan di kolom Due Date In, dan pilih User type:
To always assign the activity to the same user, select Specific User and add the user in the Responsible field;
Untuk menargetkan user yang terhubung ke record secara dinamis, pilih Dynamic User (based on record) dan ubah User Field jika perlu.
Example
Setelah lead diubah menjadi opportunity, Anda ingin action otomatis menyiapkan panggilan untuk user yang bertanggung jawab atas lead. Untuk melakukannya, atur Activity Type ke Call dan User Type ke Dynamic User (based on record).

Send Email dan Send SMS
Action ini digunakan untuk mengirim email atau pesan teks ke kontak yang terhubung ke record tertentu. Untuk melakukannya, pilih atau buat Email Template atau SMS Template, lalu, di kolom Send Email As atau Send SMS As, pilih bagaimana Anda ingin mengirim email atau pesan teks:
Email: untuk mengirim pesan sebagai email kepada penerima Email Template.
Message: untuk memposting pesan pada catatan dan memberi tahu pengikut catatan.
Note: untuk mengirim pesan sebagai catatan internal yang terlihat oleh pengguna internal di chatter.
SMS (without note): untuk mengirim pesan sebagai pesan teks kepada penerima SMS template.
SMS (with note): untuk mengirim pesan sebagai pesan teks kepada penerima SMS template dan mempostingnya sebagai catatan internal di chatter.
Note only: untuk hanya memposting pesan sebagai catatan internal di chatter.
Tambah Pengikut dan Hapus Pengikut
Use these actions to (un)subscribe existing contacts to/from the record.
Buat Recor
Action ini digunakan untuk membuat record baru pada model apa pun.
Pilih model yang diperlukan di kolom Record to Create; secara default berisi model saat ini. Tentukan Name untuk record, lalu, jika Anda ingin membuat record pada model lain, pilih kolom di kolom Link Field untuk menghubungkan record yang memicu pembuatan record baru.
Catatan
Daftar dropdown yang terkait dengan kolom Link Field hanya berisi one2many fields yang ada pada model saat ini yang terhubung ke many2one field pada model target.
Tip
You can create another automation rule with Update Record actions to update the fields of the new record if necessary. For example, you can use a Create Record action to create a new project task and then assign it to a specific user using an Update Record action.
Jalankan Kode
Aksi ini digunakan untuk menjalankan kode Python. Anda dapat menulis kode Anda ke dalam tab Code menggunakan variabel berikut:
env: environment tempat aksi dipicumodel: model dari record tempat aksi dipicu; merupakan recordset kosongrecord: record tempat aksi dipicu; mungkin kosongrecords: recordset dari semua record tempat aksi dipicu dalam mode multi; ini mungkin dibiarkan kosongtime,datetime,dateutil,timezone: pustaka Python yang bergunafloat_compare: fungsi utilitas untuk membandingkan float berdasarkan presisi tertentulog(message, level='info'): fungsi logging untuk mencatat informasi debug dalam tabel ir.logging_logger.info(message): logger untuk mengeluarkan pesan dalam log serverUserError: kelas exception untuk memunculkan pesan peringatan yang menghadap userCommand: namespace perintah x2manyaction = {...}: untuk mengembalikan sebuah aksi
Tip
Variabel yang tersedia dijelaskan di tab Code dan Help.
Kirim Notifikasi Webhook
This action allows to send a POST request with the values of the Fields to the URL specified in the URL field.
Sample Payload menyediakan pratinjau data yang disertakan dalam permintaan menggunakan data record acak atau data dummy jika tidak ada record yang tersedia.
Jalankan Action yang Tersedia
Action ini digunakan untuk memicu beberapa action (yang terhubung ke model saat ini) secara bersamaan. Untuk melakukannya, klik Add a line, lalu, di pop-up Add: Child Actions, pilih action yang ada atau klik New untuk membuat yang baru.