품목
Odoo eCommerce allows you to create products and manage their visibility on the website. Products can be configured in various ways, including adding product images and videos, creating product combinations, implementing cross-selling and upselling strategies, attaching digital files, translating product information, managing stock, and setting packaging options.
품목 생성
프론트엔드에서 품목을 생성하려면, 웹사이트 앱으로 이동하여 오른쪽 상단의 신규 를 클릭한 후 품목 을 선택합니다. 품목명 과 함께 바코드, 판매 가격, 기본 판매세 및 웹사이트 카테고리 등을 입력한 후 이미지를 추가합니다. 저장 을 클릭하면 품목 페이지로 이동하며, 여기서 웹사이트 편집기 를 사용해 사용자 지정 할 수 있습니다. 완료되면 저장 을 클릭합니다. 추가로 고급 품목 세부 정보 를 설정하려면 오른쪽 상단의 품목 을 클릭하면 백엔드 품목 양식을 이용할 수 있습니다.
팁
It is also possible to create a product from the backend by navigating to . Then:
Configure a new product by clicking New, or
Import product data using XLSX or CSV files by clicking the (gear) icon next to Products, then Import records.
품목 공개
To publish a product, access the product page on the website and switch the toggle from Unpublished to Published.
팁
To access the product page from the product form in the backend, click the Go to Website smart button.
To publish products from the backend, navigate to the Sales tab of the product form, then go to the Ecommerce shop section and toggle the Is Published switch on.
To publish multiple products at once, follow these steps:
으로 이동합니다.
게시됨 필터를 제거하고 목록 보기로 전환합니다.
Click the (dropdown toggle) icon on the far right of the view and enable Is Published.
Click the Is Published column to re-order it by published or unpublished products.
Select the products to publish by ticking their box on the far left.
In the Is Published column, tick the box for any of the selected products, then Update to publish them.
참고
관리 중인 웹사이트가 여러 개인 경우, 각 웹사이트에서 판매할 품목은 품목 양식 에서 설정할 수 있습니다. 판매 탭으로 이동한 후 이커머스 상점 섹션에서 품목을 판매하려는 웹사이트 를 선택합니다. 필드를 비워두면 모든 웹사이트에 해당 품목을 판매하도록 적용됩니다. 품목별로 하나의 웹사이트 또는 모든 웹사이트 에서 판매되도록 설정할 수 있으나, 일부 웹사이트 만 선택하는 것은 불가능합니다. 모든 웹사이트에서 판매하지 않고 특정한 여러 개의 웹사이트에서 품목을 판매하도록 설정하려면, 품목을 복제 한 후 각 복제본에 해당 웹사이트를 지정하면 됩니다.
품목 환경설정
To add general information to a product, navigate to and select the relevant product. You can configure various options, such as choosing a product type, adding variants and categories, or defining prices.
Additionally, add an e-commerce-specific product description to be displayed below the product name on the frontend product page. To do so, go to the Sales tab, scroll down to the Ecommerce description section, and write a description. Use Odoo’s rich-text editor to customize the content.
팁
Click the Go to Website smart button to access the frontend product page and customize it using the website editor.
Product descriptions can also be generated using AI. To do so, type
/in the Ecommerce description section and select AI to open the AI agent.
품목 이미지 및 동영상
To add media items, such as images and videos, navigate to the product form and go to the Sales tab. In the Ecommerce Media section, click Add Media. In the Select a media pop-up window:
To add an image, select an image, click Add URL or Upload an image in the Images tab.
To add a video, navigate to the Videos tab, paste a video URL, or embed HTML code. Then, enable the relevant video options.
Once the media is selected, click Add.
팁
Customize product images and videos using the website editor from the frontend.
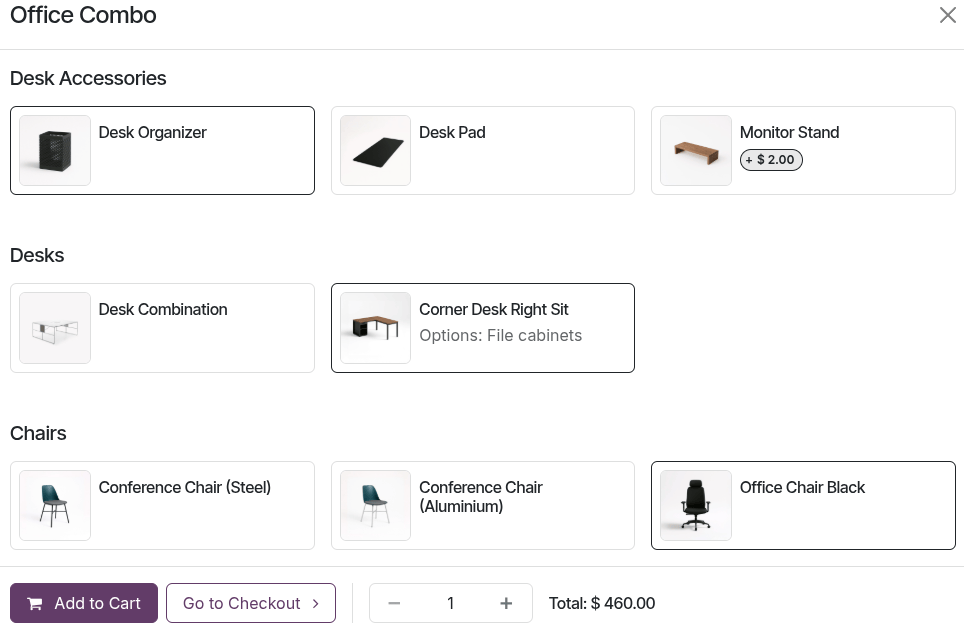
품목 콤보
Product combinations allow users to configure a set of related products to buy as a bundle. To configure combos, go to . Once finished and published, customers can choose the combo when adding the product to the cart. Depending on the configuration, certain items may incur an additional charge.
상향판매 및 교차판매 (크로스셀링 및 업셀링)
Cross-selling and upselling are sales techniques used to present customers with additional or higher-tier products and services from the catalog. Cross-selling focuses on recommending accessory or optional products alongside the item being purchased during ordering and checkout. Upselling, on the other hand, encourages customers to choose a higher-priced or upgraded alternative product.
To configure these product suggestions, go to , select the relevant product, go to the Sales tab, and add the desired products in the corresponding Optional products, Accessory Products, and/or Alternative products fields.
Optional products are suggested when the customer clicks the Add to cart button to buy a specific product.

Accessory products appear in the Suggested accessories section during the Order summary step, just prior to proceeding to checkout.

참고
To hide this section, open the website editor, go to the Style tab, and toggle the Suggested Accessories switch off.
Alternative products are displayed at the bottom of the product page under the Alternative Products heading.

팁
To customize this block, open the website editor, click the block on the page, and adapt the heading and text if necessary. Go to the Style tab, scroll to the Alternative Products section, and modify the options as needed.
디지털 파일
It is possible to link digital files, such as certificates, eBooks, or user manuals, to the products. To do so, go to the product form and click the Documents smart button. Then, click Upload to upload a file directly, or for additional options, click New. Choose the Type of attachment:
파일: 파일을 업로드합니다.
URL: Insert the link to the file or media item.
Cloud Storage (if applicable): Insert a link to your cloud storage to store the file on the cloud storage platform instead of the database’s server.
These documents can be made available:
On the product page (before checkout): Set the Sales visibility field to Hidden and enable Publish on website.
In the customer portal on the confirmed sales order (after checkout): Set the Sales visibility field to On confirmed order and disable Publish on website.
팁
In Kanban view, click the (dropdown menu) in the top-right corner of the document card to Edit, Delete, or Download the document.
번역
If a website is available in multiple languages, product information can be translated directly on
the product form. Fields that support multiple languages
are identifiable by their language abbreviation (e.g., EN) next to the field, such as the
Product name, Out-of-Stock Message, the
E-Commerce Description, ribbon or badge names, categories and variants names, etc.
참고
Having untranslated content on a web page may be detrimental to the user experience and SEO. To avoid this, use the Translate feature to translate any remaining untranslated content on the page.
더 보기:
재고 관리
중요
The Inventory app must be installed to handle stock-related settings and operations.
To configure stock-related e-commerce options, go to , scroll down to the eCommerce section, then to the Inventory Defaults subsection. The following settings are available:
If multiple warehouses exist, select the relevant one from the Warehouse dropdown menu to set it as the default.
Next to Out-of-Stock, enable Continue Selling to allow customers to place orders even when the product is out of stock. Keep this option disabled to prevent customers from ordering products that are out of stock.
Enable the Show Available Quantity option to display the remaining available quantity on the product page when it drops below a defined threshold. The available quantity is calculated based on the On hand quantity minus the quantity already reserved for outgoing transfers.
These settings apply to all products, but can be adapted for individual products if needed. To do so, go to the product form and make sure the Track inventory option is enabled. Then, navigate to the Sales tab and, under the Ecommerce shop section, enable or disable the relevant Sell when Out-of-Stock and Show Available Qty options. You can also compose an Out-of-Stock Message or create an out-of-stock ribbon or badge.
참고
Modifying the general Inventory Defaults settings does not automatically modify the related option(s) on the product form for existing products; it only affects products created after the feature is enabled/disabled.
To display the stock level on the product page, the Product Type field on the product form must be set to Goods or Combo.
A (envelope) Get notified when back in stock button appears on the product page when an item is out of stock. Customers can click the link to enter their email address and receive a notification once the item is back in stock.
If the Click & Collect feature is enabled, the product availability is displayed on the product page based on the stock in the warehouse defined on the related delivery method form.
Example
Currently, the Boko Chair is not available in any warehouses. However, customers can click
the (envelope) Get notified when back in
stock link to receive a notification as soon as the product becomes available again. An
Out-of-Stock Message can also be added to inform customers that the item will be
replenished.

팁
If a unique reference is needed for inventory management, install the Manufacturing app and create kit bills of materials. Each kit links its published “virtual” products to the main reference tracked in Inventory. This ensures that any item sold on the website is converted into the corresponding stocked item in the delivery order.
패키지
To offer different product pack sizes to customers on the e-commerce, configure product packagings. Then go to the product form and navigate to the Sales tab. Under Upsell & cross-sell, add as many package types as needed in the Packagings field. The available package types are displayed on the e-commerce product page.

팁
It is also possible to add packagings to a specific product variant. To do so, go to the product form, click the Variants smart button, and select the relevant product variant. Under Sales, add as many package types as needed in the Packagings field.