Standuri de eveniment
The Odoo Events application provides users with the ability to create, sell, and manage event booth reservations.
Configurare
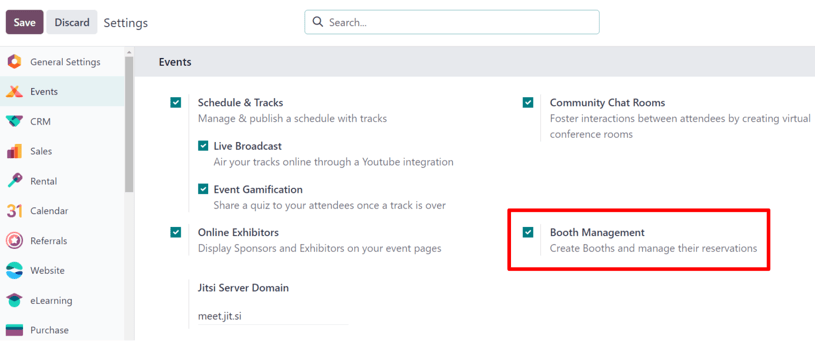
Pentru a crea, vinde și gestiona standuri pentru evenimente, funcția Booth Management trebuie activată.
To do that, navigate to . Click the Booth Management checkbox, then click Save to enable the setting.
When the Booth Management setting is activated, Odoo automatically creates a default Event Booth product in the database with its Product Type set to Service and its Create on Order field set to Event Booth.
Users can modify/duplicate this default product or create a new, custom product. In either case, users must verify that an Event Booth product exists with this configuration in order to create booths and booth categories, as shown later in this documentation.
Categorii de standuri
Custom booth categories can be created by users to assign different price tiers and sponsors for multiple booths at once.
When the Booth Management setting is activated, Odoo automatically creates three default booth categories: Standard Booth, Premium Booth, and VIP Booth. Users can modify/duplicate these default categories or create new, custom categories. In either case, booth categories must exist in the database before users can create event booths.
Booth categories dashboard
To view and manage booth categories, navigate to .
The Booth Category dashboard displays a list of all created booth categories along with the booth category name, associated Event Booth product, and price.
Notă
If sponsors are enabled in the Events app, an additional Create Sponsor checkbox appears on each record in the list as well as on the booth category form.

To edit an existing booth category, select it from the list and proceed to make any desired modifications in the resulting booth category form.
Creează categorie de stand
To create a booth category, click the New button in the upper-left corner of the page to reveal a blank booth category form.

Start by entering a name for the booth category in the top Booth Category field. This is a required field.
Optionally, upload a corresponding image (e.g., a sample photo of how the booth looks).
In the Booth Details section, assign an Event Booth product in the Product field. This a required field.
Next, set a price for the booth category in the Price field.
If event sponsors are configured, a Sponsorship section appears with a Create Sponsor checkbox option. When enabled, the user is created as an official Sponsor of the event whenever a booth of this category is booked.
Additionally, the Sponsor Level and Sponsor Type fields can be configured to specify the level/tier and the type of sponsorship. See the event sponsors documentation for more information about configuring sponsor levels and types.
Finally, in the Description tab, enter any information about the booth category (e.g., the square footage, any amenities, size of display screen, etc.).
Add booths to events
After configuring booth categories, booths can be created and added to specific events.
Booths dashboard
To create and add booths to a specific event, first navigate to its event form and click the Booths smart button at the top to access the Booths dashboard.
The dashboard is displayed in a Kanban view, by default, and grouped by two different: Available and Unavailable. The booths in the Available stage are still available for exhibitors to reserve. The booths in the Unavailable stage have already been reserved and are no longer available.
Notă
The Booths dashboard is also viewable in a (List), (Graph), or (Pivot) views for users to track insights about booths for a particular event.
In addition to the default Available and Unavailable filters, the Booths dashboard can be grouped by the following:
Status: Group by the availability of the booths. This is the default grouping option.
Renter: Group by the individual renters of the booths.
Booth Category: Group by the booth categories of the booths.
Is Paid: Group by booths that have been paid and reserved.
Event: Group by the associated event of the booths.
See the reporting documentation for more information about views and how to apply filters and grouping options.
Create an event booth
To create a new booth, click New in either the Kanban or List view. This opens an event booth form for the user to configure a new booth.
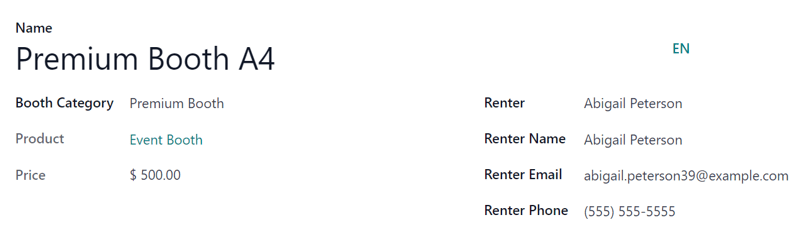
Începe prin a introduce un Nume pentru stand. Acesta este un câmp obligatoriu.
Then, apply (or create) a Booth Category. This is a required field.
After selecting an existing Booth Category, the corresponding product and price of the selected booth category appear in the non-modifiable Product and Price fields.
Continue by selecting a renter’s contact in the Renter drop-down to automatically populate the Renter Name, Renter Email, and Renter Phone fields. Alternatively, these fields can also be entered manually.
Notă
When a renter reserves a booth through the event website, the renter-related fields on the form automatically populate based on the information provided during the online transaction. The booth then automatically changes status from Available to Unavailable.
The status of the booth (Available or Unavailable) can also be changed manually, either by clicking the appropriate status from the status bar in the upper-right of the booth form or by dragging-and-dropping the desired booth into the appropriate stage via the Booths dashboard Kanban view.
Event booth reservation
With event booths configured, renters can view and reserve them on the event webpage via the Get A Booth event sub-menu link.
This section outlines how to configure the event website to allow renters to reserve booths. It then provides a view of how renters can reserve the booths through the website.
Enable booth reservations
To access the event booths page for a specific event, navigate to the event form in the Events app and click the Go to Website smart button to open the event page.
If the event sub-menu (with the Get A Booth option) is not showing up, there are two ways to make it appear: via the website edit mode or through the developer mode.
Website edit mode
While on the event page, enter the edit mode by clicking the Edit button in the upper-right corner. Then, click into the Customize tab of the resulting sidebar of web design tools.
In the Customize tab, click the toggle switch for Sub-menu (Specific), then click Save. Doing so reveals the event sub-menu with various options (e.g., Talks, Agenda, Info, etc.).
Developer mode
Alternatively, enter Debug mode and open the specific event form in the Events application.
With Debug mode on, an array of sub-menu options appears at the top of the event form. Click the checkbox for Website Submenu to display the event sub-menu on the event page.
Next, choose which sub-menu options to include on the event page. In this case, make sure the Booth Register checkbox is selected.
Reserve a booth
Once the sub-menu is enabled on the event page either through the website editor or through the debug mode, renters can then view and reserve available booths.
Renters can access the Get A Booth page on the event website by selecting the desired event from the Events homepage then clicking the Get A Booth sub-menu option.

From the Get A Booth page, the renter can select their desired booth option, then Location. Next, they click the Book my Booth(s) button located at the bottom-right of the page.
Doing so reveals a Contact Details page where they fill out either Contact Details or Sponsor Details depending on how the booth was configured.
Once the necessary information has been entered, the renter then clicks the Go to Payment at the bottom of the page and proceeds to complete the typical checkout process.
Upon a successful payment confirmation, the renter has successfully reserved a booth.
In the database, that selected booth automatically moves to the Unavailable stage on the event-specific Booths page in the Events app.
The provided Sponsor information (if applicable) and Sales Order information are also accessible from the specific event form via their respective smart buttons that appear at the top of the form.