
Paski płac
Payslips are individual records of payment, containing all the details of how the pay was calculated (hours, deductions, other inputs, etc.), and generated by payroll officers through the Payroll app. Payslips can be created and processed individually, or multiple payslips can be processed at one time, in a single batch, referred to in Odoo as pay runs.
Tworzenie paska wynagrodzeń
To create a new payslip, navigate to , and the Employee Payslips dashboard loads. Click the New Off-Cycle button in the corner, and a blank payslip form loads. Fill out the following information on the payslip form:
Employee: Select the employee being paid using the drop-down menu. This field is required. Once a selection is made, other fields may auto-populate according to the employee record.
Informacja
It is recommended to only create payslips for employees that are already in the database. If there is no current employee record, and therefore no employee contract, it is recommended to create the new employee in the Employees application before creating payslips for that employee. Refer to the new employee documentation for instructions on how to add an employee.
Employee Record: The date the current contract began for the selected employee automatically populates this field. This field is required.
Ważne
All employees are required to have a contract in order to generate payslips. Additionally, only one contract can be in the running stage for each employee. Therefore the current contract start date populates this field, and it is not recommended to make changes to this field.
Pay Run: Select the pay run this new payslip should be added to, if applicable, using the drop-down menu. For individual payslips not related to a pay run, leave this field blank.
Struktura: Struktura powiązana z umową pracownika automatycznie wypełnia to pole domyślnie. W razie potrzeby użyj menu rozwijanego, aby wybrać inną strukturę.
Period: The start and end dates of the pay period. The first and last days of the current month auto-populate the two Period fields by default. The dates can be changed, if desired.
To change the start or end date, click on the first date in the Period field to reveal a pop-up calendar. Navigate to the desired month, and click on the desired day to select that specific date. These fields are required.
Ważne
If modifications to auto-populated fields are made, it is recommended to check with the accounting department to ensure every entry that affects the Accounting app is correct.

Worked days tab
The Worked Days tab lists the number of days and hours the employee worked during the Period specified at the top portion of the payslip form. This tab is automatically populated with all the individual attendance records for the time period, including both worked time and any time off taken.
Each individual entry lists:
The Type of entry
A Description
The number of Days worked
The total Hours
The Amount earned
Additional records cannot be created for the Worked Days tab as it is auto-populated according to the employee’s attendance records or working schedule on their employee record.

Wskazówka
Adjusting work entries can be done on the Work Entry dashboard or in the Attendances app.
Salary inputs tab
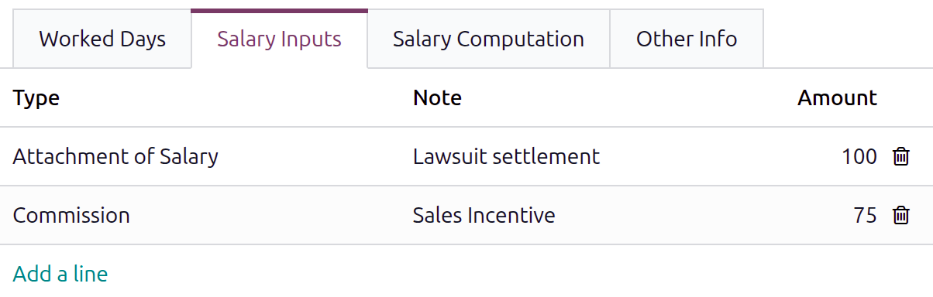
The Salary Inputs tab automatically lists all running salary adjustments and other additional inputs such as tips, bonuses, etc.
Each salary input lists:
The Type of input
The Note related to it
The Amount
To manually add an additional salary input, click Add a line, and a blank line appears in the tab. Select the Type using the drop-down menu. Add any relevant Notes to the corresponding field, then enter the Amount.
Zakładka obliczania wynagrodzenia
The Salary Computation tab calculates each individual salary rule. This includes everything from the employee’s salary to all the deductions and allowances associated with the installed payroll localization, such as taxes, expenses, benefit contributions, and any other items.
When the payslip is first created, this tab remains blank. Click the Compute Sheet button in the corner, and the Salary Computation tab is populated.
Nie można edytować tej zakładki, ponieważ obliczenia opierają się na innych wpisach w pasku wypłat.
Ważne
The Compute Sheet button does not disappear from view after it is clicked, so the payslip can be recalculated at any point prior to processing it.
If any changes need to be made to the Worked Days or Salary Inputs tabs, make the necessary changes, then click the Compute Sheet button to recalculate the payslip.

Zakładka inne informacje
The Other Info tab displays accounting details that are not used in the Salary Computation tab.
The Payslip Name is auto-populated according to the employee name and the time period
the payslip is for, in the following format: Salary Slip - (Employee) - (Month) (Year). Make any
desired edits to the name in this field. This field is required.
Pole Firma jest również automatycznie wypełniane zgodnie z danymi pracownika i nie można go zmodyfikować.
Enter the Payment Date using the calendar selector in the corresponding field. This is the date payment is issued to the employee. The Date Account field is the date the payslip is recorded in the accounting journals. If left blank, the validation date of the payslip is used to determine when the payslip is logged in the accounting journals.
Pole Dziennik wynagrodzeń jest wypełniane domyślnie i nie można go edytować. To dziennik księgowy, w którym rejestrowana jest wypłata.
If there are any additional notes or information needed for the payslip, add them to the Add an Internal Note field.

Przetwarzanie paska wypłat
Before processing payslips, check for possible issues concerning payroll. To view all payroll issues, navigate to . The Payroll app dashboard loads, including a Warnings section that appears in the corner of the dashboard.
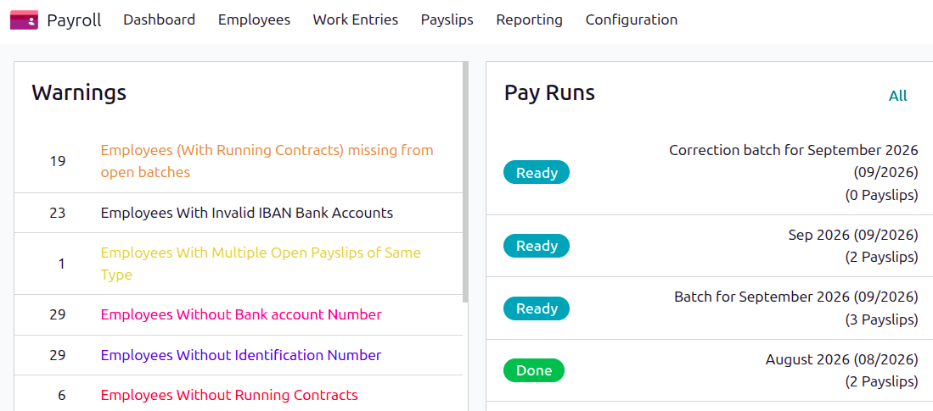
Ostrzeżenia są pogrupowane według typu, takie jak Pracownicy bez aktywnych umów lub Pracownicy bez numeru konta bankowego. Kliknij na ostrzeżenie, aby wyświetlić wszystkie wpisy powiązane z tym konkretnym problemem.
If the warnings are not resolved at any point in the payslip processing process, an error may occur. Errors appear in a pop-up window, providing details for each error and how to resolve them.
After all relevant warnings are resolved, and all the necessary information on the payslip is entered, the payslip can be processed. First, the payslip is validated, then a payment report is created, the journal entries are posted, and finally, the employee is paid.
Validate the payslip
Once everything on the payslip form is correct, and the payslip has been computed, click the Validate button. A Confirmation pop-up window appears, asking Are you sure you want to proceed? Click Ok to confirm.
Once the payslip is validated, the status changes from Draft to Validated, and a Journal Entry (Draft) smart button appears at the top. A PDF of the payslip appears in the sidebar, if the screen is wide enough to display it.
Wskazówka
To email a PDF payslip to the employee, click the Send By Email button. The email is sent, and logged in the chatter.
Generate a payment report
Once the payslip status has changed to Done, a payment report must be created. A payment report is a document that contains all the necessary information to transfer the pay earnings from the company’s bank account to the employee’s bank account. These are submitted by the payroll department to the appropriate institution.
Click the Create Payment Report button and a Generate a Payment Report pop-up window loads. Using the drop-down menu, select the Export Format for the payment report. The two default options available are CSV and NACHA. NACHA stands for the National Automated Clearing House Association, and this selection creates a compatible ACH file ,which is sent to the company’s bank.
Informacja
Inne opcje mogą być dostępne w zależności od zainstalowanej w bazie danych lokalizacji listy płac.
Jeśli wybrano CSV, wszystkie inne pola są ukryte.
Next, set the date the paycheck is issued in the Payment Date field using the calendar selector. Lastly, select the desired Bank Journal the paycheck is logged to using the drop-down menu.
Once the Generate a Payment Report pop-up window is configured, click the Generate button, and the file appears on the payslip form, in a new Payment Report field.

Post the journal entry
Before the payment can be sent to the employee, the journal entry must be posted.
Click the Journal Entry (Draft) smart button, and the journal entry loads. Click Post to post the entry, then click the payslip breadcrumb to return to the payslip. The Journal Entry (Draft) smart button changes to Journal Entry (Posted).
Pay the employee
To pay the employee, click the Pay button in the corner. Doing so reveals a Pay pop-up window.
Ważne
Employees cannot be paid until the journal entry is posted.
Wszystkie niezbędne informacje są wstępnie wypełnione w formularzu zgodnie z konfiguracją listy płac, ale w razie potrzeby można wprowadzić modyfikacje w dowolnym polu z wyjątkiem Kwota. To pole jest wypełniane zgodnie z obliczeniami listy płac i nie może zostać zmodyfikowane.
Dziennik: Dziennik księgowy, do którego rejestrowana jest lista płac.
Metoda płatności: Z menu rozwijanego wybierz sposób wypłaty wynagrodzenia pracownikowi. Domyślne opcje to:
Manual Payment: Select this if paying the employee in a method other than Check or NACHA.
Czek: Wybierz tę opcję, gdy wystawiasz czek bezpośrednio dla pracownika.
NACHA: Wybierz tę opcję, jeśli używasz National Automated Clearing House Association do przekazania płatności pracownikowi poprzez przelew bezpośredni.
Group Payments: If the employee has multiple payslips for the same time period (for example, separate payroll, reimbursement, and commission checks), click the checkbox to group all payments into one payment.
Data płatności: Używając selektora kalendarza, wybierz datę, kiedy pracownik ma otrzymać płatność.
Once the Pay pop-up form is complete, click the Create Payments button, and the payment is processed.
After the payment is processed, and there is confirmation that the checks have been issued, or the funds have been directly deposited to the employee’s bank account, click the Mark as paid button, and the payslip’s status changes to Paid.
Ważne
For a payslip to be paid, the employee must have a bank account entered in the private information tab of their employee record, and the bank account must be marked as Trusted.
Jeśli brak informacji bankowych lub bank nie jest oznaczony jako Zaufany, list płac nie można wypłacić i pojawia się błąd po kliknięciu przycisku Zapłać. Edytuj rekord pracownika i dodaj informacje bankowe lub oznacz konto bankowe jako zaufane, w zależności od potrzeb.

Zwrot listy płac
Przy zwracaniu płatności zwrot jest realizowany przez utworzenie listy płac na ujemną kwotę oryginalnej listy płac.
Example
Pracownik otrzymał błędnie 5 000,00 USD w czeku wypłaty. Przy zwracaniu listy płac tworzona jest nowa lista płac na kwotę -5 000,00 USD.
If a payment needs to be refunded, navigate to , and click on the individual payslip being refunded. Click the Revert button, located in the corner of the screen.
The Refund Payslip dashboard loads, with both the original payslip being refunded (with a status of Paid) and the newly created payslip in the negative amount of the original payslip, in a list view.
By default, the refund payslip has a status of Draft. This refund payslip is processed in the same way a regular payslip is processed.

Drukowanie listy płac
To print a payslip, navigate to , and click on the individual payslip being printed. Click the Print button in the corner of the payslip record, and a file explorer window opens in a new tab.
The name of the file is Payslip - (Employee).pdf by default. Modify the file name if desired,
navigate to where the payslip should be saved, and click Save.
A PDF file is downloaded to the selected location.
Wskazówka
Depending on the configured settings of the browser, the file may automatically download.
Wyświetl wszystkie paski wypłat
To view all payslips, regardless of status, go to . The Employee Payslips dashboard loads, displaying all payslips in a default list view.
The Status for each individual payslip is displayed, indicating one of the following status options:
Draft: The payslip has not been validated yet, and edits can still be made.
Done: The payslip is calculated, validated, and ready to be paid.
Paid: The employee has been paid.
Canceled: The payslip has been canceled.
Warning: The payslip has errors that must be resolved before the payslip can be processed.
Error: The payslip is in the Draft stage, but an error prevents it from being processed further.

Kliknij pojedynczy pasek wypłaty, aby wyświetlić szczegóły tego paska wypłaty na osobnej stronie. Używając menu nawigacji, kliknij Paski wypłat pracowników, aby wrócić do widoku listy wszystkich pasków wypłat.
Export payslips
All or a select number of payslips can be exported to an Excel spreadsheet.
All payslips
To export all payslips, navigate to . Click the (Actions) icon, then click Export All in the drop-down menu.
In the file explorer window that loads, select the desired location for the file, update the default
Pay Slip (hr.payslip).xlsx file name if desired, and click Save.
Select payslips
To export only specific payslips, first click the checkbox to the left of each individual payslip on the Employee Payslips dashboard to select the payslip. As payslips are selected, a # Selected smart button appears, indicating the number of selected payslips.
Click the Actions button at the top of the page, click Export, and an Export Data pop-up window loads. Configure the Export Data pop-up window, then click Export to export the data.
In the file explorer window that loads, select the desired location for the file, update the default
Pay Slip (hr.payslip).xlsx file name if desired, and click Save.