
Messico
Webinar
A video on the Mexican localization is also available. This video covers how to implement this localization from scratch, including how to set up the configurations, how to complete common workflows, and provides an in-depth look at several specific use cases, as well.
Introduzione
The Odoo Mexican localization modules allow for the signing of electronic invoices, according to the specifications of the SAT for version 4.0 of the CFDI, a legal requirement, as of January 1, 2022. These modules also add relevant accounting reports (such as: the DIOT, enables foreign trade, and the creation of delivery guides).
Nota
In order to electronically sign any documents in Odoo, ensure the Sign application is installed.
Configurazione
Requisiti
È necessario soddisfare i seguenti requisiti prima di configurare i moduli di localizzazione messicana in Odoo:
Be registered in the SAT, with a valid RFC.
Have a Certificate of Digital Seal (CSD).
Choose a PAC (Proveedor Autorizado de Certificación / Authorized Certification Provider). Currently, Odoo works with the following PACs: Solución Factible, Quadrum (formerly Finkok) and SW Sapien - Smarter Web.
Have knowledge and experience with billing, sales, and accounting in Odoo. This documentation only contains the necessary information needed to use Odoo.
Installing modules
Install the following modules to get all the features of the Mexican localization. The Accounting and Contacts modules are required to be installed for this configuration:
Nome |
Nome tecnico |
Descrizione |
|---|---|---|
Messico - Contabilità |
|
The default fiscal localization package, adds accounting characteristics for the Mexican localization, such as: the most common taxes and the chart of accounts – based on the SAT account grouping code. |
EDI per il Messico |
|
Includes all the technical and functional requirements to generate and validate Electronics Documents — based on the technical documentation published by the SAT. This allows you to send invoices (with or without addedums) and payment complements to the government. |
EDI v4.0 for Mexico |
|
Necessary to create XML documents with the correct specifications of the CFDI 4.0. |
Report di localizzazione messicana Odoo |
|
Adapts reports for Mexico’s Electronic Accounting: Chart of Accounts, Trial Balance, and DIOT. |
Mexico - Localization Reports for Closing |
|
Necessary to create the Closing Entry (Also known as the month 13th move). |
Esportazione Polizas XML Messicano Odoo |
|
Allows the export of XML files of Journal Entries for a compulsory audit. |
Odoo Mexican XML Polizas Export Edi bridge |
|
Complements the module |
Nota
When installing a database from scratch and selecting Mexico as the country, Odoo automatically installs the following modules: Mexico - Accounting, EDI for Mexico, and EDI v4.0 for Mexico.
The following modules are optional. It’s recommended to install them only if meeting a specific requirement. Make sure that they are needed for the business.
Nome |
Nome tecnico |
Descrizione |
|---|---|---|
EDI per il Messico (Funzionalità avanzate) |
|
Adds the external trade complement to invoices: A legal requirement for selling products to foreign countries. |
EDI v4.0 for Mexico (COMEX) |
|
Adapts the module |
Messico - Guida di consegna elettronica |
|
Consente di creare una Carta Porte: una bolla di accompagnamento che dimostra al governo che si stanno inviando merci tra A e B con un documento elettronico firmato. |
Electronic Delivery Guide for Mexico CFDI 4.0 |
|
Adapts the module |
Localizzazione Messicana Odoo per Magazzino/Landing |
|
Consente di gestire i numeri doganali relativi ai costi di trasporto nei documenti elettronici. |
Configura la tua azienda
After installing the correct modules, the next step is to verify that your company is configured with the correct data. To do so, go to , and select Update Info under your company name.
Enter the full Address in the resulting form, including: ZIP code, State, Country, and RFC (VAT number).
According to the requirements of the CFDI 4.0, the name of the main company contact must coincide with your business name registered in the SAT, without the legal entity abbreviation.

Importante
From a legal point of view, a Mexican company must use the local currency (MXN). Therefore, Odoo does not provide features to manage an alternative configuration. If you want to manage another currency, let MXN be the default currency and use a pricelist, instead.
Next, go to , then select the regime that applies to your company from the drop-down list, and click Save.

Suggerimento
If you want to test the Mexican localization, the company can be configured with a real address
within Mexico (including all fields), and add EKU9003173C9 as the VAT and ESCUELA
KEMPER URGATE as the Company Name. For the Fiscal Regime, use
General de Ley Personas Morales.
Contatti
To create a contact that can be invoiced, go to . Then, enter the contact name, full Address including: ZIP code, State, Country, and RFC (VAT number).
Importante
As with your own company, all of your contacts needs to have their correct business name registered in the SAT. This also applies to the Fiscal Regime, which needs to be added in the MX EDI tab.
Imposte
Some additional configurations for factor type and tax objects need to be added to the sales taxes in order to properly sign invoices.
Tipo di fattore
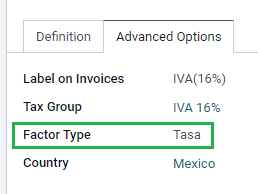
The Factor Type field is pre-loaded in the default taxes. If new taxes are created, you need to make sure to configure this field. To do so, go to , then enable the Factor Type field in the Advanced Options tab for all records, with the Tax Type set as Sales.
Suggerimento
Il Messico gestisce due diversi tipi di IVA allo 0% per soddisfare due scenari:
0% VAT set the Factor Type as Tasa
VAT Exempt set the Factor Type as Exento
Oggetto fiscale
One requirement of the CFDI 4.0 is that the resulting XML file needs (or does not need) to break down the taxes of the operation. There are three different possible values that are added in the XML file:
01: Not subject to tax - this value is added automatically if your invoice line doesn’t contain any taxes.02: Subject to tax - this is the default configuration of any invoice line that contains taxes.03: Subject to tax and not forced to break down - this value can be triggered on-demand for certain customers to replace the value 02.
To use the 03 value, navigate to , and activate the No Tax Breakdown checkbox.

Importante
Il valore Nessuna ripartizione fiscale si applica solo a regimi fiscali e/o imposte specifici. Consultare prima il proprio commercialista per verificare se è necessario per la propria attività prima di apportare qualsiasi modifica.
Altre configurazioni fiscali
When registering a payment, Odoo will carry out the movement of taxes from the Cash Basis
Transition Account to the account set in the Definition tab. For such movement, a tax
base account will be used: (Base Imponible de Impuestos en Base a Flujo de Efectivo) in the
journal entry when reclassifying taxes. Do not delete this account.
If you create a new tax in , you need to add
the correct Tax Grids for it (IVA, ISR or IEPS). Odoo only supports these
three groups of taxes.

Prodotti
To configure products, go to , then select a product to configure, or Create a new one. In the Accounting tab, and in the UNSPSC Product Category field, select the category that represents the product. The process can be done manually, or through a bulk import.
Nota
All products need to have an SAT code associated with them in order to prevent validation errors.
Fatturazione elettronica
Credenziali PAC
After you have processed your Private Key (CSD) with the SAT, you must register directly with the PAC of your choice before you start creating invoices from Odoo.
Once you’ve created your account with any of these providers, go to . Under the MX PAC section, enter the name of your PAC with your credentials (PAC username and PAC password).

Suggerimento
If you do not have credentials, but want to test the electronic invoicing, you can activate the MX PAC test environment checkbox, and select Solucion Factible as the PAC. You do not need to add a username or password for a test environment.
Certificati .cer e .key
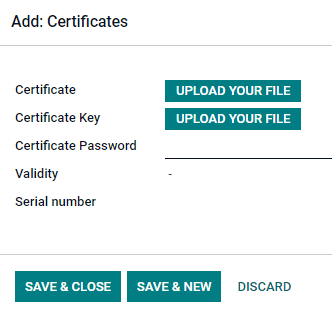
The digital certificates of the company must be uploaded within
the MX Certificates section. To do so, navigate to . Under the MX Certificates section, select
Add a line, and a window will open. Click Create, and from there, upload
your digital Certificate (.cer file), your Certificate Key
(.key file), and your Certificate Password. To finish, click on Save
& Close.
Suggerimento
If you still do not have one of the contracted PACs and you want to test electronic invoicing, you can use the following SAT test certificates:
Password:
12345678a
Workflow
Fatturazione elettronica
Il processo di fatturazione in Odoo si basa sull”Allegato 20 versione 4.0 della fatturazione elettronica del SAT.
Fatture cliente
Per iniziare a fatturare da Odoo, è necessario creare una fattura cliente utilizzando il flusso di fatturazione standard.
Mentre il documento è in modalità bozza, è possibile apportarvi modifiche (è possibile aggiungere, ad esempio, il Metodo di pagamento o l”Uso corretto che il cliente potrebbe richiedere).
After you Confirm the customer invoice, a blue message appears stating: The invoice will be processed asynchronously by the following E-invoicing service: CFDI (4.0).
Pressing the Process Now button sends the document to the government so it can be signed. After receiving the signed document back from the government, the Fiscal Folio field appears on the document, and the XML file is attached in the chatter.
Suggerimento
If you click Retry in the SAT status field on the invoice, you can confirm if the XML file is valid in the SAT.
If you are in a testing environment, you will always receive the message Not Found.
To send the signed invoice to your client by mail, you can send both the XML and PDF files together, directly from Odoo, by clicking the Send & Print button. You can also download the PDF file to your computer, by clicking the Print button, and selecting the desired print option.
Note di credito
Mentre una fattura è un tipo di documento «I» (Ingreso), una nota di credito è un tipo di documento «E» (Egreso).
L’unica aggiunta al flusso standard per le note di credito è che, come requisito del SAT, deve esserci una relazione tra una nota di credito e una fattura attraverso il folio fiscale.
A causa di questo requisito, il campo Origine CFDI aggiunge questa relazione con un 01|, seguito dal folio fiscale della fattura originale.

Suggerimento
Affinché il campo Origine CFDI venga aggiunto automaticamente, utilizzare il pulsante Aggiungi nota di credito dalla fattura, invece di crearla manualmente.
Payment complements
Politica di pagamento
One addition of the Mexican localization is the Payment Policy field. According to the SAT documentation, there are two types of payments:
PUE(Pago en una Sola Exhibición/Payment in a Single Exhibition)PPD(Pago en Parcialidades o Diferido/Payment in Installements or Deferred)Vedi anche
The difference lies in the Due Date or Payment Terms of the invoice.
To configure PUE invoices, navigate to , and either select an invoice Due Date within the same month, or choose a payment term that does not imply changing the due month (immediate payment, 15 days, 21 days, all falling within the current month).

Suggerimento
Some Payment Terms are already installed by default, and can be managed from .
Per configurare le fatture PPD, accedere a e selezionare una fattura con una Data di scadenza successiva al primo giorno del mese seguente. Questo vale anche se il Termine di pagamento è previsto nel mese seguente.

Importante
Because the PPD policy implies that an invoice is not going to get paid at the moment, the correct Payment Way for the PPD invoices is 99 - Por Definir (To define).
Flusso di pagamento
In both cases, the payment process in Odoo is the same, the main difference being payments related to PPD invoices trigger the creation of a document type «P» (Pago).
If a payment is related to a PUE invoice, it can be registered with the wizard, and be associated with the corresponding invoice. To do so, navigate to , and select an invoice. Then, click the Register Payment button. The invoice status changes to In Payment, since the payment is effectively validated when it is bank reconciled.
Vedi anche
While this process is the same for PPD invoices, the addition of the creating an electronic document means some additional requirements are needed to correctly send the document to the SAT.
From an invoice, you need to confirm the specific Payment Way where you received the
payment. Because of this, the Payment Way field cannot be set as 99 - Por Definir
(To Define).
If you are going to add a bank account number in the Accounting tab of a customer’s contact card, it must have a valid account number.
Nota
Le configurazioni esatte si trovano nell”Anexo 20 del SAT. Di solito, il Conto bancario deve essere di 10 o 18 cifre per i bonifici, 16 per le carte di credito o debito.
If a payment is related to a signed invoice with the Payment Policy PPD, Odoo
generates the corresponding payment complement automatically, once you click Process
Now.

Avvertimento
A payment in MXN cannot be used to pay multiple invoices in USD. Instead, the payment should be separated into multiple payments, using the Register Payment button on the corresponding invoices.
Annullamenti di fatture
È possibile annullare i documenti EDI inviati al SAT. Secondo la Reforma Fiscal 2022, dal 1° gennaio 2022 sono previsti due requisiti per questo:
With all cancellation requests, you must specify a cancellation reason.
Dopo 24 ore dalla creazione della fattura, è necessario chiedere al cliente di approvare l’annullamento. Se non c’è risposta entro 72 ore, l’annullamento viene elaborato automaticamente.
Gli annullamenti delle fatture possono essere effettuati per uno dei seguenti motivi:
01 - Fattura emessa con errori (con documento correlato)
02 - Fattura emessa con errori (nessuna sostituzione)
03 - L’operazione non è stata eseguita
04 - Operazione nominativa correlata alla fattura globale
To initiate a cancellation, go to , select the posted invoice to cancel, and click Request Cancel. Then, refer to the Cancellation reason 01 - Invoice issued with errors (with related document) or Motivi di annullamento 02, 03 e 04 sections, depending on the cancellation reason.
Suggerimento
In alternativa, richiedere un annullamento dalla scheda CFDI facendo clic su Annulla sulla riga.
Cancellation reason 01 - Invoice issued with errors (with related document)
Nella finestra pop-up Richiesta annullamento CFDI, selezionare 01 - Fattura emessa con errori (con documento correlato) dal campo Motivo e fare clic su Crea fattura sostitutiva per creare una nuova bozza di fattura. Questa nuova bozza di fattura sostituisce la fattura precedente, insieme al relativo CFDI.
Confirm the draft and Send & Print the invoice.
Tornare alla fattura iniziale (ovvero la fattura dalla quale è stato richiesto l’annullamento). Si noti che appare il campo Sostituita da con un riferimento alla nuova fattura sostitutiva.
Fare clic su Richiedi annullamento. Nella finestra pop-up Richiesta annullamento CFDI, l’opzione 01 - Fattura emessa con errori (con documento correlato) viene automaticamente selezionata nel campo Motivo.
Fai clic su Conferma.
L’annullamento della fattura viene quindi generato con una voce di motivo nella scheda CFDI.

Nota
Se il cliente rifiuta l’annullamento, la voce dell’annullamento della fattura viene rimossa dalla scheda CFDI.
When using the 01 - Invoice issued with errors (with related document) cancellation reason, the
04|prefix may appear in the Fiscal Folio field. This is an internal prefix used by Odoo to complete the cancellation and does not mean that the cancellation reason was 04 - Nominative operation related to the global invoice.
Motivi di annullamento 02, 03 e 04
Nella finestra pop-up Richiesta annullamento CFDI, selezionare il Motivo di annullamento desiderato e Confermare l’annullamento.
In questo modo, l’annullamento della fattura viene generato con una voce di motivo nella scheda CFDI.
Nota
Se il cliente rifiuta l’annullamento, la voce dell’annullamento della fattura viene rimossa dalla scheda CFDI.
Annullamenti di pagamento
It is also possible to cancel Payment Complements. For this, go to the payment, via , and select Request EDI Cancellation. As with invoices, a blue button will appear. Click Process now, and the document will be sent to the SAT. After a few seconds, you can click Retry to confirm the current SAT status.
Finally, the payment status is moved to Cancelled.
Nota
Just like invoices, when you create a new Payment Complement, you can add the relation of the
original document, by adding a 04| plus the fiscal folio in the CFDI Origin field.
Casi d’uso speciali per la fatturazione
CFDI al pubblico
If the customer you are selling goods or services to does not require an invoice, a CFDI to Public has to be created.
If you use the Customer name PUBLICO EN GENERAL, an error will be triggered. This is a
main change in the CFDI 4.0 that requires invoices with that specific name to need additional
fields, which Odoo does not currently support. So, for a CFDI to Public to be created, you need to
add any name to your customer that is not PUBLICO EN GENERAL. (For example: CLIENTE FINAL).
In addition to this, it is required that the ZIP code of your company is added, the
generic RFC is set as XAXX010101000, and the Fiscal Regime of your customer must be
set as: Sin obligaciones fiscales.

Multivaluta
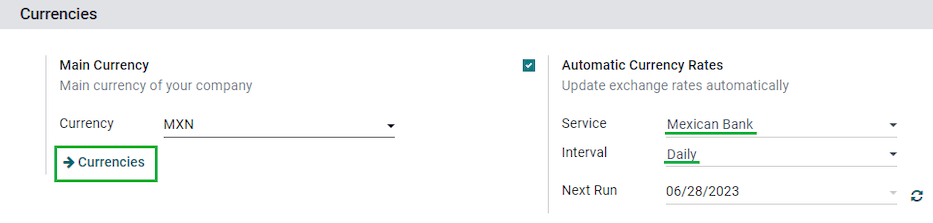
The main currency in Mexico is MXN. While this is mandatory for all Mexican companies, it is possible to send and receive invoices (and payments) in different currencies. To enable the use of multicurrency, navigate to the , and set Mexican Bank as the Service in the Automatic Currency Rates section. Then, set the Interval field to the frequency you wish to update the exchange rates.
In questo modo, il file XML del documento avrà il tasso di cambio corretto e l’importo totale, sia nella valuta estera che in MXN.
It is highly recommended to use a bank account for each currency.
Nota
The only currencies that automatically update their exchange rate daily are: USD, EUR, GBP, and JPY.
Acconti
There can be cases where you receive a payment in advance from a customer that needs to be applied to an invoice later. In order to do this in Odoo, it is required to properly link invoices to each other with the CFDI Origin field. To do so, it is necessary to have the Sales app installed.
First, navigate to the app to create a product Anticipo and configure it.
The Product Type must be Service, and use the UNSPSC Category
must be: 84111506 Servicios de facturación.
Quindi, vai su e aggiungi il prodotto Anticipo come predefinito.
Create a sales order with the total amount, and create a down payment (either using a percentage or fixed amount). Then, sign the document, and Register the Payment.
When the time comes for the customer to get the final invoice, create it again from the same sales order. In the Create Invoices wizard, select Regular Invoice, and uncheck Deduct down payments.
Then, copy the Fiscal Folio from the first invoice, and paste it into the
CDFI Origin of the second invoice, adding the prefix 07| before the value. Then, sign
the document.
After this, create a credit note for the first invoice. Copy the Fiscal Folio from the
second invoice, and paste it in the CFDI Origin of the credit note, adding the prefix
07|. Then, sign the document.
With this, all electronic documents are linked to each other. The final step is to fully pay the new invoice. At the bottom of the new invoice, you can find the credit note in the Outstanding credits - add it as payment. Finally, register the remaining amount with the Register Payment wizard.
Commercio estero
Il commercio estero è un complemento a una fattura regolare che aggiunge determinati valori sia nell’XML che nel PDF, alle fatture con un cliente estero secondo le normative SAT, come:
L’indirizzo specifico del destinatario e del mittente
L’aggiunta di una Frazione tariffaria che identifica il tipo di prodotto
The correct Incoterm (International Commercial Terms), among others (certificate of origin and special units of measure).
Ciò consente la corretta identificazione di esportatori e importatori, oltre ad ampliare la descrizione della merce venduta.
Since January 1, 2018, external trade is a requirement for taxpayers, who carry export operations of type A1. While the current CFDI is 4.0, the external trade is currently on version 1.1
In order to use this feature, the modules l10n_mx_edi_extended and l10n_mx_edi_extended_40 have to be installed.
Importante
Prima di installare, assicurarsi che la propria azienda abbia bisogno di utilizzare questa funzionalità. Consultare prima il proprio commercialista, se necessario, prima di installare qualsiasi modulo.
Configurazione
Contatti
To configure your company contact for external trade, navigate to , and select your Company. While the CFDI 4.0 requirements ask you to add a valid ZIP code in your contact, the external trade complement adds the requirement that your City and the State must also be valid. All three fields must coincide with the Official SAT Catalog, or you will receive an error.
Avvertimento
Add the City and State in the company’s contact, not in the company itself. You can find your company’s contact in .
The fields Locality and Colony Code are optional and can be added in the company directly in . These two fields have to coincide with the data in the SAT.

Per configurare i dati di contatto per un cliente estero ricevente, andare in e selezionare il contatto del cliente estero. Il contatto deve avere i seguenti campi compilati per evitare errori:
L’intero Indirizzo dell’azienda, incluso un codice CAP valido e il Paese estero.
The format of the foreign VAT (tax identification number, for example: Colombia
123456789-1)In the MX EDI tab, you need to address if the customer receives goods for a period of time temporarily (Temporary) or permanently (Definitive).
Importante
If the new contact was created by duplicating another existing contact from Mexico, make sure to delete any carried over information from the Fiscal Regime field. In addition, do not enable the No Tax Breakdown option. Selecting this option hides mandatory fields that are required for external trade contact configuration.

Nota
Nei file XML e PDF risultanti, l”IVA viene automaticamente sostituita dall’IVA generica per le transazioni estere: XEXX010101000.
Prodotti
All products involved with external trade have four fields that are required, two of them exclusive to external trade.
The Internal Reference of the product is in the General Information tab.
The Weight of the product must be more than
0.The correct Tariff Fraction of the product in the Accounting tab.
The UMT Aduana corresponds to the Tariff Fraction.

Suggerimento
Se il codice UdM della Frazione tariffaria è
01, l”UMT Aduana corretto èkg.Se il codice UdM della Frazione tariffaria è
06, l”UMT Aduana corretto èUnità.
Flusso di fatturazione
Before creating an invoice, it is important to take into account that external trade invoices require to convert the amounts of your product into USD. Therefore, multicurrency must be enabled and USD must be activated in the Currencies section. The correct Service to run is Mexican Bank.
Then, with the correct exchange rate set up in , the only fields left are Incoterm and the optional Certificate Source in the Other Info tab.

Finally, sign the invoice with the same process as a regular invoice, and click the Process Now button.
Guida di consegna
Una Carta Porte è una bolla di accompagnamento: un documento che indica il tipo, la quantità e la destinazione delle merci trasportate.
On December 1st, 2021, version 2.0 of this CFDI was implemented for all transportation providers, intermediaries, and owners of goods. Odoo is able to generate a document type «T» (Traslado), which, unlike other documents, is created in a delivery order instead of an invoice or payment.
Odoo può creare file XML e PDF con (o senza) trasporto su strada e può elaborare materiali trattati come Pericoli pericolosi.
In order to use this feature, the modules l10n_mx_edi_extended, l10n_mx_edi_extended_40, l10n_mx_edi_stock and l10n_mx_edi_stock_40 have to be installed.
In addition to this, it is necessary to have the Inventory and Sales apps installed, as well.
Importante
Odoo non supporta il tipo di documento Carta Porte «I» (Ingreso), trasporto aereo o marittimo. Consultare prima il proprio commercialista se questa funzionalità è necessaria prima di apportare qualsiasi modifica.
Configurazione
Odoo manages two different types of CFDI:
No Federal Highways: Is used when the Distance to Destination is less than 30 KM.
Federal Transport: Is used when the Distance to Destination exceeds 30 KM.
Other than the standard requirements of regular invoicing (The RFC of the customer, the UNSPSC code, etc.), if you are using No Federal Highways, no external configuration is needed.
For Federal Transport, several configurations have to be added to contacts, vehicle setups, and products. Those configurations are added to the XML and PDF files.
Contatti e veicoli
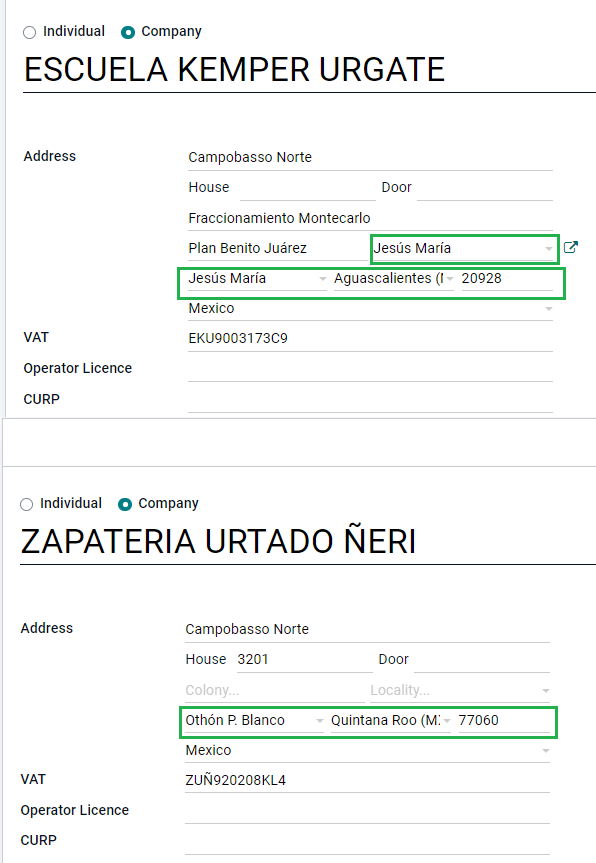
Like the external trade feature, the Address in both the company and the final customer
must be complete. The ZIP code, City, and State must coincide
with the Official SAT Catalog for Carta Porte <sat-catalog_>_.
Suggerimento
Il campo Località è facoltativo per entrambi gli indirizzi.
Importante
The origin address used for the delivery guide is set in . While this is set as the company address by default, you can change it according to your correct warehouse address.
Another addition to this feature is the Vehicle Setups menu found in . This menu lets you add all the information related to the vehicle used for the delivery order.
Tutti i campi sono obbligatori per creare una guida di consegna corretta.
Suggerimento
The fields, Vehicle Plate Number and Number Plate, must contain between 5 to 7 characters.
In the Intermediaries section, you must add the operator of the vehicle. The only mandatory fields for this contact are the VAT and Operator Licence.

Prodotti
Analogamente alla fatturazione regolare, tutti i prodotti devono avere una categoria UNSPSC. Oltre a questo, ci sono due configurazioni aggiuntive per i prodotti coinvolti nelle guide di trasporto:
Il Tipo di prodotto deve essere impostato come Prodotto stoccabile affinché vengano creati i movimenti di magazzino.
In the Inventory tab, the field Weight should have more than
0.
Avvertimento
Creating a delivery guide of a product with the value 0 will trigger an error. As the
Weight has been already stored in the delivery order, it is needed to return the
products, and create the delivery order (and delivery guide) again with the correct amounts.

Flusso vendite e magazzino
To create a delivery guide, first, you need to create and confirm a sales order from . This generates a Delivery smart button. Click it, and Validate the transfer.
After the status is set to Done, you can edit the transfer, and select the Transport Type (either No Federal Highways or Federal Transport).
If your delivery guide has the type No Federal Highways, you can save the transfer, and then click Generate Delivery Guide. The resulting XML can be found in the chatter.
Nota
Other than the UNSPSC in all products, delivery guides that use No Federal Highways do not require any special configuration to be sent to the government.
If your delivery guide has the type, Federal Transport, the tab MX EDI
appears. There, enter a value in Distance to Destination (KM) bigger than 0, and
select the Vehicle Setup used for this delivery.

Merci pericolose
Alcuni valori nella Categoria UNSPSC sono considerati nel `catalogo ufficiale SAT<http://omawww.sat.gob.mx/tramitesyservicios/Paginas/complemento_carta_porte.htm>`_ come merci pericolose. Queste categorie richiedono considerazioni aggiuntive durante la creazione di una guida di trasporto con Trasporto federale.
First, select your product from . Then, in the Accounting tab, the fields Hazardous Material Designation Code (MX) and Hazardous Packaging (MX) must be filled with the correct code from the SAT catalog.

In , the data from the Environment Insurer and Environment Insurance Policy has to be filed, as well. After this, continue with the regular process to create a delivery guide.

Numeri doganali
A customs declaration (Pedimento Aduanero) is a fiscal document that certifies that all contributions to the fiscal entity (the SAT) has been paid for, including the import/export of goods.
According to the Annex 20 of CFDI 4.0, in documents where the invoiced goods come from a first-hand import operation, the field, Customs Number, needs to be added to all lines of products involved with the operation.
To do so, the module l10n_mx_edi_landing must be installed, in addition to the Inventory, Purchase and Sales apps.
Importante
Non confondere questa funzionalità con il commercio estero. I numeri doganali sono direttamente correlati all’importazione di merci, mentre il complemento di commercio estero è correlato all’esportazione. Consultare prima il proprio commercialista per verificare se questa funzionalità è necessaria prima di apportare modifiche.
Configurazione
In order to track the correct customs number for a specific invoice, Odoo uses landed costs. Go to . Make sure that Landed Costs is activated.
Begin by creating a service-type product called, Pedimento. In the Purchase tab,
activate Is a Landed Cost, and select a Default Split Method.
Then, configure the storable products that hold the customs numbers. To do so, create the storable products, and make sure the Product Category has the following configuration.
Metodo di costo: FIFO o AVCO
Valutazione delle scorte: Automatizzata
Stock Valuation Account: 115.01.01 Inventario
Giornale di magazzino: Valutazione delle scorte
Stock Input Account: 115.05.01 Mercancías en tránsito
Stock Output Account: 115.05.01 Mercancías en tránsito


Flusso di acquisto e vendita
After you configure your product, follow the standard purchase flow.
Create a purchase order from . Then, confirm the order to display a Receipt smart button. Click on the Receipt smart button to Validate the receipt.
Go to , and create a new record. Add the
transfer that you just created, and both: the product Pedimento and Customs number.
Optionally, you can add a cost amount. After this, validate the landed cost. Once Posted, all products related to that receipt have the customs number assigned.
Avvertimento
You can only add the Pedimentos number once, so be careful when associating the correct number with the transfer(s).

Now, create a sales order, and confirm it. This should trigger a Delivery smart button. Validate it.
Finally, create an invoice from the sales order, and confirm it. The invoice line related to your product has a customs number in it. This number should match the customs number added in the Landed Costs record you created earlier.

Electronic accounting
Per il Messico, la Contabilità Elettronica si riferisce all’obbligo di tenere registri e scritture contabili tramite mezzi elettronici e di inserire le informazioni contabili su base mensile attraverso il sito web SAT.
È composta da tre file XML principali:
The updated list of the chart of accounts that you are currently using.
A monthly trial balance, plus a closing entry report, also known as: Trial Balance Month 13.
Either optional, or for a compulsory audit, an export of the journal entries in your general ledger.
I file XML risultanti seguono i requisiti dell”Anexo Técnico de Contabilidad Electrónica 1.3.
In addition to this, you can generate the DIOT: A report of vendor’s journal entries that involve IVA taxes that can be
exported in a .txt file.
In order to use these reports, the modules l10n_mx_reports, l10n_mx_reports_closing, l10n_mx_xml_polizas and l10n_mx_xml_polizas_edi have to be installed, as well as the Accounting.
Importante
Le caratteristiche e gli obblighi specifici dei report da inviare potrebbero variare in base al regime fiscale. Consultare sempre il proprio commercialista prima di inviare documenti al governo.
Piano dei conti
The chart of accounts in México follows a specific pattern based on SAT’s” Código agrupador de cuentas.
You can create any account, as long as it respects SAT’s encoding group: the pattern is
NNN.YY.ZZ or NNN.YY.ZZZ.
Example
Alcuni esempi sono 102.01.99 o 401.01.001.
When a new account is created in , with the SAT encoding group pattern, the correct grouping code appears in Tags, and your account appears in the COA report.
Once you create all your accounts, make sure the correct Tags are added.
Nota
You cannot use any pattern that ends a section with a 0 (such as 100.01.01, 301.00.003 or
604.77.00). This triggers errors in the report.
Once everything is set up, go to , click the (down arrow) next to the PDF button, and select COA SAT (XML). This generates an XML file with your accounts, which you can upload directly to the SAT website.
Bilancio di verifica
Il bilancio di verifica riporta il saldo iniziale, la carta di credito e il saldo totale dei conti, a condizione che sia stato aggiunto il corretto gruppo di codifica.
To generate this report in an XML format, go to . Select the month you want to download in the calendar, then click the (down arrow) next to the PDF button, and select SAT (XML).

Nota
Odoo non genera la Balanza de Comprobación Complementaria.
Month 13 trial balance
The Month 13 report is a closing balance sheet that shows any adjustments or movements made in the accounting to close the year.
To generate it, proceed as follows:
Go to and create a new entry for all the amounts to be changed, balancing the debit and/or credit of each one.
In the Other Info tab, enable the Month 13 Closing option.
Go to , click the calendar, and select Month 13.
Click the (down arrow) next to the PDF button, and select SAT (XML).

Libro mastro
By law, all transactions in Mexico must be recorded digitally. Since Odoo automatically creates all the underlying journal entries of your invoicing and payments, you can export your journal entries to comply with SAT’s audits and/or tax refunds.
Suggerimento
You can filter by period, or by journal, according to your current needs.
To create the XML, go to , click the (down arrow) next to the PDF button, and select XML (Polizas). In the XML Polizas Export Options window, choose between four different Export types:
Controllo fiscale
Certificazione di audit
Reso merci
Compensazione
For Tax audit or Audit certification, you need to write the Order Number provided by the SAT. For Return of goods, or Compensation, you need to write your Process Number, also provided by the SAT.
Nota
If you want to see this report without sending it, use ABC6987654/99 for Order
Number and AB123451234512 for Process Number.
Report DIOT
The DIOT (Declaración Informativa de Operaciones con Terceros / Informative Declaration of Operations with Third Parties) is an additional obligation with the SAT, where the current status of creditable and non-creditable payments, withholdings, and refunds of VAT from your vendor bills, are provided to the SAT.
Unlike other reports, the DIOT is uploaded to a software provided by the SAT that contains the
A-29 form. In Odoo, you can download the records of your transactions as a .txt file that
can be uploaded to the form, avoiding direct capture of this data.
Il file delle transazioni contiene l’importo totale dei pagamenti registrati nelle fatture fornitore, suddiviso nei tipi di IVA corrispondenti. L”IVA e il Paese sono obbligatori per tutti i fornitori.
To generate the DIOT report, go to .
Select the month you want to download in the calendar, then click the
(down arrow) next to the PDF button to select Report: DIOT (MX)
and download the .txt file.

Importante
You need to fill the L10N Mx Type of Operation field in the Accounting tab of each one of your vendors to prevent validation errors. Make sure that your foreign customers have their country set up for L10N Mx Nationality to appear automatically.
