
Pianificare i colloqui
Schedule in-person, virtual, and phone interviews with Odoo through the Recruitment app.
An interview can be scheduled in one of two ways: either by the recruitment team, or by the applicant.
Colloqui pianificati dal team di assunzioni
Quando un candidato raggiunge la fase del colloquio, il team di assunzioni dovrebbe pianificare il colloquio, coordinando prima una data e un orario adatti con il candidato e gli intervistatori.
Per pianificare il colloquio, accedere alla scheda del candidato andando prima su e facendo clic sulla scheda della posizione lavorativa pertinente. Questo apre la pagina Candidature per quella posizione lavorativa. Quindi, fare clic sulla scheda del candidato desiderato per visualizzare il modulo dettagliato del candidato.
To schedule an phone, virtual, or in-person interview, click the No Meeting smart button at the top of the applicant’s record.
Nota
The Meetings smart button displays No Meeting if no meetings are currently scheduled. For applicants who are new to the First Interview stage, this is the default.
If there is one meeting already scheduled, the smart button displays 1 Meeting, with the date of the upcoming meeting beneath it. If more than one meeting is scheduled, the button displays Next Meeting, with the date of the first upcoming meeting beneath it.
Clicking the Meetings smart button loads a calendar, showing the scheduled meetings and events for the currently signed-in user, as well as the employees who are listed under the Attendees section, located to the right of the calendar.
Per modificare le riunioni e gli eventi attualmente caricati che vengono visualizzati, deselezionare un partecipante i cui eventi del calendario devono essere nascosti. Solo i partecipanti selezionati sono visibili nel calendario.

Per aggiungere una riunione al calendario quando si è nella vista Giorno o Settimana, fare clic sull’ora di inizio della riunione e trascinare verso il basso fino all’ora di fine. In questo modo si selezionano la data, l’ora e la durata della riunione.
Una riunione può anche essere aggiunta in questa vista facendo clic sul giorno e sulla fascia oraria desiderati.
Entrambi i metodi causano la visualizzazione di una finestra pop-up Nuovo evento.
Finestra pop-up nuovo evento
Facendo clic su una casella della griglia, corrispondente all’ora e alla data, si apre la finestra pop-up Nuovo evento per pianificare una riunione.
Inserire le informazioni nel modulo. Gli unici campi obbligatori da inserire sono un titolo per la riunione, insieme ai campi Inizio (e data/ora di fine).
Una volta inseriti i dettagli della scheda, fare clic su Salva e chiudi per salvare le modifiche e creare il colloquio.
Dopo aver inserito un nome obbligatorio per la riunione, i campi disponibili da modificare nella scheda Nuovo evento sono i seguenti:
Meeting Title: enter the subject for the meeting. This should clearly indicate the purpose of the meeting. The default subject is the Subject/Application Name on the applicant’s card.
Start: start and end date and times for the meeting. Clicking either of these fields opens a calendar pop-up window. Click Apply to close the window.
All Day: tick the box to schedule an all-day interview. If this box is ticked, the Start field changes to Start Date.
Attendees: select the people who should attend the meeting. The default employee listed is the person who created the meeting. Add as many other people as desired.
Videocall URL: if the meeting is virtual, or if there is a virtual option available, click Odoo meeting, and a URL is automatically created for the meeting, which populates the field.
Description: enter a brief description in this field. There is an option to enter formatted text, such as numbered lists, headings, tables, links, photos, and more. Use the powerbox feature, by typing a
/to reveal a list of options.Scorrere le opzioni e fare clic sull’elemento desiderato. L’elemento appare nel campo e può essere modificato. Ogni comando presenta una diversa finestra pop-up. Seguire le istruzioni per ciascun comando per completare l’inserimento.
Più opzioni
Per aggiungere ulteriori informazioni alla riunione, fare clic sul pulsante Altre opzioni nell’angolo in basso a destra della finestra pop-up Nuovo evento. Inserire uno dei seguenti campi aggiuntivi:
Durata: questo campo si compila automaticamente in base alla data e all’ora di Inizio (e fine). Se l’orario della riunione viene modificato, questo campo si adatta automaticamente alla durata corretta. La durata predefinita di una riunione è di un’ora.
Ricorrente: se la riunione deve ripetersi a un intervallo selezionato (non tipico per un primo colloquio), selezionare la casella accanto a Ricorrente. Quando questa opzione è abilitata, vengono visualizzati diversi campi aggiuntivi:
Fuso orario: utilizzando il menu a tendina, selezionare il Fuso orario per le riunioni ricorrenti.
Ripeti: scegliere riunioni ricorrenti Giornaliere, Settimanali, Mensili, Annuali o Personalizzate. Se si seleziona Personalizzata, viene visualizzato un campo Ripeti ogni sottostante, insieme a un altro parametro di frequenza temporale (Giorni, Settimane, Mesi o Anni). Inserire un numero nel campo vuoto, quindi selezionare il periodo di tempo utilizzando il menu a tendina.
Ripeti il: abilitato quando l’opzione Settimanale è selezionata nel campo Ripeti. Scegliere il giorno in cui cade la riunione settimanale.
Giorno del mese: configurare le due opzioni del menu a tendina per selezionare un giorno specifico del mese, indipendentemente dalla data (ad es. il primo martedì di ogni mese). Per impostare una data specifica del calendario, scegliere Data del mese e inserire la data del calendario nel campo (ad es.
15per impostare la riunione il quindici di ogni mese).Until: using the drop-down menu, select when the meetings stop repeating. The available options are Number of repetitions, End date, and Forever. If Number of repetitions is selected, enter the number of total meetings to occur in the blank field to the right. If End date is selected, specify the date using the calendar pop-up window, or type in a date in a XX/XX/XXXX format. Forever schedules meetings indefinitely.
Luogo: inserire il luogo della riunione.
Tag: selezionare eventuali tag per la riunione utilizzando il menu a tendina oppure aggiungere un nuovo tag digitandolo e facendo clic su Crea «tag». Non esiste un limite al numero di tag utilizzabili.
Appointment: if an appointment is associated with this meeting, select it from the drop-down menu, or create a new appointment by typing in the appointment name, then clicking Create & Edit… from the resulting drop-down men. A Create Appointment form loads. Enter the information on the form, then click Save & Close.
Privacy: selezionare se l’organizzatore appare Disponibile o Occupato per la durata della riunione. Successivamente, selezionare la visibilità di questa riunione utilizzando il menu a tendina a destra della prima selezione. Le opzioni sono Pubblico, Privato e Solo utenti interni. Pubblico consente a tutti di vedere la riunione, Privato consente solo ai partecipanti elencati nella riunione di vederla e Solo utenti interni consente a chiunque sia connesso al database aziendale di vedere la riunione.
Organizzatore: il dipendente che ha creato la riunione viene inserito in questo campo. Utilizzare il menu a tendina per modificare il dipendente selezionato.
Promemoria: selezionare un promemoria dal menu a tendina. Le opzioni predefinite includono Notifica, Email e Messaggio di testo SMS, ciascuno con un periodo di tempo specifico prima dell’evento (ore, giorni, ecc.). Il promemoria scelto avvisa i partecipanti alla riunione tramite l’opzione selezionata all’ora specificata. In questo campo è possibile selezionare più promemoria.

Inviare la riunione ai partecipanti
Una volta inserite le modifiche nella finestra popup Nuovo evento e verificati i dettagli della riunione, la riunione può essere inviata ai partecipanti via email o messaggio di testo dal modulo evento espanso (ciò che si visualizza quando si fa clic sul pulsante Altre opzioni nella finestra popup Nuovo evento).
To send the meeting via email, click the Email button next to the Attendees field on the expanded meeting form.
Viene visualizzata una finestra popup di configurazione email Contatta i partecipanti. Un’email preformattata, che utilizza il modello email predefinito Calendario: aggiornamento evento, popola il campo del corpo dell’email.
The followers of the job application, as well as the user who created the meeting, are added as Recipients by default. If needed, add the applicant’s email address to the list to send the email to the applicant, as well. Make any other desired changes to the email. If an attachment is needed, click the Attachments button, navigate to the file, then click Open. Once the email is ready to be sent, click Send.

To send the meeting via text message, click the SMS button next to the Attendees field on the expanded meeting form. A Send SMS Text Message pop-up window appears.
Nella parte superiore viene visualizzato un banner blu se alcuni partecipanti non hanno numeri di cellulare validi ed elenca quanti record non sono validi. Se un contatto non ha un numero di cellulare valido elencato, fare clic su Chiudi e modificare il record del partecipante, quindi ripetere questi passaggi.
Quando non viene visualizzato alcun messaggio di avviso, digitare il messaggio da inviare ai partecipanti nel campo Messaggio. Per aggiungere emoji al messaggio, fare clic sull’icona (aggiungi smile) sul lato destro della finestra popup.
The number of characters, and amount of text messages required to send the message (according to GSM7 criteria) appears beneath the Message field. Click Put In Queue to have the text sent later, after any other messages are scheduled, or click Send Now to send the message immediately.

Nota
L’invio di messaggi di testo non è una funzionalità predefinita di Odoo. Per inviare messaggi di testo sono necessari crediti, che devono essere acquistati. Per ulteriori informazioni sui crediti e i piani IAP, consultare la documentazione Acquisti in-app (IAP).
Colloqui programmati dai candidati
By default, the recruitment interview stages are not set up for applicants to schedule their own interviews.
However, if the First Interview or Second Interview stages are modified to send the Recruitment: Schedule Interview email template when an applicant reaches that stage, the applicant receives a link to the recruitment team’s calendar, and can schedule the interview on their own. The recruitment team’s availability is reflected in the calendar.
In order for applicants to be able to schedule their own interviews, a stage must first be modified in the Recruitment app.
Modificare fase
To modify either the First Interview or Second Interview stage, first navigate to the main app dashboard. Next, click on the desired job card to navigate to the Applications page for that job position.
Hover over the name of the stage, and a (gear) icon appears in the upper-right hand side of the stage name. Click the (gear) icon, and a drop-down menu appears. Then, click on the Edit option, and an Edit: (Stage) form appears.

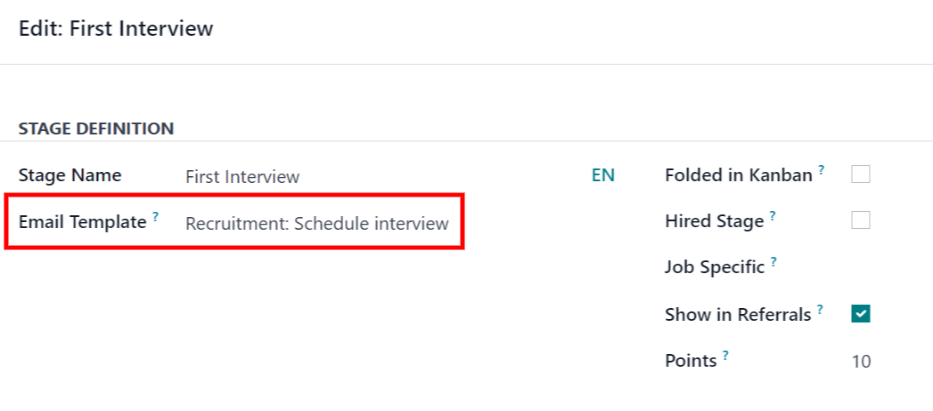
The Email Template field is blank, by default. Using the drop-down menu, select Recruitment: Schedule interview for the Email Template field, then click Save & Close when done.
Invia email
After either the First Interview or Second Interview stages are modified to send the Recruitment: Schedule interview email to the applicant upon moving their applicant card to one of those stages, the following email is received by the applicant:
Subject: Can we plan an interview together for your (Job Position) application?
Congratulations!
Your application is really interesting and we'd like to plan an interview with you.
Can you please use the button below to schedule it with one of our recruiters?
Plan my interview
Schedule interview
When the applicant received the email, they click the Plan my interview button at the bottom of the email. This navigates the applicant to a private online scheduling page, which is only accessible through the emailed link.
Questa pagina mostra i DETTAGLI DELLA RIUNIONE sul lato destro dello schermo. Questo include il formato e la durata della riunione. In questo esempio, il colloquio è virtuale ( Online) e la durata è di mezz’ora ( 30 minuti).
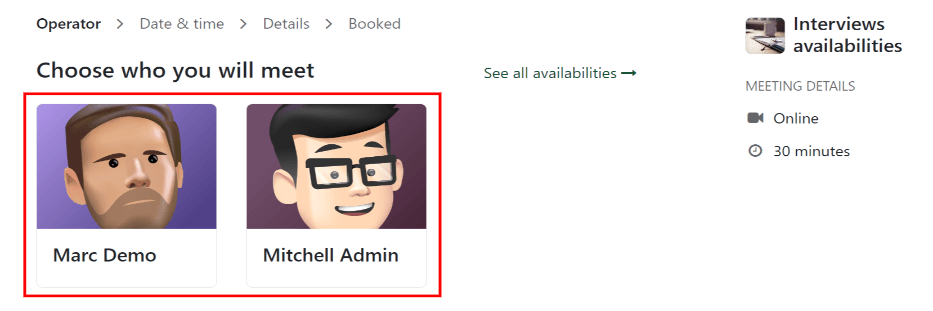
First, if there is an option of who to meet with, the user selects who they are scheduling their meeting with, by clicking on their icon and name. If only one person is available to interview the applicant, this step is not available. If the applicant does not wish to chose an interviewer, they can just click See all availabilities .
Nota
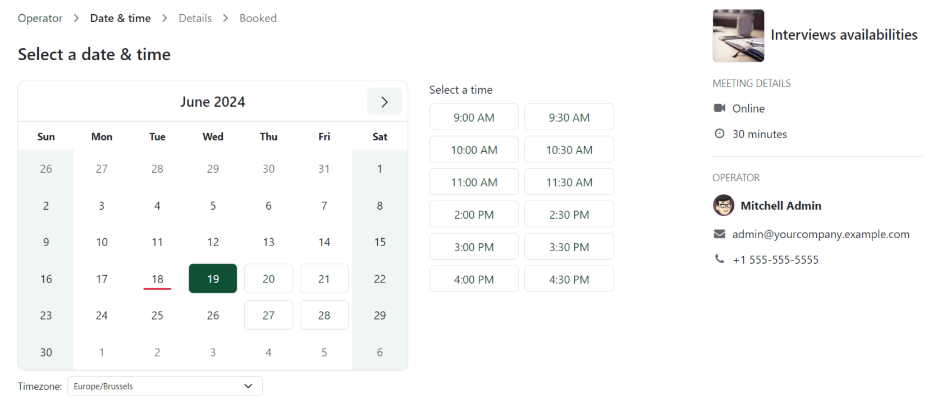
If the applicant selects an interviewer, the applicant is shown a Select a date & time page, and only sees the dates and times that specific person is available. In addition, that interviewer’s information (name, email, and phone number) appears on the right-side of the screen, under the heading OPERATOR, located beneath the MEETING DETAILS.
If the applicant clicks See all availabilities instead, or if there are no interviewer options available, the user is navigated to the same Select a date & time page, but there is no OPERATOR section visible.
Then the applicant clicks on an available day on the calendar, signified by a square around the date. Once a day is selected, they click on one of the available times to select that date and time.
Suggerimento
Assicurarsi di controllare il campo Fuso orario, sotto il calendario, per verificare che sia impostato sul fuso orario corretto. La modifica del fuso orario può alterare gli orari disponibili presentati.
Una volta selezionati data e ora, il candidato viene indirizzato a una pagina Aggiungi maggiori dettagli su di te. Questa pagina chiede al candidato di inserire il proprio Nome completo, E-mail e Numero di telefono. Le informazioni di contatto inserite in questo modulo sono il modo in cui il candidato viene contattato per ricordargli il colloquio programmato.
Quando tutto è stato inserito nella pagina Aggiungi maggiori dettagli su di te, il candidato fa clic sul pulsante Conferma appuntamento e il colloquio viene programmato.

Dopo aver confermato il colloquio, il candidato viene indirizzato a una pagina di conferma, dove vengono visualizzati tutti i dettagli del colloquio. È disponibile l’opzione per aggiungere la riunione ai calendari personali del candidato, tramite i pulsanti Aggiungi a iCal/Outlook e Aggiungi a Google Agenda, sotto i dettagli del colloquio.
The applicant is also able to cancel or reschedule the interview, if necessary, with the Cancel/Reschedule button.