
Chatbot
Un Chatbot è un programma progettato per simulare una conversazione con un essere umano reale. Ai chatbot viene assegnato uno script di passaggi prescritti da seguire. Gli script sono progettati per anticipare la potenziale risposta di un visitatore e guidarlo attraverso una serie di domande e risposte nello stesso modo in cui farebbe un membro del team reale.
I chatbot possono essere personalizzati per ricoprire vari ruoli, dal supporto clienti alla creazione di lead, alla raccolta di informazioni di contatto. L’obiettivo di ciascun chatbot può variare in base a diversi criteri, tra cui la pagina web in cui si trova e le informazioni che acquisisce.

Creare un chatbot
Before creating a new chatbot, the Live Chat application must first be installed on the database.
This can be done directly from the application, by searching for Live Chat
in the Search… bar, and clicking Install.
Once the Live Chat application has been installed on the database, go to .
Nota
When the Live Chat app is installed, a sample chatbot is created, named Welcome Bot. This chatbot has a preconfigured script that walks through a few basic steps, including asking for a visitor’s email address, and forwarding the conversation to an operator.
Welcome Bot può essere utilizzato come punto di partenza. I passaggi esistenti possono essere modificati o rimossi e possono essere aggiunti nuovi passaggi per personalizzare lo script secondo necessità.
Welcome Bot può essere eliminato o archiviato, se necessario.

To create a new chatbot, navigate to the Chatbot page () and click New. This opens a blank chatbot details page.
On the blank chatbot details page, enter a name in the Chatbot Name field and click on the Edit Image icon in the upper right corner of the form to add a photo.
Script del chatbot
After the new chatbot has been created and named, the next step is to create a script. Chatbot conversations follow an accompanying script. These scripts are comprised of lines of dialog, each designed to deliver or capture information.
To create a chatbot script, click Add a Line in the Script tab of the chatbot detail page, and a Create Script Steps modal appears.
This form must be filled out for each line of text (dialog) that the chatbot could deliver during the conversation.
First, enter the content of the message in the Message field. Then, select an option from the Step Type and Only If drop-down menus.
Tipi di passaggio
The Step Type selected depends on the intended purpose of the message. The available options in the Step Type drop-down menu are detailed below:
Testo
Questo passaggio viene utilizzato per messaggi in cui non è prevista o necessaria alcuna risposta. I passaggi di testo possono essere utilizzati per saluti, per offrire risorse come documentazione o fornire link a pagine web specifiche.
Importante
Text step types are only intended to deliver information, and do not allow for any visitor input. As such, they must be followed by additional steps to continue the conversation.
Domanda
Questo passaggio pone una domanda e fornisce una serie di risposte. Il visitatore fa clic su una risposta, che porta a un nuovo passaggio nella conversazione o può portare a un link facoltativo a una nuova pagina web.
Inserisci la domanda nel campo Messaggio. Quindi, sotto l’intestazione Risposta, fai clic su Aggiungi una riga per creare una riga di risposta vuota.
Procedi a inserire la risposta come dovrebbe apparire al visitatore. Per trasformare la risposta in un link che reindirizza il visitatore quando viene selezionato, aggiungi l’URL alla riga di risposta sotto l’intestazione Link facoltativo.
Repeat these steps for every answer to be included for the question.
fai clic su Salva e chiudi oppure su Salva e nuova.
Suggerimento
It is helpful to add a catchall answer to question steps (e.g: Something else). This helps
visitors continue the conversation, even if their needs do not exactly fit with any of the other
answers.
E-mail
Questo passaggio richiede ai visitatori di fornire il proprio indirizzo email, che viene memorizzato e può essere utilizzato dai membri del team in seguito per dare seguito con informazioni aggiuntive.
The only accepted inputs for this step type are email addresses that are in a valid format. If a visitor attempts to enter anything other than a valid email address, the chatbot responds with a message stating it does not recognize the information submitted.

Telefono
Analogamente all’email, questo tipo di passaggio richiede al visitatore di inserire il proprio numero di telefono, che può essere utilizzato per dare seguito con informazioni aggiuntive, programmare demo e altro.
Avvertimento
Due to the vast number of formats used for phone numbers worldwide, responses to this step type are not validated for formatting, and can include both numbers and special characters.
Inoltra all’operatore
Questo passaggio inoltra la conversazione a un operatore livechat attivo, in modo che possa continuare ad assistere il visitatore. Poiché la trascrizione della conversazione viene passata all’operatore, questi può riprendere da dove il chatbot si era fermato. Questo non solo fa risparmiare tempo a tutte le parti coinvolte, ma può anche aiutare a qualificare le conversazioni prima che raggiungano gli operatori in tempo reale.
Nota
Se non è disponibile alcun operatore attivo sul canale, il chatbot continua la conversazione con il visitatore. Pertanto, dovrebbero essere aggiunti ulteriori passaggi dopo questo per garantire che non ci sia una fine brusca della conversazione. I passaggi aggiuntivi possono sia informare i visitatori sulla mancanza di operatori disponibili (ad es. Ops, sembra che nessuno dei nostri operatori sia disponibile) sia continuare la conversazione (ad es. Vorresti lasciare il tuo indirizzo email?).

Input libero/Multiriga
Il passaggio input libero consente ai visitatori di rispondere alle domande senza fornire risposte pre-scritte. Le informazioni fornite in queste risposte vengono memorizzate nelle trascrizioni della chat.
Scegli tra Input libero e Input libero (Multiriga) a seconda del tipo e della quantità di informazioni che viene chiesto al visitatore di fornire.
Crea lead
This step creates a lead in the CRM application. Select an option from the Sales Team drop-down field that appears to assign the created lead to a specific team.
Nota
This step is only available if the CRM application is installed on the database.
Crea segnalazione
This step creates a ticket in the Helpdesk application. Select an option from the Helpdesk Team drop-down field that appears to assign the created ticket to a specific team.
Nota
This step is only available if the Helpdesk application is installed on the database.
Solo se
Gli script dei chatbot funzionano su base se/allora, il che significa che la prossima domanda presentata al visitatore è determinata dalla risposta fornita alla domanda precedente.
To continue the progression of the conversation, the Create Script Steps form for a new step contains a field labeled Only If. This field is where the progression of questions is defined.
If a step is intended to follow all of the previous messages, this field can be left empty. However, if a message should only be sent conditionally, based on a previous response, or several previous responses, those responses must be added to this field.
Importante
If any selections are made in the Only If field, they must all be selected during the conversation before this step will be included. Only include selections in this field if they are necessary for this step to be displayed.
Example
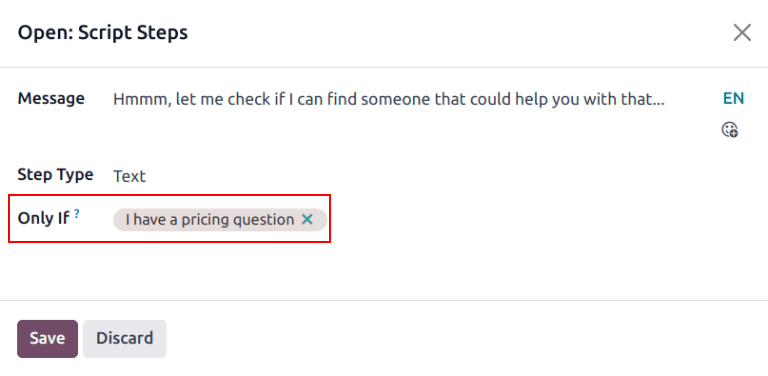
In the Welcome Bot script, a visitor can ask about pricing information. If the visitor selects this response, a step is included to forward the conversation to an operator. The chatbot first sends a message informing the visitor that it is checking to see if an operator is available to chat.
However, this message should only be delivered if the visitor requests pricing information. In that situation, the conversation would proceed as below:
Bot di benvenuto: «Costa stai cercando?»
Visitatore: «Ho una domanda sui prezzi.»
Welcome Bot: «Hmmm, fammi controllare se riesco a trovare qualcuno che possa aiutarti con questo…»
In the details form for the Text step, the I have a pricing question response has been selected in the Only If field. As such, this step is only shown in conversations where that response has been selected.
Test dello script
Per garantire che tutti i visitatori abbiano un’esperienza soddisfacente con il chatbot, ogni messaggio deve portare a una conclusione naturale. Gli script del chatbot devono essere testati per confermare che non ci siano vicoli ciechi e per capire cosa vede il visitatore quando interagisce con il chatbot.
Importante
If the visitor provides an answer, or input, that is not assigned a corresponding follow-up response, the conversation stops (dead-ends). Since the visitor cannot re-engage the chatbot, they must restart the conversation by refreshing the chat window, or their browser.
Per testare le prestazioni di un chatbot, fare prima clic sul pulsante Test in alto a sinistra della pagina dello script del chatbot. Quindi, dopo essere stati reindirizzati alla schermata di test, rispondere ai prompt del chatbot nello stesso modo in cui lo farebbe un potenziale visitatore del sito.
When the script has reached an end-point, the message Conversation ended…Restart appears at the bottom of the chat window. To begin the conversation at the beginning of the script, click on Restart. To return to the script page, click Back to edit mode at the top of the page.
Aggiungere il chatbot a un canale
Dopo aver creato e testato un chatbot, è necessario aggiungerlo a un canale di livechat.
First, open the application, find the Kanban card for the appropriate live chat channel, hover over it, and click the ⋮ (three dots) icon to open the drop-down menu. Click Configure Channel to open the channel detail form.
Nota
Per creare un nuovo canale di livechat, aprire l” e fare clic su Nuovo. Consultare Livechat per maggiori informazioni.
Fare clic sulla scheda Regole del canale. Quindi, aprire una regola esistente oppure crearne una nuova facendo clic su Aggiungi una riga.
On the Create Rules modal, choose the appropriate chatbot in the Chatbot field.
If the chatbot should only be active if there are no live chat operators available, check the box labeled Enabled only if no operator.

Vedi anche