Richiedi ferie
Once time off has been allocated to an employee, a request to use it can be submitted.
Time off can be requested in one of two ways: either from the main Time Off application Dashboard (), or from the My Time Off dashboard view ().
To create a new request for time off, click the New button on either the main Time Off Dashboard or the My Time Off dashboard, in the default list view.
Nota
Both New buttons allow the user to request time off, but when requested from the Dashboard, a New Time Off request form appears in a pop-up window. When requested from the My Time Off list view, the screen navigates to a new time off request page, instead.
Inserire le seguenti informazioni nel modulo di richiesta Nuove ferie:
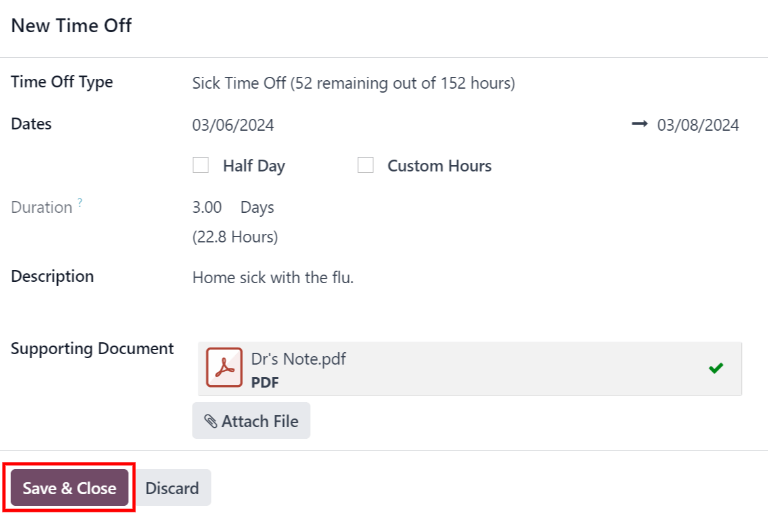
Time Off Type: select the type of time off being requested from the drop-down menu.
Dates: enter the dates that the time off falls under. There are two fields to populate: the start and end dates. Click on either date field and a popover calendar appears.
Fare clic sulla data di inizio, quindi fare clic sulla data di fine. Le date di inizio e fine selezionate sono cerchiate e le date tra di esse sono evidenziate (se applicabile).
Se si richiedono ferie solo per un singolo giorno, fare clic sulla data di inizio, quindi fare nuovamente clic sulla stessa data per la data di fine.
Quando le date corrette sono selezionate, fare clic sul pulsante Applica.
Le date selezionate ora popolano le due porzioni del campo Date.
Se il Tipo di ferie selezionato è configurato per avere le ferie prese in ore, vengono visualizzati anche i seguenti due campi:
Half Day: if the time off request is for a half day, tick this checkbox. When this is selected, the second date field disappears, and is replaced with a drop-down menu. From that drop-down menu, select either Morning or Afternoon to indicate which half of the day is being requested.
Custom Hours: if the time off requested is not a whole or half day, tick this checkbox. If selected, a From and To field appears beneath this option. Using the drop-down menu, select the start and end time for the time off request.
Duration: this field updates automatically once the Date section is completed. If the Date section is modified, this section automatically updates to reflect the total time off requested. This field is in either hours or days, depending on how the selected Time Off Type is configured.
Description: enter a description for the time off request. This should include any details that managers and approvers may need to approve the request.
Supporting Document: this field only appears if the Time Off Type selected allows for the attachment of documents. Click the Attach File button, and a file explorer window appears.
Navigare ai file desiderati che devono essere allegati, selezionarli, quindi fare clic sul pulsante Apri. I file vengono quindi visualizzati nel modulo di richiesta di ferie. È possibile allegare più documenti, se necessario.
If the request was created from the Dashboard, click the Save & Close button to save the information, and submit the request.
If the form was completed from the My Time Off list view, the information is automatically saved as it is entered. However, the form can be saved manually at any time by clicking the (cloud upload) icon.