Noleggi
L’applicazione Odoo Noleggi fornisce soluzioni complete per configurare e gestire noleggi di ogni tipo.
Invia preventivi, conferma gli ordini, programma i noleggi, registra i prodotti quando vengono ritirati e restituiti ed emetti fatture per i clienti da un’unica piattaforma.
Dashboard
Dopo aver aperto l’applicazione Noleggi, apparirà la dashboard Ordini di noleggio.
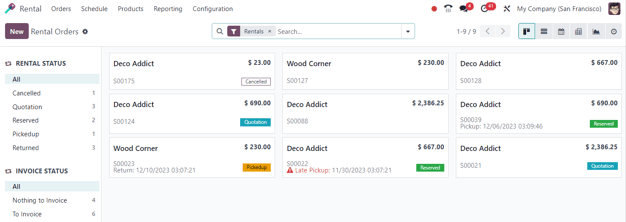
Nella vista kanban predefinita, sono visibili tutti i noleggi. Ogni scheda di noleggio mostra il nome del cliente, il prezzo del noleggio, il numero dell’ordine di vendita e lo stato del noleggio.
Nota
Se schede kanban non mostrano lo stato del noleggio significa che i noleggi hanno un preventivo confermato, ma non è ancora stato effettuato il ritiro.
Nella barra laterale di sinistra trovi il campo Stato noleggio. Sotto di essa, è possibile accedere allo Stato fattura dei noleggi. Facendo clic su un’opzione qualsiasi nella barra laterale di sinistra, potrai filtrare gli affitti visualizzati nella dashboard.
Impostazioni
Per configurare i costi aggiuntivi legati al ritardo del noleggio, alla disponibilità di articoli a noleggio o alla durata minima del noleggio, vai sull’app .
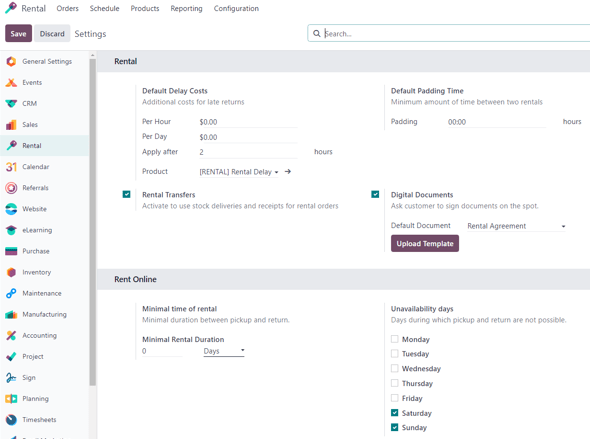
Nella sezione Noleggio, ci sono opzioni per configurare Costi di ritardo predefiniti e Intervallo di tempo predefinito. È inoltre possibile attivare le opzioni Trasferimenti noleggio e Documenti digitali.
I Costi di ritardo predefiniti rappresentano costi aggiuntivi per noleggi restituiti in ritardo
Il campo Intervallo di tempo predefinito rappresenta il tempo minimo che deve trascorrere tra due noleggi
Per Trasferimenti noleggio si intende che le consegne e le ricezioni di magazzino possono essere utilizzate per gli ordini di noleggio
- I Documenti digitali permettono agli utenti di caricare documenti per i clienti da firmare prima di
confermare il noleggio.
Nella sezione Noleggio online, ci sono opzioni per configurare una Durata minima noleggio e indicare dei Giorni di indisponibilità, ovvero giorni in cui non è possibile effettuare il ritiro e la restituzione.
Prodotti noleggio
Per visualizzare tutti i prodotti che possono essere noleggiati nel database, accedi all’app . Per impostazione predefinita, il filtro di ricerca Può essere noleggiato appare nella barra di ricerca.
Ogni scheda kanban prodotto mostra il nome, il prezzo di noleggio e l’immagine del prodotto stesso (se applicabile).
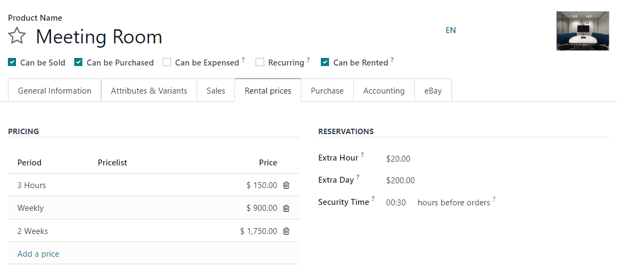
Tariffe noleggio
Per regolare il prezzo di noleggio di un prodotto, apri la pagina Prodotti nell’applicazione Noleggi, poi seleziona il prodotto desiderato o fai clic su Nuovo per creare un nuovo prodotto da zero.
Nel modulo del prodotto, assicurati che la casella relativa alla voce Può essere noleggiato sia selezionata. In seguito, apri la scheda Prezzi noleggio.
Nota
Se crei un prodotto noleggio al di fuori dell’applicazione Noleggi, è sufficiente assicurarti che la casella relativa alla voce Può essere noleggiato sia selezionata nel modulo del prodotto. Per impostazione predefinita, questa casella è selezionata ogni volta che un prodotto viene creato direttamente nell’applicazione Noleggi.
Tariffazione
Under the Pricing section of the Rental prices tab, designate custom rental prices and rental periods for the product.
To add pricing for a rental, click Add a price. Then, choose a pricing period (the unit of duration of the rental) in the Period column, or create a new pricing period by typing in the name and clicking Create.
Next, decide whether or not to apply this custom rental price to a specific Pricelist.
Lastly, enter the desired Price for that specific Period.
Nota
There is no limit to how many pricing lines can be added. Multiple pricing options for rental products are typically used to give discounts for customers who agree to longer rental durations.
To delete any rental pricing option, click the 🗑️ (trash) icon, and that row is deleted.
Prenotazioni
Under the Reservations section of the Rental prices tab, there is the option to configure additional fines for any Extra Hour or Extra Day that the customer takes to return a rental.
There is also the option to set a Security Time, expressed in hours, to make the rental product temporarily unavailable between two rental orders. Such a feature may prove useful if maintenance or cleaning is required between rentals.
Price computing
Odoo always uses two rules to compute the price of a product when a rental order is created:
Only one price line is used.
The cheapest line is selected.
Exercise
Consider the following rental pricing configuration for a product:
1 day: $100
3 days: $250
1 week: $500
A customer wants to rent this product for eight days. What price will they pay?
After an order is created, Odoo selects the second line as this is the cheapest option. The customer has to pay three times “3 days” to cover the rental’s eight days, for a total of $750.
Ordini di noleggio
To create a rental order in the Rental app, navigate to , and click New. Doing so reveals a blank rental order form to be filled in accordingly.
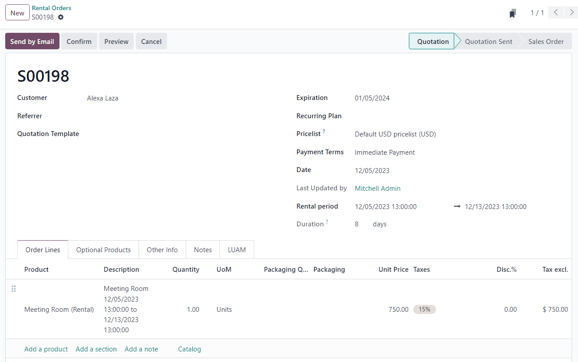
Start by adding a Customer, then configure the desired duration of the rental in the Rental period field.
To adjust the rental duration, click the first date in the Rental period field, and select the range of dates to represent the rental duration from the pop-up calendar form that appears.
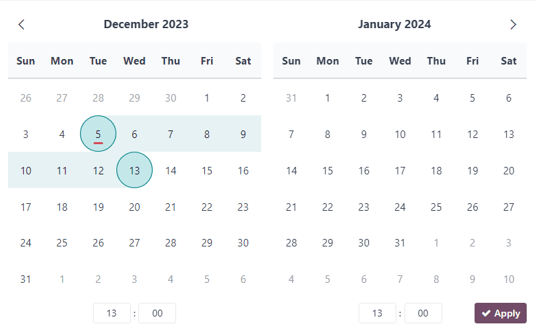
Once complete, click Apply in the calendar pop-up form. Following that, the pop-up form disappears, and the designated time period of the rental is represented in the Duration field.
Next, add a rental product in the Order Lines tab, by clicking Add a product, and selecting the desired rental product to add to the form.
Nota
If a rental product is added before the Rental period field has been properly configured, the user can still adjust the Rental period field accordingly.
Simply select the desired range of dates to represent the duration of the rental, then click Update Rental Prices in the Duration field.

Doing so reveals a Confirmation pop-up window. If everything is correct, click Ok, and Odoo recalculates the rental price accordingly.
Once all the information has been entered correctly on the rental order form, click the Send by Email button to send the quotation to the customer, or click the Confirm button to confirm the order.
Customer signature
Upon confirming a rental order, the Sign Documents button appears. This gives the ability to request the customer sign a rental agreement, outlining the arrangement between the company and customer, before they pick up the rental product(s).
Such documents can ensure everything is returned on-time and in its original condition.
Importante
The Sign Documents button/option only appears if the Digital Documents feature has been activated in the Rental application settings. To do so, navigate to , activate Digital Documents, and click Save.
Nota
This feature also requires the Sign app. If necessary, Odoo automatically installs it after activating the Digital Documents setting.
To request a customer signature on a rental agreement, select a confirmed rental order, and click the Sign Documents button to reveal a Sign Documents pop-up window.
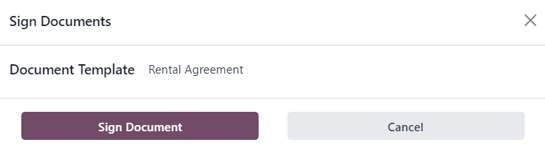
From here, select the desired document from the Document Template field. Then, click Sign Document. Doing so reveals a New Signature Request pop-up window.
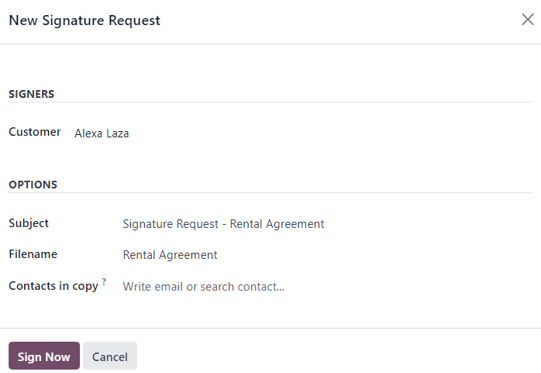
Upon confirming the information in the New Signature Request pop-up form, click Sign Now to initiate the signing process.
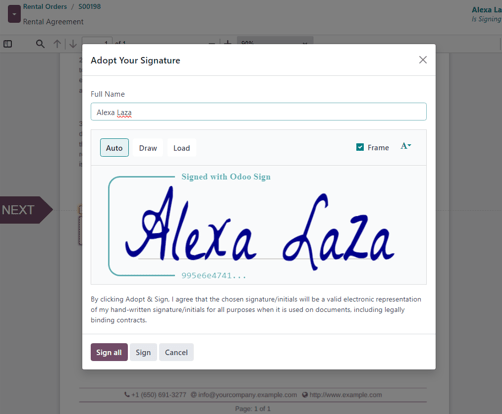
A separate page is then revealed, showcasing the document to be signed, which is accessible to the customer via the customer portal.
Odoo guides the customer through the signing process with clear, clickable indicators, and allows them to create electronic signatures to quickly complete the form.
Once the document has been signed and completed, click the Validate & Send Completed Document button at the bottom of the document.
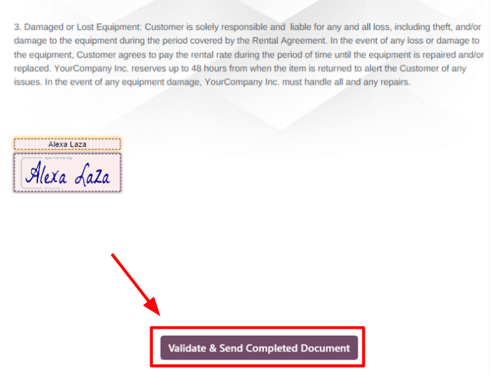
Upon clicking the Validate & Send Completed Document button, Odoo presents the option to download the signed document for record-keeping purposes, if necessary.
Vedi anche
Pickup products
When a customer picks up the product(s), navigate to the appropriate rental order, click the Pickup button, and then click Validate in the Validate a pickup pop-up form that appears.
Doing so places a Picked-up status banner on the rental order.
Restituire prodotti
When a customer returns the product(s), navigate to the appropriate rental order, click the Return button, and validate the return by clicking Validate in the Validate a return pop-up form that appears.
Doing so places a Returned status banner on the rental order.
Print pickup and return receipts
Pickup and return receipts can be printed for customers when they pick up and/or return rental products.
To print pickup and/or return receipts, navigate to the appropriate rental order, click the ⚙️ (gear) icon to reveal a drop-down menu.
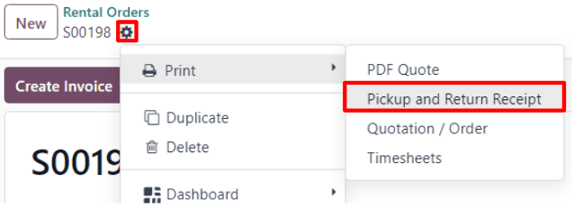
From this drop-down menu, hover over the Print option to reveal a sub-menu. Then select Pickup and Return Receipt.
Odoo generates and downloads a PDF, detailing all information about the current status of the rented item(s).