
Dispositivi e integrazioni
VoIP può essere utilizzato su molti dispositivi diversi, come computer, tablet, telefoni cellulari e molti altri. Questo è utile in quanto riduce i costi e i dipendenti possono lavorare da qualsiasi parte del mondo, purché dispongano di una connessione Internet a banda larga.
Odoo VoIP è compatibile con SIP (Session Initiation Protocol), il che significa che può essere utilizzato con qualsiasi applicazione compatibile SIP.
Questo documento descrive il processo di configurazione di Odoo VoIP su diversi dispositivi e integrazioni.
Odoo è completamente integrato con tutte le app Odoo, consentendo agli utenti di accedere a qualsiasi app e pianificare una chiamata come attività nel chatter.
Example
Ad esempio, nell’app CRM, un utente può accedere a un’opportunità e fare clic su Attività nel chatter.
Successivamente, possono scegliere Chiamata e sotto Data di scadenza, possono selezionare una data.
Una volta fatto clic su Salva, un’attività viene visualizzata nella chat.
Se la Scadenza è per la data odierna, l’attività viene visualizzata nel widget VoIP.

Odoo VoIP (laptop/desktop)
Il modulo e il widget Odoo VoIP (Voice over Internet Protocol) possono essere utilizzati da qualsiasi browser su un laptop o desktop. È sufficiente fare clic sull’icona ☎️ (telefono) nell’angolo in alto a destra, mentre si è nel database Odoo, e il widget appare.
Vedi anche
Per vedere come utilizzare il widget VoIP su un computer desktop/laptop, consulta questa documentazione: Widget VoIP.
Odoo VoIP (tablet/dispositivo mobile)
L’app Odoo VoIP può essere utilizzata su tablet e telefoni cellulari, tramite le applicazioni Odoo Android o Apple iOS. Inoltre, è possibile utilizzare un browser web mobile per accedere al database.
Avvertimento
Le applicazioni Odoo Android e Apple iOS non sono più mantenute da Odoo sui portali Android e Apple. Ciò significa che il supporto Odoo gestisce solo ambiti limitati di ticket di supporto Odoo Android o Apple iOS.
Importante
Sebbene sia possibile effettuare chiamate in uscita utilizzando Odoo su un dispositivo mobile, tieni presente che Odoo non è un’applicazione VoIP completa e non squilla per le chiamate in arrivo. Se l’utente deve essere raggiungibile su un dispositivo mobile in qualsiasi momento, dovrebbe essere utilizzata un’app come Zoiper. App come quella rimangono connesse in background in ogni momento.
Per ulteriori informazioni, consulta questa documentazione: Zoiper Lite.
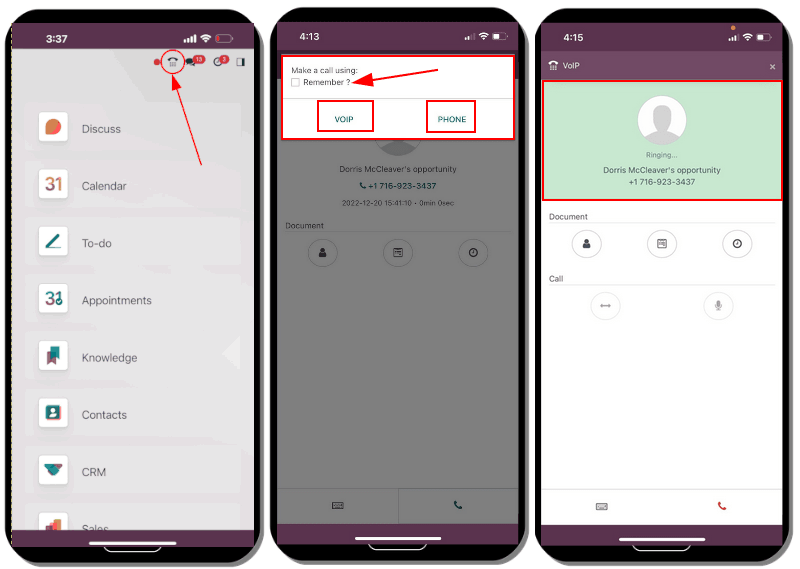
Mentre si è nell’applicazione mobile su un dispositivo mobile/tablet, accedi al widget Odoo VoIP toccando l’icona ☎️ (telefono) nell’angolo in alto a destra. Il widget appare nell’angolo in basso a sinistra.
Quando si effettua una chiamata dal tablet utilizzando l’applicazione mobile per la prima volta, all’utente viene richiesto di Consentire al database di utilizzare il microfono. Fare clic su Consenti quando richiesto per continuare la chiamata utilizzando il microfono.
Questo passaggio è necessario, sia che si utilizzi l’applicazione mobile Odoo o il browser web.

Odoo chiede quindi come effettuare la chiamata. Le due opzioni sono: VOIP o Telefono (se il tablet è abilitato per le chiamate). Fare clic sulla casella accanto a Ricordare? se si desidera che questa decisione sia quella predefinita in futuro.

Ecco il layout dell’aspetto dell’app Odoo VoIP su un dispositivo mobile:
Zoiper Lite
Zoiper Lite è un dialer VoIP SIP gratuito con voce e video.
Per iniziare a utilizzare l’app Zoiper, scaricala sul dispositivo tramite la pagina di download di Zoiper.
Un dispositivo mobile è l’installazione più comune e questo documento descrive come configurarlo sull’applicazione IOS Zoiper. Schermate e passaggi potrebbero differire a seconda delle condizioni di configurazione.
Dopo aver installato l’applicazione Zoiper sul telefono cellulare, aprire l’applicazione e toccare Impostazioni. Navigare in e toccare l’icona + (più) per aggiungere un account.
Se l’account VoIP è già configurato, fare clic su Sì. Ciò significa che un nome utente e una password dell’account sono già stati creati.

Successivamente, toccare Seleziona un provider. Nella schermata che appare, toccare Paese, nell’angolo in alto a destra, per restringere i provider a un paese specifico. Scegliere il paese per il provider che si sta configurando, quindi trovare il Provider e selezionarlo.
Example
Se il provider in fase di configurazione è Axivox, selezionare Belgio. Quindi, scegliere Axivox come provider.

Nelle opzioni SIP, inserire Nome account, Dominio, Nome utente e Password. Tutte queste informazioni variano in base all’account.
Suggerimento
Per accedere a queste informazioni, tramite il portale Axivox, navigare in . Il Nome utente SIP, il Dominio, la Password SIP e l”Indirizzo del server proxy sono tutti presenti in questa scheda.
Campo Zoiper |
Campo Axivox |
|---|---|
Nome conto |
Può essere qualsiasi cosa |
Dominio |
Dominio |
Nome utente |
Nome utente SIP |
Password |
Password SIP |
Una volta inserite queste informazioni account, fare clic sul pulsante verde Registra nella parte superiore dello schermo. Una volta verificate le informazioni di registrazione, Zoiper mostra un messaggio che indica Stato registrazione: OK.
A questo punto, Zoiper è ora configurato per effettuare telefonate utilizzando il servizio VoIP.

Linphone
Linphone è un softphone VoIP SIP open-source, utilizzato per voce, video, messaggistica (di gruppo e individuale), nonché per conferenze telefoniche.
Per iniziare a utilizzare l’app Linphone, scaricarla sul dispositivo tramite la pagina di download di Linphone.
Un dispositivo mobile è l’installazione più comune e questo documento descrive come configurare l’applicazione IOS Linphone. Schermate e passaggi potrebbero differire a seconda delle circostanze.
Per iniziare a configurare Linphone per l’uso con un provider SIP, aprire prima Linphone e apparirà una schermata di assistenza.
Da questa schermata, selezionare Usa account SIP. Quindi, nella schermata successiva, inserire Nome utente, Password, Dominio e Nome visualizzato. Una volta completato, premere Accedi.
A questo punto, Linphone è pronto per iniziare a effettuare chiamate, una volta che nella parte superiore della schermata dell’applicazione compare un pulsante verde con la scritta Connesso.

Suggerimento
Linphone realizza una varietà di applicazioni per dispositivi mobili e desktop in sistemi operativi come Windows, Linux, Apple e Android. Poiché Linphone è un progetto open-source, vengono rilasciati regolarmente molti nuovi aggiornamenti.