
Fornitori
Before products can be added to the Lunch app, the restaurants that provide the food must be configured.
To add a new vendor, first navigate to . Here, all currently configured vendors for the Lunch app appear in a default Kanban view. To change to a list view, click the (list) icon in the top-right corner.
Nota
No vendors are preconfigured in the Lunch app, so all vendors must be added to the database.
To add a new vendor, click the New button in the top-left corner, and a new lunch supplier form loads.
Fill out the following fields on the vendor form:
Informazioni fornitore
Vendor: enter a name for the vendor.
Vendor (beneath the line for vendor name): select the vendor from the drop-down menu. If the vendor has not already been entered in the system, type in the vendor name, and click either Create «new vendor name» to add them. Alternatively, click Create and edit… to create the vendor, and edit the vendor form. The vendor form allows for more detail, aside from the name, to be entered, such as contact information.
Nota
Se si effettua una selezione nel campo a discesa Fornitore, il campo di testo Fornitore (sopra, per il nome del fornitore) si aggiorna con il nome del fornitore scelto dal menu a discesa.
The list of vendors that is presented in the drop-down menu is pulled from the Contacts application.
Address: enter the vendor’s address in the various fields.
Email: enter the vendor’s email.
Phone: enter the vendor’s phone number.
Company: if this vendor is only available to a specific company, select the company from the drop-down menu. If this field is left blank, the vendor’s items are available to all companies.

Disponibilità
La sezione DISPONIBILITÀ presenta una tabella con due righe. I giorni della settimana occupano la riga superiore e la riga inferiore contiene caselle di spunta. Spuntare la casella corrispondente per ogni giorno della settimana in cui il fornitore è disponibile.
Per impostazione predefinita, dal lunedì al venerdì sono spuntati.

Ordini
La sezione ORDINI del modulo fornitore dettaglia per quali sedi il fornitore è disponibile, oltre a come e quando gli ordini vengono effettuati e ricevuti.
Delivery: using the drop-down menu, select Delivery if the vendor delivers to the office, or select No Delivery if orders must be picked up.
Location: select which locations are able to order from this vendor. Multiple locations can be selected. If this field is left blank, all locations can order from the vendor.
Nota
Una sede
Ufficio centraleviene creata per impostazione predefinita quando si crea un database ed è disponibile per la selezione dall’elenco.Send Order By: click the radio button to select how orders are sent to the vendor. The available options are Phone or Email.
Order Time: this field only appears if Email is selected in the Send Order By field. Enter the time that an order must be emailed for it to be accepted. Enter the time in the following format:
HH:MM. Then select either AM or PM from the drop-down menu, next to the time field.

Aggiunte
When ordering an item in the Lunch app, optional extra items, sometimes referred to as add-ons, can be shown. These can be configured in any manner that suits the products being offered.
Per impostazione predefinita, Odoo consente tre tipi di articoli extra, che possono essere considerati come categorie. Per impostazione predefinita, il primo tipo (o categoria) di aggiunte è etichettato Extras, il secondo è etichettato Beverages e il terzo è etichettato Extra Label 3.
Importante
Durante la configurazione degli extra, è importante tenere presente che tutti gli extra configurati appaiono per ogni articolo offerto dal fornitore. Ciò significa che dovrebbero essere aggiunti solo articoli che si applicano a tutti i prodotti del fornitore.
Configurare gli extra
Inserire le seguenti informazioni per ciascuna delle tre sezioni extra disponibili:
Extra (#) Label: enter a name for the type of extra, such as
Toppings. This can be thought of as a category.Extra (#) Quantity: select how the extras are selected. The options are:
None or More: select this if the user is not required to make a selection.
One or More: select this to require the user to make at least one selection.
Only One: select this to require the user to make only one selection.
Aggiungere extra
Dopo aver configurato le etichette e le quantità per una categoria di extra, è necessario aggiungere i singoli elementi extra per ciascuna categoria.
Fare clic su Aggiungi una riga in fondo all’elenco che appare sul lato destro della categoria di extra. Inserire il Nome e il Prezzo per ciascun elemento aggiunto. Il prezzo può rimanere a $0.00 se non c’è alcun costo. Questo è comune per articoli come posate monouso o condimenti.
Example
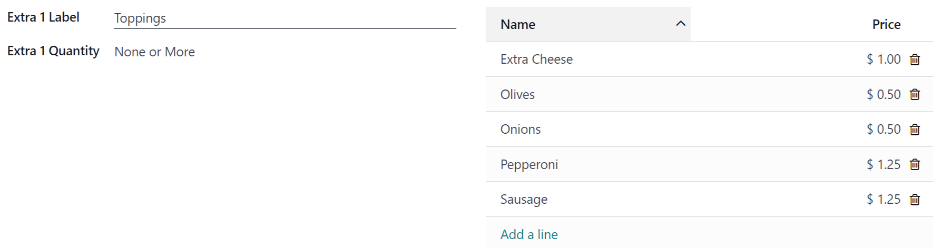
Per una pizzeria che offre solo pizze personali, vedere i loro extra configurati come segue:
Il primo extra è configurato per i vari condimenti offerti. L”Etichetta extra 1 è impostata su Condimenti e la Quantità extra 1 è impostata su Nessuno o più. I vari condimenti vengono quindi aggiunti, con i relativi costi.
La pizzeria offre anche una bevanda gratuita con qualsiasi acquisto. Per configurare questo, l”Etichetta extra 2 è impostata su Bevande e la Quantità extra 2 è impostata su Solo uno. Le varie scelte di bevande vengono aggiunte e il costo per ciascuna rimane zero.
