Planifier des entretiens
Schedule in-person, virtual, and phone interviews with Odoo through the Recruitment app.
An interview can be scheduled in one of two ways: either by the recruitment team, or by the applicant.
Entretiens planifiés par l’équipe de recrutement
Lorsqu’un candidat atteint l’étape de l’entretien, l’équipe de recrutement doit planifier l’entretien en coordonnant d’abord une date et une heure appropriées avec le candidat et les intervieweurs.
Pour planifier l’entretien, accéder à la carte du candidat en allant d’abord dans , puis cliquer sur la carte du poste concerné. Cela ouvre la page Candidatures pour ce poste. Ensuite, cliquer sur la carte du candidat souhaité pour afficher son formulaire détaillé.
To schedule an phone, virtual, or in-person interview, click the No Meeting smart button at the top of the applicant’s record.
Note
The Meetings smart button displays No Meeting if no meetings are currently scheduled. For applicants who are new to the First Interview stage, this is the default.
If there is one meeting already scheduled, the smart button displays 1 Meeting, with the date of the upcoming meeting beneath it. If more than one meeting is scheduled, the button displays Next Meeting, with the date of the first upcoming meeting beneath it.
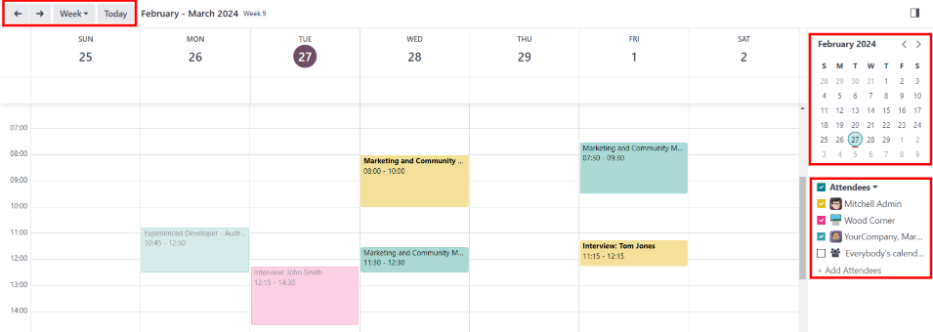
Clicking the Meetings smart button loads a calendar, showing the scheduled meetings and events for the currently signed-in user, as well as the employees who are listed under the Attendees section, located to the right of the calendar.
Pour modifier les réunions et événements affichés, décocher un participant dont les événements du calendrier doivent être masqués. Seuls les participants cochés sont visibles sur le calendrier.
Pour ajouter une réunion au calendrier en vue Jour ou Semaine, cliquer sur l’heure de début de la réunion et faire glisser vers le bas jusqu’à l’heure de fin. Cela permet de sélectionner la date, l’heure et la durée de la réunion.
Une réunion peut également être ajoutée dans cette vue en cliquant sur le jour et le créneau horaire souhaités.
Les deux méthodes font apparaître une fenêtre contextuelle Nouvel événement.
Fenêtre contextuelle Nouvel événement
Cliquer sur une case de la grille, correspondant à l’heure et à la date, ouvre la fenêtre contextuelle Nouvel événement pour planifier une réunion.
Saisir les informations dans le formulaire. Les seuls champs obligatoires sont un titre pour la réunion, ainsi que les champs Début (et date/heure de fin).
Une fois les détails de la fiche saisis, cliquer sur Enregistrer et fermer pour enregistrer les modifications et créer l’entretien.
Après avoir saisi un nom obligatoire pour la réunion, les champs modifiables sur la fiche Nouvel événement sont les suivants :
Meeting Title: enter the subject for the meeting. This should clearly indicate the purpose of the meeting. The default subject is the Subject/Application Name on the applicant’s card.
Start: start and end date and times for the meeting. Clicking either of these fields opens a calendar pop-up window. Click Apply to close the window.
All Day: tick the box to schedule an all-day interview. If this box is ticked, the Start field changes to Start Date.
Attendees: select the people who should attend the meeting. The default employee listed is the person who created the meeting. Add as many other people as desired.
Videocall URL: if the meeting is virtual, or if there is a virtual option available, click Odoo meeting, and a URL is automatically created for the meeting, which populates the field.
Description: enter a brief description in this field. There is an option to enter formatted text, such as numbered lists, headings, tables, links, photos, and more. Use the powerbox feature, by typing a
/to reveal a list of options.Parcourir les options et cliquer sur l’élément souhaité. L’élément apparaît dans le champ et peut être modifié. Chaque commande présente une fenêtre contextuelle différente. Suivre les instructions de chaque commande pour compléter la saisie.
Plus d’options
Pour ajouter des informations supplémentaires à la réunion, cliquer sur le bouton Plus d’options dans le coin inférieur droit de la fenêtre contextuelle Nouvel événement. Saisir l’un des champs supplémentaires suivants :
Durée : ce champ se remplit automatiquement en fonction de la date et de l’heure de Début (et de fin). Si l’heure de la réunion est ajustée, ce champ s’ajuste automatiquement à la durée correcte. La durée par défaut d’une réunion est d’une heure.
Récurrent : si la réunion doit se répéter à un intervalle sélectionné (non typique pour un premier entretien), cocher la case à côté de Récurrent. Plusieurs champs supplémentaires apparaissent lorsque cette option est activée :
Fuseau horaire : à l’aide du menu déroulant, sélectionner le Fuseau horaire pour les réunions récurrentes.
Répéter : choisir des réunions récurrentes Quotidiennes, Hebdomadaires, Mensuelles, Annuelles, ou Personnalisées. Si Personnalisé est sélectionné, un champ Répéter tous les apparaît en dessous, accompagné d’un autre paramètre de fréquence temporelle (Jours, Semaines, Mois, ou Ans). Saisir un nombre dans le champ vide, puis sélectionner la période à l’aide du menu déroulant.
Répéter le : activé lorsque l’option Hebdomadaire est sélectionnée dans le champ Répéter. Choisir le jour où tombe la réunion hebdomadaire.
Jour du mois : configurer les deux options du menu déroulant pour sélectionner un jour spécifique du mois, indépendamment de la date (par ex. le premier mardi de chaque mois). Pour définir une date de calendrier spécifique, choisir Date du mois et saisir la date du calendrier dans le champ (par ex.
15pour définir la réunion au quinze de chaque mois).Until: using the drop-down menu, select when the meetings stop repeating. The available options are Number of repetitions, End date, and Forever. If Number of repetitions is selected, enter the number of total meetings to occur in the blank field to the right. If End date is selected, specify the date using the calendar pop-up window, or type in a date in a XX/XX/XXXX format. Forever schedules meetings indefinitely.
Lieu : saisir le lieu de la réunion.
Tags : sélectionner les tags de la réunion dans le menu déroulant ou ajouter un nouveau tag en le saisissant et en cliquant sur Créer « tag ». Le nombre de tags est illimité.
Appointment: if an appointment is associated with this meeting, select it from the drop-down menu, or create a new appointment by typing in the appointment name, then clicking Create & Edit… from the resulting drop-down men. A Create Appointment form loads. Enter the information on the form, then click Save & Close.
Confidentialité : indiquer si l’organisateur apparaît comme Disponible ou Occupé pendant la réunion. Ensuite, sélectionner la visibilité de cette réunion dans le menu déroulant à droite de la première sélection. Les options sont Public, Privé et Utilisateurs internes uniquement. Public permet à tous de voir la réunion, Privé permet uniquement aux participants listés dans la réunion de la voir, et Utilisateurs internes uniquement permet à toute personne connectée à la base de données de l’entreprise de voir la réunion.
Organisateur : l’employé qui a créé la réunion est automatiquement renseigné dans ce champ. Utiliser le menu déroulant pour changer l’employé sélectionné.
Rappels : sélectionner un rappel dans le menu déroulant. Les options par défaut incluent Notification, Email et SMS Text Message, chacune avec une période spécifique avant l’événement (heures, jours, etc.). Le rappel choisi alerte les participants de la réunion via l’option sélectionnée au moment spécifié. Plusieurs rappels peuvent être sélectionnés dans ce champ.

Envoyer la réunion aux participants
Une fois les modifications saisies dans la fenêtre contextuelle Nouvel événement et les détails de la réunion vérifiés, la réunion peut être envoyée aux participants par email ou SMS depuis le formulaire d’événement étendu (ce qui est affiché lorsque le bouton Plus d’options est cliqué dans la fenêtre contextuelle Nouvel événement).
To send the meeting via email, click the Email button next to the Attendees field on the expanded meeting form.
Une fenêtre contextuelle de configuration d’email Contacter les participants apparaît. Un email pré-formaté, utilisant le modèle d’email par défaut Calendar: Event Update, remplit le champ du corps de l’email.
The followers of the job application, as well as the user who created the meeting, are added as Recipients by default. If needed, add the applicant’s email address to the list to send the email to the applicant, as well. Make any other desired changes to the email. If an attachment is needed, click the Attachments button, navigate to the file, then click Open. Once the email is ready to be sent, click Send.

To send the meeting via text message, click the SMS button next to the Attendees field on the expanded meeting form. A Send SMS Text Message pop-up window appears.
En haut, une bannière bleue apparaît si des participants n’ont pas de numéros de mobile valides et indique le nombre d’enregistrements invalides. Si un contact n’a pas de numéro de mobile valide, cliquer sur Fermer, modifier l’enregistrement du participant, puis recommencer ces étapes.
Lorsqu’aucun message d’avertissement n’apparaît, saisir le message à envoyer aux participants dans le champ Message. Pour ajouter des emojis au message, cliquer sur l’icône (smile add) sur le côté droit de la fenêtre contextuelle.
The number of characters, and amount of text messages required to send the message (according to GSM7 criteria) appears beneath the Message field. Click Put In Queue to have the text sent later, after any other messages are scheduled, or click Send Now to send the message immediately.

Note
L’envoi de SMS n’est pas une fonctionnalité par défaut avec Odoo. Pour envoyer des SMS, des crédits sont nécessaires et doivent être achetés. Pour plus d’informations sur les crédits et les forfaits IAP, consulter la documentation In-app purchases (IAP).
Entretiens programmés par le candidat
By default, the recruitment interview stages are not set up for applicants to schedule their own interviews.
However, if the First Interview or Second Interview stages are modified to send the Recruitment: Schedule Interview email template when an applicant reaches that stage, the applicant receives a link to the recruitment team’s calendar, and can schedule the interview on their own. The recruitment team’s availability is reflected in the calendar.
In order for applicants to be able to schedule their own interviews, a stage must first be modified in the Recruitment app.
Modifier l’étape
To modify either the First Interview or Second Interview stage, first navigate to the main app dashboard. Next, click on the desired job card to navigate to the Applications page for that job position.
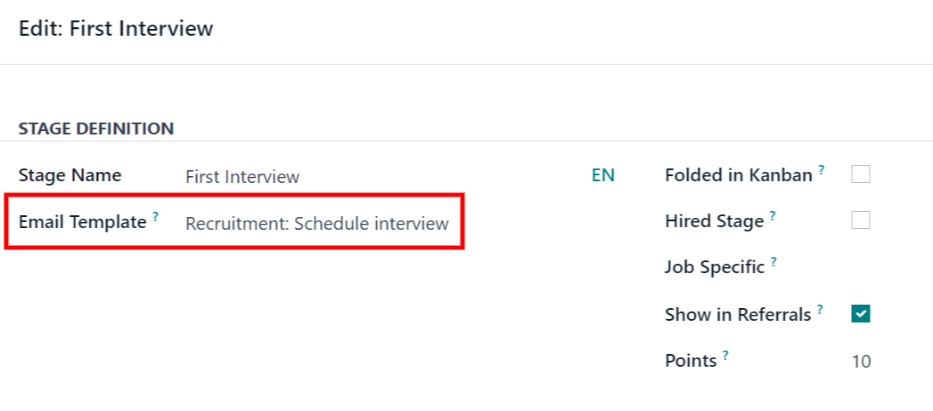
Hover over the name of the stage, and a (gear) icon appears in the upper-right hand side of the stage name. Click the (gear) icon, and a drop-down menu appears. Then, click on the Edit option, and an Edit: (Stage) form appears.

The Email Template field is blank, by default. Using the drop-down menu, select Recruitment: Schedule interview for the Email Template field, then click Save & Close when done.
Envoyer un e-mail
After either the First Interview or Second Interview stages are modified to send the Recruitment: Schedule interview email to the applicant upon moving their applicant card to one of those stages, the following email is received by the applicant:
Subject: Can we plan an interview together for your (Job Position) application?
Congratulations!
Your application is really interesting and we'd like to plan an interview with you.
Can you please use the button below to schedule it with one of our recruiters?
Plan my interview
Schedule interview
When the applicant received the email, they click the Plan my interview button at the bottom of the email. This navigates the applicant to a private online scheduling page, which is only accessible through the emailed link.
Cette page affiche les DÉTAILS DE LA RÉUNION sur le côté droit de l’écran. Cela inclut le format et la durée de la réunion. Dans cet exemple, l’entretien est virtuel ( En ligne) et la durée est d’une demi-heure ( 30 minutes).
First, if there is an option of who to meet with, the user selects who they are scheduling their meeting with, by clicking on their icon and name. If only one person is available to interview the applicant, this step is not available. If the applicant does not wish to chose an interviewer, they can just click See all availabilities .

Note
If the applicant selects an interviewer, the applicant is shown a Select a date & time page, and only sees the dates and times that specific person is available. In addition, that interviewer’s information (name, email, and phone number) appears on the right-side of the screen, under the heading OPERATOR, located beneath the MEETING DETAILS.
If the applicant clicks See all availabilities instead, or if there are no interviewer options available, the user is navigated to the same Select a date & time page, but there is no OPERATOR section visible.
Then the applicant clicks on an available day on the calendar, signified by a square around the date. Once a day is selected, they click on one of the available times to select that date and time.

Astuce
Vérifier le champ Fuseau horaire, sous le calendrier, pour s’assurer qu’il est défini sur le fuseau horaire correct. Changer le fuseau horaire peut modifier les horaires disponibles présentés.
Une fois la date et l’heure sélectionnées, le candidat est redirigé vers une page Ajouter plus de détails vous concernant. Cette page demande au candidat de saisir son Nom complet, son E-mail et son Numéro de téléphone. Les coordonnées saisies dans ce formulaire servent à contacter le candidat pour lui rappeler l’entretien planifié.
Lorsque tout est saisi sur la page Ajouter plus de détails vous concernant, le candidat clique sur le bouton Confirmer le rendez-vous et l’entretien est planifié.

Après confirmation de l’entretien, le candidat est dirigé vers une page de confirmation où tous les détails de l’entretien sont affichés. L’option d’ajouter la réunion aux calendriers personnels du candidat est disponible via les boutons Ajouter à iCal/Outlook et Ajouter à Google Agenda, sous les détails de l’entretien.
The applicant is also able to cancel or reschedule the interview, if necessary, with the Cancel/Reschedule button.