Eventbås
Create event booths, sell their availability, and manage reservations with the Odoo Events application.
Konfiguration
To create, sell, and manage booths for events, the Booth Management feature must be activated.
Navigate to , and in the Events section, tick the Booth Management checkbox. Then, click Save.
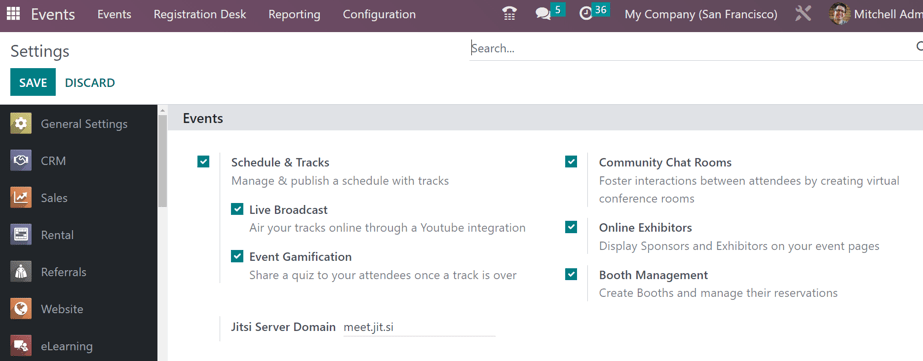
Inställningen Booth Management i Odoo Events-programmet.
Viktigt
When the Booth Management setting is activated, a new Product Type becomes available on all product forms: Event Booth.
Every created booth must be assigned a Booth Category on its respective booth form, and every booth category must have an Event Booth product assigned to it.
Kategorier av montrar
With the Booth Management setting activated in the Events app, the Booth Categories option appears in the Configuration menu.
För att komma åt Booth Category dashboard, gå till , som avslöjar en lista över alla skapade monterkategorier.

På sidan Booth Category listas följande information för varje monterkategori:
Namn: namnet på monterkategorin.
Create Sponsor: If ticked, booking this booth category creates a sponsor for the user.
Product: den Event Booth-produkt som är associerad med den specifika monterkategorin.
Price: Priset för en monter i den aktuella monterkategorin.
När du klickar på ikonen (settings), som finns längst till höger om kolumntitlarna, visas en rullgardinsmeny med ytterligare kolumnalternativ. I rullgardinsmenyn markerar du kryssrutan bredvid Sponsornivå och/eller Sponsortyp för att visa dessa kolumner på sidan Monterkategori.
To edit an existing booth category, select it from the list, and make any desired modifications.
Skapa monterkategori
Om du vill skapa en monterkategori från sidan Monterkategori klickar du på knappen Ny i det övre vänstra hörnet för att öppna ett tomt formulär för monterkategori.
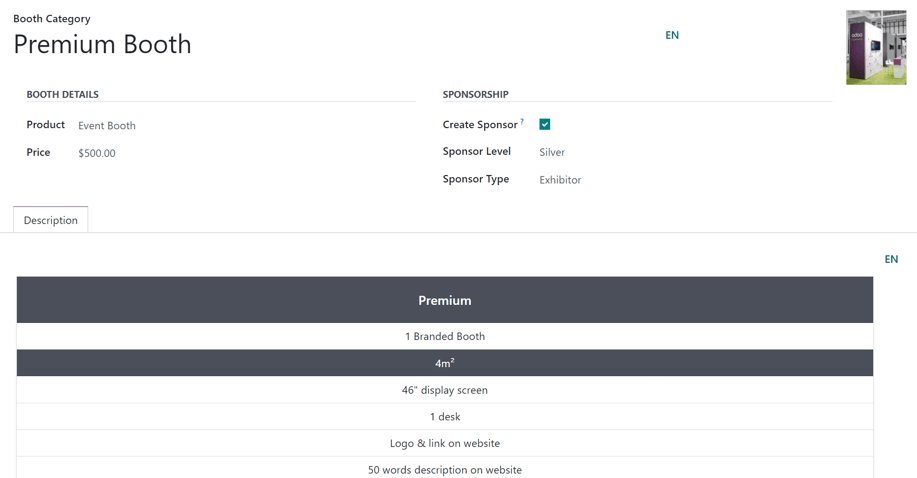
Enter a name for the booth category in the top Booth Category field. This is a required field.
To add a corresponding image to the booth category (e.g. a sample photo of the booth), click the (pencil) icon that appears when the cursor hovers over the camera placeholder in the upper-right corner of the booth category form. Then, upload the desired image to the booth category form, if needed.
I avsnittet Booth Details måste användare tilldela en Product till kategorin, och den måste ha Event Booth inställd som Product Type på produktformuläret.
Regardless of the listed price on the Event Booth product chosen, a custom Price can be applied for this booth category in that field.
In the Sponsorship section, tick the Create Sponsor checkbox option, if the user should be created as an official Sponsor of the event, whenever a booth belonging to this category is booked.
När kryssrutan Create Sponsor är markerad visas två ytterligare fält under den: Sponsor Level och Sponsor Type.
Observera
Sponsor Level and Sponsor Type establish different distinctions of sponsors.
For example, if a sponsor has been attached to a company for multiple years, they would be granted a higher level (e.g. Gold level), which provides them with immediate credibility and status. Whereas, conversely, a relatively new sponsor would be granted a lower level (e.g. Bronze level), which coincides with its own credibility and status.
Välj önskad sponsringsnivå i rullgardinsmenyn Sponsor Level.
Tips
För att ändra en befintlig Sponsor Level, välj den i rullgardinsmenyn och klicka sedan på (högerpil) som visas i slutet av raden. Då öppnas en separat sida där namnet på Sponsor Level och Ribbon Style kan ändras om det behövs.
Användare kan också skapa en ny Sponsornivå genom att skriva in namnet på den nya nivån och klicka på Create and edit… i den rullgardinsmeny som visas.
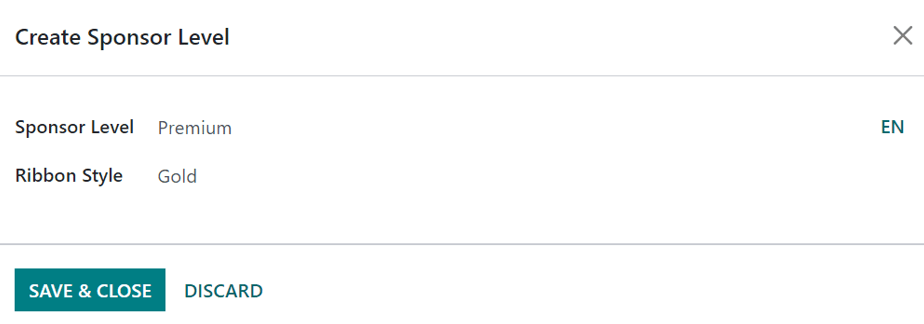
När du gör det visas ett popup-fönster med Create Sponsor Level.
Observera
Clicking Create from the resulting drop-down menu in this instance, creates the sponsor level, but does not immediately prompt the user to further configure it, via a Create Sponsor Level pop-up window.
From the Create Sponsor Level pop-up window, confirm the newly-created Sponsor Level, and decide what kind of Ribbon Style should be applied, if any.
The Ribbon Style options available in that drop-down field are: No Ribbon, Gold, Silver, and Bronze.
Om en sådan väljs ut visas den Ribbon Style med sponsorns namn på evenemangets webbplats.
In the Sponsor Type field, choose one of the following options from the drop-down menu: Footer Logo Only, Exhibitor, or Online Exhibitor.
Footer Logo Only: the sponsor is only featured on the footer of the event website.
Exhibitor: the sponsor is scheduled to be an exhibitor at the event.
Online Exhibitor: the sponsor is scheduled to be an online exhibitor for a virtual event.
On the booth category form, beneath those sections (Booth Details and Sponsorship), there is the Description tab. In this tab, enter any vital information related to the booth category that would be important for any potential booth-buyer to know about (e.g., the square footage, available amenities, size of display screen, etc.).
Lägg till monter till ett evenemang
To add a booth to an event, navigate to an existing event form, via , and select the desired event from the Events dashboard. Or, click New to open a blank event form.
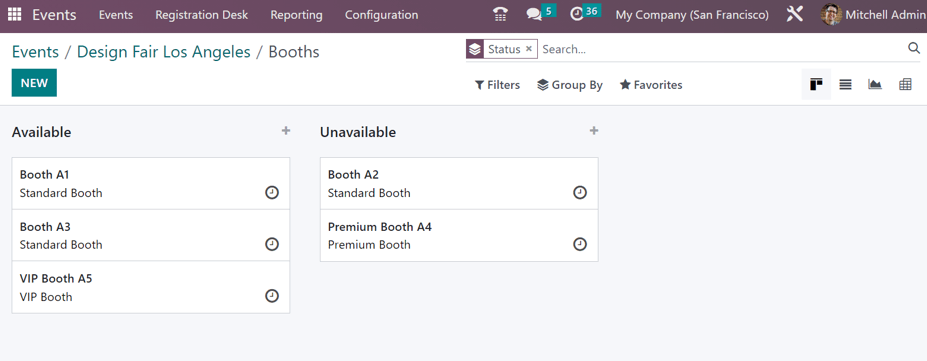
From the event form, click the Booths smart button at the top of the page to reveal the Booths page for that event.
Sidan Booths visas som standard i en Kanban-vy med två olika steg: Available och Unavailable.
Observera
Sidan Booths för ett evenemang kan också visas i en List-vy, Graph-vy och Pivot-vy. Alla dessa är tillgängliga, via sina ikoner, i det övre högra hörnet på sidan Booths.
The booths present in the Available stage are still available for purchase. The booths present in the Unavailable stage have already been purchased, and are no longer available.
To modify any existing booth, click the desired booth from the Booths page, and make any necessary changes from the booth form. Or, create a new one, by clicking the New button in the upper-left corner of the Booths page to reveal a blank booth form.
Formulär för monter
The booth form in Odoo Events lets users customize and configure event booths.
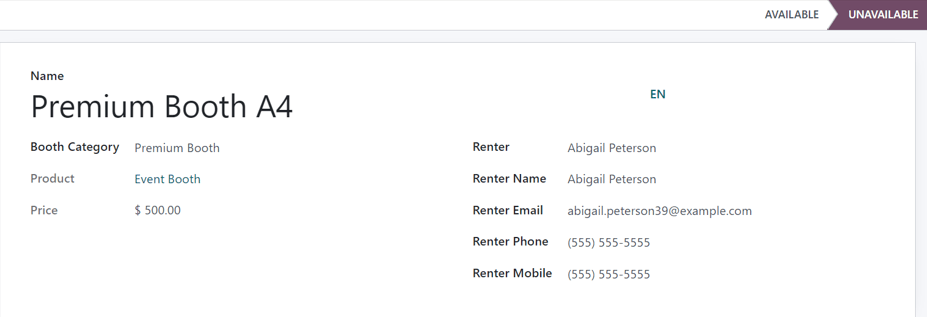
Börja med att skriva in ett Namn för montern. Detta är ett obligatoriskt fält.
Lägg sedan till en Booth Category på montern. Detta är ett obligatoriskt fält.
Tips
En ny Booth Category kan skapas från detta fält genom att skriva in namnet på den nya kategorin och klicka på Create and edit… i rullgardinsmenyn som visas. Då öppnas ett popup-fönster Create Booth Category med alla de standardfält som finns i ett vanligt formulär för monterkategorier.
Clicking Create from the resulting drop-down menu that appears after typing in a new name creates the category, but does not reveal the Create Booth Category pop-up window. The category would have to be modified later, via the Booth Categories page ().
Upon selecting a Booth Category, two additional, non-modifiable fields appear: Product and Price. Both fields represent their respective selections for that specific booth category.
When a person purchases a booth rental through the event website, the subsequent renter-related fields on the form auto-populate, based on the information provided by the purchaser during the online transaction. The booth also automatically changes its status from Available to Unavailable.
However, if the rental of a booth is conducted in any other way (e.g., in person, via sales order, etc.), the Renter, Renter Name, Renter Email, Renter Phone, and Renter Mobile fields can be entered manually.
The status of the booth (Available or Unavailable) can also be changed manually, either by clicking the appropriate status from the status bar present on the booth form, or by dragging-and-dropping the desired booth into the appropriate stage, via the Booths page, while in Kanban view.
Sälja montrar till evenemang
With event booths configured on the event form, Odoo presents them on the event website, via the Get A Booth event subheader link.
För att komma åt Get A Booth-sidan på evenemangswebbplatsen, öppna och välj önskat evenemang från Events dashboard. Från eventformuläret klickar du på den smarta knappen Go to Website för att komma till den Odoo-byggda eventwebbplatsen.
Om evenemangets underrubriksmeny (med alternativet Get A Booth) inte visas på evenemangets webbplats finns det två sätt att få den att visas.
När du är på evenemangets webbplats går du till redigeringsläget genom att klicka på knappen Edit i det övre högra hörnet. Klicka sedan på fliken Customize i det sidofält med webbdesignverktyg som visas.
På fliken Customize klickar du på vippknappen för Sub-Menu (Specific) och sedan på Save. Då visas undermenyn för händelsen med olika alternativ.
Alternatively, enter Debug mode, and open the specific event form in the Events application.
På evenemangsformuläret, med Debug-läge på, visas en rad menyalternativ för underrubriker. Markera kryssrutan för Website Submenu, för att undermenyn ska visas på evenemangets webbplats. Om du gör detta kryssas även alla andra undermeny-relaterade kryssrutor i automatiskt.
At this point, choose which options to keep on the event subheader menu. In this case, make sure the Booth Register checkbox is ticked.
On the event website, click the Get A Booth event subheader menu option. Doing so reveals the Get A Booth page, showcasing all the configured event booths that were created.
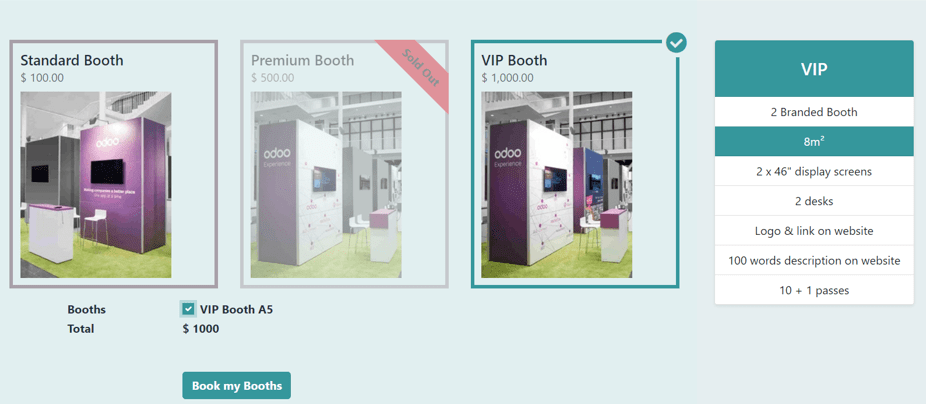
From here, the visitor can select their desired booth option. Next, they would click the Book my Booths button, located at the bottom of the Get A Booth page.
Doing so reveals a Sponsor Details page, wherein they fill out either Sponsor Details or Contact Details, depending on how the booth was configured on the event form. The fields present on this form vary, depending on whether it is meant for a basic contact or an event sponsor.
Observera
Om kryssrutan Create Sponsor är markerad i den valda montern visas den här sidan som Sponsor Details.
The information provided on this page is used to auto-populate the renter-related information on the booth form.
Once the necessary information has been entered, the booth purchaser then clicks the Book my Booths button at the bottom of the page, and completes the typical checkout process.
Upon successful payment confirmation, that selected booth automatically moves to the Unavailable stage on the event-specific Booths page in the Events application (accessible via the Booths smart button on the event form).
Also, the provided Sponsor information (if applicable), and Sales Order information, are accessible from the specific event form, via their respective smart buttons that appear at the top of the form.
Observera
Click the Sponsors smart button on an event form to view and modify any information about the sponsor, if necessary.