Estands de eventos
Crea stands para eventos, vende su disponibilidad y gestiona las reservas con la aplicación Eventos de Odoo.
Configuración
Para crear, vender y gestionar stands para eventos, la función Gestión de stands* **debe estar activada.
Vaya a , y en la sección Eventos, marque la casilla de verificación Gestión de stands. A continuación, haga clic en Guardar.
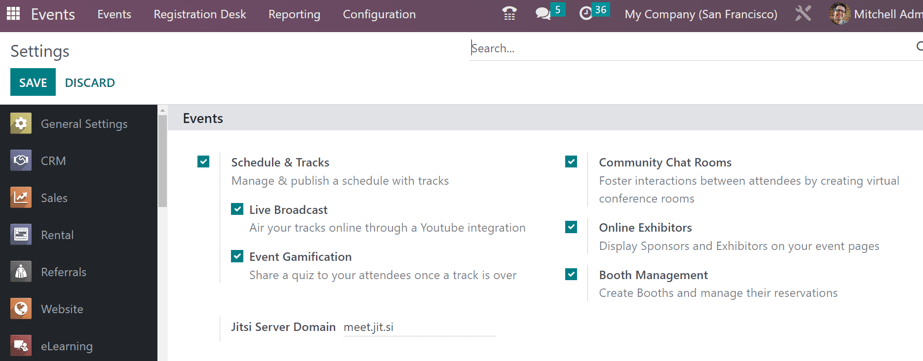
La función Gestión de estands en la aplicación Eventos de Odoo.
Importante
Cuando se activa la opción Gestión de stands, un nuevo Tipo de producto está disponible en todos los formularios de producto: Stand de eventos.
A cada stand creado debe asignarse una Categoría de stand en su respectivo formulario de stand, y cada categoría de stand debe tener un producto de Stand de Eventos asignado.
Categorías de los estands
Con la opción Gestión de stands activada en la aplicación Eventos, la opción Categorías de stands aparece en el menú Configuración.
Para acceder al tablero de categoría de estand, vaya a . Allí aparece una lista con todas las categorías de estand que ha creado.

La página Categoría de estand muestra la siguiente información de cada categoría:
Nombre: el nombre de la categoría de estand.
Crear patrocinador: Si está marcada, la reserva de esta categoría de stand crea un patrocinador para el usuario.
Producto: el producto Estand de evento asociado a esa categoría de estand en específico.
Precio: el precio de un estand de esa categoría.
Al hacer clic en el icono (ajustes), que se encuentra en el extremo derecho de los títulos de las columnas, aparece un menú desplegable con opciones adicionales para las columnas. En este menú desplegable seleccione la casilla junto a Nivel de patrocinador o Tipo de patrocinador para que esas columnas aparezcan en la página de categoría de estand.
Para editar una categoría de stand existente, selecciónela de la lista y realice las modificaciones que desee.
Crear categorías de estand
Para crear una nueva categoría de estand desde la página Categoría de estand haga clic en el botón Nuevo ubicado en la esquina superior izquierda. Esta acción abrirá un formulario vacío.
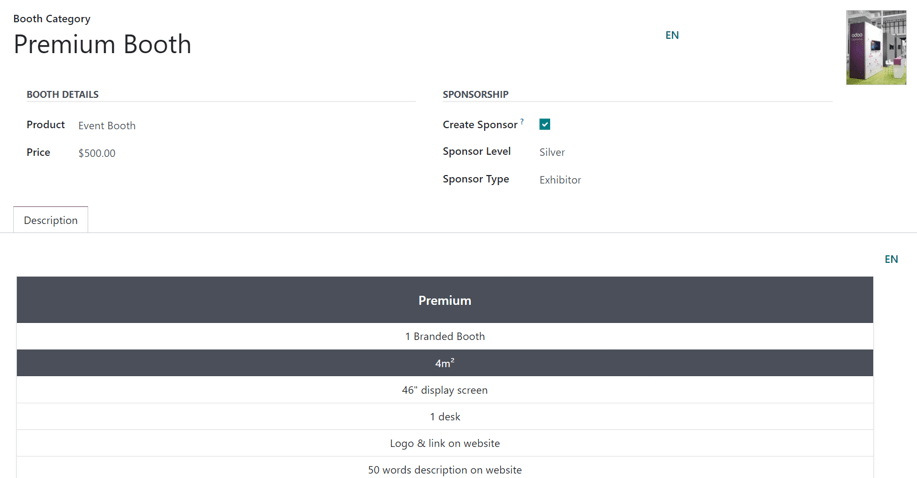
Introduzca un nombre para la categoría de stand en el campo superior Categoría de stand. Este es un campo obligatorio.
Para agregar una imagen correspondiente a la categoría del stand (por ejemplo, una foto de muestra del stand), haga clic en el icono (pencil) que aparece cuando el cursor se desplaza sobre el marcador de posición de la cámara en la esquina superior derecha del formulario de categoría de stand. Luego, cargue la imagen deseada en el formulario de categoría de stand, si es necesario.
En la sección Detalles del estand los usuarios deben asignarle un producto a la categoría y el tipo de producto configurado en su formulario debe ser estand de evento.
Independientemente del precio de lista en el producto Stand del evento elegido, se puede aplicar un Precio personalizado para esta categoría de stand en ese campo.
En el apartado Patrocinio, marque la casilla Crear patrocinador, si el usuario debe ser creado como Patrocinador oficial del evento, siempre que se reserve un stand perteneciente a esta categoría.
Al seleccionar la casilla Crear patrocinador aparecen otros dos campos abajo: Nivel de patrocinador y Tipo de patrocinador.
Nota
Nivel de Patrocinador y Tipo de Patrocinador establecen diferentes distinciones de patrocinadores.
Por ejemplo, si un patrocinador ha estado vinculado a una empresa durante varios años, se le otorgaría un nivel más alto (por ejemplo, nivel Oro), lo que le proporciona credibilidad y estatus inmediatos. Mientras que, por el contrario, a un patrocinador relativamente nuevo se le concedería un nivel más bajo (por ejemplo, nivel Bronce), que coincide con su propia credibilidad y estatus.
Seleccione el nivel de patrocinio correspondiente con el campo desplegable Nivel de patrocinador.
Truco
Para modificar los niveles de patrocinador existentes, seleccione el correspondiente en el campo desplegable y luego haga clic en la (flecha a la derecha) que aparece al final de la línea. Esta acción abrirá otra página donde podrá cambiar el nombre del nivel de patrocinador y el estilo de la cinta en caso de que sea necesario.
Los usuarios también pueden crear un nuevo nivel de patrocinador al escribir el nombre del nuevo nivel y hacer clic en Crear y editar… en el menú desplegable.
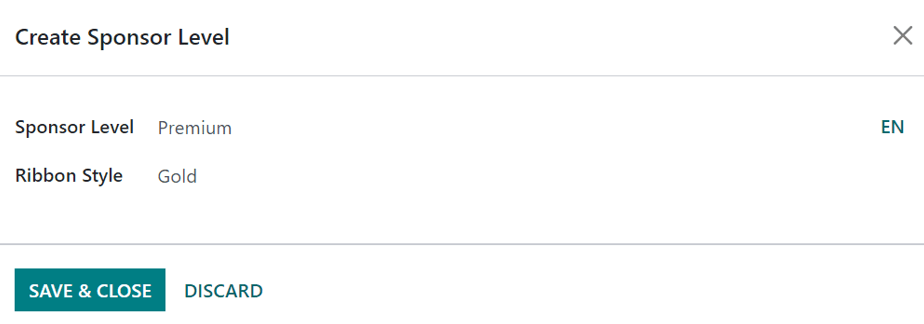
Esta acción abre la ventana emergente Crear nivel de patrocinador.
Nota
Al hacer clic en Crear en el menú desplegable resultante en este caso, se crea el nivel de patrocinador, pero no solicita inmediatamente al usuario que lo configure más, a través de una ventana emergente Crear nivel de patrocinador.
Desde la ventana emergente Crear Nivel de Patrocinador, confirme el Nivel de Patrocinador recién creado, y decida qué tipo de Estilo de Cinta debe aplicarse, si corresponde.
Las opciones de Estilo de cinta disponibles en ese campo desplegable son: Sin cinta, Oro, Plata y Bronce.
Si selecciona uno, el estilo de la cinta aparecerá con el nombre del patrocinador en el sitio web del evento.
En el campo Tipo de patrocinador, elija una de las siguientes opciones en el menú desplegable: Solo logotipo de pie de página, Expositor o Expositor en línea.
Footer Logo Only: el patrocinador solo aparece en el pie de página del sitio web del evento.
Expositor: el patrocinador está programado para ser un expositor en el evento.
Expositor en línea: el patrocinador está programado para ser un expositor en línea para un evento virtual.
En el formulario de categoría de stand, debajo de esas secciones (Detalles del stand y Patrocinio), está la pestaña Descripción. En esta pestaña, ingrese cualquier información vital relacionada con la categoría del stand que sería importante que cualquier comprador potencial del stand conociera (por ejemplo, los pies cuadrados, las comodidades disponibles, el tamaño de la pantalla de visualización, etc.).
Agregar un estand a un evento
Para agregar un stand a un evento, navegue a un formulario de evento existente, a través de , y seleccione el evento deseado en el panel Events. O bien, haga clic en Nuevo para abrir un formulario de evento en blanco.
Desde el formulario del evento, haga clic en el botón inteligente Stands en la parte superior de la página para revelar la página Booths para ese evento.
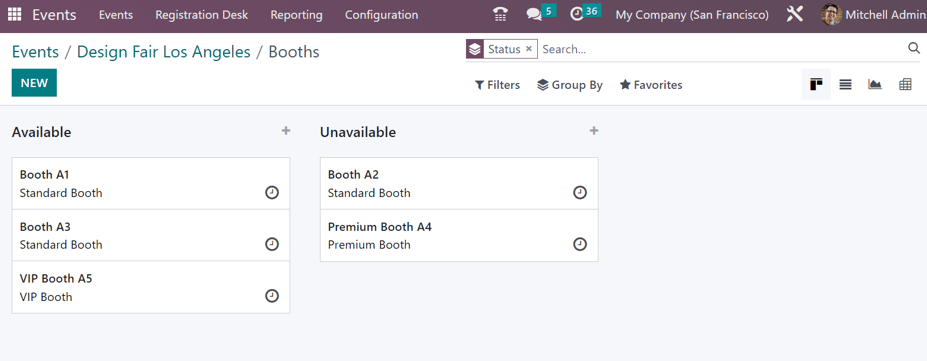
La página Estands aparece en la vista de Kanban de manera predeterminada con dos etapas distintas: Disponible y No disponible.
Nota
También puede ver la página de estands de un evento también en vista de lista, vista de gráfico y vista de tabla dinámica. Todas estas vistas cuentan con iconos que están ubicados en la esquina superior derecha de la página de estands.
Los stands presentes en la etapa Available todavía están disponibles para su compra. Los stands presentes en la etapa No disponible ya han sido comprados, y ya no están disponibles.
Para modificar cualquier stand existente, haga clic en el stand deseado en la página Booths y realice los cambios necesarios desde el formulario del stand. O bien, cree uno nuevo, haciendo clic en el botón Nuevo en la esquina superior izquierda de la página Stands para revelar un formulario de stand en blanco.
Formulario de estand
El formulario de stand en Odoo Eventos permite a los usuarios personalizar y configurar stands de eventos.
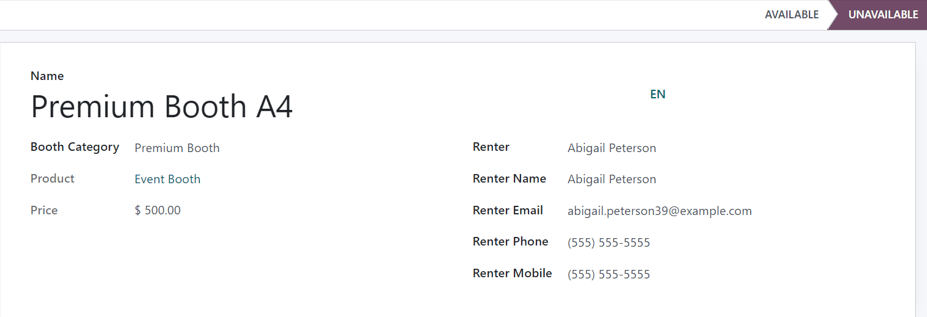
Escriba un nombre para el estand. Este campo es obligatorio.
Después seleccione una categoría de estand. Este campo es obligatorio.
Truco
Puede crear una nueva categoría de estand desde este campo. Escriba el nombre de la categoría y haga clic en Crear y editar… en el menú desplegable, esta acción abre la ventana emergente Crear categoría de estand con todos los campos estándar que están presentes en uno de estos formularios.
Al hacer clic en Crear en el menú desplegable resultante que aparece después de escribir un nuevo nombre, se crea la categoría, pero no revela la ventana emergente Crear categoría de stand. La categoría tendría que ser modificada más tarde, a través de la página Categorías de stands ().
Al seleccionar una Categoría de stand, aparecen dos campos adicionales no modificables: Producto y Precio. Ambos campos representan sus respectivas selecciones para esa categoría específica de stand.
Cuando una persona compra el alquiler de un stand a través del sitio web del evento, los siguientes campos relacionados con el inquilino en el formulario se completan automáticamente, en función de la información proporcionada por el comprador durante la transacción en línea. El stand también cambia automáticamente su estado de Available a Unavailable.
Sin embargo, si el alquiler de un stand se realiza de cualquier otra forma (por ejemplo, en persona, a través de un pedido de venta, etc.), los campos Alquiler, Nombre del arrendatario, Correo electrónico del arrendatario, Teléfono del arrendatario y Móvil del arrendatario se pueden introducir manualmente.
El estado del stand (Available o Unavailable) también se puede cambiar manualmente, ya sea haciendo clic en el estado apropiado de la barra de estado presente en el formulario del stand, o arrastrando y soltando el stand deseado en el escenario apropiado, a través de la página Booths, mientras está en la vista Kanban.
Vender un estand de evento
Con los stands de eventos configurados en el formulario del evento, Odoo los presenta en el sitio web del evento, a través del enlace del subtítulo del evento Obtener un stand.
Para entrar a la página Adquiera un estand en el sitio web del evento, abra y seleccione uno en el tablero Eventos. Desde el formulario correspondiente, haga clic en el botón inteligente Ir al sitio web para abrir el sitio web del evento creado con Odoo.
Si este menú (con la opción Adquiera un estand) no aparece en el sitio web del evento hay dos maneras en que puede insertarlo.
Ingrese al modo de edición del sitio web del evento. Haga clic en el botón Editar ubicado en la esquina superior derecha y después haga clic en la pestaña Personalizar en la barra lateral de herramientas de diseño web.
En la pestaña Personalizar, haga clic en el botón Submenú (Específico) y luego en Guardar. Esta acción abrirá el submenú del encabezado del evento con varias opciones.
Alternativamente, ingrese Modo de depuración, y abra el formulario de evento específico en la aplicación Eventos.
En el formulario del evento, con el modo de solución de errores activado, aparecen varias opciones del submenú del encabezado. Seleccione la casilla Submenú del sitio web para que aparezca en el sitio web del evento. Esta acción también selecciona el resto de las casillas relacionadas con el submenú.
En este punto, elija las opciones que desea mantener en el menú de subencabezado del evento. En este caso, asegúrese de que la casilla de verificación Booth Register esté marcada.
En el sitio web del evento, haga clic en la opción del menú del subencabezado del evento Get A Booth. Al hacerlo, se muestra la página Get A Booth, que muestra todos los stands de eventos configurados que se crearon.
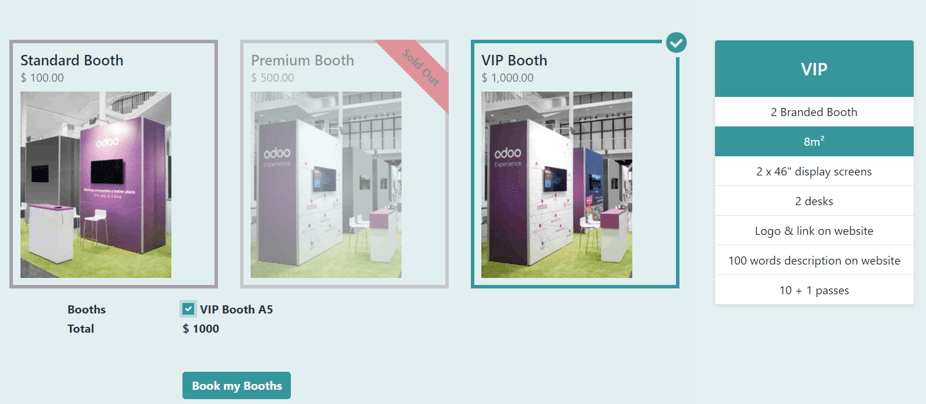
Desde aquí, el visitante puede seleccionar la opción de stand que desee. A continuación, harían clic en el botón Reservar mis stands, ubicado en la parte inferior de la página Obtener un stand.
Al hacerlo, se revela una página Detalles del patrocinador, en la que completan Detalles del patrocinador o Datos de contacto, dependiendo de cómo se configuró el stand en el formulario del evento. Los campos presentes en este formulario varían, dependiendo de si está destinado a un contacto básico o a un patrocinador del evento.
Nota
Si la casilla Crear patrocinador del estand está seleccionada esta página dirá Detalles del patrocinador.
La información proporcionada en esta página se utiliza para completar automáticamente la información relacionada con el arrendatario en el formulario de la cabina.
Una vez que se ha ingresado la información necesaria, el comprador del stand hace clic en el botón Reservar mis stands en la parte inferior de la página y completa el proceso de pago típico.
Una vez confirmado el pago con éxito, el stand seleccionado pasa automáticamente a la etapa No disponible en la página Stands específica del evento en la aplicación Eventos (accesible a través del botón inteligente Stands en el formulario del evento).
Además, se puede acceder a la información sobre los Patrocinadores (si procede) y los Pedidos de venta desde el formulario específico del evento, a través de sus respectivos botones inteligentes que aparecen en la parte superior del formulario.
Nota
Haga clic en el botón inteligente Patrocinadores en un formulario de evento para ver y modificar cualquier información sobre el patrocinador, si es necesario.