Chapter 3 - Customisation, Part I
Add custom SCSS
You’ve adjusted Odoo and Bootstrap variables and set presets, yet you still notice disparities between your website and the client’s design. The only solution is to incorporate custom SCSS.
In theme.scss, reproduce the following design elements:
Add a green underline on active nav items.
Modify the arrow for collapsible nav items.
Modify the slider’s arrows by adding a green background and changing their design.
You will find the various media here.
Se även
See reference documentation on how to add your SCSS rules.


Observera
#wrapwrap. This ID is applied to the
div that groups the header, footer, and main content of all
your pages.Find the solution in our Airproof example on header.scss and caroussel.scss.
Add custom JS
Now, let’s add a mouse follower to the website. This interactive element will enhance the browsing experience, making it more engaging and visually appealing.
Use your JavaScript skills to implement this.
Se även
See reference documentation on how to add Javascript code.
Find the solution in our Airproof example on mouse_follower.js and mouse_follower.scss.
Create a custom header
With variables, presets, and custom SCSS in place, it’s time to refine the layout and add key cross-page elements, starting with the header.
Based on the Airproof design, create a custom header with the following elements:
A centered logo. Ensure to declare the logo so that it appears automatically in the header.
A custom shopping cart icon.
A login/user as a button.
Navigation text to 14px.
You can find the logo, cart icon and template illustration.
Se även
See reference documentation on how to:
create custom headers,
do a XPath,
declare a Company logo.

Tips
Base yourself on the code of existing header templates that you can find in odoo/addons/website/views/website_templates.xml.
A good practise should be to create different files to manage your custom views and templates. For example, everything concerning the general layout (header, footer…) in
website_templates.xml, everything related to blog inwebsite_blog_templates.xml, to event inwebsite_event_templates.xml, etc.- To modify the cart icon, you can use an
XPath.Since this is linked to eCommerce, place it in a new file calledwebsite_sale_templates.xml. Don’t forget to continue making as many modifications as you can through the
Bootstrap variablesandprimary variables(font, colors, size…). You can use them to help you with this exercise.
Find the solution in our Airproof example for:
the xml structure and to add the template to the options list on website_template.xml.
disable the default header:
/website_airproof/data/presets.xml¶<!-- Disable default header --> <record id="website.template_header_default" model="ir.ui.view"> <field name="active" eval="False"/> </record>
record the logo:
/website_airproof/data/images.xml¶<!-- Set as the logo of the website --> <record id="website.default_website" model="website"> <field name="logo" type="base64" file="website_airproof/static/src/img/content/branding/airproof-logo.svg"/> </record>
declare your
website_templates.xmlfile along with all the new ones in yourmanifest.make the use of primaries like
header-template,navbar-font,header-font-size…use bootstrap_overridden like
$navbar-light-color,$navbar-light-hover-color,$navbar-padding-y…add some scss rules.
Create a custom footer
The client is delighted with the new header, as it aligns perfectly with the provided design. Now, he wants a matching custom footer.
Based on the Airproof design, create a custom footer with the following elements:
A section for newsletter subscription.
A section for the copyright and social media.
You will find the icons here.
Se även
See reference documentation on how to create a custom footer and adapt the Copyright.

Tips
You can enable or disable the copyright section via the presets.
For the newsletter section to work, you need to install the
website_mass_mailingapplication.
To complete this exercise, you need to:
add
mass mailingto your depends:/website_airproof/__manifest__.py¶'depends': ['website_sale', 'website_sale_wishlist', 'website_blog', 'website_mass_mailing'],
find the xml structure and add the template to the options list on website_template.xml.
disable the default footer and enable the copyright:
/website_airproof/data/presets.xml¶<!-- Disable Default Footer --> <record id="website.footer_custom" model="ir.ui.view"> <field name="active" eval="False"/> </record> <!-- Enable Copyright --> <record id="website.footer_no_copyright" model="ir.ui.view"> <field name="active" eval="False"/> </record>
make the use of primaries like
footer-template,footer,o-cc4-link…add a little scss rule for the newsletter section.
Create your custom building blocks
To allow your client to further customize his website, create tailor-made building blocks that he can freely drag & drop onto different pages.
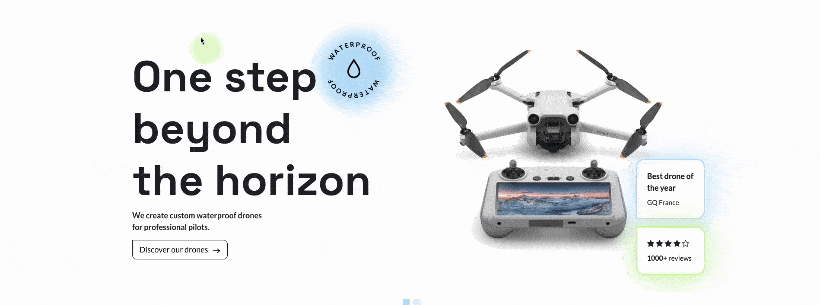
Based on the Airproof design, create a custom carousel snippet to showcase drones. Then, add it as cover section on your homepage.
Create the snippet template and add it to the list of building blocks available in the website builder. Here you will find the images and snippet illustration.
Se även
See reference documentation on how to create a custom building blocks.

Add an option in the Website Builder to allow users to choose between a blue or green bubble shadow.
Se även
See reference documentation on how to add snippet options.

Add the snippet on your homepage.
Tips
Don’t forget to always properly declare your new files in your __manifest__.py and follow
the good folder structure seen previously.
To complete this exercise, you need to:
Create your template.
You can find all the necessary information in s_airproof_carousel.xml file and s_airproof_carousel/000.scss file from our example module.
Record your images in images.xml.
Declare your files in the __manifest__.py.
Add it to the list of building blocks. In our example, it looks like this:
/website_airproof/views/snippets/options.xml¶<!-- Add custom snippets to the builder --> <template id="snippets" inherit_id="website.snippets" name="Airproof - Custom Snippets"> <xpath expr="//*[@id='default_snippets']" position="before"> <t id="x_theme_snippets"> <div id="x_airproof_snippets" class="o_panel"> <div class="o_panel_header">Airproof</div> <div class="o_panel_body"> <!-- Carousel snippet --> <t t-snippet="website_airproof.s_airproof_carousel" t-thumbnail="/website_airproof/static/src/img/wbuilder/s-airproof-snippet.svg"> <keywords>Carousel block</keywords> </t> </div> </div> </t> </xpath> </template>
Add the option to the Website Builder. In our example, it looks like this:
/website_airproof/views/snippets/s_airproof_carousel.xml¶<!-- Add options to snippets --> <template id="snippet_options" inherit_id="website.snippet_options" name="Airproof - Snippets Options"> <xpath expr="." position="inside"> <!-- *** Carousel snippet : blue or green bubble *** --> <div data-selector=".x_bubble_item"> <we-button-group string="Bubble shadow"> <we-button data-select-class="x_bubble1">Blue</we-button> <we-button data-select-class="x_bubble2">Green</we-button> </we-button-group> </div> </xpath> </template>
Additionally, the SCSS related to the bubbles in the s_airproof_carousel/000.scss file.
Add your snippet to the homepage. You can find all the necessary information in the home.xml file from our example module.
Create a new dynamic snippets template
Based on the Airproof design, create a custom template that you will apply to a product dynamic snippet on the homepage.
First, create a custom template that will be added to the list of dynamic products templates. It has to include the following elements:
Add a Discover more link.
Add a hover effect on cards.
Move the navigation arrows.
You will find the icons here.
Se även
See reference documentation on how to create a template for dynamic snippets.

Tips
You can verify in the Website Builder that your template appears in the list of available templates for the product dynamic snippet.
Then, add a product dynamic snippet with the template you just created to the homepage.
Se även
See reference documentation on how to call a template.
To complete this exercise, you need to:
Create your snippet template. You can find all the necessary information in the options.xml file and caroussel.scss file from our example module.
Apply the template to a product dynamic snippet on the homepage. You can find all the necessary information in the home.xml file from our example module.