バーコードによる在庫調整
在庫調整、または在庫監査とは、データベースに記録されている数量と、実際のプロダクトの在庫数量を照合するプロセスです。定期的な監査により、正確な在庫記録を確保し、在庫の不一致を防ぎ、効率的なオペレーションを維持することができます。倉庫では、通常、マネジャーが従業員に在庫カウントを割り当て、従業員は指定のロケーションに移動し、プロダクトのバーコードをスキャンして、必要に応じて数量を調整します。
在庫調整は、互換性のあるスキャナーまたはOdooモバイルアプリを使用して、バーコードアプリケーション で実行できます。
注釈
Odoo互換のバーコードモバイルスキャナー、および 在庫 および バーコード アプリ用のその他のハードウェアの一覧については、`Odoo 在庫 • ハードウェアページ<https://www.odoo.com/app/inventory-hardware>`_ をご覧ください。
参照
ちなみに
Odoo の バーコード アプリケーションには、アプリの機能を試すためのバーコード付きデモデータが用意されています。これらはテスト目的で使用でき、アプリのホーム画面から印刷することができます。
このデモデータにアクセスするには、 に移動し、スキャナーの上のバナーにある デモデータシート または バーコード をクリックします。

在庫カウントの割り当て
在庫カウントを実行する前に、マネジャーはカウントタスクを従業員に 割り当て ることができます。これは、 から、カウントする特定のロケーションとプロダクトを選択し、それらに ユーザ を割り当てることで実行できます。割り当てが完了すると、ユーザは バーコード アプリを開くと、保留中のカウントを確認できます。
To view a requested inventory count, navigate to the dashboard. If a count has been requested, the number of products to be counted is listed on the Count Inventory button.

設定
Before an inventory adjustment can be performed with the Barcode app, the app has to be installed and configured. Navigate to , and scroll to the Barcode section. Select the checkbox next to Barcode Scanner, and click Save to save any changes. If necessary, click Confirm on the pop-up.
危険
バーコード 機能を有効にするには、バーコード アプリケーションをインストールする必要があります。シングルアプリ無料データベースに新しいアプリケーションをインストールすると、15 日間の試用期間がトリガされます。試用期間が終了しても、データベースに有料サブスクリプションが追加されていない場合、そのアプリケーションにはアクセスできなくなります。
保存後、バーコードスキャナ オプションの下に新しいドロップダウンメニューが表示され、バーコード表現規則 と表示され、デフォルト表現規則 または デフォルトGS1表現規則 を選択できます。それぞれの表現規則オプションは、スキャナがOdooでバーコードをどのように解釈するかを決定します。
バーコードを使用してプロダクトをカウントするには、まず Odoo 内でプロダクトと保管場所のバーコードが設定されていることを確認してください。詳細な手順については、次のセクションを参照してください プロダクトバーコードを設定する Barcodes

在庫カウントを実施する
To perform an inventory adjustment, first navigate to the . If assigned counts exist, tap Count Inventory to view pending tasks.

指定の保管場所まで歩いて行き、ロケーションバーコードをスキャンしてください。
ちなみに
データベースで倉庫の 複数ロケーション 機能が有効になっていない場合、ソースのロケーションをスキャンする必要はありません。プロダクトのバーコードをスキャンして在庫調整を開始してください。
そうすることで、そのロケーションがハイライト表示され、そこに保管されている全てのプロダクトが表示されます。各プロダクトのバーコードをスキャンして、その数量を調整します。
注釈
ユーザにカウントが割当てられておらず、全ロケーションをカウント 機能が有効になっていない場合、ロケーションバーコードをスキャンしても、プロダクトは表示されません。
必要に応じて (編集) アイコンをタップして、手動で数量を調整してください。そうすると、キーパッド付きの別のウィンドウが開きます。数量 明細で数量を変更してください。+1 や -1 ボタンをクリックしてプロダクトの数量を増減したり、数字キーを使用して数量を追加したりすることもできます。
Example
以下の在庫調整では、ソースロケーション WH/Stock/Shelf/1 がスキャンされ、ロケーションが割り当てられました。次に、プロダクト [FURN_7888] スクリーン付きデスクスタンド のバーコードが 3 回スキャンされ、調整の単位が増加しました。追加のプロダクトは、それらの特定のプロダクトのバーコードをスキャンすることで、この調整に追加することができます。

全ロケーションをカウントする
全ロケーションをカウント 機能は、ユーザがそのロケーションのバーコードをスキャンした時点で、ロケーション内のすべてのプロダクトのカウントを割り当てます。この機能により、1つのプロダクトのカウントを割り当てるだけでロケーション全体をユーザーに割り当てることができ、サイクルカウントをより簡単に行うことができます。サイクルカウント中、ユーザは在庫数が正確であるか確認したり、特定のロケーションにあるべき製品が欠けていないかを確認したり、誤って保管されているプロダクトを発見したりすることができます。
重要
You can only count entire locations if Storage Locations is enabled in the Inventory settings, found at .
To perform an inventory count of an entire location, navigate to . Tap the (actions) icon. Enter or scan a location barcode, and select the Count Entire Locations check box. Tap Apply. The app then displays all assigned products in that location. Proceed with the count as normal.
カウント対象数量を表示する
When conducting an inventory count, the expected quantity of products is not displayed by default, as displaying expected quantities can result in users relying on this count instead of performing a new count.
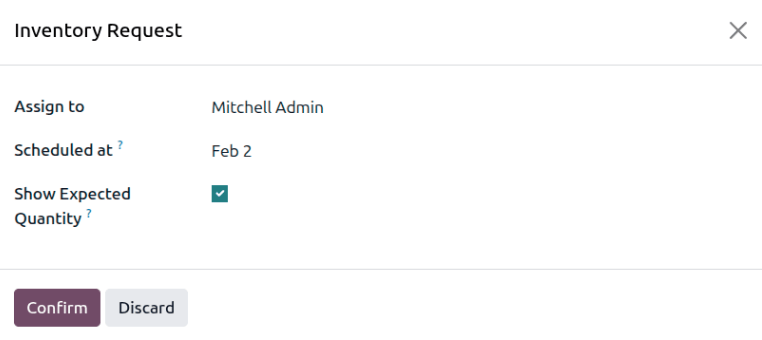
To show the expected quantity, navigate to . Request a count by selecting the check boxes to the left of the products to count, then clicking the Request a Count button. The Inventory Request window opens.
Specify a user to assign the count to in the Assign to field. Specify the date to perform the count in the Scheduled at field. Select the Show Expected Quantity check box to show the expected quantity on the Barcode Count Inventory page.
Example
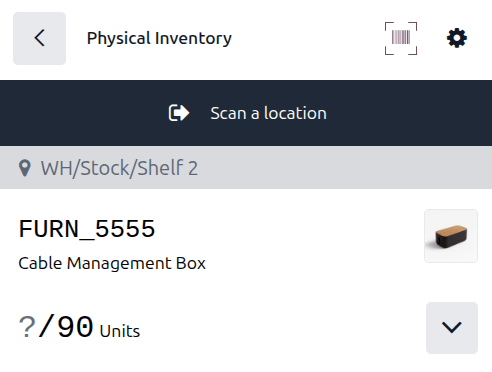
Warehouse managers have requested a count of all Cable Management Box products in inventory.
When the assigned user opens the Count Inventory page in the Barcode app, the
expected quantity of 90 units of the Cable Management Box product is displayed.
プロダクトを手動で在庫カウントに追加する
ロケーションやプロダクトのバーコードがない場合でも、Odoo バーコード を使用して在庫カウントを行うことができます。
To do this, navigate to .
在庫調整にプロダクトを手動で追加するには、画面下部の白い プロダクトを追加 ボタンをクリックしてください。
新しい空白のページが表示され、希望のプロダクト、数量、ソースロケーションを選択する必要があります。
まず、 プロダクト 行をクリックし、在庫数を調整するプロダクトを選択します。次に、そのプロダクトの数量を手動で入力します。 数量 行の 1 を変更するか、 +1 と -1 ボタンをクリックして、プロダクトの数量を追加または減算します。数字のパッドも同様に数量を追加するために使用することができます。
Below the number pad is the Location line, which should read WH/Stock by default.
Click this line to reveal a list of locations to choose from, and choose the location for this
inventory adjustment.
確定 をクリックして、変更を確定します。

在庫カウントを確定する
After counting all of the products, review the entries to ensure all the counted quantities are accurately entered. To complete the inventory adjustment, click Confirm.
ちなみに
The Validate barcode can be scanned in place of clicking the Confirm button.
その後、Odooは自動的に バーコードスキャン 画面に戻ります。画面右上に小さな緑のバナーが表示され、在庫カウントが更新されたことが確認できます。