Paiements
In Odoo, payments can either be automatically linked to an invoice or bill or be stand-alone records for use at a later date:
If a payment is linked to an invoice or bill, it reduces/settles the amount due on the invoice. Multiple payments on the same invoice are possible.
If a payment is not linked to an invoice or bill, the customer has an outstanding credit with the company, or the company has an outstanding debit with a vendor. Those outstanding amounts reduce/settle unpaid invoices/bills.
Enregistrer un paiement à partir d’une facture client ou d’une facture fournisseur
Clicking Register payment in a customer invoice or vendor bill generates a new journal entry and sets the amount due according to the payment amount. The counterpart is reflected in an outstanding receipts or payments account. At this point, the customer invoice or vendor bill is marked as In payment or Partially paid. Then, when the outstanding account is reconciled with a bank transaction, the invoice or vendor bill changes to the Paid status.
To open the Journal Entry Info window and display more information about the payment, click the (information) icon in the footer of the Invoice Lines tab. To access additional information, such as the related journal entry, click View.
Note
The customer invoice or vendor bill must be in the Posted status to register the payment.
If a payment is unreconciled, it still appears in the books but is no longer linked to the invoice.
If a payment is (un)reconciled in a different currency, a journal entry is automatically created to post the currency exchange gains/losses (reversal) amount.
If a payment is (un)reconciled on an invoice with cash-basis taxes, a journal entry is automatically created to post the cash-basis tax (reversal) amount.
Astuce
If the main bank account is set as the outstanding account on the bank journal’s payment method, registering the full payment on an invoice or bill moves the invoice/bill directly to the Paid status without requiring bank reconciliation.
Enregistrer des paiements non associés à une facture client ou fournisseur
When a new payment is registered via , it is not directly linked to an invoice or bill. Instead, the account receivable or the account payable is matched with the outstanding account until it is manually matched with its related invoice or bill. Then, reconciling the payment with the bank transaction completes the payment workflow.
Lettrage des paiements
Note
During the bank reconciliation process, a remaining balance is identified if the total debits and credits do not match when records are compared with bank transactions. This balance must either be reconciled later or written off immediately.
For a single invoice or bill
A blue banner appears when validating a new invoice/bill and an outstanding payment exists for this specific customer or vendor. To match it with the invoice or bill, click Add under Outstanding Credits or Outstanding Debits.
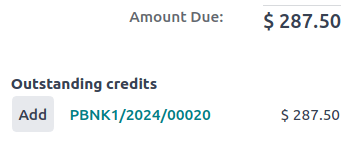
The invoice or bill is then marked as In payment until the payment is reconciled with its corresponding bank transaction(s).
Matching payments
The Payments matching or Auto-reconcile tool allows reconciling journal items with each other (i.e., payments with customer invoices or vendor bills) either individually or in batches. Access the Accounting Dashboard, click the (dropdown menu) button from the Customer Invoices or Vendor Bills journals, and select Payments Matching. Alternatively, go to .
To manually Reconcile journal items, select the individual items from the list view and click Reconcile.
Auto-Reconcile Feature
To use the Auto-Reconcile feature, follow these steps:
In the Journal Items to reconcile list view, click Auto-Reconcile next to the receivable or payable account (or a specific contact’s journal item in that account).
In the Find Entries to Reconcile Automatically window, set the Reconcile field depending on how you want to match journal items:
Opposite balances one by one: Each debit journal item will be matched with the corresponding credit journal item of the same value.
Accounts with zero balances: All reconciled journal items will have the same matching number.
Click Launch.
Invoices and bills are automatically matched to their corresponding payments and marked as In payment until they are reconciled with their corresponding bank transactions.
Registering payments on multiple invoices or bills (group payments)
To register payments on multiple invoices/bills, follow these steps:
Go to or .
In the list view, select the relevant invoices/credit notes or bills/refunds.
Click Actions and select Register Payment.
In the Register Payment window, select the Journal, the Payment Method, and the Payment Date.
To combine all payments from the same contact into a single payment, enable the Group Payments option, or leave it unchecked to create separate payments.
Click Create payment.
The invoices or bills are then marked as In payment until the bank transactions are reconciled with the payments.
Registering a single payment for multiple customers or vendors (batch payments)
Batch payments allow grouping payments from multiple customers to ease reconciliation. They are also useful when depositing checks or cash payments to the bank or for generating bank payment files such as SEPA or NACHA.
Voir aussi
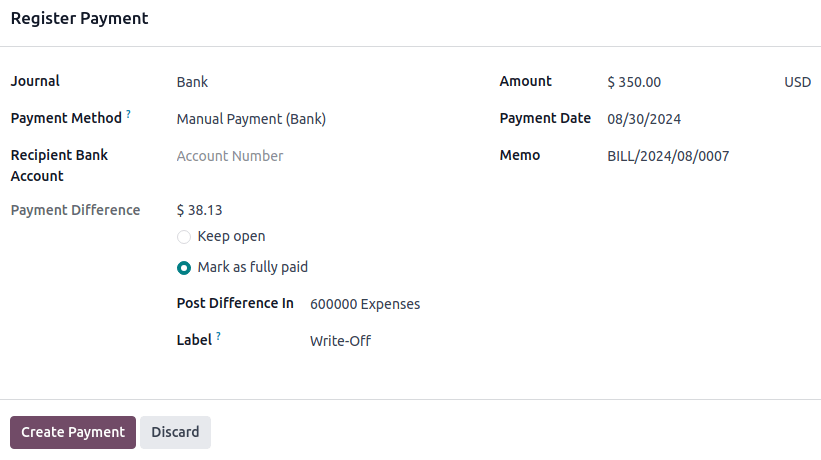
Registering a partial payment
To register a partial payment, click on Register Payment from the related invoice or bill. In the case of a partial payment (when the Amount paid is less than the total remaining amount on the invoice or the bill), the Payment Difference field displays the outstanding balance. There are two options:
Keep open: Keep the invoice or the bill open and mark it with a Partial banner;
Mark as fully paid: Select an account in the Post Difference In field and change the Label if needed. A journal entry will be created to balance the accounts payable or receivable with the selected account.
Reconciling payments with bank transactions
Once a payment has been registered, the status of the invoice or bill is In payment. The next step is reconciling the payment with the related bank transaction line to finalize the payment workflow and mark the invoice or bill as Paid.