Congés
L’application Congés d’Odoo sert de hub centralisé pour toutes les informations relatives aux congés. Cette application gère les demandes, les soldes, les allocations, les validations et les rapports.
Les utilisateurs peuvent demander des congés et voir un aperçu de leurs demandes et soldes de congés. Les responsables peuvent allouer des congés à des individus, des équipes ou à toute l’entreprise, et approuver les demandes de congés.
Detailed reports can be run to see how much time off (and what kinds of time off) are being used, accrual plans can be created, and public holidays can be set.
Note
Notez que seuls les utilisateurs disposant de droits d’accès spécifiques peuvent voir tous les aspects de l’application Congés.
Tous les utilisateurs peuvent accéder aux sections Mes congés et Aperçu de l’application Congés. Toutes les autres sections nécessitent des droits d’accès spécifiques.
To better understand how access rights affect the Time Off app, refer to the Nouveaux employés document, specifically the section about configuring the work information tab.
Configuration
Afin d’allouer des congés aux employés, et pour que les employés puissent demander et utiliser leurs congés, les différents types de congés doivent d’abord être configurés, puis alloués aux employés (si l’allocation est requise).
Types de congés
Pour consulter les types de congés actuellement configurés, aller à . Les types de congés sont présentés sous forme de liste.
The Time Off app comes with four preconfigured time off types: Paid Time Off, Sick Time Off, Unpaid, and Compensatory Days. These can be modified to suit business needs, or used as-is.
Créer un type de congé
Pour créer un nouveau type de congé, naviguez vers . À partir de là, cliquez sur le bouton Nouveau pour afficher un formulaire de type de congé vierge.
Enter the name for the particular type of time off in the blank line at the top of the form, such as
Sick Time or Vacation. Then, enter the following information on the form.
Note
Les seuls champs obligatoires sur le formulaire de type de congé sont le nom du Type de congé, Prendre un congé en et Type de congé. De plus, les sections Demandes de congés et Demandes d’allocation doivent être configurées.
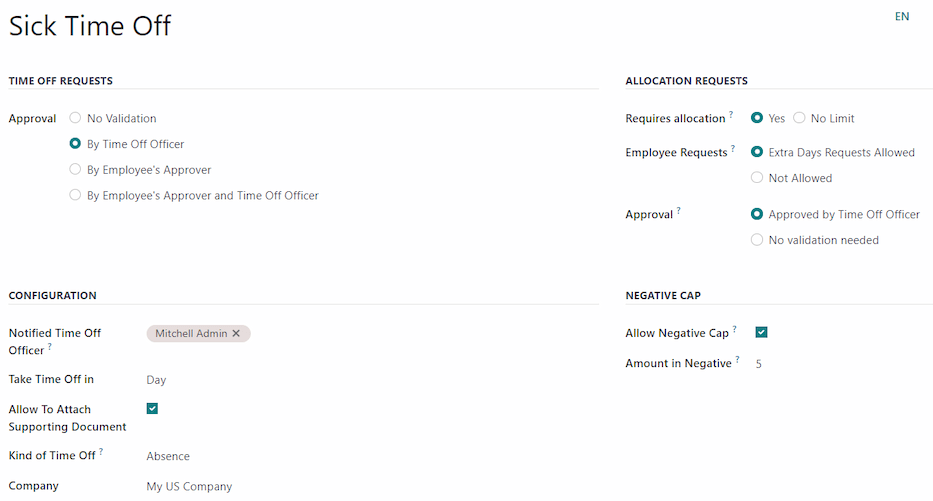
Time Off Requests section
Approbation : sélectionner le type spécifique d’approbation requis pour le type de congé. Les options sont :
Pas de validation : aucune approbation n’est requise lors de la demande de ce type de congé. La demande de congé est automatiquement approuvée.
Par responsable des congés : Seul le responsable des congés spécifié, défini sur ce formulaire dans le champ Responsable des congés notifié, est tenu d’approuver la demande de congé. Cette option est sélectionnée par défaut.
Par l’approbateur de l’employé : Seul l’approbateur de congés spécifié de l’employé, défini dans l’onglet Informations de travail sur le formulaire de l’employé, est tenu d’approuver la demande de congé.
By Employee’s Approver and Time Off Officer: Both the employee’s specified time off approver and the Time Off Officer are required to approve the time off request.
Allocation Requests section
Nécessite une allocation : Si le congé doit être alloué aux employés, sélectionner Oui. Si le congé peut être demandé sans qu’une allocation préalable ne soit nécessaire, sélectionner Aucune limite. Si Aucune limite est sélectionné, les options suivantes n’apparaissent pas sur le formulaire.
Demandes des employés : Sélectionner Demandes de jours supplémentaires autorisées si l’employé peut demander plus de congés que ce qui lui a été alloué.
Si les employés ne doivent pas être en mesure de faire des demandes de congés supérieures à ce qui a été alloué, sélectionner l’option Non autorisé.
Example
Dix jours sont alloués à l’employé pour ce type particulier de congé, et l’option Demandes de jours supplémentaires autorisées est activée. L’employé souhaite prendre des vacances de douze jours. Il peut soumettre une demande pour deux jours supplémentaires, puisque l’option Demandes de jours supplémentaires autorisées est activée.
Important
Il est important de noter que demander des congés supplémentaires ne garantit pas que ces congés soient accordés.
Validation : sélectionner le type de validations requis pour l’allocation de ce type de congé particulier.
Approved by Time Off Officer indicates the Time Off Officer set on this form must approve the allocation.
No validation needed indicates that no approvals are required.
Section de configuration
Notified Time Off Officer: Select the person who is notified and responsible for approving requests and allocations for this specific type of time off.
Take Time Off in: Select the format the time off is requested in from the drop-down menu.
Les options sont :
Jour : si le congé ne peut être demandé qu’en incréments de jours complets (8 heures).
Demi-journée : si le congé ne peut être demandé qu’en incréments de demi-journées (4 heures).
Heures : si le congé peut être pris en incréments d’heures.
Déduire les heures supplémentaires : activer cette option si la demande de congé doit prendre en compte les heures supplémentaires accumulées par l’employé.
Example
Si un employé travaille deux heures supplémentaires pour la semaine et demande cinq heures de congé, la demande porterait sur trois heures, car les deux heures supplémentaires travaillées sont utilisées en premier et déduites de la demande.
Autoriser la pièce jointe de document justificatif : Activer cette option pour permettre à l’employé de joindre des documents à la demande de congé. Ceci est utile dans les situations où une documentation est requise, comme un congé médical de longue durée.
Type de congé : Dans le menu déroulant, sélectionner le type de congé, soit Temps travaillé, soit Absence. Temps travaillé indique que le congé pris compte comme temps travaillé pour tout type d’acquisition à laquelle l’employé participe, tandis que Absence ne compte pour aucun type d’acquisition.
Société : Si plusieurs sociétés sont créées dans la base de données et que ce type de congé ne s’applique qu’à une seule société, sélectionner la société dans le menu déroulant. Si ce champ est laissé vide, le type de congé s’applique à toutes les sociétés de la base de données. Ce champ n’apparaît que dans une base de données multi-sociétés.
Negative Cap section
Enable the Allow Negative Cap option if employees are able to request more time off than they currently have, allowing a negative balance. If enabled, an Amount in Negative field appears. In this field, enter the maximum amount of negative time allowed, in days.
Example
Sara a actuellement trois jours du type de congé Vacation. Elle planifie un voyage qui nécessite cinq jours de congé.
The Vacation time off type has the Allow Negative Cap option enabled, and the
Amount in Negative is set to five.
Ces paramètres permettent à Sara de soumettre une demande de cinq jours du type de congé Vacation. Si elle est approuvée, son solde de congés Vacation sera de moins deux (-2) jours.
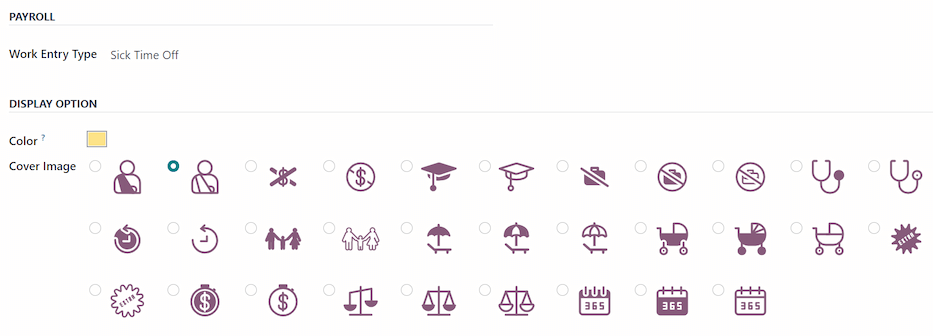
Section paie
Si le type de congé doit créer Prestations dans l’application Paie, sélectionner le Type d’entrée de travail dans la liste déroulante.
Section Feuilles de temps
Note
La section Feuilles de temps n’apparaît que si l’utilisateur est en mode développeur. Consulter le document Mode développeur (mode debug) pour plus de détails sur l’accès au mode développeur.
Lorsqu’un employé prend un congé et utilise également des feuilles de temps, Odoo crée des entrées dans l’application Feuilles de temps pour le congé. Cette section définit comment elles sont saisies.
Projet : Sélectionner le projet dans lequel les entrées de type de congé apparaissent.
Tâche : sélectionner la tâche qui apparaît dans la feuille de temps pour ce type de congé. Les options par défaut sont : Congés, Réunion, ou Formation.
Display Option section
Couleur : Sélectionner une couleur à utiliser dans le tableau de bord de l’application Congés.
Image de couverture : Sélectionner une icône à utiliser dans le tableau de bord de l’application Congés.
Plans de cumul de congés
Certains congés sont acquis par le biais d’un plan de cumul, ce qui signifie que pour chaque période de temps spécifiée pendant laquelle un employé travaille (heure, jour, semaine, etc.), il gagne ou cumule une durée de congé spécifiée.
Example
Si un employé cumule un jour de vacances pour chaque semaine travaillée, il gagne 0,2 jour de vacances pour chaque heure travaillée. À la fin d’une semaine de travail de quarante heures, il gagne un jour de vacances complet (8 heures).
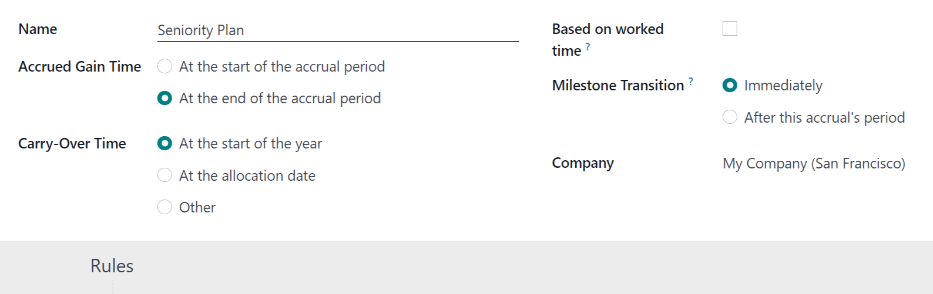
Créer un plan de cumul
Pour créer un nouveau plan de cumul, aller à . Ensuite, cliquer sur le bouton Nouveau, ce qui affiche un formulaire de plan de cumul vierge.
Saisir les informations suivantes dans le formulaire :
Nom : saisir le nom du plan de cumul.
Heure de gain cumulée : sélectionner quand l’employé commence à cumuler des congés, soit Au début de la période de cumul, soit À la fin de la période de cumul.
Report de temps : sélectionner quand l’employé reçoit le temps acquis précédemment. Les options sont :
Au début de l’année : Sélectionner cette option si l’accumulation bascule le 1er janvier de l’année suivante.
À la date d’allocation : Sélectionner cette option si l’accumulation bascule dès que le temps est alloué à l’employé.
Autre : sélectionner cette option si aucune des deux autres options n’est applicable. Lorsqu’elle est sélectionnée, un champ Date de report apparaît. Sélectionner la date à l’aide des deux menus déroulants, un pour le jour et un pour le mois.
Basé sur le temps de travail : activer cette option si le cumul de congés est déterminé par les heures de travail de l’employé. Les jours non considérés comme du temps de travail ne contribuent pas au plan de cumul dans Odoo.
Example
An employee is granted time off from an accrual plan configured to accrue one day of vacation for every five days worked. The accrual plan is based on the employee’s worked time (the Based on worked time checkbox is ticked).
L’employé travaille des semaines standard de 40 heures. Selon le plan de cumul, il devrait gagner quatre jours de vacances par mois.
The employee takes five days off. The time off type the employee has taken has the Kind of Time Off configured as an Absence.
Since the accrual plan only grants time off based on the worked time, the employee does not accrue a vacation day for the five days of time off that is considered an absence.
At the end of the month, the employee accrues only three days, instead of four.
Transition de jalon : ce champ est visible uniquement après qu’un minimum de deux règles ont été configurées sur le plan de cumul. Cette sélection détermine quand les employés passent à un nouveau jalon. S’ils sont admissibles à changer de jalon au milieu d’une période de paie, décider si l’employé change de jalon Immédiatement ou Après la période de ce cumul (après la période de paie en cours).
Company: This field only appears in a multi-company database. Using the drop-down menu, select the company the accrual plan applies to. If left blank, the accrual plan can be used for all companies.
Règles
Des règles doivent être créées pour que les employés cumulent des congés à partir du plan de cumul.
Pour créer une nouvelle règle, cliquer sur le bouton Nouveau jalon dans la section grise Règles, et un formulaire modal Créer un jalon apparaît.
Remplir les champs suivants sur le formulaire :
Les employés cumulent : sélectionner les paramètres pour les congés acquis dans cette section.
D’abord, sélectionner soit Jours, soit Heures pour l’incrément de temps cumulé à l’aide du menu déroulant.
Ensuite, saisir le montant numérique du paramètre sélectionné qui est cumulé. Le format numérique est
X.XXXX, de sorte que des jours ou des heures partiels peuvent également être configurés.Enfin, sélectionner la fréquence à laquelle le temps est cumulé à l’aide du menu déroulant. Les options par défaut sont Horaire, Quotidien, Hebdomadaire, Deux fois par mois, Mensuel, Deux fois par an, et Annuel.
Selon l’option sélectionnée, des champs supplémentaires peuvent apparaître. Par exemple, si Deux fois par mois est sélectionné, deux champs supplémentaires apparaissent, pour spécifier les deux jours de chaque mois où le jalon se produit.
Cap accrued time: If there is a maximum amount of days the employee can accrue with this plan, enable this option.
When enabled, two additional fields appear beneath it. Select the type of time period from the drop-down menu, either Days or Hours.
Then, enter a numerical value in the field to specify the maximum amount of time that can be accrued.
Milestone reached: Enter the number and value of the time period that must pass before the employee starts to accumulate time off. The first value is numerical; enter a number in the first field.
Then, select the type of time period using the drop-down menu in the second field. The options are: Days, Months, or Years.
Report : sélectionner comment les congés non utilisés sont gérés. Les options sont :
None. Accrued time reset to 0: Any unused time off is gone.
Tout le temps accumulé reporté : Tous les congés non utilisés sont reportés à l’année civile suivante.
Carry over with a maximum: Unused time off is rolled over to the next calendar year, but there is a cap. An Up to field appears if this is selected. Enter the maximum number of Days that can roll over to the following year. Any time off beyond this parameter is lost.
Important
Si le champ Report est défini sur Aucun. Temps accumulé remis à 0, cette règle remplace le Temps de report défini sur le plan d’acquisition.
Si une entreprise crée un plan d’acquisition, accordant des congés aux employés Au début de la période d’acquisition (c’est-à-dire au début de l’année), et définit le Temps de report sur le plan d’acquisition à Au début de l’année, cela permet aux congés non utilisés d’être reportés à l’année suivante.
Ensuite, l’entreprise ajoute des règles au plan d’acquisition, allouant cinq jours de congé, annuellement, le premier de l’année (une semaine de congé allouée le 1er janvier).
Si le champ Report est défini sur Aucun. Temps d’acquisition remis à 0 sur la fenêtre Créer une étape, les congés non utilisés ne sont pas reportés, même si sur le formulaire Plan d’acquisition, le Temps de report est défini sur Au début de l’année.
Le report défini sur la règle a priorité sur le report défini sur le formulaire du plan d’acquisition.
Une fois le formulaire complété, cliquer sur Enregistrer & Fermer pour enregistrer le formulaire Créer une étape et fermer la fenêtre, ou cliquer sur Enregistrer & Nouveau pour enregistrer le formulaire et créer une autre étape. Ajouter autant d’étapes que souhaité.

Jours fériés
To observe public or national holidays, and provide extra days off as holidays to employees, configure the observed public holidays in Odoo.
It is important to configure these days in Odoo, so employees are aware of the days they have off, and do not request time off on days that are already set as a public holiday (non-working days).
De plus, tous les jours fériés configurés dans l’application Congés sont également reflétés dans toute application utilisant des horaires de travail, telles que Calendrier, Planificiation, Fabrication, etc.
En raison de l’intégration d’Odoo avec d’autres applications utilisant des horaires de travail, il est considéré comme une bonne pratique de s’assurer que tous les jours fériés sont configurés.
Create public holiday
To create a public holiday, navigate to .
All currently configured public holidays appear in a list view.
Cliquer sur le bouton Nouveau et une nouvelle ligne apparaît en bas de la liste.
Saisir les informations suivantes sur cette nouvelle ligne :
Nom : Saisir le nom du jour férié.
Société : Dans une base de données multi-sociétés, la société actuelle remplit ce champ par défaut. Il n’est pas possible de modifier ce champ.
Note
The Company field is hidden, by default. To view this field, click the (additional options) icon in the top-right corner of the list, to the far-right of the column titles, and activate the Company selection from the drop-down menu that appears.
Start Date: Using the date and time picker, select the date and time the holiday starts, then click Apply. By default, this field is configured for the current date. The start time is set according to the start time for the company (according to the working schedules). If the user’s computer is set to a different time zone, the start time is adjusted according, compared to the company’s time zone.
End Date: Using the date and time picker, select the date and time the holiday ends, then click Apply. By default, this field is configured for the current date, and the time is set to the end time for the company (according to the working schedules). If the user’s computer is set to a different time zone, the start time is adjusted accordingly, compared to the company’s time zone.
Example
Une société située à San Francisco fonctionne de 9h00 à 18h00, avec une journée de travail de huit heures et une heure de pause déjeuner.
Pour un utilisateur à New York, avec un fuseau horaire d’ordinateur défini sur l’heure normale de l’Est, un jour férié créé affiche une heure de début de 12h00 à 21h00, tenant compte des trois heures de décalage horaire.
De même, un utilisateur situé à Los Angeles, avec un fuseau horaire de l’ordinateur défini sur Pacific Standard Time, voit les horaires d’un jour férié comme 9h00 - 18h00.
Horaires de travail : si le jour férié ne doit s’appliquer qu’aux employés ayant des horaires de travail spécifiques, sélectionner les horaires de travail dans le menu déroulant. Si laissé vide, le jour férié s’applique à tous les employés.
Work Entry Type: If using the Payroll app, this field defines how the work entries for the holiday appear. Select the work entry type from the drop-down menu.

Jours obligatoires
Certaines entreprises ont des jours spéciaux où des départements spécifiques, ou l’ensemble du personnel, doivent être présents, et les congés ne sont pas autorisés ces jours-là.
Ces types de jours sont appelés jours obligatoires dans Odoo. Ils peuvent être configurés au niveau de l’entreprise ou spécifiques à un département. Une fois configurés, les employés du département ou de l’entreprise spécifiés ne peuvent pas soumettre de demandes de congés pour ces jours obligatoires.
Créer des jours obligatoires
Aucun jour obligatoire n’est configuré par défaut dans Odoo. Pour créer un jour obligatoire, aller à .
Cliquer sur le bouton Nouveau en haut à gauche, et une ligne vierge apparaît dans la liste.
Saisir les informations suivantes sur cette nouvelle ligne :
Nom : saisir le nom du jour obligatoire.
Société : dans une base de données multi-sociétés, ce champ est visible et la société actuelle remplit ce champ par défaut. À l’aide du menu déroulant, sélectionner la société pour laquelle le jour obligatoire est destiné.
Départements : cette colonne est masquée par défaut. D’abord, cliquer sur l’icône (options supplémentaires) en haut à droite, à côté de Couleur, puis cocher la case à côté de Départements pour afficher cette colonne.
Ensuite, sélectionner les départements souhaités dans le menu déroulant. Plusieurs départements peuvent être sélectionnés, et il n’y a pas de limite au nombre de départements pouvant être ajoutés.
Si ce champ est laissé vide, le jour obligatoire s’applique à l’ensemble de l’entreprise.
Date de début : à l’aide du sélecteur de calendrier, sélectionner la date de début du jour obligatoire.
Date de fin : à l’aide du sélecteur de calendrier, sélectionner la date de fin du jour obligatoire. Pour créer un seul jour obligatoire, la date de fin doit être identique à la date de début.
Color: If desired, select a color from the available presented options. If no color is desired, select the
No coloroption, represented by a white box with a red line diagonally across it. The selected color appears on the main Time Off app dashboard, in both the calendar and in the legend.

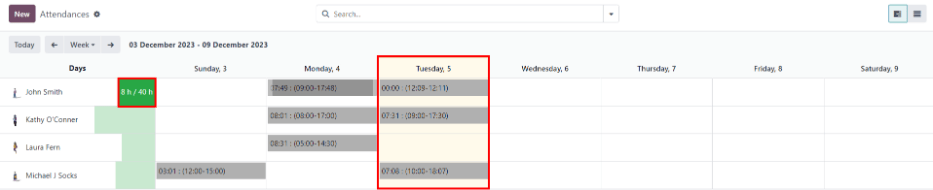
Aperçu
To view a color-coded schedule of the user’s time off, and/or of the team managed by them, navigate
to . This presents a calendar with the default filter of
My Team, in a month view.
To change the time period displayed, click on the Month button to reveal a drop-down menu. Then, select either Day, Week, or Year to present the calendar in that corresponding view.
To navigate forward or backward in time, in the selected increment (Month, Week, etc.), click the ← (left arrow) or → (right arrow) to move either forward or backward in that specified amount of time.
For example, if Month is selected, the arrows adjust the view by one month.
To return to a view containing the current day, click the Today button at any time.
Les membres de l’équipe sont listés par ordre alphabétique sur des lignes individuelles, et leurs demandes de congés, quel que soit le statut (validé ou à approuver), sont visibles sur le calendrier.
Chaque employé est identifié par une couleur. La couleur de l’employé est sélectionnée aléatoirement et ne correspond pas au type de congé demandé.
Le statut du congé est représenté par le détail de couleur de la demande, apparaissant soit plein (validé) soit hachuré (à approuver).
Le nombre de jours ou d’heures demandés est inscrit sur la demande (si l’espace le permet).
En bas du calendrier, dans la ligne Total, un graphique en barres indique combien de personnes sont prévues absentes pour chaque jour. Le chiffre sur chaque barre représente le nombre d’employés absents pour ces jours.
Cliquer sur une entrée de congé pour afficher les détails de cette demande. Le nombre total d’heures ou de jours est indiqué, ainsi que les dates et heures de début et de fin du congé. Pour afficher les détails de la demande dans une fenêtre modale, cliquer sur le bouton Voir.
Analyse
The reporting feature allows users to view time off for their team, either by employee or type of time off. This allows users to see which employees are taking time off, how much time off they are taking, and what time off types are being used.
Any report can be added to a spreadsheet, when in either the (Graph) or (Pivot) view, through the Insert in Spreadsheet button that appears in the top-left of the report.
Note
Si l’application Documents est installée, une option pour ajouter le rapport à une feuille de calcul apparaît. Sinon, le rapport peut être ajouté à un tableau de bord.
Par employé
To view a report of employee time off requests, navigate to .
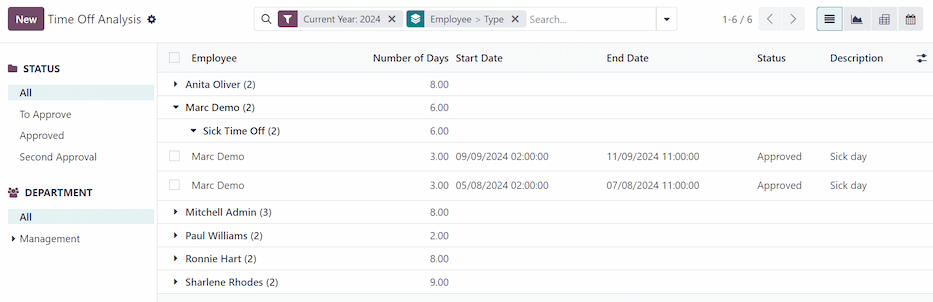
Le rapport par défaut présente les données de l’année en cours dans une vue liste, affichant tous les employés par ordre alphabétique. La ligne de chaque employé est repliée par défaut. Pour déplier une ligne, cliquer n’importe où sur celle-ci.
La vue se déplie et présente les demandes de congés organisées par type de congé. Cliquer n’importe où sur une ligne de type de congé pour la déplier et voir toutes les demandes individuelles relevant de ce type.
Les informations affichées dans la liste incluent : le nom de l”Employé, le Nombre de jours de congé demandés, la Date de début, la Date de fin, le Statut et la Description.
Le rapport peut également être affiché d’autres manières. Cliquer sur le bouton correspondant dans le coin supérieur droit de la page pour afficher les données de cette façon. Les différentes options sont une vue (Liste), ou vue par défaut, (Graphique), tableau (Tableau croisé), ou vue (Calendrier).
When a selection has been made, additional options appear for that particular selection. For more detailed information on the reports and their various options, refer to the reporting documentation.
Par type
To view a list of all time off, organized by time off type, navigate to . This shows all time off requests in a default bar chart.
Survoler une barre pour afficher la Durée (Jours) de ce type de congé spécifique.
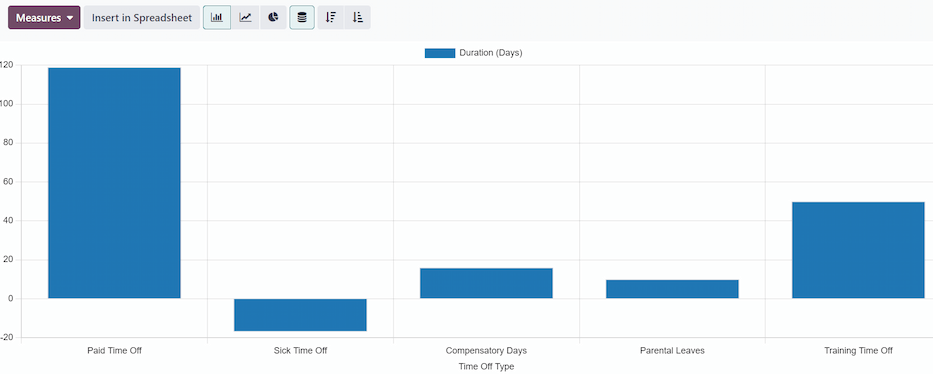
Cliquer sur une barre pour accéder à une vue en liste détaillée de toutes les demandes de congés pour ce type de congé.
Chaque demande est listée avec les informations suivantes : l”employé, le nombre de jours, le type de demande, la date de début, la date de fin, le statut et la description.
Le rapport peut également être affiché d’autres manières. Cliquer sur le bouton correspondant dans le coin supérieur droit de la page pour afficher les données de cette manière. Les différentes options sont un graphique (la vue par défaut), une liste ou un tableau croisé.
When a selection has been made, additional options appear for that particular selection. For more detailed information on the reports, and their various options, refer to the reporting documentation.
Voir également