Déjeuner
The Lunch application in Odoo allows users a convenient way to order food and pay for their meal directly from the database.
Before employees can use the Lunch application, there are a number of configurations to consider: settings, vendors, locations, products, product categories, and alerts. Once these are created, employees can view offerings and order food.
Paramètres
Only two settings are needed to configure in the Lunch app: overdraft settings and notifications. To access the settings, navigate to .
Configurer les éléments suivants :
Découvert Lunch : saisir le montant maximum du découvert pour les employés. Le format de la devise est déterminé par le paramètre de localisation de l’entreprise.
Reception notification: set the message users receive via the Discuss app when their food has been delivered. The default message
Your lunch has been delivered. Enjoy your meal!populates this field, but can be modified, if desired.
Astuce
If in a database with multiple languages installed, many forms in the Lunch application have the option of entering translations for various fields.
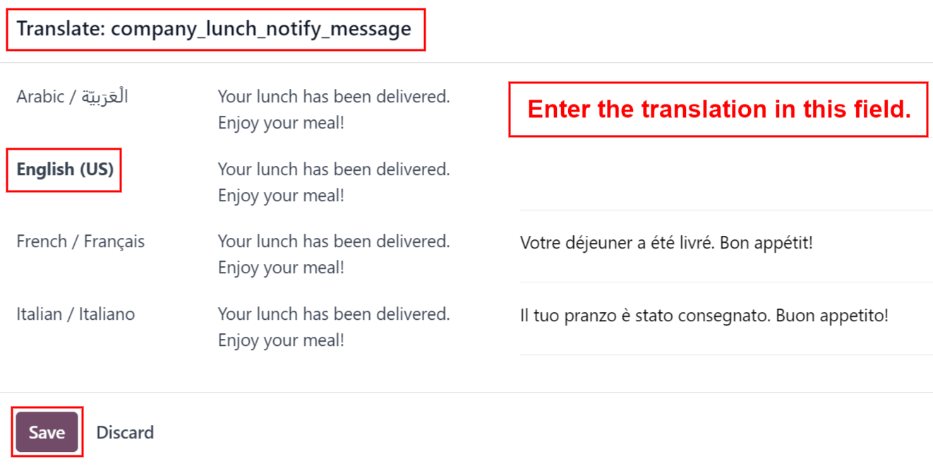
Si des traductions peuvent être configurées, un code de langue apparaît à côté d’un champ traduisible sur un formulaire. Pour ajouter des traductions pour ce champ, cliquer sur le code de langue à deux lettres (par exemple, EN pour l’anglais) et une fenêtre contextuelle de traduction apparaît.
Voici un exemple pour le champ Notification de réception dans le menu des paramètres :
Navigate to . Click the EN In the top-right of the text box beneath the Reception notification section. A Translate: company_lunch_notify_message pop-up window loads with the option to enter a translation for the other languages used by the database.
La première colonne liste les différentes langues par ordre alphabétique, avec la langue actuellement sélectionnée en gras. La deuxième colonne contient le message actuellement configuré dans chaque colonne. La dernière colonne à l’extrême droite fournit une zone de texte pour saisir une traduction pour chaque langue.
Saisir le texte qui doit apparaître pour chaque langue, puis cliquer sur Enregistrer.
Emplacements
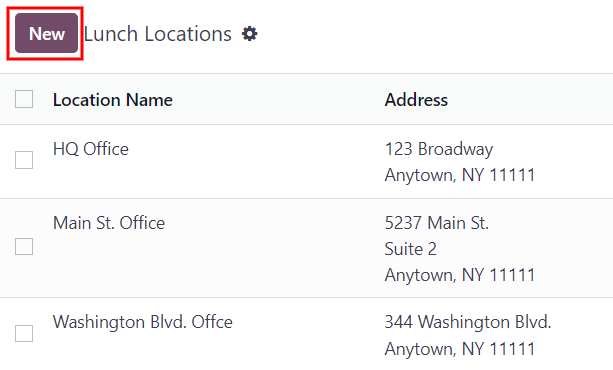
By default, Odoo creates an HQ Office location when the Lunch application is installed. If a
company has more than one location, they must be configured.
To add a location, navigate to . The currently configured locations appear in a list view. Click the New button in the top-left corner and a blank line appears beneath the last location in the list.
Saisir le nom du lieu dans le champ. Ensuite, cliquer dans le champ Adresse à droite du nom et saisir l’adresse du lieu. Il est possible de saisir plusieurs lignes dans le champ adresse.
Répéter cette opération pour tous les lieux à ajouter.
Alertes
It is possible to set up alerts that can either be displayed in the Lunch app, or be sent to specific employees via the Discuss app.
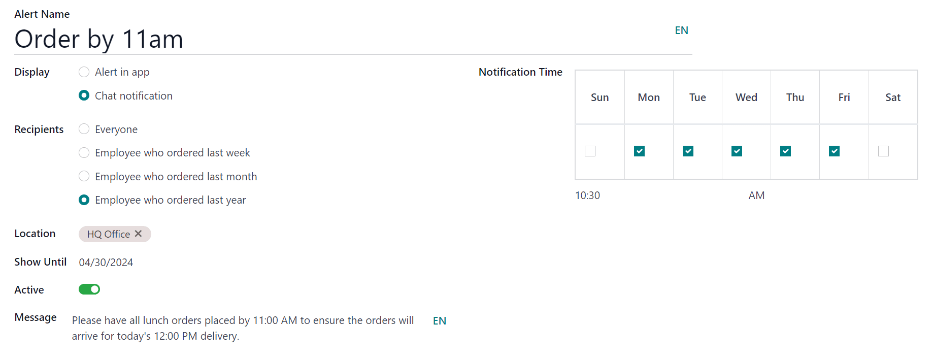
No alerts are pre-configured by default. To set up an alert, navigate to . Click the New button in the top-left corner and a blank lunch alert form loads. Enter the following information on the form:
Alert Name: enter a name for the alert. This should be short and descriptive, such as
New Lunch VendororOrder by 11. This field is required.Display: select whether the alert is visible in the Lunch app (Alert in app) or sent to employees via the Discuss app in a chat window (Chat notification).
Destinataires : ce champ n’apparaît que si Notification de chat est sélectionné pour l’option Affichage. Sélectionner qui reçoit l’alerte de chat. Les options sont : Tout le monde, Employé ayant commandé la semaine dernière, Employé ayant commandé le mois dernier ou Employé ayant commandé l’année dernière.
Lieu : sélectionner les lieux pour lesquels l’alerte doit apparaître dans le menu déroulant. Plusieurs lieux peuvent être sélectionnés. Ce champ est obligatoire, par conséquent, si l’alerte s’applique à tous les lieux, sélectionner tous les lieux dans le menu déroulant.
Afficher jusqu’au : si l’alerte doit expirer à une date spécifique, sélectionner la date dans le sélecteur de calendrier.
Actif : cette option est activée (apparaît en vert) par défaut. Pour désactiver l’alerte, cliquer sur le bouton bascule afin qu’il n’apparaisse plus en vert.
Message : saisir le message d’alerte dans ce champ. Ce champ est obligatoire.
Heure de notification : sélectionner les jours de la semaine où l’alerte doit être envoyée. Par défaut, les sept jours sont actifs. Cliquer sur une case à cocher pour modifier le paramètre d’actif à inactif.
Si Notification de chat a été sélectionné pour l’option Affichage, un champ Heure apparaît également. Saisir l’heure à laquelle le message de chat doit être envoyé. Ensuite, sélectionner si l’heure est soit AM soit PM à l’aide du menu déroulant à droite du champ Heure.
Voir également