Recommandations
Odoo’s Referrals application is a centralized place where all information regarding referrals is housed - from points earned, coworkers hired, and rewards selected. Users can recommend people they know for job positions, and then earn referral points as those people progress through the recruitment pipeline. Once enough referral points are earned, they can be exchanged for prizes. The Referrals application integrates with the Employees, Recruitment, and Website applications, all of which must be installed in order for the Referrals application to function.
The only configurations needed for the Referrals application after it has been installed, are related to the rewards; everything else is pre-configured when Odoo Referrals is installed.
Users with either Referral User, Officer, or Administrator access rights for the Recruitment application have access to the Referrals application. Only users with Administrator access rights for the Recruitment application have access to the reporting and configurations menus. For more information on users and access rights, refer to these documents: Utilisateurs and Droits d’accès.
Parcours d’intégration
When opening the Referrals application for the first time, a pre-configured onboarding script appears. This is in the form of four slides, each explaining the different parts of the Referrals application. At the top of the dashboard, the following message is displayed throughout all the onboarding slides: GATHER YOUR TEAM! Job Referral Program. Behind this main message is an image, and beneath it some more explanatory text.
Each of the onboarding slides has a corresponding image and message that is displayed. After reading each message, click the Next button to advance to the next slide.
Le texte qui apparaît sur chaque diapositive est le suivant :
Oh no! Villains are lurking the city! Help us recruit a team of superheroes to save the day!
Browse through open job positions, promote them on social media, or refer friends.
Collect points and exchange them for awesome gifts in the shop.
Compete against your colleagues to build the best justice league!
Note
The onboarding slides will appear every time the Referrals application is opened, until all the slides have been viewed and the Start Now button has been clicked. If the onboarding is exited at any point, or if the Start Now button has not been clicked, the onboarding slides will begin again when the Referrals application is opened. Once the Start Now button has been clicked, the onboarding slides will not be seen again, and the main dashboard will load when the Referrals application is opened from that point on.
At any point during onboarding, the Skip button may be clicked. This exits the onboarding, and the main Referrals dashboard loads. If Skip is clicked, onboarding slides will not load anymore when opening the Referrals application.

Note
If there are any candidates hired that the user had referred prior to opening the Referrals app (meaning the onboarding slides have not appeared before), when Start Now is clicked at the end of onboarding, instead of going to the main dashboard, a hired screen appears instead.
Modifier les diapositives d’intégration
Onboarding slides can be modified if desired. Only users with Administrator rights for the Recruitment application can modify onboarding slides. To edit a slide, navigate to Each line displays the text for the individual onboarding slide. To edit an onboarding slide, click on an individual slide line to open the slide’s onboarding form.
Apporter les modifications souhaitées au message dans le champ Texte. Une Société peut également être sélectionnée. Cependant, si ce champ est renseigné, cette diapositive est affichée uniquement pour cette société particulière.
Note
Le champ Société n’apparaît que dans une base de données multi-sociétés.
The image can be modified, as well. Hover over the image thumbnail in the top-right corner of the form. A ✏️ (pencil) icon and 🗑️ (garbage can) icon appear. Click the ✏️ (pencil) icon to change the image. A file navigator window loads. Navigate to the desired image, select it, then click Open. The new image appears in the thumbnail. To delete an image, click the 🗑️ (garbage can) icon, then select a new image using the ✏️ (pencil) icon.

The sequence in which the slides appear can be changed from the Onboarding dashboard. Click the (six small gray boxes) icon to the left of the the slide text, and drag the slide to the desired position.

Recommandations embauchées
When a candidate that has been referred by a user is hired, the user « grows their superhero team » and adds superhero avatars to their Referrals dashboard.
After a referral has been hired, when the user next opens the Referrals app, instead of the main dashboard, a hired page loads. The text (Referral Name) has been hired! Choose an avatar for your new friend! appears.
Sous ce message se trouvent cinq vignettes d’avatar parmi lesquelles choisir. Si un avatar a déjà été attribué à une recommandation, la vignette est grisée et le nom pour lequel l’avatar a été choisi apparaît sous l’avatar. Cliquer sur un avatar disponible pour le sélectionner.
If more than one referral was hired since opening the Referrals application, after selecting the first avatar, the user is prompted to select another avatar for the subsequent hired referral. Once all avatars have been selected, the dashboard loads and all the avatars are now visible. Mouse over each avatar and their name is displayed above them.
Modifier les amis
Friend avatars are able to be modified in the same manner that levels are modified. Only users with Administrator rights for the Recruitment application can make modifications to friends. The pre-configured friends can be seen and modified by navigating to . Each friend avatar appears in the Dashboard Image column, and the corresponding name appears in the Friend Name column. The default images are a motley group of hero characters, ranging from robots to dogs.
To modify a friend’s dashboard image, thumbnail, name, or position, click on an individual friend to open the referral friend form. Click Edit to make modifications. Type the name in the Friend Name field. The name is solely to differentiate the friends in the configuration menu; the friend’s name is not visible anywhere else in the Referrals application.
La Position peut être définie sur Devant ou Derrière. Cela détermine la position de l’ami par rapport à l’avatar de super-héros de l’utilisateur. Cliquer sur le bouton radio à côté de la sélection souhaitée, et l’ami apparaîtra soit devant soit derrière l’avatar de l’utilisateur lorsqu’il sera activé.
If desired, both the thumbnail Image and the Dashboard Image can be modified. Hover over the image being replaced to reveal a ✏️ (pencil) icon and 🗑️ (garbage can) icon. Click the ✏️ (pencil) icon, and a file explorer window appears. Navigate to the desired image file, then click Open to select it.
The referral friend form automatically saves, but can be saved manually at any time by clicking the Save manually option, represented by a (cloud upload) icon, located in the top-left corner. To cancel any changes made, click the ✖️ (Discard all changes) icon to delete any changes, and revert to the original content.

Avertissement
It is not advised to edit the images. An image file must have a transparent background in order for it to render properly. Only users with knowledge about transparent images should attempt adjusting any images in the Referrals application.
Once an image is changed and the friend is saved, it is not possible to revert to the original image. To revert to the original image, the Referrals application must be uninstalled then reinstalled.
Niveaux
The Referrals application has pre-configured levels that are reflected in the user’s avatar on the Referrals dashboard. As a user refers potential employees and earns points, they can level up, much like in a video game.
Levels have no functional impact on the performance of the application. They are solely used for the purpose of adding achievement tiers for participants to aim for, gamifying referrals for the user.
The user’s current level is displayed at the top of the main Referrals application dashboard, directly beneath their photo, in a Level: X format. In addition, a colored ring appears around the user’s photo, indicating how many points the user currently has, and how many additional points they need to level up. The cyan colored portion of the ring represents points earned, while the white colored portion represents the points still needed before they can level up.
Modifier les niveaux
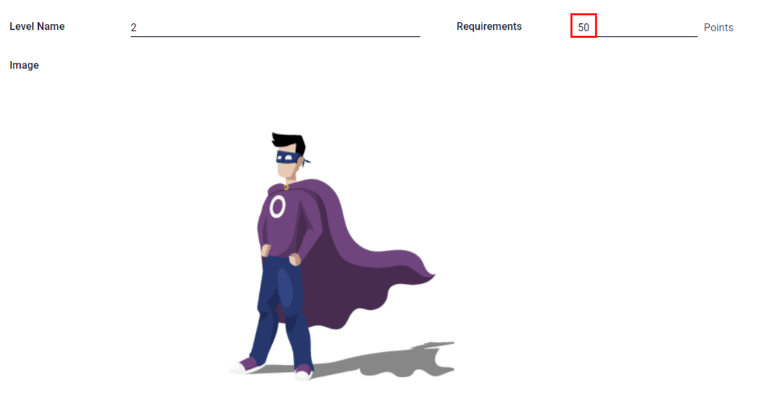
Only users with Administrator rights for the Recruitment application can modify levels. The pre-configured levels can be seen and modified by navigating to . Each avatar appears in the Image column, and the corresponding level number appears in the Level Name column. The default images are of Odoo superheroes, and each level adds an additional element to their avatar, such as capes and shields.
Pour modifier l’image, le nom ou les points requis pour atteindre le niveau, cliquer sur un niveau individuel dans la liste pour ouvrir le formulaire de niveau, puis apporter des modifications.
Saisir le nom (ou le numéro) du niveau dans le champ Nom du niveau. Ce qui est saisi est affiché sous la photo de l’utilisateur sur le tableau de bord principal lorsqu’il atteint ce niveau. Saisir le nombre de points de parrainage nécessaires pour atteindre ce niveau dans le champ Exigences. Les points nécessaires pour monter de niveau sont le total des points accumulés gagnés au cours de la carrière de l’employé, et non des points supplémentaires par rapport au niveau précédent qui doivent être gagnés.
If desired, the Image can also be modified. Hover over the image to reveal a ✏️ (pencil) icon and 🗑️ (garbage can) icon. Click the ✏️ (pencil) icon, and a file explorer window appears. Navigate to the desired image file, then click Open to select it.
The level form saves automatically, but can be saved manually at any time by clicking the save manually option, represented by a (cloud upload) icon, located in the top-left corner. To cancel any changes made, click the ✖️ (Discard all changes) icon to delete any changes, and revert to the original content.
Avertissement
It is not advised to edit the images. An image file must have a transparent background in order for it to render properly. Only users with knowledge about transparent images should attempt adjusting any images in the Referrals application.
Once an image is changed and the level is saved, it is not possible to revert to the original image. To revert to the original image, the Referrals application must be uninstalled then reinstalled.
Passer au niveau supérieur
Once enough points have been accumulated to level up, the circle around the user’s photo is completely filled in with a cyan color, a large image stating Level up! appears above the photo, and the phrase Click to level up! appears beneath the user’s photo and current level.
Click on either the LEVEL UP! graphic, the user’s photo, or the text Click to level up! beneath the user’s photo to level up the user. The user’s avatar changes to the current level, and the ring around the photo is updated to indicate the current amount of points.
Leveling up does not cost the user any points, the user simply needs to earn the specified amount of points required.

Note
Une fois qu’un utilisateur a atteint le niveau le plus élevé configuré, il continue à accumuler des points qui peuvent être échangés contre des récompenses, mais il ne peut plus passer au niveau supérieur. L’anneau autour de sa photo reste cyan uni.
Voir également