
Créer des événements
With the Events application, event organizers can create and configure in-person or online-only events in Odoo. Each new event contains a number of customizable options that are geared around specific event logistics, as needed per event, such as ticket sales and registration desk, booths, tracks, sponsors, rooms, and more.
Events can be manually created from scratch or built off of pre-made templates. Once launched, the Events application then integrates with the Website app for the front-end promotion and registration of the event for attendees, the Sales app for the purchasing ability of paid tickets, as well the CRM application through customizable lead generation rules.
New event
To create a new event, begin by navigating to the to land on the default Events dashboard, in the Kanban view. From there, or alternatively from the List or Gantt views, click the New button in the upper-left corner of the dashboard to open up a new event form.

Note
If certain fields do not readily appear on the event form, that means an additional application needs to be installed, or the database is not operating in a multi-company environment.
For example, the Twitter Wall field only appears if the Social Marketing app is installed, and the Company field only appears if the database is working in a multi-company environment.
These are just additional elements that can be used for an event. They are not required to create, host, and manage an event with Odoo Events.
Event form
At the top of the event form are a series of smart buttons related to various event metrics, which will autopopulate with pertinent data once attendees begin to register, booths and sponsors sign on for the event, the event takes place, and so on.
Primarily, these smart buttons are used as logistical portals to perform specific actions for the event. The numeric displays are primarily for quick reference points.
While those visual metrics are useful, they can still be clicked, and used to navigate to specific event-related pages to modify and/or perform any desired actions.
Beneath the smart buttons is the event form, which contains various fields and clickable tabs that serve to configure the initial, necessary details of the event.
The following are fields found on an event form:
Event Name: the title of the event. This field is required.
Note
To the right of the entered Event Name, there is a language tooltip, represented by an abbreviated language indicator (e.g.
EN). When clicked, a Translate: name pop-up window appears, displaying various pre-configured language translation options available in the database.Date: when the event is scheduled to take place (expressed in your local timezone). This field is auto-populated, but modifiable, and is required.
Display Timezone: the timezone in which the event dates/times will be displayed on the website. This field is auto-populated, but modifiable, and is required.
Language: designate a specific language for all event communications to be translated into, if necessary. This field is blank, by default, so if event-related communications are being sent to recipients who speak a different language, be sure to configure this field properly.
Twitter Wall: creates a separate page on the event website to feature specific social posts on X (formerly Twitter) that contain pre-determined desired elements.
Astuce
To create and customize a Twitter Wall, type the name of the desired wall into the field, and select Create and edit… from the resulting drop-down menu.
Doing so reveals Create Twitter Wall pop-up window.

From this window, enter a Wall Name. Then, select a certain word or hashtag for Odoo to search for on X, like
#WoodWorkingExpo24, for example.Next, determine the Type of tweets Odoo should showcase with that predetermined criteria. The choices in this field are: Recent, Popular, or Mixed.
Users also have the option to add a brief Description to the wall, as well.
Lastly, the greyed-out, non-modifiable Website URL field will autopopulate with the full URL needed to access the document through the event website.
An image can also be added to the wall by clicking the (pencil) icon that appears when the cursor hovers over the (camera) placeholder image in the upper-right corner of the pop-up window.
Then, from the resulting file explorer window, select the desired image to be added to the wall.
This Twitter Wall field only appears on the event form if the Social Marketing app is installed, and an X account has been added as a stream on the application. To learn more, check out the Social Marketing documentation.
Template: choose a pre-configured event template from the resulting drop-down menu.
Or, create a new one directly from this field, by typing in the name of the new template, and selecting either:
Create (which creates the template, and can be edited later) or
Create and edit… (which creates the template, and reveals a separate template page to configure the template in greater detail).
Tags: add any corresponding tags to briefly describe the event (e.g.
Online,Conference, etc.). Multiple tags can be added per event.Astuce
Tags can be displayed on events that are listed on the website by enabling the Show on Website checkbox from .
Organizer: designate the organizer of the event (a company, contact, or employee).
Responsible: designate a user in the database to be responsible for this event.
Company: designate which company in the database to which this event is related. This field only appears if working in a multi-company environment. This field is auto-populated, but modifiable, and is required.
Website: choose to restrict the publishing of this event to a specific website created in Odoo. If this field is left blank, the event can be published on all websites in the database. To learn more, refer to the Multiple websites documentation.
Venue: enter event venue details. This field pulls pertinent information from the Contacts application. Alternatively, Venue information can be manually added in this field, as well. At the very least, there must be a venue name, address, city, zip code/region, and country entered.
Exhibition Map: if desired, click the Upload your file button to upload an image of the event venue map.
Limit Registrations: if this checkbox is ticked, a limit to the amount of registrations is added to the event, and that desired limit amount must be entered in the blank field before Attendees.
Badge Dimension: select a desired paper format dimension for event badges. The options are: A4 foldable, A6, or 4 per sheet.
Badge Background: if desired, click the Upload your file button to upload a custom background image for event badges.
When the above fields in the event form have been adequately filled in, move on to the four tabs at the bottom of the event form for further customization.
Those tabs are: Tickets, Communication, Questions, and Notes.
Onglet billets
Create custom tickets (and ticket tiers) for events in the Tickets tab of an event form.

To create a ticket, click Add a line in the Tickets tab. Then, enter a name
for the ticket (e.g. Basic Ticket or VIP) in the Name field.
In the Product field, either select the pre-configured Event Registration product, or create a new one by typing in the name of the new event registration product, and then select either Create or Create and edit… from the resulting drop-down menu.
Important
Upon installing Odoo Events, a new product type, Event Ticket, becomes available on product forms (). In order for an event registration product to be selectable in the Tickets tab, the event registration Product Type must be set to Event Ticket.
Astuce
Existing event registration products can be modified directly from this field, as well, by clicking the (right arrow) icon, located beside the event registration product. Doing so reveals that product’s form. If the Inventory application is installed, additional choices are available to customize for the product.
Ensuite, définir le coût d’inscription du billet dans le champ Price.
Note
The Sales Price defined on the event registration product’s product form sets the default cost of a ticket. Modifying the Price of a ticket in the Tickets tab, sets a new registration cost of the ticket for that event.
Next, determine a Sales Start and Sales End date in their respective fields. To do that, click into the blank field to reveal a calendar popover. From there, select the desired date and time, then click Apply.
Puis, si souhaité, désigner un montant Maximum de ce billet spécifique pouvant être vendu.
The Taken column populates with the number of tickets that are sold.
Optionally, in the Color column, add a custom color to differentiate ticket badges. The selected color displays on ticket badges when printed.
To delete any tickets from the Tickets tab, click the (trash can) icon on the corresponding line for the ticket that should be deleted.
Astuce
Pour ajouter une colonne Description optionnelle à l’onglet Tickets, cliquer sur le menu déroulant (additional options), situé à l’extrême droite des titres de colonnes.
Ensuite, cocher la case à côté de Description dans le menu déroulant résultant.
Lorsqu’elle est ajoutée, l’option permettant d’ajouter de brèves descriptions pour chaque billet d’événement apparaît, ce qui peut être utilisé pour informer les participants de tout avantage ou commodité pouvant coïncider avec des achats de billets spécifiques.
Onglet communication
In the Communication tab of an event form, create various marketing communications that can be scheduled to be sent at specific intervals leading up to, and following, the event.

Note
By default, Odoo provides three separate pre-configured communications on every new event form. One is an email sent after each registration to confirm the purchase with the attendee. The other two are email event reminders that are scheduled to be sent at different time intervals leading up to the event to remind the recipient of the upcoming event.
To add a communication in the Communication tab, click Add a line. Then, select the desired type of communication in the Send field. The options are: Mail, SMS, Social Post, or WhatsApp.
There is no limit to the number of communications that can be added in the Communication tab of an event form.
To delete a communication from the Communication tab, click the (trash can) icon on the corresponding communication line. Doing so removes the communication from the event entirely.
Important
The Social Post option only appears if the Social Marketing application is installed. The WhatsApp option only appears if the WhatsApp Integration module is installed.
WhatsApp templates cannot be edited during active configuration. A separate approval from Meta is required.
Email
Select an existing email template from the Template drop-down menu.
Next, define the Interval, Unit, and Trigger from their respective drop-down fields, letting Odoo know when the communication should be sent.
The Unit options are: Immediately, Hours, Days, Weeks, and Months.
Ensuite, sélectionner une option dans le menu déroulant Déclencheur. Les options sont : Après chaque inscription, Avant l’événement et Après l’événement.
The Sent column populates with the number of sent communications. And, beside the number are different icons that appear, depending on the status of that particular communication.
The status of Running is represented by a (three gears) icon. The status of Sent is represented by a (checkmark) icon. And, the status of Scheduled is represented by an (hourglass) icon.
Example
Pour envoyer un e-mail de confirmation une heure après l’inscription d’un participant à un événement, configurer la communication suivante :
Intervalle :
1Unité : Heures
Déclencheur : Après chaque inscription
Note
Existing email templates can be modified directly from the Template drop-down menu, if necessary, by clicking the (right arrow) icon next to the template name. Doing so reveals a separate page where users can edit the Content, Email Configuration, and Settings of that particular email template.
Pour afficher et gérer tous les modèles d’e-mail, activer Mode développeur (mode debug) et aller à . Modifier avec prudence car les modèles d’e-mail affectent toutes les communications où le modèle est utilisé.
Onglet Questions
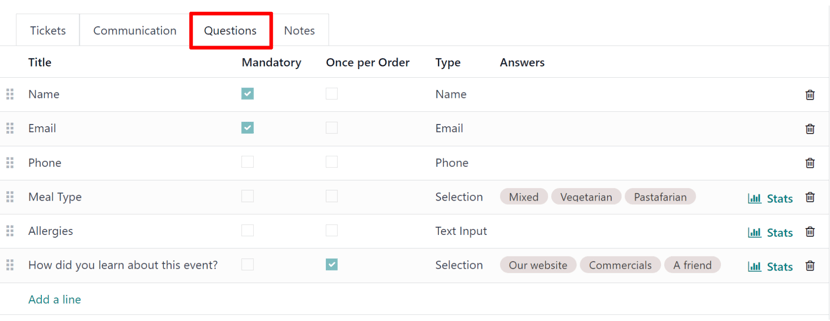
Dans l’onglet Questions d’un formulaire d’événement, les utilisateurs peuvent créer de brefs questionnaires avec lesquels les inscrits peuvent interagir et auxquels ils peuvent répondre après leur inscription à l’événement.
Ces questions peuvent porter sur la collecte d’informations de base sur le participant, la connaissance de ses préférences, de ses attentes et d’autres choses de cette nature. Ces informations peuvent également être utilisées pour créer des statistiques de reporting plus détaillées, en plus d’être utilisées pour créer des règles spécifiques de génération de prospects.
Note
By default, Odoo provides three questions in the Questions tab for every event form. The default questions require the registrant(s) to provide their Name and Email, and make it optional to include their Phone number, as well.
The information gathered from the Questions tab can be found on the Attendees dashboard, accessible via the Attendees smart button. Odoo populates individual records that contain basic information about the registrant(s), as well as their preferences.
Pour ajouter une question dans l’onglet Questions, cliquer sur Ajouter une ligne. Cette action fait apparaître une fenêtre contextuelle Créer une question. À partir de là, les utilisateurs peuvent créer et configurer leur question.

D’abord, saisir la question dans le champ en haut du formulaire. Ensuite, décider si la question doit nécessiter une Réponse obligatoire et/ou si Odoo doit Demander une fois par commande, en cochant leurs cases respectives, si souhaité.
If the Ask once per order checkbox is ticked, the question will only be asked once, and its value is propogated to every attendee in the order (if multiple tickets are purchased at once). If the checkbox is not ticked for this setting, Odoo will present the question for every attendee that is connected to that registration.
Ensuite, sélectionner une option Type de question :
Selection: provide answer options to the question for registrants to choose from. Selectable answer options can be managed in the Answers column at the bottom of the pop-up window.
Text Input: lets the users enter a custom response to the question in a text field.
Name: provides registrants with a field for them to enter their name.
Email: provides registrants with a field for them to enter their email address.
Phone: provides registrants with a field for them to enter their phone number.
Company: provides registrants with a field for them to enter a company they are associated with.
Une fois toutes les configurations souhaitées saisies, cliquer sur Enregistrer et fermer pour enregistrer la question et revenir à l’onglet Questions du formulaire d’événement, ou cliquer sur Enregistrer et nouveau pour enregistrer la question et créer immédiatement une nouvelle question sur une nouvelle fenêtre contextuelle Créer une question.
Au fur et à mesure que des questions sont ajoutées à l’onglet Questions, les colonnes informatives affichent les configurations de chaque question.
Les colonnes informatives sont les suivantes :
Titre
Obligatoire
Une fois par commande
Type
Réponses (si applicable)
Pour les types Sélection et Saisie de texte, un bouton Stats apparaît à droite de la ligne de question. Lorsqu’il est cliqué, Odoo affiche une page séparée présentant les métriques de réponse à cette question spécifique.
Pour supprimer une question de l’onglet Questions, cliquer sur l’icône (corbeille) sur la ligne de question correspondante.
There is no limit to the number of questions that can be added in the Questions tab of an event form.
Onglet notes
Dans l’onglet Notes d’un formulaire d’événement, les utilisateurs peuvent laisser des notes internes détaillées et/ou des instructions/informations liées à l’événement pour les participants.
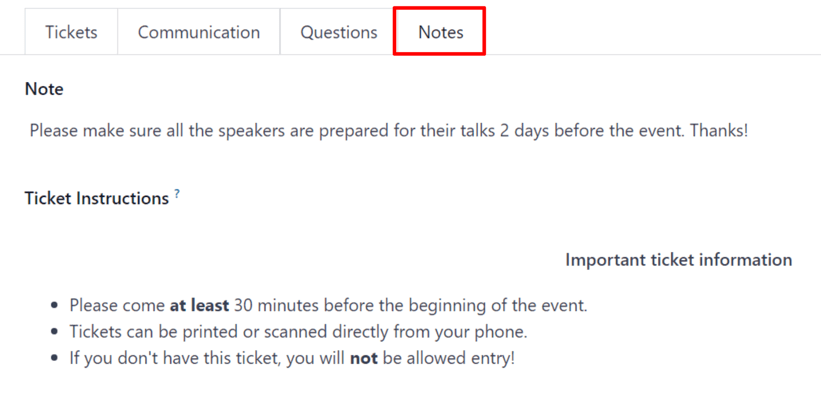
Dans le champ Note de l’onglet Notes, les utilisateurs peuvent laisser des notes internes pour d’autres employés travaillant sur l’événement, comme des listes de tâches, des coordonnées, des instructions, etc.
Dans le champ Instructions du billet de l’onglet Notes, les utilisateurs peuvent laisser des instructions spécifiques pour les personnes assistant à l’événement qui apparaîtront sur le billet des participants.
Publier des événements
Une fois toutes les configurations et modifications terminées sur le formulaire d’événement, il est temps de publier l’événement sur le site web. Cela rend l’événement visible aux visiteurs du site et permet aux personnes de s’inscrire à l’événement.
Pour publier un événement après avoir terminé toutes les personnalisations, cliquer sur le bouton intelligent Aller au site web en haut du formulaire d’événement. Cela affiche la page web de l’événement, qui peut être personnalisée comme n’importe quelle autre page du site, via le bouton Modifier.
To learn more about website design functionality and options, consult the Building block documentation.
Once the event website is ready to be shared, click the red Unpublished toggle switch in the header menu, changing it to a green Published switch. At this point, the event web page is published, and viewable/accessible by all website visitors.
Envoyer des invitations à l’événement
Pour envoyer des invitations à l’événement aux participants potentiels, accéder au formulaire d’événement souhaité via , puis cliquer sur l’événement souhaité. Ensuite, cliquer sur le bouton Inviter dans le coin supérieur gauche du formulaire d’événement.
Cela affiche un formulaire d’e-mail vierge à remplir comme souhaité. Pour en savoir plus sur la création et la personnalisation d’e-mails comme celui-ci, consulter la documentation Créer un e-mail.
Proceed to create and customize an email message to send as an invite to potential attendees. Remember to include a link to the registration page on the event website, allowing interested recipients to quickly register.
Astuce
L’envoi d’e-mails depuis Odoo est soumis à une limite quotidienne qui, par défaut, est de 200. Pour en savoir plus sur les limites quotidiennes, consulter la documentation Limite journalière atteinte.
Voir également