Concediu
Aplicația Concedii din Odoo servește ca un centru centralizat pentru toate informațiile legate de concedii. Această aplicație gestionează cererile, soldurile, alocările, aprobările și rapoartele.
Utilizatorii pot solicita concediu și pot vedea o prezentare generală a cererilor și soldurilor de concediu. Managerii pot aloca concediu individual, pe echipe sau pentru întreaga companie și pot aproba cererile de concediu.
Detaliat rapoarte poate fi rulat pentru a vedea cât de mult timp liber (și ce tipuri de timp liber) sunt utilizate, planuri de acumulare pot fi create , și sărbătorile legale pot fi setate.
Notă
Rețineți că doar utilizatorii cu drepturi specifice de acces pot vedea toate aspectele aplicației Concedii.
Toți utilizatorii pot accesa secțiunile Concediile mele și Prezentare generală din aplicația Concedii. Toate celelalte secțiuni necesită drepturi specifice de acces.
To better understand how access rights affect the Time Off app, refer to the Angajați noi document, specifically the section about configuring the work information tab.
Configurare
Pentru a aloca timp liber angajaților și pentru ca angajații să solicite și să-și folosească timpul liber, mai întâi trebuie configurate diferitele tipuri de concediu, apoi alocate angajaților (dacă este necesară alocarea).
Tipuri de concediu
Pentru a vedea tipurile de timp liber configurate în prezent, navigați la . Tipurile de timp liber sunt prezentate într-o vizualizare listă.
The Time Off app comes with four preconfigured time off types: Paid Time Off, Sick Time Off, Unpaid, and Compensatory Days. These can be modified to suit business needs, or used as-is.
Creați tip de timp liber
Pentru a crea un nou tip de pauză, navigați la . De aici, faceți clic pe butonul Nou pentru a dezvălui un formular de tip liber liber.
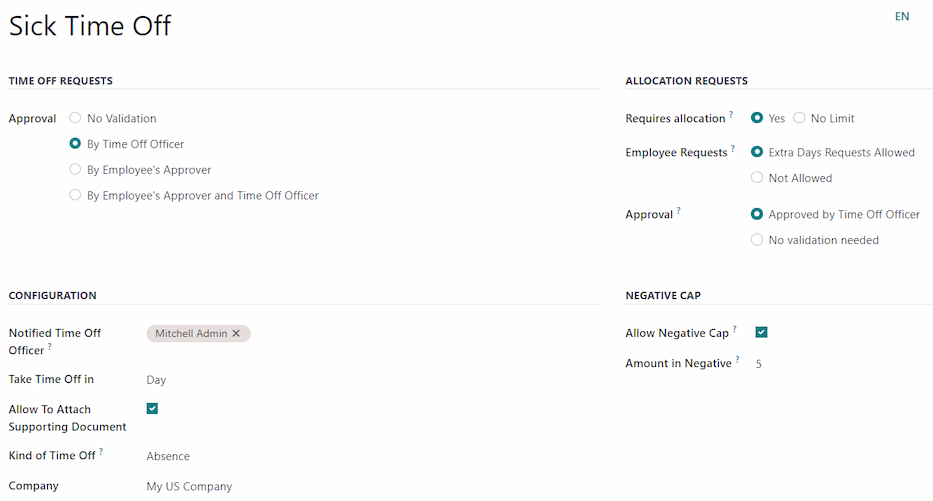
Introduceți numele pentru tipul de timp liber în linia goală din partea de sus a formularului, cum ar fi „Timp de boală” sau „Vacanță”. Apoi, introduceți următoarele informații în formular.
Notă
Singurele câmpuri obligatorii din formularul de tip de pauză sunt numele Tipul de concediu, Ia pauza în și Tipul de concediu . În plus, secțiunile Solicitări de concediu și Cereri de alocare trebuie să fie configurate.
Secțiunea Solicitări de concediu
Aprobare: selectați ce tip specific de aprobare este necesar pentru tipul de concediu. Opțiunile sunt:
Fără validare: Nu este necesară nicio aprobare la solicitarea acestui tip de concediu. Cererea de concediu este aprobată automat.
De către responsabilul cu concediile: Doar responsabilul specificat Responsabil concedii, setat în acest formular la câmpul Responsabil concedii notificat, trebuie să aprobe cererea de concediu. Această opțiune este selectată implicit.
De către aprobatorul angajatului: Doar aprobatorul specificat pentru concedii, setat pe tabul Informații de lucru din fișa angajatului, trebuie să aprobe cererea de concediu.
By Employee’s Approver and Time Off Officer: Both the employee’s specified time off approver and the Time Off Officer are required to approve the time off request.
Secțiunea Cereri de alocare
Necesită alocare: Dacă acest tip de concediu trebuie alocat angajaților, selectați Da. Dacă poate fi solicitat fără alocare prealabilă, selectați Fără limită. Dacă este selectat Fără limită, următoarele opțiuni nu vor apărea în formular.
Solicitări angajat: Selectați Solicitări zile suplimentare permise dacă angajatul poate solicita mai multe zile de concediu decât i-au fost alocate.
Dacă angajații nu ar trebui să poată face solicitări pentru mai mult timp liber decât cel alocat, selectați opțiunea Nepermis.
Example
Zece zile sunt alocate angajatului pentru acest tip de timp liber, iar opțiunea Solicitări de zile suplimentare permise este activată. Angajatul dorește să ia o vacanță de douăsprezece zile. Aceștia pot trimite o cerere pentru două zile suplimentare, deoarece opțiunea Solicitări de zile suplimentare permise este activată.
Important
Este important să rețineți că solicitarea de timp liber suplimentar nu garantează acordarea de timp liber.
Aprobare: Selectați tipul de aprobare necesar pentru alocarea acestui tip de concediu.
Aprobat de ofițerul de concediu indică Ofițerul de concediu stabilit în acest formular trebuie să aprobe alocarea.
Nu este nevoie de validare indică faptul că nu sunt necesare aprobări.
Secțiunea de configurare
Notified Time Off Officer: Select the person who is notified and responsible for approving requests and allocations for this specific type of time off.
Take Time Off in: Select the format the time off is requested in from the drop-down menu.
Opțiunile sunt:
Ziua: dacă timpul liber poate fi solicitat numai în trepte de zi întreagă (8 ore).
Jumătate de zi: dacă timpul liber poate fi solicitat numai în trepte de jumătate de zi (4 ore).
Ore: dacă timpul liber poate fi luat în trepte de oră.
Scade ore suplimentare: Activați această opțiune dacă cererea de concediu trebuie să țină cont de orele suplimentare acumulate de angajat.
Example
Dacă un angajat lucrează două ore suplimentare pe săptămână și solicită cinci ore libere, cererea ar fi de trei ore, deoarece cele două ore lucrate în plus sunt utilizate mai întâi și sunt deduse din cerere.
Permite atașarea documentelor justificative: Activați această opțiune pentru a permite angajatului să atașeze documente la cererea de concediu. Este utilă în situațiile în care este necesară documentație, cum ar fi concediul medical de lungă durată.
Tip concediu: Din meniul derulant, selectați tipul de concediu, fie Timp lucrat, fie Absenta. Timp lucrat înseamnă că perioada de concediu se adaugă la timpul lucrat pentru orice tip de acumulare la care angajatul lucrează, în timp ce Absenta nu se adaugă la nicio acumulare.
Companie: Dacă în baza de date sunt create mai multe companii și acest tip de concediu se aplică doar uneia, selectați compania din meniul derulant. Dacă acest câmp este lăsat necompletat, tipul de concediu se aplică tuturor companiilor din baza de date. Acest câmp apare doar într-o bază de date multi-companie.
Secțiunea Cap negativ
Activați opțiunea Permiteți plafon negativ dacă angajații pot solicita mai mult timp liber decât au în prezent, permițând un sold negativ. Dacă este activat, apare un câmp Suma în negativ. În acest câmp, introduceți cantitatea maximă de timp negativ permisă, în zile.
Example
În prezent, Sara are trei zile libere de tip „Vacanta”. Ea plănuiește o călătorie care necesită cinci zile libere.
Tipul de concediu Vacation are opțiunea Permiteți limita negativ`, iar Suma în negativ este setată la cinci.
Aceste setări îi permit lui Sara să trimită o solicitare pentru cinci zile de tip concediu „Vacanță”. Dacă este aprobat, soldul ei de concediu pentru „vacanță” va fi negativ de două (-2) zile.

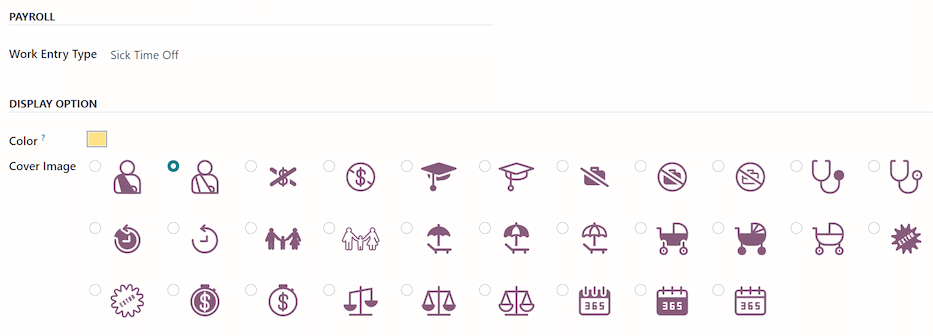
Secțiunea de salarizare
Dacă tipul de concediu ar trebui să creeze Intrări de lucru în aplicația Salarizare, selectați Tip intrare pontaj din lista derulantă.
Secțiunea Foi de pontaj
Notă
Secțiunea Foi de pontaj apare numai dacă utilizatorul este în modul dezvoltator. Consultați documentul Modul dezvoltator (mod depanare) pentru detalii despre cum să accesați modul dezvoltator.
Când un angajat își ia concediu și folosește și pontajul, Odoo creează înregistrări în aplicația Pontaj pentru perioada de concediu. Această secțiune definește modul în care sunt introduse aceste înregistrări.
Proiect: Selectați proiectul în care apar înregistrările pentru acest tip de concediu.
Sarcină: Selectați sarcina care apare în pontaj pentru acest tip de concediu. Opțiunile implicite sunt: Concediu, Întâlnire sau Instruire.
Secțiunea Opțiuni de afișare
Culoare: Selectați o culoare care va fi folosită în tabloul de bord al aplicației Concedii.
Imagine de copertă: Selectați o pictogramă care va fi folosită în tabloul de bord al aplicației Concedii.

Planuri de acumulare
O parte din timpul liber este câștigat printr-un plan de acumulare, ceea ce înseamnă că pentru fiecare perioadă specificată de timp în care lucrează un angajat (oră, zi, săptămână etc.), acesta câștigă sau acumulează o anumită perioadă de timp liber.
Example
Dacă un angajat acumulează o zi de concediu pentru fiecare săptămână în care lucrează, ar câștiga 0,2 zile de concediu pentru fiecare oră de muncă. La sfârșitul unei săptămâni de lucru de patruzeci de ore, aceștia ar câștiga o zi întreagă de vacanță (8 ore).
Creați un plan de acumulare
Pentru a crea un nou plan de acumulare, navigați la . Apoi, faceți clic pe butonul Nou, care dezvăluie un formular de plan de acumulare necompletat.
Introduceți următoarele informații în formular:
Nume: Introduceți numele planului de acumulare.
Timp acumulat: Selectați când începe angajatul să acumuleze concediu, fie La începutul perioadei de acumulare, fie La sfârșitul perioadei de acumulare.
Report timp acumulat: Selectați când primește angajatul timpul acumulat anterior. Opțiunile sunt:
La începutul anului: Selectați această opțiune dacă acumularea se reportează la 1 ianuarie al anului următor.
La data alocării: Selectați această opțiune dacă acumularea se reportează imediat ce timpul este alocat angajatului.
Altul: Selectați această opțiune dacă niciuna dintre celelalte două nu se aplică. Când este selectată, apare câmpul Dată report. Selectați data folosind cele două meniuri derulante, unul pentru zi și unul pentru lună.
Pe baza timpului lucrat: Activați această opțiune dacă acumularea concediului se bazează pe orele lucrate de angajat. Zilele care nu sunt considerate timp lucrat nu contribuie la planul de acumulare în Odoo.
Example
An employee is granted time off from an accrual plan configured to accrue one day of vacation for every five days worked. The accrual plan is based on the employee’s worked time (the Based on worked time checkbox is ticked).
Angajatul lucrează săptămâni standard de 40 de ore. Conform planului de acumulare, ar trebui să câștige patru zile de vacanță pe lună.
The employee takes five days off. The time off type the employee has taken has the Kind of Time Off configured as an Absence.
Since the accrual plan only grants time off based on the worked time, the employee does not accrue a vacation day for the five days of time off that is considered an absence.
At the end of the month, the employee accrues only three days, instead of four.
Tranziție prag: Acest câmp este vizibil doar după ce au fost configurate cel puțin două reguli pe planul de acumulare. Această selecție stabilește când angajații trec la un nou prag. Dacă se califică pentru a schimba pragul în mijlocul unei perioade de plată, decideți dacă angajatul schimbă pragul Imediat sau După această perioadă de acumulare (după perioada de plată curentă).
Company: This field only appears in a multi-company database. Using the drop-down menu, select the company the accrual plan applies to. If left blank, the accrual plan can be used for all companies.

Reguli
Trebuie create reguli pentru ca angajații să acumuleze timp liber din planul de acumulare.
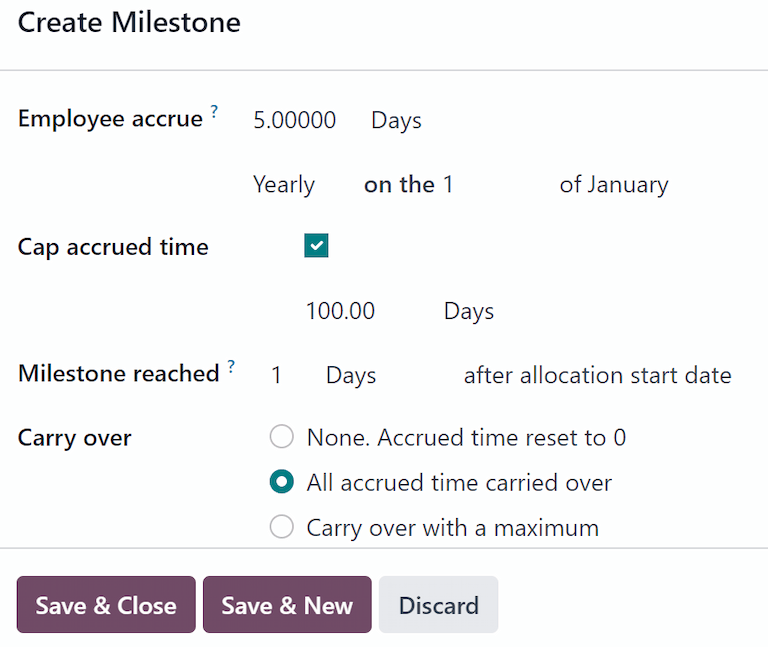
Pentru a crea o regulă nouă, faceți clic pe butonul New Milestone din secțiunea gri Rules și va apărea un formular modal Create Milestone.
Completați următoarele câmpuri din formular:
Acumulare angajat: Selectați parametrii pentru concediul câștigat în această secțiune.
Mai întâi, selectați fie Zile, fie Ore pentru creșterea timpului acumulat folosind meniul derulant.
Apoi, introduceți suma numerică a parametrului selectat care este acumulat. Formatul numeric este
X.XXXX, astfel încât zilele sau orele parțiale pot fi, de asemenea, configurate.În sfârșit, selectați cât de des se acumulează timpul utilizând meniul derulant. Opțiunile implicite sunt Hourly, Daily, Săptămânal, De două ori pe lună, Monthly, De două ori pe an, și Anual.
În funcție de opțiunea selectată, pot apărea câmpuri suplimentare. De exemplu, dacă se selectează De două ori pe lună, apar două câmpuri suplimentare pentru a specifica cele două zile din fiecare lună când are loc pragul.
Cap accrued time: If there is a maximum amount of days the employee can accrue with this plan, enable this option.
Când este activată, sub acesta apar două câmpuri suplimentare. Selectați tipul perioadei de timp din meniul derulant, fie Zile, fie Ore.
Apoi, introduceți o valoare numerică în câmp pentru a specifica perioada maximă de timp care poate fi acumulată.
Milestone reached: Enter the number and value of the time period that must pass before the employee starts to accumulate time off. The first value is numerical; enter a number in the first field.
Apoi, selectați tipul perioadei de timp utilizând meniul derulant din al doilea câmp. Opțiunile sunt: :guilabel:
Zile, Luni, sau Ani.Carry over: selectați modul în care este gestionat orice timp liber neutilizat. Opțiunile sunt fie:
None. Accrued time reset to 0: Any unused time off is gone.
Tot timpul acumulat reportat: Tot timpul liber neutilizat este reportat în anul calendaristic următor.
Carry over with a maximum: Unused time off is rolled over to the next calendar year, but there is a cap. An Up to field appears if this is selected. Enter the maximum number of Days that can roll over to the following year. Any time off beyond this parameter is lost.
Important
Dacă câmpul Reportare este setat la Niciuna. Timpul acumulat resetat la 0, această regulă suprascrie valoarea Timp reportat setată pe planul de acumulare.
Dacă o companie creează un plan de acumulare, acordând angajaților timp liber La începutul perioadei de acumulare (adică la începutul anului) și setează Timp reportat pe planul de acumulare la La începutul anului, permite reportarea timpului de vacanță neutilizat în anul următor.
Apoi, compania adaugă reguli la planul de acumulare, alocând cinci zile de vacanță anual, la începutul anului (o săptămână de vacanță alocată pe 1 ianuarie).
Dacă câmpul Reportare este setat la Niciuna. Timpul acumulat resetat la 0 în fereastra Creare prag, orice timp de vacanță neutilizat nu se reportează, chiar dacă pe formularul Plan de acumulare, Timp reportat este setat la La începutul anului.
Reportarea setată pe regulă are prioritate față de reportarea setată pe formularul planului de acumulare.
După ce formularul este completat, apasă Salvează & Închide pentru a salva formularul Creează etapă și a închide fereastra, sau apasă Salvează & Nou pentru a salva formularul și a crea o altă etapă. Adaugă oricâte etape dorești.

Sărbători legale
Pentru a respecta sărbătorile legale sau naționale și pentru a oferi angajaților zile libere suplimentare ca sărbători, configurați sărbătorile legale respectate în Odoo.
Este important să configurați aceste zile în Odoo, astfel încât angajații să fie conștienți de zilele pe care le au liber și să nu solicite concediu în zilele care sunt deja setate ca sărbătoare legală (zile nelucrătoare).
De asemenea, toate sărbătorile legale configurate în aplicația Concedii sunt reflectate și în orice altă aplicație care folosește programe de lucru, precum Calendar, Planificare, Producție și altele.
Datorită integrării Odoo cu alte aplicații care folosesc programe de lucru, se consideră cea mai bună practică să se asigure că toate sărbătorile legale sunt configurate.
Creați sărbătoare legală
Pentru a crea o sărbătoare legală, navigați la .
Toate sărbătorile legale configurate în prezent apar într-o vizualizare listă.
Faceți clic pe butonul Nou și o nouă linie apare în partea de jos a listei.
Introduceți următoarele informații pe acea nouă linie:
Nume: Introdu numele sărbătorii.
Companie: Dacă este o bază de date multi-companie, compania curentă completează acest câmp implicit. Nu este posibilă editarea acestui câmp.
Notă
The Company field is hidden, by default. To view this field, click the (additional options) icon in the top-right corner of the list, to the far-right of the column titles, and activate the Company selection from the drop-down menu that appears.
Start Date: Using the date and time picker, select the date and time the holiday starts, then click Apply. By default, this field is configured for the current date. The start time is set according to the start time for the company (according to the working schedules). If the user’s computer is set to a different time zone, the start time is adjusted according, compared to the company’s time zone.
Data de sfârșit: Folosind selectorul de dată și oră, selectează data și ora la care se termină sărbătoarea, apoi apasă Aplică. Implicit, acest câmp este configurat pentru data curentă, iar ora este setată la ora de sfârșit pentru companie (conform programelor de lucru). Dacă calculatorul utilizatorului este setat pe un alt fus orar, ora de început este ajustată în consecință, comparativ cu fusul orar al companiei.
Example
O companie situată în San Francisco operează între orele 9:00 - 18:00, cu o zi de lucru de opt ore și o pauză de prânz.
Pentru un utilizator din New York, cu un fus orar al computerului setat la Ora standard de est, o sărbătoare publică creată afișează o oră de începere de 12:00 PM - 9:00 PM, luând în considerare diferența de fus orar de trei ore.
În mod similar, un utilizator situat în Los Angeles, cu un fus orar al computerului setat la Ora standard a Pacificului, vede o oră de sărbătoare publică ca fiind 9:00 AM - 6:00 PM.
Ore de lucru: Dacă sărbătoarea ar trebui să se aplice doar angajaților care au un anumit program de lucru, selectează programul din meniul derulant. Dacă este lăsat necompletat, sărbătoarea se aplică tuturor angajaților.
Tip de pontaj: Dacă folosești aplicația Salarizare, acest câmp definește modul în care pontajele pentru sărbătoare apar. Selectează tipul de pontaj din meniul derulant.

Zile obligatorii
Unele companii au zile speciale în care anumite departamente, sau întregul personal, trebuie să fie prezente, iar timpul liber nu este permis în acele zile specifice.
Aceste tipuri de zile sunt numite zile obligatorii în Odoo. Acestea pot fi configurate pentru a fi la nivel de companie sau specifice departamentului. Când sunt configurați, angajații din departamentul sau compania specificate nu pot trimite cereri de concediu pentru aceste zile obligatorii.
Creați zile obligatorii
Nu sunt configurate zile obligatorii în Odoo în mod implicit. Pentru a crea o zi obligatorie, navigați la .
Faceți clic pe butonul Nou din colțul din stânga sus și va apărea o linie goală în listă.
Introduceți următoarele informații pe acea nouă linie:
Nume: Introdu numele zilei obligatorii.
Companie: Dacă baza de date este multi-companie, acest câmp este vizibil, iar compania curentă îl completează implicit. Folosiți meniul derulant pentru a selecta compania pentru ziua obligatorie.
Departamente: Această coloană este ascunsă implicit. Mai întâi, faceți clic pe pictograma (opțiuni suplimentare) din colțul din dreapta sus, lângă Culoare, apoi bifați caseta de lângă Departamente pentru a o afișa.
Apoi, selectați departamentele dorite din meniul derulant. Pot fi selectate mai multe departamente și nu există o limită a numărului de departamente care pot fi adăugate.
Dacă acest câmp este lăsat necompletat, ziua obligatorie se aplică întregii companii.
Data de început: Folosiți selectorul de calendar pentru a alege data la care începe ziua obligatorie.
Data de sfârșit: Folosiți selectorul de calendar pentru a alege data la care se termină ziua obligatorie. Dacă creați o singură zi obligatorie, data de sfârșit trebuie să fie aceeași cu data de început.
Color: If desired, select a color from the available presented options. If no color is desired, select the
No coloroption, represented by a white box with a red line diagonally across it. The selected color appears on the main Time Off app dashboard, in both the calendar and in the legend.

Prezentare generală
Pentru a vedea un program codat de culori al timpului liber al utilizatorului și/sau al echipei gestionate de acesta, navigați la . Acesta prezintă un calendar cu filtrul implicit de „Echipa mea”, într-o vizualizare lunară.
Pentru a schimba perioada de timp afișată, faceți clic pe butonul Lună pentru a afișa un meniu derulant. Apoi, selectați fie Ziu, Săptămâna, fie Anul pentru a prezenta calendarul în acea vizualizare corespunzătoare.
Pentru a naviga înainte sau înapoi în timp, în incrementul selectat (Lună, Săptămâna etc.), faceți clic pe ← (săgeata stânga) sau → ( săgeată dreapta) pentru a vă deplasa înainte sau înapoi în intervalul de timp specificat.
De exemplu, dacă este selectat Lună, săgețile ajustează vizualizarea cu o lună.
Pentru a reveni la o vizualizare care conține ziua curentă, faceți clic pe butonul Astăzi oricând.
Membrii echipei sunt listați alfabetic pe rânduri individuale, iar timpul liber solicitat, indiferent de stare (validat sau de aprobat), este vizibil în calendar.
Fiecare angajat are un cod de culoare. Culoarea angajatului este aleasă la întâmplare și nu corespunde tipului de concediu pe care l-a solicitat.
Starea timpului liber este reprezentată de detaliul de culoare al cererii, fie arătând solid (validat), fie în dungi (pentru aprobare).
Pe cerere este scris numărul de zile sau de ore solicitate (dacă este suficient spațiu).
În partea de jos a calendarului, în linia Total, un grafic cu bare arată câte persoane se preconizează că vor fi afară într-o zi dată. Numărul de pe fiecare bară individuală reprezintă numărul de angajați plecați pentru acele zile evidențiate.
Faceți clic pe o intrare de timp liber pentru a vedea detaliile pentru intrarea de timp liber specific. Sunt listate numărul total de ore sau zile, împreună cu ora de începere și de sfârșit a timpului liber. Pentru a vedea detaliile cererii de timp liber într-un mod, faceți clic pe butonul Vizualizare.

Raportare
Funcția de raportare permite utilizatorilor să vadă timpul liber pentru echipa lor, fie în funcție de angajat, fie de tipul de timp liber. Acest lucru permite utilizatorilor să vadă ce angajați își iau concediu, cât timp liber și ce tipuri de concediu sunt folosite.
Any report can be added to a spreadsheet, when in either the (Graph) or (Pivot) view, through the Insert in Spreadsheet button that appears in the top-left of the report.
Notă
Dacă aplicația Documente este instalată, apare opțiunea de a adăuga raportul într-un tabel. Dacă nu, raportul poate fi adăugat într-un Tablou de bord.
Prin angajat
Pentru a vedea un raport al solicitărilor de concediu ale angajaților, navigați la .
Raportul implicit prezintă datele anului curent într-o vizualizare de listă, afișând toți angajații în ordine alfabetică. Linia fiecărui angajat este restrânsă implicit. Pentru a extinde o linie, faceți clic oriunde pe linie.
Vizualizarea se extinde și are cererile de concediu organizate în funcție de tipul de concediu. Faceți clic oriunde pe o linie de tip de timp liber pentru a o extinde și vizualiza toate solicitările individuale de concediu care se încadrează în acel tip.
Informațiile afișate în listă includ: Numele angajatului, Numărul de zile libere solicitate, Data de începere, Data de încheiere, Starea ` și :guilabel:`Descriere.

Raportul poate fi afișat și în alte moduri. Faceți clic pe butonul corespunzător din colțul din dreapta sus al paginii pentru a vizualiza datele în acel mod. Opțiunile sunt (Listă), vizualizarea implicită, (Grafic), (Pivot) sau (Calendar).
Când a fost făcută o selecție, apar opțiuni suplimentare pentru acea selecție anume. Pentru informații mai detaliate despre rapoarte și diferitele lor opțiuni, consultați documentația reporting.
După tip
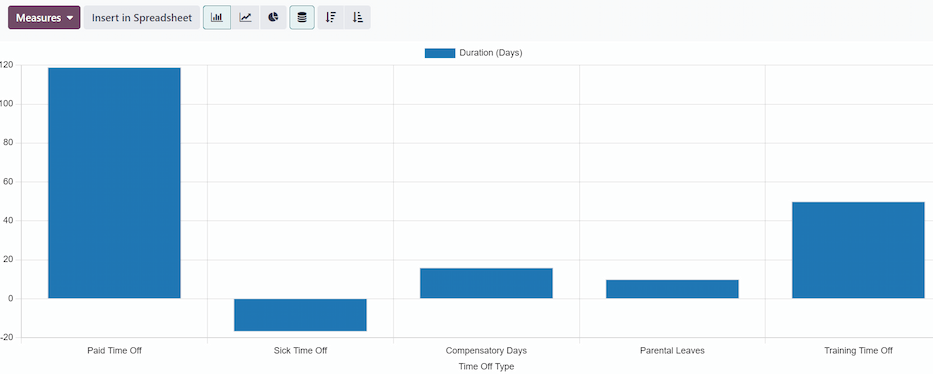
Pentru a vedea o listă a tuturor timpurilor libere, organizate după tipul de timp liber, navigați la . Aceasta arată toate solicitările de timp liber într-o diagramă cu bare implicită.
Plasați cursorul peste o bară pentru a vedea Durata (Zile) a acelui tip de timp liber.

Faceți clic pe o bară pentru a accesa o listă detaliată a tuturor solicitărilor de concediu pentru acel tip de concediu.
Fiecare cerere este listată, cu următoarele informații afișate: Angajat, Numărul de zile, Tipul cererii, Data de începere, Data de încheiere `, :guilabel:`Stare și Descriere.
Raportul poate fi afișat și în alte moduri. Faceți clic pe butonul corespunzător din colțul din dreapta sus al paginii pentru a vizualiza datele astfel. Opțiunile sunt (Grafic) (vizualizarea implicită), (Listă) sau (Pivot).
Când a fost făcută o selecție, apar opțiuni suplimentare pentru acea selecție anume. Pentru informații mai detaliate despre rapoarte și despre diferitele lor opțiuni, consultați documentația reporting.
Vezi și
concedii/alocări
concedii/solicitare_concediu
concedii/timpul_meu
concedii/management