Kết nối máy in
Việc cài đặt máy in có thể được thực hiện chỉ trong vài bước đơn giản. Máy in có thể được sử dụng để in hóa đơn, nhãn, đơn hàng hoặc thậm chí là các báo cáo từ những ứng dụng khác nhau trong Odoo. Ngoài ra, tác vụ máy in cũng có thể được gán như một hành động theo kích hoạt trong quá trình sản xuất, hoặc được thêm vào một điểm kiểm soát chất lượng hay một bước kiểm tra chất lượng.
Cảnh báo
Cách duy nhất để kết nối máy in trực tiếp với cơ sở dữ liệu Odoo là thông qua việc sử dụng hệ thống IoT. Không có hệ thống IoT, việc in vẫn có thể xảy ra, nhưng nó được quản lý thông qua chính máy in, đây không phải là quy trình được khuyến nghị.
Kết nối
Các hệ thống IoT hỗ trợ máy in kết nối qua USB hoặc kết nối mạng. Máy in được hỗ trợ được phát hiện tự động và xuất hiện trong danh sách Thiết bị của ứng dụng IoT.

Ghi chú
Máy in có thể mất đến hai phút để xuất hiện trong danh sách Thiết bị của ứng dụng IoT.
Liên kết máy in
Liên kết lệnh sản xuất với máy in
Lệnh sản xuất có thể được liên kết với máy in thông qua điểm kiểm soát chất lượng để in nhãn cho sản phẩm được sản xuất.
Trong ứng dụng Chất lượng, thiết bị có thể được thiết lập trên điểm kiểm soát chất lượng. Để thực hiện, đi đến , và mở điểm kiểm soát mong muốn.
Quan trọng
Hoạt động sản xuất và hoạt động lệnh sản xuất cần được gắn với điểm kiểm soát chất lượng trước khi trường Loại cho phép chọn tùy chọn In nhãn.
Từ đây, chỉnh sửa điểm kiểm soát bằng cách chọn trường Loại, và chọn In nhãn từ menu thả xuống các tùy chọn. Thực hiện như vậy sẽ hiển thị trường Thiết bị, nơi có thể chọn thiết bị đã gắn.
Máy in giờ đây có thể được sử dụng với điểm kiểm soát chất lượng đã chọn. Khi đạt đến điểm kiểm soát chất lượng trong quá trình sản xuất, cơ sở dữ liệu sẽ hiển thị tùy chọn in nhãn cho sản phẩm cụ thể.
Mẹo
Các điểm kiểm soát chất lượng cũng có thể được truy cập bằng cách điều hướng đến , sau đó chọn thiết bị. Đi đến tab Điểm kiểm soát chất lượng để thêm chúng vào thiết bị.
Ghi chú
Trên biểu mẫu kiểm tra chất lượng, Loại kiểm tra cũng có thể được đặt thành In nhãn.
Liên kết báo cáo với máy in
Có thể liên kết các loại báo cáo với máy in cụ thể. Để thực hiện:
Truy cập và chọn máy in mong muốn.
Chuyển đến tab Printer Reports và nhấp Add a line.
Trong cửa sổ bật lên, chọn các loại báo cáo cần liên kết với máy in và nhấp Select.

Mẹo
Các báo cáo cũng có thể được cấu hình bằng cách enabling the developer mode và truy cập . Chọn báo cáo mong muốn từ danh sách và đặt IoT Device.
Lần đầu tiên chọn in báo cáo đã liên kết, cửa sổ bật lên Select Printers sẽ xuất hiện. Đánh dấu vào ô chọn bên cạnh máy in phù hợp cho báo cáo và nhấp Print. Lúc này, báo cáo đã được liên kết với máy in.
Xóa bộ nhớ cache máy in thiết bị
Sau khi một máy in được liên kết để in một báo cáo, cài đặt này sẽ được lưu trong bộ nhớ cache của trình duyệt. Điều này có nghĩa là người dùng có thể có các thiết bị khác nhau được lưu trong bộ nhớ cache của họ cho các báo cáo khác nhau, dựa trên thiết bị mà họ sử dụng để truy cập Odoo. Nó cũng có nghĩa là những người dùng khác nhau có thể in tự động một báo cáo từ các máy in khác nhau, dựa trên sở thích của họ.
Để hủy liên kết báo cáo khỏi máy in, điều hướng đến . Thao tác này tạo ra danh sách các báo cáo được liên kết với máy in trên thiết bị hiện tại. Nhấp nút Unlink bên cạnh mỗi báo cáo để xóa liên kết.
Quan trọng
Bước này chỉ ngăn báo cáo tự động in sang máy in được liệt kê từ trình duyệt hiện tại. Báo cáo vẫn được linked trên thiết bị, trong tab Printer Reports.

Xem thêm
Các vấn đề tiềm ẩn
Máy in không được phát hiện
Nếu máy in không xuất hiện trong danh sách thiết bị, truy cập trang chủ của IoT box's hoặc Windows virtual IoT's, nhấp Show trong phần Devices và đảm bảo máy in được liệt kê.
Nếu máy in không xuất hiện trên trang chủ của hệ thống IoT, nhấp Printer Server, sau đó Administration và Add Printer. Nếu máy in không có trong danh sách, có khả năng nó chưa được kết nối đúng cách.
Máy in xuất ra văn bản ngẫu nhiên
Với hầu hết các máy in, trình điều khiển chính xác sẽ tự động được phát hiện và chọn. Tuy nhiên, trong một số trường hợp, cơ chế phát hiện tự động có thể không đủ và nếu không tìm thấy trình điều khiển, máy in có thể in ra các ký tự ngẫu nhiên.
Giải pháp là chọn trình điều khiển tương ứng theo cách thủ công. Trên trang chủ của hệ thống IoT, nhấp Printer Server, sau đó Printers và chọn máy in trong danh sách. Trong menu thả xuống Administration, nhấp Modify Printer. Thực hiện các bước và chọn hãng và mẫu của máy in.

Ghi chú
Máy in hóa đơn Epson và máy in nhãn Zebra không cần trình điều khiển để hoạt động. Đảm bảo rằng không có trình điều khiển nào được chọn cho các máy in đó.
Máy in được phát hiện nhưng không được nhận dạng chính xác
Nếu Odoo và hệ thống IoT không nhận dạng chính xác máy in, hãy vào , nhấp vào thẻ thiết bị để truy cập biểu mẫu, và đặt trường Loại phụ thành tùy chọn phù hợp: Máy in hóa đơn, Máy in nhãn, hoặc Máy in văn phòng.
Trường hợp đặc biệt cấu hình Epson
Hầu hết máy in Epson hỗ trợ in hóa đơn trong Odoo POS bằng lệnh GS v 0. Tuy nhiên, các mẫu máy in Epson sau không hỗ trợ lệnh này:
TM-U220
TM-U230
TM-P60
TMP-P60II
Để giải quyết vấn đề này, bạn có thể cấu hình máy in sử dụng lệnh ESC *.
Trước tiên, hãy xem lại trang web của Epson để kiểm tra khả năng tương thích cho cả lệnh GS v 0 và ESC *.
Nếu máy in không tương thích với GS v 0 nhưng hỗ trợ ESC *, hãy cấu hình hệ thống IoT để sử dụng lệnh ESC * như sau:
Truy cập trang chủ của IoT box hoặc Windows virtual IoT.
Nhấp vào nút Máy chủ máy in, sau đó nhấp vào Quản trị trên trang CUPS.
Nhấp vào Thêm máy in trong phần Máy in, chọn máy in và nhấp vào Tiếp tục.
Mẹo
Nếu tên máy in vẫn chưa chắc chắn, hãy thực hiện các bước sau:
Ghi nhận các máy in được liệt kê trên trang CUPS.
Tắt máy in và làm mới trang.
So sánh sự khác biệt với danh sách đầu tiên để xem máy in nào biến mất.
Bật lại máy in và làm mới trang một lần nữa.
Kiểm tra lại danh sách để xem máy in có xuất hiện trở lại không.
Máy in biến mất và xuất hiện lại trong danh sách máy in chính là tên của máy in cần tìm. Nó có thể là Unknown trong Máy in cục bộ.
Trên trang Thêm máy in, chỉ định Tên của máy in theo quy ước sau:
<printer_name>__IMC_<param_1>_<param_2>_..._<param_n>__, trong đó:printer_namelà tên máy in. Nó có thể chứa bất kỳ ký tự nào trừ_,/,#hoặc ` ` (ký tự khoảng trắng).IMC: Viết tắt của Image Mode Column (tên đơn giản hóa choESC *).param_1: Viết tắt của tham số cụ thể:SCALE<X>: Tỷ lệ của hình ảnh (với cùng tỷ lệ khung hình).Xphải là số nguyên mô tả phần trăm tỷ lệ cần sử dụng. Ví dụ:100là kích thước gốc,50là một nửa kích thước và200là gấp đôi kích thước.LDV: Dọc Mật độ Thấp (sẽ được đặt thành Dọc Mật độ Cao nếu không chỉ định).LDH: Ngang Mật độ Thấp (sẽ được đặt thành Ngang Mật độ Cao nếu không chỉ định).
Ghi chú
Các tham số Mật độ có thể cần được cấu hình theo cách cụ thể, tùy thuộc vào model máy in.
Tham khảo tài liệu ESC * của Epson để xác định xem máy in có yêu cầu thiết lập các tham số này hay không.
Example
Sau đây là các ví dụ về định dạng tên đúng và không đúng:
Định dạng tên đúng:
EPSONTMm30II__IMC__EPSON_TM_U220__IMC_LDV_LDH_SCALE80__
Định dạng tên không đúng (điều này sẽ không ngăn in, nhưng kết quả có thể không có đầu ra in như mong đợi):
EPSON TMm 30II: Tên không được chứa khoảng trắng.EPSONTMm30II: Bản thân tên là đúng, nhưng nó sẽ không sử dụngESC *.EPSONTMm30II__IMC: Tên này thiếu__ở cuối.EPSONTMm30II__IMC_XDV__: Tham sốXDVkhông khớp với bất kỳ tham số hiện có nào.EPSONTMm30II__IMC_SCALE__: Tham sốSCALEthiếu giá trị tỷ lệ.
Sau khi tên máy in đã được xác định bằng quy ước đặt tên thích hợp, nhấp vào Tiếp tục.
Đặt giá trị Make thành Raw và giá trị Model thành Raw Queue (en).
Nhấp vào Add Printer. Nếu mọi thứ đã được thực hiện đúng, trang sẽ chuyển hướng đến trang Banners.
Đợi vài phút để hệ thống IoT phát hiện máy in và đồng bộ với máy chủ của Odoo.
Truy cập cài đặt POS và chọn POS của bạn, hoặc nhấp vào nút ba chấm dọc (⋮) trên thẻ POS và nhấp vào Chỉnh sửa. Cuộn xuống phần Thiết bị được kết nối, bật IoT Box và chọn máy in trong trường Máy in hóa đơn. Nhấp vào Lưu.
Ghi chú
Nếu máy in được thiết lập không chính xác (ví dụ: nó tiếp tục in văn bản ngẫu nhiên hoặc hóa đơn in quá lớn hoặc quá nhỏ), nó không thể được sửa đổi thông qua tên máy in trong CUPS. Thay vào đó, hãy cấu hình một máy in mới từ đầu với các tham số đã sửa đổi, theo các bước trên.
Sau đây là ví dụ về quy trình khắc phục sự cố cho model máy in TM-U220B sử dụng lệnh ESC *. Hóa đơn được minh họa bên dưới là ví dụ về hóa đơn đang in chính xác do định dạng đúng (về lý thuyết):
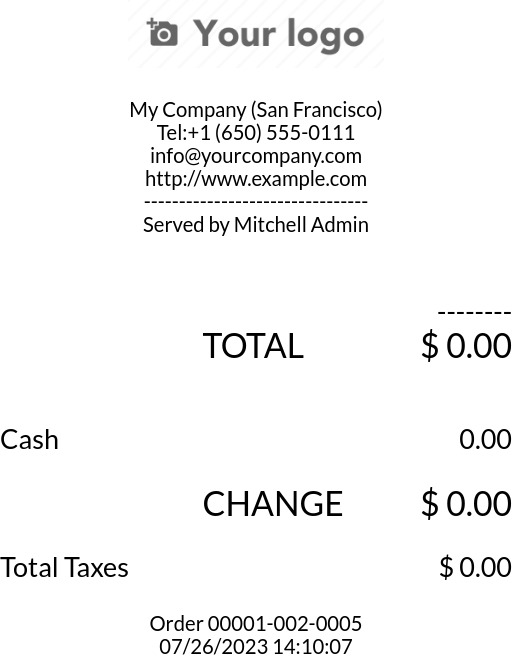
In ngay hóa đơn này mà không định dạng đúng sẽ không hoạt động, vì máy in TM-U220B không hỗ trợ lệnh GS v 0. Thay vào đó, các ký tự ngẫu nhiên sẽ được in:

Để cấu hình định dạng đúng cho máy in Epson TM-U220B, hãy thực hiện các bước sau:
Sau khi kiểm tra trang web của Epson về tính tương thích với cả lệnh GS v 0 và ESC *, máy in TM-U220B thực sự không tương thích với
GS v 0nhưng hỗ trợESC *.
Khi thêm máy in, CUPS hiển thị danh sách các máy in khả dụng:

Trong trường hợp này, máy in được kết nối qua USB, vì vậy nó không phải là một phần của Máy in mạng được phát hiện. Thay vào đó, nó có thể là một phần của lựa chọn Không xác định trong Máy in cục bộ. Khi rút cáp USB của máy in khỏi hệ thống IoT và làm mới trang, máy in Không xác định sẽ biến mất. Khi cắm lại cáp USB, máy in sẽ xuất hiện trở lại.
Đối với quy ước đặt tên, vì máy in phải in bằng lệnh
ESC *, bắt buộc phải thêm__IMC.
Đối với mẫu máy cụ thể này (TM-U220),
mphải bằng 0 hoặc 1. Khi tham khảo bảng Mô tả trên trang web ESC * của Epson, giá trịmcó thể là 0, 1, 32 hoặc 33. Vì vậy, trong trường hợp này, giá trịmkhông thể là 32 hoặc 33 (nếu không, các ký tự ngẫu nhiên sẽ được in).Bảng bao gồm các giá trị số 32 và 33; cả hai xuất hiện nếu Số bit cho dữ liệu dọc được đặt là 24, tức là có Mật độ dọc cao. Khi cấu hình máy in Epson TM-U220, cần buộc sử dụng Mật độ dọc thấp vì mẫu máy in này không hỗ trợ Mật độ dọc cao cho lệnh
ESC *.Để thêm Mật độ dọc thấp, hãy thêm tham số
LDVvào quy ước đặt tên.
Nhấp Tiếp tục để tiếp tục. Tiếp theo, đặt giá trị Hãng sản xuất thành Raw và giá trị Mẫu má thành Raw Queue (en).

Tuy nhiên, khi thử in với quy ước đặt tên
EpsonTMU220B__IMC_LDV__, hóa đơn được in nhưng nó quá lớn và nằm ngoài lề. Để giải quyết vấn đề này, hãy thêm một máy in mới (và quy ước đặt tên) với tham sốSCALE<X>để điều chỉnh theo kích thước hóa đơn.Dưới đây là một số ví dụ:
Quy ước đặt tên máy in
EpsonTMU220B__IMC_LDV__EpsonTMU220B__IMC_LDV_SCALE75__EpsonTMU220B__IMC_LDV_LDH__EpsonTMU220B__IMC_LDV_LDH_SCALE35__


Sự cố in DYMO LabelWriter
DYMO LabelWriter có sự cố đã biết khi in với hệ thống IoT. Máy chủ OpenPrinting CUPS cài đặt máy in bằng trình điều khiển Local RAW Printer. Để in bất kỳ thứ gì, cần đặt đúng Make and Model để tham chiếu trình điều khiển chính xác khi sử dụng thiết bị.
Ngoài ra, cần thêm máy in mới để giảm độ trễ in xảy ra sau khi cập nhật trình điều khiển.
Quan trọng
Máy in DYMO LabelWriter 450 DUO là máy in DYMO được khuyến nghị sử dụng với Odoo và các hệ thống IoT. Thiết bị này kết hợp hai loại máy in: một máy in nhãn và một máy in băng. Khi cấu hình các quy trình sau, cần đảm bảo chọn đúng mẫu máy (DYMO LabelWriter 450 DUO Label (en) hoặc DYMO LabelWriter 450 DUO Tape (en)). Để đảm bảo tính nhất quán, các quy trình sau đây hướng dẫn các bước cấu hình cho mẫu DYMO LabelWriter 450 DUO Label (en). Điều chỉnh lựa chọn mẫu máy theo nhu cầu.
DYMO Series 5 printers are not compatible with the IoT box and require pairing with a Windows virtual IoT.
DYMO LabelWriter không in được
Nếu DYMO LabelWriter không in được, hãy cài đặt trình điều khiển mới:
Truy cập trang chủ của hệ thống IoT và nhấp để mở bảng điều khiển OpenPrinting CUPS.
Nhấp trong menu trên cùng, sau đó nhấp vào máy in trong danh sách.
Chọn Bảo dưỡng trong menu thả xuống đầu tiên.
Chọn Modify Printer trong menu thả xuống thứ hai.

Chọn kết nối mạng/máy in cụ thể mà sửa đổi cần được thực hiện và nhấp Continue.
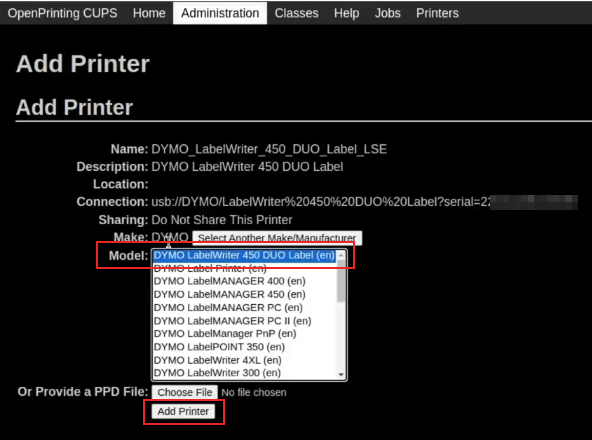
Ở trang tiếp theo, nhấp Continue, sau đó chọn DYMO từ danh sách thả xuống Make.
Nhấp vào Continue và đặt Model thành DYMO LabelWriter 450 DUO Label (en) (hoặc bất kỳ mẫu máy in DYMO nào đang được sử dụng).
Nhấp Modify Printer để đặt trình điều khiển mới; trang xác nhận xuất hiện.
Nhấp trong menu trên cùng; tất cả máy in được cài đặt trên máy chủ OpenPrinting CUPS xuất hiện, bao gồm DYMO LabelWriter 450 DUO Label vừa cập nhật (hoặc bất kỳ mẫu máy in DYMO nào đang được sử dụng).
Nhấp vào máy in vừa cập nhật, sau đó nhấp vào menu thả xuống Bảo dưỡng và chọn Print Test Page để in nhãn thử nghiệm. Nhãn thử nghiệm được in sau vài giây nếu cập nhật trình điều khiển thành công.
Để giảm độ trễ này, hãy thêm máy in mới bằng các bước dưới đây.
Độ trễ in DYMO LabelWriter
Mẹo
Nếu máy in DYMO LabelWriter 450 DUO không in được hoặc không được nhận dạng (tức là có kiểu trình điều khiển RAW), hãy cập nhật trình điều khiển trên thiết bị.
Để giải quyết vấn đề chậm trễ sau khi sửa đổi trình điều khiển, hãy cài đặt lại máy in:
Truy cập trang chủ của hệ thống IoT và nhấp để mở bảng điều khiển OpenPrinting CUPS.
Nhấp vào trong menu trên cùng, sau đó nhấp vào Add a Printer.
Trên trang tiếp theo, trong phần Local Printers, chọn máy in được cài đặt sẵn DYMO LabelWriter 450 DUO Label (DYMO LabelWriter 450 DUO Label) (hoặc bất kỳ mẫu máy in DYMO nào đang được sử dụng). Nhấp vào Continue.

Trên màn hình tiếp theo, cập nhật Name thành tên dễ nhận biết, vì máy in ban đầu sẽ vẫn còn trong danh sách. Sau đó, nhấp vào Continue.

Đặt trường Model thành DYMO LabelWriter 450 DUO Label (en) (hoặc bất kỳ mẫu máy in DYMO nào đang được sử dụng), sau đó nhấp vào Add Printer để hoàn tất cài đặt.
Nhấp vào trong menu trên cùng và nhấp vào máy in mới cài đặt DYMO LabelWriter 450 DUO Label (hoặc bất kỳ mẫu máy in DYMO nào đang được sử dụng) trong danh sách.

Nhấp vào danh sách thả xuống Bảo dưỡng và chọn Print Test Page để in nhãn thử nghiệm. Nhãn thử nghiệm sẽ được in ngay lập tức hoặc sau một hoặc hai giây.
Máy in Zebra không in được gì
Máy in Zebra khá nhạy cảm với định dạng mã Ngôn ngữ lập trình Zebra (ZPL). Nếu không in được gì hoặc in ra nhãn trống, hãy thử thay đổi định dạng báo cáo gửi đến máy in. Để thực hiện, kích hoạt chế độ lập trình viên, truy cập , và tìm kiếm mẫu tương ứng.
Máy in xuất hiện nhiều lần
Nếu máy in xuất hiện nhiều lần trên trang chủ của hộp IoT hoặc Windows virtual IoT và/hoặc trong danh sách Thiết bị trên biểu mẫu hệ thống IoT, nguyên nhân thường là tính năng tự động phát hiện CUPS. Tính năng này cho phép liệt kê tất cả máy in được phát hiện cùng với tất cả trình điều khiển khả dụng, tạo một mục cho mỗi cặp máy in-trình điều khiển.
Chỉ cần chọn mục hoạt động tốt nhất và bỏ qua các mục khác.
Ghi chú
Có các cách giải quyết để tắt tính năng tự động phát hiện CUPS.
Vấn đề về máy quét mã vạch
Các ký tự được đọc bởi máy quét mã vạch không khớp với mã vạch
Theo mặc định, hầu hết các máy quét mã vạch được cấu hình theo định dạng US QWERTY. Nếu máy quét mã vạch sử dụng bố cục khác, hãy vào và nhấp vào thẻ thiết bị quét mã vạch. Sau đó, chọn ngôn ngữ chính xác trong trường Keyboard Layout.
Ghi chú
Keyboard Layout phụ thuộc vào ngôn ngữ, với các tùy chọn có sẵn khác nhau tùy theo thiết bị và ngôn ngữ của cơ sở dữ liệu (ví dụ: English (UK), English (US), v.v.).
Không có gì xảy ra khi quét mã vạch
Đảm bảo thiết bị chính xác được chọn trong cài đặt Point of Sale (khi có thể áp dụng) và mã vạch được cấu hình để gửi ký tự ENTER (mã phím 28) ở cuối mỗi mã vạch.
Máy quét mã vạch được phát hiện là bàn phím
Quan trọng
Một số máy quét mã vạch được nhận dạng là bàn phím USB thay vì máy quét mã vạch và không được hệ thống IoT nhận diện.
Để thay đổi loại thiết bị theo cách thủ công, vào và nhấp vào thẻ thiết bị quét mã vạch. Sau đó, bật Là máy quét.
Máy quét mã vạch xử lý từng ký tự mã vạch riêng lẻ
Khi truy cập phiên bản di động của Odoo từ thiết bị di động hoặc máy tính bảng được ghép nối với máy quét mã vạch thông qua hệ thống IoT, máy quét có thể hiểu mỗi ký tự trong mã vạch là một lần quét riêng biệt. Để khắc phục, hãy truy cập và nhấp vào thẻ thiết bị mã vạch. Sau đó, chọn ngôn ngữ chính xác trong trường Bố cục bàn phím.
Ghi chú
Keyboard Layout phụ thuộc vào ngôn ngữ, với các tùy chọn có sẵn khác nhau tùy theo thiết bị và ngôn ngữ của cơ sở dữ liệu (ví dụ: English (UK), English (US), v.v.).