
Hợp đồng
Mỗi nhân viên trong Odoo được yêu cầu phải có hợp đồng đang hoạt động để được trả lương. Hợp đồng nêu rõ các điều khoản về vị trí công việc, thù lao, giờ làm việc và bất kỳ điều khoản liên quan nào khác của nhân viên.
Bảng điều khiển hợp đồng
Cả ứng dụng Bảng lương và Nhân viên đều hiển thị thông tin hợp đồng nhân viên giống hệt nhau.
Để truy cập bảng điều khiển hợp đồng từ ứng dụng Nhân viên, điều hướng đến . Để truy cập bảng điều khiển hợp đồng từ ứng dụng Bảng lương, điều hướng đến .
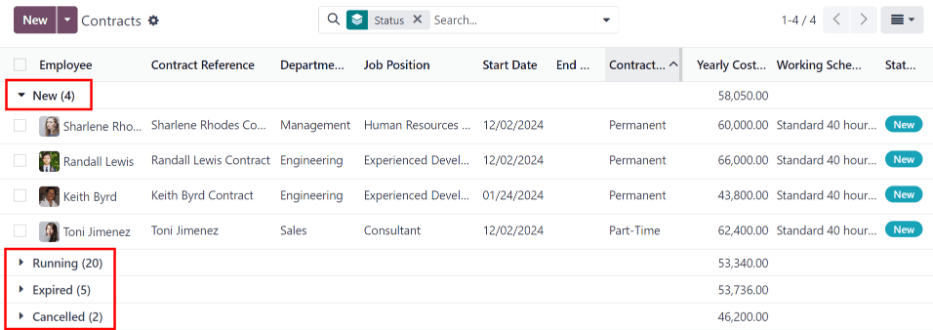
The Contracts dashboard displays all employee contracts in a default list view, grouped by Status. The available status groupings are New, Running, Expired, and Cancelled. Each grouping displays the number of contracts within the grouping.
Ghi chú
Any changes made to contracts in the Employees app is reflected in the Payroll app, and vice versa. Contract information remains identical, regardless of where the contract information is accessed.
Tạo hợp đồng
To create a new contract, click the New button on the Contracts dashboard, and a blank contract form appears.
Phần Thông tin chung
Enter the following information in the top-half of the blank contract form:
Contact Reference: Type in the name or title for the contract, such as
John Smith
Contract
. This field is required.Employee: Using the drop-down menu, select the employee the contract is for.
Contract Start Date: Select the date the contract goes into effect. Contracts can be created retroactively, or be created to begin at a future date. The current date populates this required field by default, but can be modified.
Contract End Date: If the contract has a firm end date, enter the date in this field. Leave this field blank if the contract runs indefinitely, or until a new contract is made (when the employee has a change to their job title, salary, or benefits).
Working Schedule: Select one of the available working schedules the employee is expected to work, from the drop-down menu. The selected working schedule determines how work entries are generated, which determines the employees schedule and compensation. If this field is left blank, this allows the employee to work as many or as few hours as desired every week, with no restrictions.
Mẹo
Menu thả xuống Lịch làm việc hiển thị tất cả các lịch làm việc cho công ty đã chọn. Để sửa đổi hoặc thêm vào danh sách này, đi tới . Nhấp Tạo, và tạo lịch làm việc mới, hoặc nhấp vào lịch làm việc hiện có và thực hiện chỉnh sửa.
Work Entry Source: Using the drop-down menu, select how the work entries are generated. This field is required. Click the radio button next to the desired selection. The options are:
Lịch Làm Việc: Các mục nhập công việc được tạo dựa trên Lịch Làm Việc đã chọn.
Chấm Công: Các mục nhập công việc được tạo dựa trên hồ sơ check-in của nhân viên trong ứng dụng Chấm Công. (Điều này yêu cầu ứng dụng Chấm Công được cài đặt).
Lập Kế Hoạch: Các mục nhập công việc được tạo dựa trên lịch trình đã lên kế hoạch cho nhân viên từ ứng dụng Lập Kế Hoạch. (Điều này yêu cầu ứng dụng Lập Kế Hoạch được cài đặt).
Salary Structure Type: Select one of the salary structure types from the drop-down menu. The default salary structure types are Employee or Worker. A new salary structure type can be created, if needed.
Department: Select the department the employee is working within, using the drop-down menu.
Job Position: Select the employee's specific job position using the drop-down menu.
Ghi chú
Nếu Vị trí công việc đã chọn có mẫu hợp đồng được liên kết với Loại cơ cấu lương cụ thể, Loại cơ cấu lương sẽ thay đổi thành loại được liên kết với Vị trí công việc đó.
Contract Type: Using the drop-down menu, select the type of contract being created. The default options are Permanent, Temporary, Seasonal, Full-Time, Intern, Student, Apprenticeship, Thesis, Statutory, and Employee.
Wage on Payroll: Enter the employee's monthly wage in this field.
Mẹo
Menu thả xuống Lịch làm việc hiển thị tất cả các thời gian làm việc cho Công ty đã chọn. Để sửa đổi hoặc thêm vào danh sách này, đi tới , và Tạo thời gian làm việc mới, hoặc nhấp vào thời gian làm việc hiện có, sau đó chỉnh sửa nó bằng cách nhấp Chỉnh sửa.
HR Responsible: Select the person who is responsible for validating the contract using the drop-down menu. This field is required.
Ghi chú
The HR Responsible field only appears if the Salary Configurator (
hr_contract_salary) module and the Sign app are both installed.

Tab Thông tin lương
The Salary Information tab is where the specific details of how much and how often the employee is paid. Fill in the following fields in this tab:
Wage Type: Using the drop-down menu, select what kind of pay the employee receives. The two default options are Fixed Wage or Hourly Wage. Select Fixed Wage for salaried employees, and select Hourly Wage for employees who are paid based on their logged worked hours.
Schedule Pay: Using the drop-down menu, select how often the employee is paid. The default options are Annually, Semi-annually, Quarterly, Bi-monthly, Monthly, Semi-monthly, Bi-weekly, Weekly, or Daily.
Wage: Enter the amount the employee receives each pay period. The first field allows for a wage to be entered, the second field displays how often the pay is issued to the employee. The second field cannot be modified, and is updated when the Schedule Pay field changes.
Yearly Cost (Real): This field automatically updates after the Schedule Pay and Wage fields are entered. This amount is the total yearly cost for the employer. This field can be modified. However, if this is modified, the Wage field updates, accordingly. Ensure both the Wage and Yearly Cost (Real) are correct if this field is modified.
Monthly Cost (Real): This field automatically updates after the Schedule Pay and Wage fields are entered. This amount is the total monthly cost for the employer. This field cannot be modified, and is calculated based on the Yearly Cost (Real).

Tab Chi tiết
The Details tab of the contract houses the contract template information, accounting information (refer to the country-specific localization document for more information), any part time work information, and notes. Fill out the following fields in this tab:
Contract Template: Using the drop-down menu, select a contract template to use when making an offer to an applicant.
Originated Offer: This field automatically populates with the original offer sent to the employee. This field is not modifiable, and is only populated if applicable.
Part Time: Tick the checkbox if the contract is for part time work. Once enabled, a percentage field appears next to the checkbox. The percentage cannot be modified, and automatically updates based on the selected Working Schedule in the top-half of the contract, compared to the typical working schedule for the company (typically 40 hours/week).
Standard Calendar: This field is automatically populated with the default working schedule for the company. In most cases, this is Standard 40 hours/week.
Part Time Work Entry Type: Using the drop-down menu, select the work entry type that generates the balance of a full-time working schedule.
Example
An employee contract is being created for a part-time employee who works 20 hours a week.
To configure this, the employee's Working Schedule is set to 20 Hours/Part time in the general information section. In the Details tab, the Part Time checkbox is ticked, and the percentage is set to
50. The Standard Calendar is set to Standard 40 hours/week, and the Part Time Work Entry Type is set to Unpaid.When a typical work week is processed in the Payroll app, the employee generates twenty (20) hours of regular work entries under the work entry type
Attendance, and another twenty (20) hours of work entries under the work entry typeUnpaid, for a total of forty (40) hours worth of work entries.Notes: Enter any relevant notes for the contract in this field.

Tab Người ký
The Signatories tab is where the default contract templates are selected, for both new and updated contracts.
Using the drop-down menu, select the default contract template to use when creating a new or updated contract, in the respective fields.
Once a PDF template is selected, any mapped signature fields in the file appear in a list, below the selection, identifying who must sign the document. These fields cannot be updated.
Any changes to the template and signatories but be done in the Sign app, where contract templates are uploaded, modified, and stored.
Quan trọng
The PDF Template fields are only visible if the Sign app is installed, along with the hr_contract_salary and hr_contract_salary_payroll modules.

Personal documents tab
Occasionally, additional paperwork may be required when creating a contract, such as legal documents declaring the employee is able to work in the country. When this situation occurs, Odoo allows for one image file of the necessary document to be attached to a contract in the Personal Documents tab.
Click the Upload your file button, navigate to the desired document, and click Select to attach the file to the contract. The file name appears on the Image line.
Ghi chú
This tab only appears after an Employee is selected. Additionally, only image files can be attached in this field at this time.
Khấu trừ lương
After an employee is selected for the contract, a Salary Attachments smart button appears at the top of the page.
For new employees who do not currently have a contract, the smart button displays New. If the contract is being updated for a current employee who already has salary attachments configured, the smart button displays the number of salary attachments currently running.
Create or update any necessary salary attachments for the contract, before sending.
Send a contract
After a contract has been created and configured, the next step is to send it to the employee or applicant. Click the Generate Offer button, and the Offer for (Employee) form loads.
The Offer for (Employee) form displays all the basic information from the contract, as
well as a link the employee can use to sign the contract. The last field on the form is a
Validity Days Count field. This indicates how long the offer is valid. Enter the desired
number of days in the field. The default is 30 days.
Click Send By Email and a pop-up email window loads, using a preconfigured default email template. Click Send to send the offer.
Quan trọng
In order to send a contract using the Generate Offer button, there must be an employee signature field on the contract PDF being sent.

Contract status
When creating and sending out a contract, the default status of the contract is New.
Once there is a minimum of one completed signature on the document, the status changes to Partially Signed. Internal users, such as HR and recruitment employees, are alerted in the database when there is a signature requested of them.
After all required parties have signed the contract, the status changes to Fully Signed.
All status changes happen automatically as the document is signed.
Contract templates
Contract templates eliminate the need to configure new contracts every time an employee is hired.
Having multiple contract templates allows for faster contract creation for different types of employment positions that are commonly filled, such as full time, part time, seasonal, etc.
Contract templates are created through the Payroll app configuration menu, and stored in the Documents app.
Quan trọng
To access contract templates, the Salary Configurator (hr_contract_salary) module must
be installed.
To view all contract templates, navigate to .
The Contract Templates page lists all existing templates. Click a template line to open and edit it.
Để tạo mẫu hợp đồng mới, nhấp vào nút Mới. Sau đó, nhập thông tin sau vào biểu mẫu mẫu hợp đồng trống xuất hiện:
Contract Reference: Enter a brief description for the template. This should be clear and easily understood, as this name appears in the Recruitment application, as well.
Working Schedule: Select the desired working schedule the contract applies to from the drop-down menu. If a new working schedule is needed, create a new working schedule.
Work Entry Source: Select how the work entries are generated.
Salary Structure Type: Select the salary structure type from the drop-down menu.
Phòng ban: Chọn phòng ban mà mẫu hợp đồng áp dụng từ menu thả xuống. Nếu để trống, mẫu sẽ áp dụng cho tất cả các phòng ban.
Job Position: Select the job position the contract template applies to from the drop-down menu. If blank, the template applies to all job positions.
Contract Type: Select the type of contract from the drop-down menu. This list is the same as the employment type.
Wage on Payroll: Enter the monthly wage in the field.
HR Responsible: Select the employee responsible for validating contracts, using this template, from the drop-down menu.

Tab Thông tin lương
Wage Type: Select either Fixed Wage or Hourly Wage from the drop-down menu.
Schedule Pay: Using the drop-down menu, select how often the employee is paid. Options include Annually, Semi-annually, Quarterly, Bi-monthly, Monthly, Semi-monthly, Bi-weekly, Weekly, or Daily.
Wage: Enter the gross wage. The time period presented in this field is based on what is selected for the Scheduled Pay field. It is recommended to populate the Yearly Cost (Real) field first, since that entry updates this field automatically.
Yearly Cost (Real): Enter the total yearly cost the employee costs the employer. When this value is entered, the Monthly Cost (Real) is automatically updated.
Monthly Cost (Real): This field is not editable. The value is automatically populated after the Yearly Cost (Real) is entered.
Quan trọng
Các trường Lịch Trả lương, Lương, và Chi phí Hàng năm (Thực tế) đều được liên kết. Nếu bất kỳ trường nào trong số này được cập nhật, hai trường còn lại sẽ tự động cập nhật để phản ánh thay đổi. Phương pháp tốt nhất là kiểm tra ba trường này nếu có bất kỳ sửa đổi nào được thực hiện, để đảm bảo chúng chính xác.

Phúc lợi và khoản khấu trừ
Depending on the payroll localization for the company, the entries presented in this section either vary, or may not appear at all. For example, some entries may pertain to retirement accounts, health insurance benefits, and commuter benefits.
Nhập số tiền hoặc tỷ lệ phần trăm để chỉ định số tiền từ lương của nhân viên dành cho các phúc lợi và khoản khấu trừ khác nhau.
Tab Người ký
This tab outlines which documents the employee must sign to either accept a new offer or an updated contract.
New Contract PDF Template: Select the default document that a new employee has to sign to accept an offer.
Contract Update PDF Template: Select the default document that a current employee has to sign to update their contract.