Lịch hẹn
Ứng dụng Lịch hẹn của Odoo là một công cụ đặt lịch tự động, giúp đơn giản hóa quy trình đặt lịch họp, tư vấn hoặc dịch vụ. Được tích hợp với các ứng dụng kinh doanh khác của Odoo, ứng dụng này cho phép doanh nghiệp tự động hóa công tác lên lịch, giảm bớt việc điều phối thủ công và mang đến trải nghiệm mượt mà cho khách hàng. Lịch hẹn có thể được liên kết với lịch, cơ hội trong CRM, lịch trình của nhân viên và hơn thế nữa, khiến nó trở thành công cụ lý tưởng cho các doanh nghiệp dịch vụ đang tìm kiếm sự hiệu quả và tổ chức chuyên nghiệp.
Cấu hình
Ứng dụng Lịch hẹn cho phép lên lịch các cuộc hẹn mới dựa trên khung giờ trống của người dùng hoặc tài nguyên như phòng họp hoặc khu vực chỗ ngồi. Để tạo tài nguyên mới hoặc quản lý tài nguyên hiện có, hãy đi đến . Thao tác này sẽ mở danh sách các tài nguyên có sẵn trong cơ sở dữ liệu cùng với sức chứa của từng tài nguyên.
Tài nguyên
Nhấp vào Mới để tạo tài nguyên mới. Trên bản ghi trống, nhập Tên cho tài nguyên mới. Trong trường Sức chứa, nhập số người tối đa mà tài nguyên có thể chứa. Sau đó, xác nhận Múi giờ cho tài nguyên này.
Nếu muốn, hãy chọn một hoặc nhiều Tài nguyên liên kết từ menu thả xuống. Tùy chọn này chỉ định một hoặc nhiều tài nguyên có thể được sử dụng kết hợp để xử lý nhu cầu lớn hơn.
Quan trọng
Tài nguyên liên kết chỉ được sử dụng khi sử dụng Phương thức phân công tự động phân công <appointments/configure>.
Cuối cùng, thêm Mô tả cho tài nguyên này. Nội dung của tab Mô tả sẽ hiển thị cho khách hàng khi đặt lịch hẹn trực tuyến.
Công suất tài nguyên
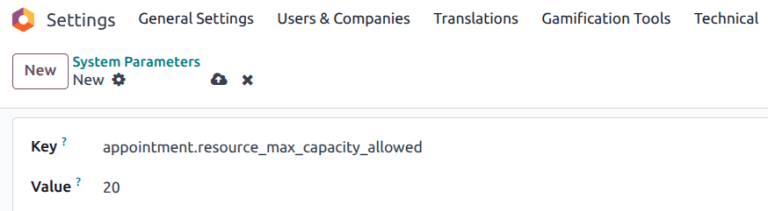
Khi đặt lịch hẹn dựa trên tính khả dụng của tài nguyên, trang web chỉ hiển thị công suất lên đến 12. Điều này xảy ra ngay cả khi tài nguyên có công suất cao hơn. Để tránh điều này, cần thêm một Tham số Hệ thống mới vào cơ sở dữ liệu.
Trước tiên, đảm bảo rằng chế độ nhà phát triển được bật. Sau đó, điều hướng đến . Nhấp vào Mới để thêm tham số mới.
Trong trường Khóa, nhập appointment.resource_max_capacity_allowed. Trong trường Giá trị, nhập công suất tối đa được phép. Nhấp vào (Lưu thủ công) khi hoàn tất.
Cấu hình loại lịch hẹn
Trước khi có thể lên lịch hoặc đặt lịch hẹn, phải tạo một loại lịch hẹn. Điều hướng đến bảng điều khiển ứng dụng và nhấp vào Mới. Trên bản ghi trống mới, nhập Tiêu đề lịch hẹn, sau đó đặt Thời lượng cho loại lịch hẹn này.
Tiếp theo, đặt Thời gian đặt trước. Đây là khoảng thời gian tối thiểu giữa khi có thể đặt lịch hẹn và khi lịch hẹn có thể bắt đầu. Nếu Thời gian đặt trước là 1 giờ, lịch hẹn phải được đặt ít nhất 1 giờ trước.
Example
Một loại lịch hẹn được tạo cho Sân tennis, với Thời lượng là 1 giờ và Thời gian đặt trước là 1 giờ. Vào lúc 02:00 chiều, một khách hàng cố gắng đặt lịch hẹn cho cùng ngày vào lúc 02:45 chiều. Thời gian có sẵn đầu tiên là 04:00 chiều.

Chọn một Khung thời gian lên lịch:
Chọn Có sẵn ngay để cho phép khách hàng đặt lịch hẹn ngay lập tức. Sử dụng trường Lên đến X ngày trong tương lai để xác định khách hàng có thể lên lịch hẹn trước bao lâu. Ví dụ, nếu nhập
14, khách hàng không thể đặt bất cứ gì quá 14 ngày kể từ ngày hiện tại.Chọn Trong khoảng ngày để giới hạn đặt chỗ trong một khoảng ngày cụ thể. Sau khi chọn tùy chọn này, nhấp vào các trường Từ và đến, sau đó sử dụng cửa sổ bật lên lịch để tùy chỉnh khoảng ngày và giờ.
Cập nhật trường Cho phép hủy để giới hạn khoảng thời gian trước lịch hẹn mà khách hàng có thể hủy. Nếu cài đặt này được bật, khách hàng không thể hủy trong khung thời gian đã chỉ định.
Ghi chú
Nếu khách hàng cố gắng hủy cuộc hẹn trong khoảng thời gian không cho phép, họ sẽ nhận được thông báo lỗi kèm theo thông tin liên hệ. Nếu lịch hẹn được đặt cho một tài nguyên, thông tin liên hệ sẽ thuộc về người tạo loại lịch hẹn đó. Nếu lịch hẹn được đặt trực tiếp với một người dùng, thì thông tin liên hệ sẽ là của người được hẹn gặp.

Tiếp theo, chỉ định xem loại lịch hẹn này dựa trên Người dùng hay Tài nguyên, bằng cách chọn nút radio thích hợp. Nếu dựa trên người dùng, hãy chọn một hoặc nhiều Người dùng trong menu thả xuống. Nếu dựa trên tài nguyên, hãy chọn một hoặc nhiều Tài nguyên trong menu thả xuống.
Mẹo
Các loại lịch hẹn dựa trên người dùng có thể được sử dụng để lên lịch các cuộc họp bán hàng và demo, cũng như các cuộc phỏng vấn tuyển dụng.
Các loại lịch hẹn dựa trên tài nguyên có thể được sử dụng để lên lịch thời gian ở các phòng hoặc địa điểm cụ thể.
Chọn Tài nguyên trong trường Tính khả dụng trên sẽ hiển thị tùy chọn Quản lý sức chứa. Nếu được chọn, lịch hẹn sẽ giới hạn số lượng người tham gia dựa trên sức chứa của các tài nguyên đã chọn.
Chọn một Phương thức phân công bằng cách chọn nút radio thích hợp:
Chọn người dùng/tài nguyên rồi đến thời gian: khách hàng chọn từ danh sách người dùng/tài nguyên có sẵn, sau đó chọn một khung thời gian trống.
Chọn thời gian rồi đến người dùng/tài nguyên: khách hàng chọn ngày và giờ, sau đó chọn từ danh sách người dùng/tài nguyên có sẵn.
Chọn Thời gian sau đó tự động phân công: khách hàng chọn khung giờ và được tự động phân công cho người dùng/nguồn lực.
Tab Lịch trình
Tab Lịch trình được sử dụng để phác thảo thời điểm loại cuộc hẹn này có thể được đặt. Các cài đặt xác định các khung giờ hiển thị trên trang đặt lịch.
Nhấp Thêm dòng để tạo khung thời gian mới. Chọn một ngày trong tuần từ menu thả xuống Mỗi, sau đó cập nhật thời gian trong các trường Từ và Đến. Nhấp vào biểu tượng (thùng rác) để xóa một mục. Có thể bao gồm nhiều mục cho một ngày.
Mẹo
Nếu cuộc hẹn không nên có sẵn vào những thời điểm cụ thể, chẳng hạn như khi người dùng đang nghỉ trưa, hãy bao gồm các khung giờ trước và sau.

Options tab
Tab Tùy chọn được sử dụng để tùy chỉnh các tùy chọn hiển thị cho cuộc hẹn này, cũng như cài đặt thông báo cho khách hàng và người dùng.
Trường Hiển thị Giao diện xác định cách trình bày cuộc hẹn trên trang web cho khách hàng. Chọn nút radio Hiển thị Hình ảnh để xuất bản hình ảnh mặc định của người dùng hoặc nguồn lực cho cuộc hẹn này trên trang web.
Các trường Múi giờ và Địa điểm tự động điền cho các cuộc hẹn nguồn lực, dựa trên vị trí của nguồn lực. Đối với các cuộc hẹn dựa trên người dùng, trường Địa điểm mặc định là Cuộc họp Trực tuyến, với Liên kết Hội nghị Truyền hình được tạo tự động. Nếu đây không phải là cuộc họp trực tuyến, hãy chọn tùy chọn khác trong trường Địa điểm.
Đánh dấu vào hộp kiểm Xác nhận Thủ công để yêu cầu phê duyệt trước khi cuộc họp được chấp nhận. Nếu tính năng này được bật, khung giờ cuộc hẹn vẫn được coi là đã đặt trước cho đến khi được xác nhận hoặc từ chối. Để trống hộp kiểm này để tự động chấp nhận các cuộc họp được tạo từ cuộc hẹn này.
Tính năng Tạo Cơ hội thêm một cơ hội vào ứng dụng CRM cho mỗi cuộc hẹn đã lên lịch, được gán cho người dùng phụ trách. Đánh dấu vào hộp kiểm Tạo Cơ hội để bật tùy chọn này.
Quan trọng
Trường này chỉ hiển thị nếu ứng dụng CRM được cài đặt trên cơ sở dữ liệu.
Trường Nhắc nhở được sử dụng để đặt cách thức liên hệ với khách hàng trước giờ hẹn. Chọn một hoặc nhiều tùy chọn từ menu thả xuống, dựa trên phương thức liên lạc và khung thời gian.
Đánh dấu vào hộp kiểm Cho phép Khách để cấp cho khách hàng khả năng thêm khách bổ sung khi đăng ký cuộc hẹn.
Thẻ Câu hỏi
Tab Câu hỏi có thể được sử dụng để nhắc khách hàng cung cấp thông tin bổ sung trong khi họ đang đặt cuộc hẹn. Nhấp Thêm dòng để thêm câu hỏi mới.
Trên cửa sổ bật lên Tạo Câu hỏi, nhập Câu hỏi, sau đó chọn Loại Câu trả lời.
Đánh dấu vào hộp kiểm Câu trả lời Bắt buộc để yêu cầu khách hàng trả lời câu hỏi này trước khi họ được phép đặt cuộc hẹn. Nhấp Lưu & Tạo mới để thêm câu hỏi khác, hoặc Lưu & Đóng khi hoàn tất.
Tab Tin nhắn
Tab Tin nhắn được doanh nghiệp sử dụng để cung cấp thông tin bổ sung cho khách hàng về loại cuộc hẹn này.
Quan trọng
Nội dung trong thẻ Tin nhắn hiển thị cho khách hàng và khách truy cập website.
Trong trường Thông điệp giới thiệu, thêm mô tả ngắn gọn về loại cuộc hẹn. Điều này có thể bao gồm chủ đề cuộc hẹn, chương trình nghị sự cuộc họp hoặc giới thiệu về người dùng phụ trách cuộc họp.
Thông điệp bổ sung khi xác nhận được hiển thị cho khách hàng sau khi họ đã đặt cuộc họp. Thêm bất kỳ thông tin bổ sung nào ở đây mà khách hàng cần biết. Điều này có thể bao gồm thông tin về chỗ đỗ xe, quy tắc phút chót hoặc hướng dẫn bổ sung.
Xuất bản cuộc hẹn
Khi cuộc hẹn đã sẵn sàng xuất bản, nhấp vào nút thông minh Đi tới website ở đầu bản ghi. Sau đó, trượt biểu tượng Chưa xuất bản sang Đã xuất bản.